MODEL REFERENCE
Brother PT-1280
10 errors · 32 guides
The checks and guides below come from the official manuals for this model.
No matches for this wording. Try a light name, error code or a shorter phrase.
Errors and messages
Messages and indicator states from the manual Battery Weak!battery Weak!
The batteries are weak.: Replace all six AAA alkaline batteries together with brand-new batteries. Fit each battery with the polarity shown in the compartment.
Check Battery!check Battery!
The installed batteries are about to run out.: Replace all six AAA alkaline batteries together with brand-new batteries. Fit each battery with the polarity shown in the compartment.
Invalid!invalid!3 checks
No Text!no Text!3 checks
Line Limit!line Limit!2 checks
No Cassette!no Cassette!
You try to print a label when there is no cassette installed.: With power off, open the back cover and insert a compatible Brother TZ tape cassette until it snaps into place. Ensure the end of the tape is under the guides, then close the cover securely. Feed the tape once before cutting it.
Cutter Error!cutter Error!
Tape Cutter lever is used in the middle of printing process.: Do not cut while printing or feeding. Wait until the Print or Feed message is no longer displayed before pressing the tape-cutter lever.
Full!full!
The maximum number of characters (80 characters) have already been entered.: The manual lists this condition but gives no separate message-specific corrective instruction.
Text Too Long!text Too Long!
The text length exceeds the selected label length or the selected Auto Format setting length.: The manual lists this condition but gives no separate message-specific corrective instruction.
No Frame OK?no Frame OK?
Printing on 3.5 mm tape with a frame setting enabled.: Press OK to print without a frame, or ESC to cancel. The manual states that frames are not printed on 3.5 mm tape.
Guides
What to do when...
Instructions from the manualThe display stays blank after you have turned on the machine.3 checks
- The display stays blank after you have turned on the machine.
- Check that the batteries are correctly inserted.
- The display stays blank after you have turned on the machine.
- If the batteries are weak, replace them.
- The display stays blank after you have turned on the machine.
- Check that the suggested adapter is correctly connected.
The machine does not print, or the printed characters are blurred.2 checks
- The machine does not print, or the printed characters are blurred.
- Check that the tape cassette has been inserted correctly.
- The machine does not print, or the printed characters are blurred.
- If the tape cassette is empty, replace it.
The printed characters are not formed properly.1 check
- The printed characters are not formed properly.
- The batteries may be weak. Replace them.
The memory has cleared on its own.1 check
- The memory has cleared on its own.
- The batteries may be weak. Replace them.
A blank horizontal line appears through the printed label.2 checks
- A blank horizontal line appears through the printed label.
- Remove the tape cassette and gently wipe the print head up and down with a dry cotton swab.
- A blank horizontal line appears through the printed label.
- The optional TZ-CL3 print-head cleaning cassette can make cleaning easier.
The machine has "locked up" (i.e., nothing happens when a key is pressed, even though the machine is on).1 check
- The machine has "locked up" (i.e., nothing happens when a key is pressed, even though the machine is on).
- Turn power off.
- Hold Shift and R while pressing Power to switch it on.
- Release Shift and R.
- This erases displayed text and formatting, all saved text files, language and unit settings.
Power supply & tape cassettes
Instructions from the manualPower Supply & Tape Cassettes10 steps
- Turn power off before replacing batteries or the tape cassette.
- Press the rough area at the top end to open the back cover.
- Pull any cassette straight up and remove old batteries.
- Insert six new AAA alkaline batteries (LR03), observing the shown polarity; always replace all six together.
- Insert a Brother TZ cassette until it snaps into place, with the tape end under the guides.
- If its ink ribbon is loose, turn the toothed wheel with your finger in the arrow direction shown on the cassette.
- Close the cover until it snaps.
- Feed the tape once, then press the cutter lever.
- Do not touch the cutter edge.
- Use only Brother TZ tapes.
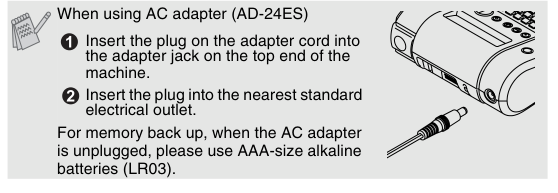
When using ac adapter (ad-24es)
Instructions from the manualWhen using AC adapter (AD-24ES)3 steps
- Insert the AD-24ES adapter cord plug into the adapter jack at the top end.
- Plug the adapter into the nearest standard electrical outlet.
- Use AAA alkaline batteries (LR03) for memory backup when the adapter is unplugged.
Initial setting
Instructions from the manualInitial Setting7 steps
- Supply power using six AAA alkaline batteries or the specified adapter, then press Power.
- Select the language with the cursor keys and confirm with OK or Enter.
- Language choices vary by distribution.
- The machine turns off after five minutes without a key press.
- Press ESC to cancel an operation.
- To initialize settings, turn power off, hold Shift and R while pressing Power, then release Shift and R.
- Initializing erases text, saved files, language and unit settings.
General precautions
Instructions from the manualGENERAL PRECAUTIONS10 steps
- Clean the machine only with a soft, dry cloth; do not use alcohol or other organic solvents.
- Do not touch the print-head mechanism; clean it with a soft wipe such as a cotton swab.
- Avoid the cutter edge and do not press hard on the LCD.
- Do not place foreign objects or heavy objects on the machine, or leave rubber or vinyl against it for a long period.
- Keep it dry and away from extreme heat, high humidity, direct sunlight, rain and excessive dust.
- Do not pull tape, cut during printing or feeding, or print with an empty cassette.
- For extended storage, remove batteries and disconnect the adapter.
- More than three minutes without power clears displayed text, saved files, language and unit settings.
- Do not mix old and new batteries or alkaline batteries with other types, and do not reverse polarity.
- Use only the specified adapter.
Accessories (supplies may differ by distribution.)
Instructions from the manualAccessories (Supplies may differ by distribution.)2 steps
- If repeated use makes the cutter blade blunt and it no longer cuts tape cleanly, obtain a replacement TC-5 cutter unit from an authorized Brother dealer.
- Availability of supplies varies by distribution.
Switching upper case/lower case
Instructions from the manualSwitching Upper Case/Lower CaseView
Press Caps to switch between upper-case and lower-case text.
Making two line text
Instructions from the manualMaking Two Line TextView
Move the cursor to the start of the second line and press Enter. Use 9 mm or 12 mm tape for two-line labels.
Entering symbols
Instructions from the manualEntering SymbolsView
Press Symbol, use the cursor keys to select a symbol, then press OK. Press Symbol again to move to the next group. Press ESC to cancel.
Entering accented characters
Instructions from the manualEntering Accented Characters5 steps
- Enter the base character.
- Press Accent; press Accent again or use the cursor keys to select its accented form.
- Confirm with Enter or OK.
- Press ESC to cancel.
- The order depends on the selected LCD language.
To clear
Instructions from the manualTo ClearView
Press Backspace to delete entries backward. Press Shift and Backspace together to clear all text and settings.
Setting [size]
Instructions from the manualSetting [Size]4 steps
- Press Function, choose Size with the cursor keys and press OK.
- Choose Large, Medium or Small and press OK.
- The machine adjusts text size to the tape width.
- The shortcut is Function + 1.
Setting [width]
Instructions from the manualSetting [Width]View
Press Function, choose Width and press OK. Choose Normal, ×2 or ×1/2 and press OK. The shortcut is Function + 2.
Setting [style] (vertical)
Instructions from the manualSetting [Style] (Vertical)3 steps
- Press Function, choose Style and press OK.
- Select Normal, Bold, Outline, Shadow, Italic, Italic Bold, Italic Outline, Italic Shadow or Vertical, then press OK.
- The shortcut is Function + 3.
Setting [underline/frame]
Instructions from the manualSetting [Underline/Frame]4 steps
- Press Function, choose Underline/Frame and press OK.
- Choose Off, Underline, Round, Candy, Callout, Banner or Wooden, then press OK.
- Frames are not printed on 3.5 mm tape.
- The shortcut is Function + 4.
Setting [tab]
Instructions from the manualSetting [Tab]View
Position the cursor where the tab belongs. Press Function, choose Tab with the cursor keys and press OK. The shortcut is Function + 5.
Setting [tab length](auto / 0 - 100mm)
Instructions from the manualSetting [Tab Length](Auto / 0 - 100mm)4 steps
- Press Function, choose Tab Length and press OK.
- Select Auto or a length from 0 to 100 mm, using the cursor or number keys, then press OK.
- Press Space to return to Auto.
- The shortcut is Function + 6.
Setting [label length](auto / 30 - 300mm)
Instructions from the manualSetting [Label Length](Auto / 30 - 300mm)View
- Press Function, choose Label Length and press OK.
- Select Auto or 30–300 mm with the cursor or number keys and press OK.
- Press Space to return to Auto.
- The shortcut is Function + 7.
Setting [auto format]
Instructions from the manualSetting [Auto Format]3 steps
- Press Function, choose Auto Format and press OK.
- Choose VHS Spine (140 mm), MiniDV Spine (42 mm), Audio Tape (89 mm), CD Case Spine (113 mm), File Tab (82 mm) or Divider Tab (42 mm), then press OK.
- The shortcut is Function + 8.
Text preview
Instructions from the manualText Preview3 steps
- Press Preview.
- The LCD shows the full text and label length in millimetres, then returns to the original text.
- It previews text only, without font, style, size, underline, frame or additional effects.
Feeding (tape feed)
Instructions from the manualFeeding (Tape Feed)View
Press Shift and Print together to feed the tape.
Printing
Instructions from the manualPrintingView
Press Print. After printing, press the upper-right cutter lever to cut the label. Do not cut while Print or Feed is displayed, and do not pull the tape.
Setting [margin] (tape margin)
Instructions from the manualSetting [Margin] (Tape Margin)8 steps
- Press Function, choose Margin and press OK.
- Choose Full, Half, Narrow or Chain Print, then press OK.
- Full gives 25 mm margins; Half gives 12 mm and Narrow gives 4 mm on each side.
- With Half or Narrow, use scissors to cut along the printed dots so the text is centred.
- Chain Print prints repeated labels or successive text in different styles with minimum margins: print the first text, enter the next text before feeding, then print it.
- Feed the tape before cutting, or part of the text may be cut off.
- Never pull the tape.
- The shortcut is Function + 9.
Using [print option]
Instructions from the manualUsing [Print Option]6 steps
- Press Function, choose Print Option and press OK.
- For Copies, select Copies, press OK, choose 1–9 with the cursor or number keys and confirm with OK.
- For Numbering, position the cursor at the selected number, choose Numbering in Print Option and set the highest number to print; each printed label increments the selected number by one.
- For Mirror, select Mirror, press OK, then confirm Mirror Print? with OK.
- Use clear tape so the label is readable from the other side of a transparent surface.
- The shortcut is Function + 0.
Completed labels
Instructions from the manualCOMPLETED LABELSView
Peel the printed label from its backing and apply it.
Favourite label memory
Instructions from the manualFavourite Label Memory5 steps
- Save up to three texts, one in each memory key.
- To save, press the chosen memory key twice and confirm Save? with OK.
- To print, press its memory key and confirm Print? with OK.
- To open for editing, press its memory key three times and confirm Open? with OK.
- Use the cursor keys to scroll a stored text longer than eight characters.
Function shortcuts
Instructions from the manualFunction ShortcutsView
Press Function with the number key, then confirm with OK: 1 Size, 2 Width, 3 Style, 4 Underline/Frame, 5 Tab, 6 Tab Length, 7 Label Length, 8 Auto Format, 9 Margin, or 0 Print Option.