MODEL REFERENCE
Brother PT-H108
13 errors · 10 troubleshooting topics · 10 guides

The checks and guides below come from the official manuals for this model.
No matches for this wording. Try a light name, error code or a shorter phrase.
Errors and messages
Messages and indicator states from the manual Low Battery!batteries are weak2 checks
Battery Deadbatteries are exhausted
Replace the expired batteries, following the battery-type, polarity and six-cell replacement instructions.
Invalid!label length is invalid
Enter a valid label length. This warning does not occur in Auto Designs.
No Text!no label text is available
Enter text before printing, selecting Text Preview or Cable Label, or using DECO MODE or Auto Designs. Save a file before printing stored text.
Line Limit!too many lines or tape too narrow2 checks
No Cassette!tape cassette is missing
Install a Brother TZe cassette before printing.
Cutter Errorcutter pressed during printing
Keep the cutter lever untouched during printing.
Text Full!text exceeds the character limit
Reduce the text to at most 80 characters for regular text, or 50 for Auto Designs and DECO MODE.
Text Limit!text exceeds the selected label length2 checks
No Frame OK?frame cannot print on 3.5 mm tape
Press Enter to print without a frame, or Backspace to cancel.
OK to Feed?chain Print is waiting to feed tape
After the last label in a chain, press Enter to feed the tape. Only then press the cutter lever; cutting before feeding may cut off text.
Insert 12mmdECO MODE needs 12 mm tape
Use a 12 mm tape cassette for DECO MODE.
Wrong Tape!tape cassette type is unsupported
Use a Brother TZe cassette bearing the TZe mark shown in the guide.
Troubleshooting
Find the problem you are experiencingDisplay stays blankView
Check that the batteries are inserted with the correct polarity; replace weak batteries.
Printed labels have too much marginView
In Margin, select Half or Narrow.
Label does not print or characters are malformedView
Check that the cassette is seated correctly, replace an empty cassette, and close the cassette cover properly.
Settings clear on their ownView
Replace weak batteries. If power is disconnected for more than three minutes, displayed text, formatting, language and unit settings are lost.
A blank horizontal line crosses the labelView
Remove the tape cassette and gently wipe the print head up and down with a dry cotton swab. The optional TZe-CL3 print-head cleaning cassette makes cleaning easier.
Label maker stops respondingView
Use the reviewed Resetting the P-touch instructions. Resetting clears all text, settings and stored files.
Power turns off when printing startsView
Replace weak batteries and check that all cells are inserted correctly.
Tape will not feed or jamsView
Check that the tape end passes under the guides. Keep the cutter lever untouched during printing.
Clear text and formatting for a new labelView
Press Clear and select Text&Format. Confirm with Enter.
Display uses the wrong languageView
Use Menu, Language, choose the language and confirm with Enter.
Guides
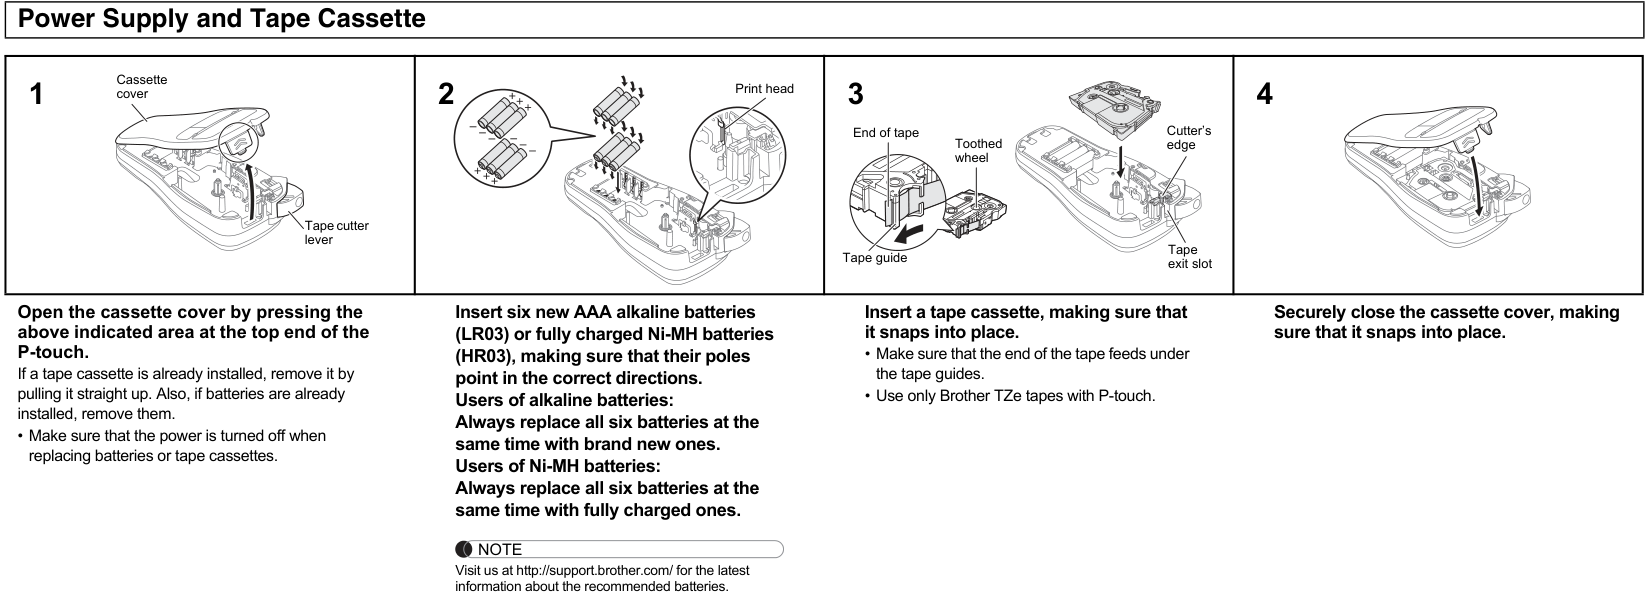
Power supply and tape cassette
Instructions from the manualInstall batteries and tape7 steps
- Switch off before replacing batteries or tape.
- Press the indicated top area and open the cassette cover.
- Remove the existing cassette straight upwards and remove existing batteries.
- Insert six new AAA alkaline LR03 batteries or six fully charged Ni-MH HR03 batteries with the shown polarity; replace all six together, without mixing types, brands, charge levels or old and new cells.
- Seat a Brother TZe cassette until it clicks and keep the tape end under the guides.
- Close the cover securely until it clicks.
- Do not touch the cutter blade.
Initial settings
Instructions from the manualSet language and measurement unit5 steps
- Supply power with six AAA batteries and press Power.
- Press Menu, select Language with the cursor keys, select the desired language and press Enter.
- Press Menu, select Unit, choose inch or mm and press Enter; mm is the default.
- Backspace cancels an operation.
- The machine switches off after five minutes without key presses.
Entering text
Instructions from the manualEnter text and choose label length7 steps
- Press Caps to switch upper and lower case.
- For two lines, press Enter after the first line, or place the cursor at the second-line start and press Enter.
- Use 9 mm or 12 mm tape and do not press Enter after the second line.
- Backspace deletes characters one at a time; Clear with Text&Format clears text and settings, while Text Only retains formatting.
- For accents, enter the character, press Accent, choose with the cursor keys and press Enter; Backspace cancels, and ordering depends on the display language.
- Use Menu, Label Length, Auto or 30–300 mm, and Enter.
- After printing, cut at the printed dots with scissors so the label matches the chosen length.
Printing labels
Instructions from the manualPreview, feed and print labels6 steps
- Use Menu, Preview and Enter to preview text; size, font and other features are not previewed.
- Use Menu, Feed and Enter to feed tape.
- Press Print, choose 1–9 copies with cursor or number keys and press Enter; for one copy, press Enter without selecting a count.
- Do not touch the cutter lever while Printing... or Feeding... appears.
- When finished, press the upper-right cutter lever, peel off the backing and apply the label.
- Do not pull the tape.
Set margins and print a chain of labels10 steps
- Select Menu, Margin and Full, Half, Narrow or Chain Print, then Enter.
- Full leaves 25 mm, Half 12 mm and Narrow 4 mm on either side.
- For a chain, enter text, press Print, choose the copy count with cursor or number keys and press Enter.
- At OK to Feed?, press Backspace to enter another label.
- Clear the text, enter the next label and press Print.
- At OK to Feed? after the final label, press Enter.
- After feeding, press the cutter lever.
- With Half or Narrow, cut at the printed dots with scissors to centre the text.
- Use Narrow to print several copies with minimum margin.
- Always feed before cutting a chain so text is not cut off; do not pull the tape.
Saving label files
Instructions from the manualSave, open and print label files5 steps
- Store up to nine labels of at most 80 characters each.
- Use Menu, File, Save, choose a file number and Enter.
- At Overwrite?, Enter saves the replacement and Backspace cancels.
- To reopen a file, use Menu, File, Open, choose a number and Enter.
- To print a stored file, use Menu, File, Print, choose a number and Enter, then choose the copy count and Enter.
Accessories
Instructions from the manualReplace a blunt tape cutter4 steps
- If repeated use leaves the blade blunt and tape will not cut cleanly, first turn the cutter board around as shown in illustration 1.
- If cutting remains difficult, obtain replacement TC-4 from an authorised Brother reseller.
- Pull out both green sections in the directions shown in illustration 2, then push the new unit in until it clicks.
- Do not touch the cutter blade with your fingers.
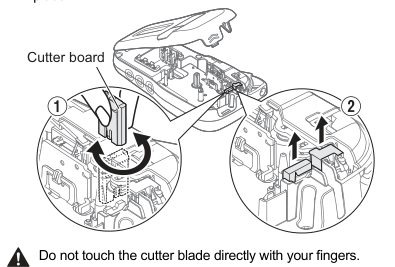
Diagram key
- 1: If repeated use leaves the blade blunt, turn the cutter board around as shown before replacing the cutter.
- Cutter board: The board identified in illustration 1 is turned around for the first check.
- 2: If cutting still fails, pull out both green cutter-unit sections in the indicated arrow directions and push in a new TC-4 until it clicks.
- Warning triangle: Do not touch the cutter blade directly with your fingers.
Resetting the p-touch
Instructions from the manualReset the label makerView
Switch off. Hold Menu and R while pressing Power to switch on again. Release Menu and R. This resets the internal memory and clears all text, settings and stored files.
Cable label
Instructions from the manualPrint cable labels4 steps
- Use Brother Flexible ID tape and consult its insertion sheet for application conditions.
- Enter the first line, press Enter, then enter the second line.
- Select Menu, Cable and Enter, confirm Print OK? with Enter, choose 1–9 copies and Enter.
- Cable mode automatically uses Auto label length and Full margins.
General precautions
Instructions from the manualClean and safely store the label maker7 steps
- Clean the housing with a soft dry cloth; do not use alcohol or other organic solvents.
- Clean the print head with a soft wipe and never touch it directly.
- Do not touch metal near the head immediately after printing or the cutter blade.
- Remove batteries for storage when the machine will not be used.
- Stop using the machine and remove batteries immediately if abnormal odour, heat, discolouration, deformation or other unusual conditions appear.
- Keep the machine away from moisture, excessive temperature and dust.
- Recharge Ni-MH cells in their own suitable charger; this machine does not charge them.
Controls and parts
See the manual diagrams 1 diagram
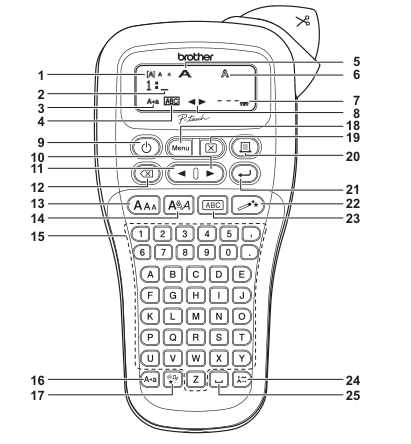
Diagram key
- 1: Size
- 2: Cursor
- 3: Caps
- 4: Underline/Frame
- 5: Width
- 6: Style
- 7: Label Length; the selected-length indicator also appears when a specific length is chosen
- 8: Guidance (left, right)
- 9: Power key
- 10: Cursor key: Right
- 11: Cursor key: Left
- 12: Backspace key
- 13: Size key
- 14: Style key
- 15: Character keys
- 16: Caps key
- 17: Symbol key
- 18: Menu key
- 19: Clear key
- 20: Print key
- 21: Enter key
- 22: Auto Designs function key
- 23: Frame key
- 24: Accent key
- 25: Space key