MODEL REFERENCE
Brother X14
21 guides

The checks and guides below come from the official manuals for this model.
No matches for this wording. Try a light name, error code or a shorter phrase.
Guides
Troubleshooting
Instructions from the manualMachine does not run3 checks
- The main power switch is turned off.
- Switch the main power on.
- The bobbin-winder shaft is pushed to the right.
- Slide the bobbin-winder shaft left.
- The machine has not used the foot controller properly.
- Use the foot controller properly.
Fabric cannot be removed1 check
- Thread is tangled below the needle plate.
- Lift up the fabric and cut the threads below it, and clean the race.
Needle breaks12 checks
- The needle is incorrectly installed.
- Refit the needle correctly.
- The needle clamp screw is loose.
- Use the screwdriver to firmly tighten the screw.
- The needle is bent or blunt.
- Fit a new needle.
- The upper thread was not threaded correctly.
- Rethread the upper path correctly.
- The machine has not used the right combination of fabric, thread and needle.
- Choose a thread and needle that are appropriate for the type of fabric.
- The presser foot you are using is not appropriate for the type of stitch that you want to sew.
- Attach the presser foot that is correct for the type of stitch that you want to sew.
- The upper thread tension is too tight.
- Reduce the upper-thread tension.
- The fabric is being pulled too strongly.
- Lightly guide the fabric.
- The machine has not fitted the spool properly.
- Seat the spool correctly.
- The area around the hole in the needle plate or the presser foot is scratched.
- Replace the needle plate. Contact your retailer or the nearest authorized service center.
- The bobbin case is scratched.
- Replace the bobbin case. Contact your retailer or the nearest authorized service center.
- The machine has not used a bobbin that has been designed for this machine.
- Use the specified bobbin type for this machine.
Upper thread breaks9 checks
- The machine has not threaded the upper thread properly. (For example, you have not fitted the spool properly, or the thread has come out of the guide above the needle.)
- Rethread the upper path correctly.
- There are knots or tangles in the thread.
- Remove any knots or tangles.
- The needle is not appropriate for the thread you are using.
- Choose a needle that is appropriate for the type of stitch.
- The upper thread tension is too tight.
- Reduce the upper-thread tension.
- The needle is bent or blunt.
- Fit a new needle.
- The needle is incorrectly installed.
- Refit the needle correctly.
- The area around the hole in the needle plate or the presser foot is scratched.
- Replace the needle plate. Contact your retailer or the nearest authorized service center.
- The bobbin case is scratched, or has a burr on it.
- Replace the bobbin case. Contact your retailer or the nearest authorized service center.
- The machine has not used a bobbin that has been designed for this machine.
- Use the specified bobbin type for this machine.
Lower thread tangles or breaks5 checks
- The machine has not wound the bobbin thread properly.
- Rewind the bobbin correctly.
- The bobbin is scratched or does not turn smoothly.
- Replace the bobbin.
- The thread is tangled.
- Remove the tangled thread and clean the race.
- The machine has not used a bobbin that has been designed for this machine.
- Use the specified bobbin type for this machine.
- Bobbin is set incorrectly.
- Refit and rethread the bobbin correctly.
Thread tension is incorrect7 checks
- The machine has not threaded the upper thread properly.
- Rethread the upper path correctly.
- The machine has not wound the bobbin thread properly.
- Rewind the bobbin correctly.
- The machine has not threaded the right combination of thread and needle for the fabric you are using.
- Choose a thread and needle that are appropriate for the type of fabric.
- The machine has not attached the presser foot holder properly.
- Attach the presser foot holder properly.
- The thread tension is incorrect.
- Adjust upper-thread tension.
- The machine has not used a bobbin that has been designed for this machine.
- Use the specified bobbin type for this machine.
- Bobbin is set incorrectly.
- Refit and rethread the bobbin correctly.
Fabric wrinkles7 checks
- The machine has not threaded the upper thread properly or fitted the bobbin properly.
- Thread the upper thread and wind the bobbin thread properly.
- The machine has not fitted the spool properly.
- Seat the spool correctly.
- The machine has not used the right combination of fabric, thread and needle.
- Choose a thread and needle that are appropriate for the type of fabric.
- The needle is bent or blunt.
- Fit a new needle.
- If thin fabrics are being sewn, the fabric is not being fed correctly.
- Sew with stabilizer material under the fabric.
- The presser foot you are using is not appropriate for the type of stitch that you want to sew.
- Attach the presser foot that is correct for the type of stitch that you want to sew.
- The thread tension is incorrect.
- Adjust upper-thread tension.
Stitches are skipped5 checks
- The machine has not threaded the upper thread properly.
- Rethread the upper path correctly.
- The machine has not used the right combination of fabric, thread and needle.
- Choose a thread and needle that are appropriate for the type of fabric.
- The needle is bent or blunt.
- Fit a new needle.
- The needle is incorrectly installed.
- Refit the needle correctly.
- Dust has accumulated under the needle plate or in the bobbin case.
- Remove the needle plate and clean the plate and the bobbin case.
Stitch is not formed correctly3 checks
- The presser foot that you are using is not correct for the type of stitch.
- Attach the presser foot that is correct for the type of stitch that you want to sew.
- The thread tension is incorrect.
- Adjust upper-thread tension.
- The thread is tangled.
- Remove the tangled thread. If the thread is tangled in the bobbin case, clean the bobbin case.
Fabric does not feed4 checks
- The darning plate is fitted on the needle plate.
- Take off the darning plate.
- The machine has not used the right combination of fabric, thread and needle.
- Choose a thread and needle that are appropriate for the type of fabric.
- The thread is tangled, for example, in the race.
- Remove the tangle thread. If the thread is tangled in the race, clean the race.
- The presser foot you are using is not appropriate for the type of stitch that you want to sew.
- Attach the presser foot that is correct for the type of stitch that you want to sew.
Using your sewing machine
Instructions from the manualConnect power and operate the foot controller8 steps
- Use only the supplied cord and regular household electricity, without extension cords or crowded multi-plug adapters.
- With power off, connect the foot-controller plug to the machine, then connect the power plug to a sound wall outlet; seat both firmly.
- Switch on toward I and off toward O.
- Keep your foot off the controller when switching on.
- Light pressure gives slow sewing; greater pressure increases speed, and removing your foot stops the machine.
- Keep cloth, dust and other objects off the controller.
- After use, when away, during storms, after power failure or faulty operation, switch off and unplug by holding the plug with dry hands.
- Stop and have a damaged cord or plug repaired before use.
Replacing the needle
Instructions from the manualReplace or refit the needle7 steps
- Switch off.
- Raise the needle by turning the handwheel toward you, counterclockwise, until its mark points up; lower the presser-foot lever.
- Place fabric or paper under the foot to catch a dropped needle.
- Hold the needle with your left hand and loosen the clamp screw counterclockwise with a screwdriver; avoid excessive force.
- Insert a straight, sharp home-sewing needle with its flat side toward the back until it touches the stopper.
- Tighten the clamp screw securely with the screwdriver, without excessive force.
- Never sew with a bent needle.
Changing the presser foot
Instructions from the manualChange the presser foot6 steps
- Switch off and raise the presser-foot lever.
- Raise the needle by turning the handwheel toward you until its mark points up.
- Pull the existing foot vertically downward.
- Put the correct replacement foot on the plate with its bar aligned to the shank slot, then lower the lever so the bar snaps in.
- Check the orientation: an incorrectly fitted or unsuitable foot may be struck by the needle.
- Use only feet designed for this machine and the chosen stitch.
Winding the bobbin
Instructions from the manualWind the bobbin13 steps
- Use the supplied bobbin type only: SA156 or SFB XA5539-151, 11.5 mm high.
- Raise the spool pin and seat the spool.
- Hold the thread with your right hand, pass it toward you through the guide groove and fully around the pre-tension disk.
- Pass the end through the bobbin hole from inside.
- Seat the bobbin on the winder shaft, slide the shaft right, and rotate the bobbin clockwise by hand until its projection enters the notch.
- Leave 7–10 cm, holding the end taut and straight upwards.
- Switch on with your foot off the controller.
- Gently press the controller to wind a few turns, then stop.
- Trim the excess end, leaving 1 cm at the hole; incomplete trimming can tangle thread and break the needle.
- Press the controller to continue; stop when the full bobbin begins turning slowly.
- Cut the thread, slide the shaft left and remove the bobbin.
- Uneven winding may loosen tension and break the needle.
- The post-winding click is normal, and the needle bar does not move with the shaft to the right.
Lower threading
Instructions from the manualFit and thread the bobbin9 steps
- Switch off while threading.
- Prepare a correctly wound specified bobbin.
- Turn the handwheel toward you to raise the needle and raise the presser-foot lever.
- Slide and lift the bobbin cover toward you.
- Set the bobbin so thread unwinds in the arrow direction in the reviewed diagram.
- Hold the thread end, press the bobbin down and pass thread through the slit and under its tension-adjusting spring.
- Fit the cover projection into the race-retainer groove and push closed, leaving the thread end toward the rear.
- Incorrect direction or routing can cause faulty tension or break the needle.
- Thread the upper path and draw up the lower thread before sewing.
Upper threading
Instructions from the manualThread the upper path8 steps
- Switch off and raise the presser-foot lever.
- Turn the handwheel toward you until its mark points up, raising the needle and take-up lever.
- Raise the spool pin and seat the spool correctly.
- Hold thread with your right hand and draw it toward you through the guide groove so its spring catches it.
- Follow the illustrated upper-thread path and pass the take-up lever from right to left.
- Put thread behind the needle-bar guide, then thread the needle front to back, leaving about 5 cm.
- Do not use thread weight 20 or lower; match fabric, needle and thread to the manual table.
- Threading with the foot or take-up lever lowered, incorrect routing or an incorrectly seated spool can tangle thread or bend or break the needle.
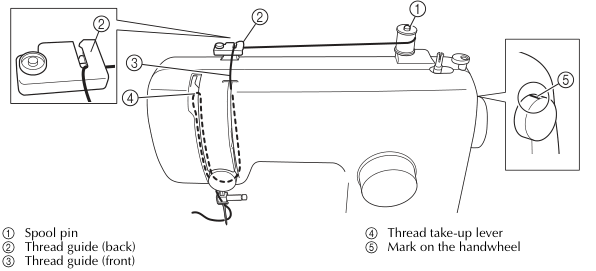
Diagram key
- 1: Spool pin.
- 2: Rear thread guide; the same guide is repeated in the enlarged detail.
- 3: Front thread guide.
- 4: Thread take-up lever.
- 5: Handwheel mark; raise the needle until this mark points up before threading.
Drawing up the lower thread
Instructions from the manualDraw up the lower thread3 steps
- Lightly hold the upper-thread end and slowly turn the handwheel toward you by hand to lower and raise the needle.
- Pull the upper thread to bring up the lower thread.
- Pull out about 10 cm of both threads and place them toward the rear under the presser foot.
Starting sewing
Instructions from the manualStart and stop sewing safely11 steps
- Keep hands clear of the needle and moving parts.
- Do not pull or stretch the fabric, use bent needles or let the needle hit pins.
- Use the correct foot and always turn the handwheel toward you.
- Put fabric under the foot before sewing.
- Switch on with your foot off the controller.
- Raise the needle until the wheel mark points up, select the stitch, and switch off when changing to the correct foot.
- Raise the foot, put fabric underneath and draw about 5 cm of thread toward the rear.
- Holding thread and fabric with your left hand, turn the handwheel toward you to lower the needle to the starting point.
- Lower the foot and slowly press the controller to sew.
- Remove your foot to stop, raise the needle and foot, pull the fabric left and cut threads using the cutter.
- Test the same fabric and thread on a scrap before your project.
Thread tension
Instructions from the manualAdjust upper-thread tension6 steps
- Test a scrap of the project fabric.
- Loops on the fabric surface indicate excessive upper tension, but first check and rethread incorrectly installed bobbin thread.
- Reduce upper tension by turning its dial to a lower number.
- Loops on the back indicate insufficient upper tension, but first rethread an incorrectly routed upper path.
- Increase upper tension by turning the dial to a higher number.
- Too much or too little tension weakens seams or puckers fabric.
Cleaning
Instructions from the manualClean the race and bobbin case10 steps
- Switch off and unplug before cleaning to avoid shock or injury.
- Raise the needle and presser foot.
- Loosen the presser-foot screw and needle-clamp screw and remove the holder and needle.
- Remove the two plate screws with the screwdriver; lift the needle plate and slide it left to remove it.
- Lift the bobbin case out to the left.
- Brush or vacuum dust from the race and surrounding area; do not oil the case.
- Refit the case so its triangle mark matches the machine’s circular mark and verify the indicated alignment points.
- Fit the needle plate and securely tighten its screws.
- Never use a scratched case; contact an authorised service centre for replacement XE9326-001.
- Incorrect case fitting can break the needle.
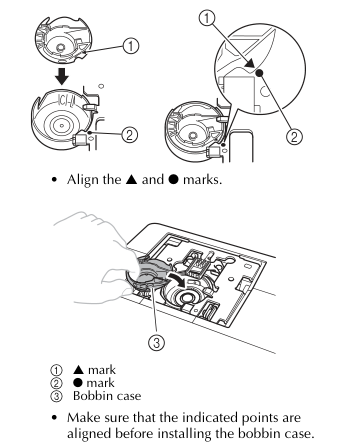
Maintenance
Instructions from the manualObserve oiling and storage restrictions4 steps
- Do not oil this machine: the factory-applied oil makes periodic user oiling unnecessary.
- Stop using it immediately and contact an authorised dealer or service centre if the handwheel becomes hard to turn or unusual noise occurs.
- Avoid storage at extreme temperatures or temperature changes, in humidity or steam, near flame, heaters or air conditioners, outdoors or direct sun, or in dusty or oily environments.
- Periodically switch on and use the machine; long unused storage can reduce efficiency.
Controls and parts
See the manual diagrams 1 diagram
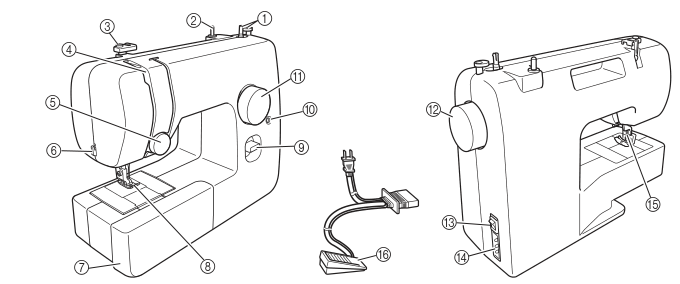
Diagram key
- 1: Bobbin winder: winds lower thread onto the bobbin
- 2: Spool pin: holds the spool
- 3: Thread guide: used for winding the bobbin and threading the machine
- 4: Thread take-up lever
- 5: Upper tension-control dial: controls upper-thread tension
- 6: Thread cutter: pass threads through it to cut them
- 7: Flat bed attachment with accessory compartment
- 8: Presser foot
- 9: Reverse sewing lever: push it to sew backwards
- 10: Buttonhole fine-adjustment screw
- 11: Pattern selection dial: turn either way to select a stitch
- 12: Handwheel: manually raises and lowers the needle
- 13: Main power and sewing light switch
- 14: Foot-controller jack/socket: connect the controller and power supply
- 15: Presser-foot lever: raises and lowers the foot
- 16: Foot controller: controls speed and starts/stops sewing. KD-1902 is listed for 110–120 V regions and 110–127 V Brazil; KD-2902 for 220–240 V. Part code varies by country; ask the dealer or authorised service centre.
Model details
Model and compatibility
- Bobbin
- Use the supplied type or SA156 / SFB XA5539-151 bobbins, 11.5 mm high. [1]
- User oiling
- Do not oil the machine; unusual handwheel resistance or noise requires stopping and contacting an authorised service provider. [1]
- Needle
- Use only home-sewing needles; insert with the flat side toward the rear and fully to the stopper. [1]