MODEL REFERENCE
CASIO XJ-UT351WN
22 errors · 27 troubleshooting topics · 105 guides

The checks and guides below come from the official manuals for this model.
No matches for this wording. Try a light name, error code or a shorter phrase.
Errors and indicators
Light patterns and messages documented in the manualFind the indicator lights
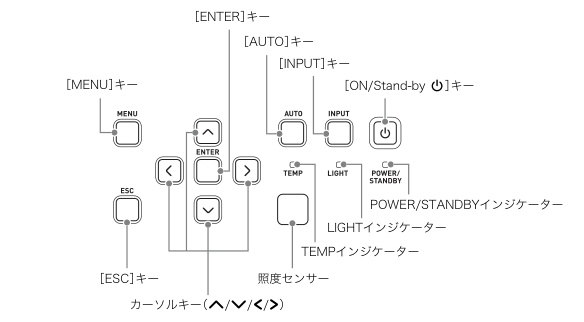
Diagram key
- ENTER: Confirm a menu selection or execute a function.
- AUTO: Automatically adjust RGB frequency and phase.
- INPUT: Select the input source.
- MENU: Open or close the settings menu.
- ON/Stand-by power symbol: Switch projector power on or off.
- POWER/STANDBY: Power and standby status indicator; colours and flashing combinations are given in the reviewed instructions.
- LIGHT: Light-source indicator; interpret with POWER/STANDBY and TEMP.
- TEMP: Temperature indicator; interpret with POWER/STANDBY and LIGHT.
- ESC: Close a menu or cancel the current operation.
- Four cursor keys: Navigate menus or change values; with no menu/dialog Up/Down opens keystone, then Up/Down adjusts vertical and Left/Right horizontal distortion. Left/Right adjusts light output with Light Control On.
- Illuminance sensor: Ambient-brightness sensing when the Brightness Sensor setting is On.
表示できない画像ファイルです。image cannot be displayed2 checks
表示できない動画ファイルです。movie cannot be displayed2 checks
内部が高温になっています。設置状況を確認してください。high internal temperature warning2 checks
内部が高温になっています。電源をオフにします。high-temperature automatic shutdown2 checks
ID-02no firmware USB connection3 checks
Troubleshooting
Find the problem you are experiencingMissing picture dotsView
Japan-domestic XJ-UT351WN network WXGA model; main cover and current exact model listing.
Some unlit dots may occur despite precision manufacturing; the manual says this is not a fault.Image discolouration after impact4 steps
Japan-domestic XJ-UT351WN network WXGA model; main cover and current exact model listing.
- Avoid impact during projection.
- If an impact interrupts or discolours the image, use INPUT to reselect the previous source.
- If colour does not recover, turn off and on.
- For an error follow the reviewed error-indicator table.
Blur after condensationView
Japan-domestic XJ-UT351WN network WXGA model; main cover and current exact model listing.
Cold-to-warm movement or rapid room heating can cause condensation and blur or faults. Turn off, leave it for a while, then turn on again. No fixed waiting time is specified.File Viewer does not appear after USB connection2 checks
- Unrecognized USB filesystem.
- Use a computer to confirm FAT/FAT32.
- Plug and Play is Off.
- Set Device Settings 2 > Plug and Play On to start automatically.
Folders or files missing from File Viewer1 check
- A folder has 1000 or more folders/files; not all display.
- Reduce the number of folders/files.
Camera memory not visible in File Viewer2 checks
- Camera requires USB Mass Storage settings or USB connection operations.
- Follow the camera manual to perform them.
- Camera does not support USB Mass Storage Class.
- Its memory cannot be displayed through File Viewer.
Question mark in image thumbnail1 check
- The image cannot be projected by File Viewer.
- The question-mark thumbnail identifies an unsupported image.
Power will not turn on2 checks
Japan-domestic XJ-UT351WN network WXGA model; main cover and current exact model listing.
- POWER/STANDBY not lit
- Connect the power cord correctly.
- TEMP or LIGHT stays lit/blinking
- Consult the reviewed error-indicator table.
No picture or abnormal picture3 checks
Japan-domestic XJ-UT351WN network WXGA model; main cover and current exact model listing.
- Source equipment off or no video
- Check the connected computer/video equipment is powered and operating normally.
- Wrong input selected
- Select the input matching the connected device.
- Component output not compatible through COMPUTER IN 1/2
- Try the projector VIDEO or S-VIDEO input instead.
Extreme colour or display displacement1 check
Japan-domestic XJ-UT351WN network WXGA model; main cover and current exact model listing.
- COMPUTER IN signal mode does not match RGB/component source
- Set Input Settings > COMPUTER IN 1 or 2 Terminal to Auto instead of the incorrect forced RGB or Component mode.
No sound4 checks
Japan-domestic XJ-UT351WN network WXGA model; main cover and current exact model listing.
- Projector volume low or muted
- Adjust with VOLUME+ or VOLUME−.
- Source volume low or absent
- Adjust the connected source volume.
- Wrong audio port connection/assignment
- Check the audio output connection to the assigned input using the reviewed audio-input guide.
- Audio Output is Line
- Set Device Settings 2 > Audio Output to Speaker.
Incorrect picture colours3 checks
Japan-domestic XJ-UT351WN network WXGA model; main cover and current exact model listing.
- Brightness mismatch
- FUNC > Brightness; adjust.
- Colour mode mismatch
- FUNC > Colour Mode; change it.
- Colour balance mismatch
- Adjust Image Adjustment 1 > Colour Balance.
Blurred text3 checks
Japan-domestic XJ-UT351WN network WXGA model; main cover and current exact model listing.
- Focus not adjusted
- Adjust the focus lever.
- RGB frequency or phase mismatch
- For RGB only press AUTO.
- RGB still requires manual adjustment
- For RGB only adjust Image Adjustment 2 > Frequency and Phase.
Cannot pass the password prompt1 check
Japan-domestic XJ-UT351WN network WXGA model; main cover and current exact model listing.
- Power On Password enabled
- Enter the correct password and ENTER. If remote keys cannot enter it, follow the remote control checks.
Remote control does not work3 checks
Japan-domestic XJ-UT351WN network WXGA model; main cover and current exact model listing.
- Batteries exhausted
- Replace remote batteries.
- Outside range
- Operate within approximately 5 m.
- IDs mismatch
- Match remote/projector IDs or set one ID to All.
TEMP or LIGHT stays lit or blinking1 check
Japan-domestic XJ-UT351WN network WXGA model; main cover and current exact model listing.
- An error has occurred
- Consult the reviewed error-indicator table.
Light-source unit does not light2 checks
Japan-domestic XJ-UT351WN network WXGA model; main cover and current exact model listing.
- BLANK temporarily switched light off
- Press BLANK or ESC.
- Light-source unit end of life or faulty
- Ask service/dealer for replacement; do not perform internal repair.
Unexpected shutdown and restart1 check
Japan-domestic XJ-UT351WN network WXGA model; main cover and current exact model listing.
- Automatic self-check restart
- Rare automatic self-check restart is not a fault; continue use. If repeated continuously contact service/dealer.
General abnormal operation recovery1 check
Japan-domestic XJ-UT351WN network WXGA model; main cover and current exact model listing.
- An abnormality may clear after the stated reset
- Wait for the fan to stop after an error, unplug and leave at least 10 minutes. Reconnect and turn on. If not restored contact service/dealer.
Cannot establish wireless projector connection6 checks
- Another wireless utility is running.
- Exit wireless utilities other than Network Connection.
- Distance or walls obstruct reception.
- Move PC and projector closer and avoid barriers.
- Microwave/Bluetooth or other interference nearby.
- Move interfering equipment away.
- Projector is off.
- Turn it on.
- Wireless adapter not connected.
- Connect it correctly.
- PC wireless is off.
- Turn wireless on.
Wireless projector link intermittently drops3 checks
- Another wireless utility is running.
- Exit utilities other than Network Connection.
- Distance or barriers weaken signal.
- Move closer and avoid barriers.
- Microwave/Bluetooth interference nearby.
- Move interfering equipment away.
Wireless link connects but PC picture is absent3 checks
- Input is not Network.
- Press INPUT and select Network.
- Network selected but PC picture absent.
- Click Network Connection One-screen Projection.
- Remote FREEZE or BLANK holds/hides picture.
- Press remote ESC to cancel it.
Network picture updates slowly3 checks
- High Quality projection setting selected.
- Open function menu > Projection Settings and choose High Speed.
- Unused apps consume PC resources.
- Close unused applications.
- Windows Aero is active.
- Disable Windows Aero.
Multiple nearby projectors cannot connect reliably1 check
- Several projectors use same SSID.
- Assign different SSIDs using the reviewed projector SSID operation.
Administration page fails to open1 check
- Browser proxy server is configured.
- Disable proxy in browser settings; consult browser help for its controls.
Forgotten administration password1 check
- Administration login password forgotten.
- Use the reviewed Initialize Network Settings operation to restore projector network defaults.
Guides
安全上のご注意
Instructions from the manualStop for smoke, unusual smell or abnormal heat3 steps
Japan-domestic XJ-UT351WN network WXGA model; main cover and current exact model listing.
- Use adult supervision if children can approach or touch the projector.
- If smoke, unusual smell or abnormal heat occurs, stop using it: continuing risks fire or electric shock.
- Unplug the power plug immediately, then contact the repair enquiry service or dealer.
Stop for faults, liquid ingress or damage7 steps
Japan-domestic XJ-UT351WN network WXGA model; main cover and current exact model listing.
- Do not continue use with abnormal operation or an abnormal image.
- Turn off, unplug, then contact the repair enquiry service or dealer.
- If water, liquid or metal/other foreign matter enters, or the projector is dropped or damaged, turn off, unplug, then contact service/dealer.
- Keep water and liquid containers away.
- Do not open, dismantle or modify the cabinet: high voltage can cause shock, burns or injury and voids warranty/repair eligibility.
- Internal inspection, adjustment and repair belong to service/dealer.
- Never throw the projector into fire.
Safe placement, ventilation and projection light15 steps
Japan-domestic XJ-UT351WN network WXGA model; main cover and current exact model listing.
- Use a firm flat stable surface; lock cart wheels.
- Keep at least 6 cm between the projection-facing front and screen/wall and 30 cm at all other sides.
- Keep the space between projector and screen empty and leave intake/exhaust unobstructed.
- Do not enclose it, cover it, place it on soft carpet/bedding/towels/soft seats, or use it standing vertically.
- Operate at 5–35°C.
- Avoid vibration, damp, dust, kitchen fumes, heaters, heated carpets, direct sun and extreme temperatures.
- Do not place it in a bathroom/wet area, on an unstable stand or high shelf, load it or stand on it.
- Do not look into the illuminated lens, intake or exhaust.
- Before switching on check nobody is looking into them; supervise children.
- Do not place magnifiers, mirrors, aquariums, refracting/reflecting objects or anything blocking the projection beam in its path.
- Do not touch the lens.
- Do not touch the hot exhaust or place heat-sensitive plastic near or below it.
- Do not open the cabinet.
- Do not use flammable-gas sprays inside or around it.
- During lightning do not touch the power plug.
電源コードについて
Instructions from the manualJapan-only electrical and model scope9 steps
Japan-domestic XJ-UT351WN network WXGA model; main cover and current exact model listing.
- Use this Japan-domestic unit only in Japan, on 100 V AC 50/60 Hz.
- Use only its supplied power cord, never with another appliance.
- Connect earth before plugging into a grounded 100 V outlet; disconnect earth only after unplugging.
- Keep the plug accessible.
- Do not overload or share the outlet with other appliances.
- Observe extension-cord ampere ratings.
- Do not bundle, heat, load, modify, damage, trap, cover with a rug, forcibly bend, twist or pull the cord.
- Keep it away from heaters; never touch cord or plug with wet hands.
- When away, keep pets away from the product and unplug: chewing can short the cord and cause fire.
Care for the power cord and move safely8 steps
Japan-domestic XJ-UT351WN network WXGA model; main cover and current exact model listing.
- Insert the plug fully.
- After use and during long non-use unplug by holding the plug, never pulling the cord.
- Turn off and remove the cord before moving.
- At least yearly unplug and remove dust from plug blades and surroundings using a dry cloth or vacuum.
- Do not use detergent on the cord, especially the plug.
- During and immediately after operation the exhaust is hot.
- Carry by the two sides shown in the source movement figure, avoiding the exhaust.
- Keep important stored settings in a separate written record because malfunction/repair may erase them.
電池について
Instructions from the manualRemote and battery safety7 steps
Japan-domestic XJ-UT351WN network WXGA model; main cover and current exact model listing.
- Use the specified two AAA alkaline batteries with correct polarity.
- Do not disassemble, short, heat, burn or recharge batteries; do not mix old/new batteries or different types.
- Remove exhausted batteries promptly and remove batteries for long non-use.
- Dispose under local rules.
- For alkaline-battery liquid in an eye, do not rub: rinse immediately with clean water and obtain medical treatment immediately; untreated exposure can cause blindness.
- Do not dismantle or modify the remote or expose it to water; ask service/dealer for inspection or repair.
- Replace its batteries at least yearly regardless of use and do not store with keys held down.
磁石について
Instructions from the manualMagnets, internal cleaning and disposal6 steps
Japan-domestic XJ-UT351WN network WXGA model; main cover and current exact model listing.
- The projector contains magnets.
- Keep it away from pacemakers and other medical electrical equipment.
- If an abnormality is felt, move away immediately and consult a doctor.
- Keep magnetic cards, tapes, disks, prepaid cards and tickets away to avoid erased recordings.
- Arrange paid internal cleaning with service/dealer at least once a year, preferably before the humid rainy season: dust can reduce brightness or cause fire/failure.
- Do not dismantle it for disposal; follow local rules.
光源ユニットについて
Instructions from the manualLight-source life and laser precautions8 steps
Japan-domestic XJ-UT351WN network WXGA model; main cover and current exact model listing.
- Laser/LED light-source life is approximately 20,000 hours depending on individual unit, conditions and settings; it is not a guarantee.
- Light-source warranty ends at the earlier of the product warranty period or 6,000 hours.
- If the light no longer lights or becomes markedly dim, ask service/dealer for replacement.
- Never dismantle or modify it.
- Do not stare into the light and supervise small children.
- The non-USA label is Class 1 under IEC 60825-1:2014; the separate USA label is Class 2 under IEC 60825-1:2007 and does not authorize overseas use of the Japan unit.
- Do not use adjustments or procedures outside the manual.
- The exhaust is hot during projection; do not touch or obstruct it or insert foreign objects.
無線アダプターyw-40(別売品)の使用に関するご注意
Instructions from the manualUse optional YW-40 safely11 steps
- YW-40 uses only 2.4 GHz DS-SS/OFDM with assumed interference distance about 40 m.
- Use only in Japan; do not dismantle/modify or remove certification labels.
- Before use check for licensed and low-power mobile-identification stations nearby.
- If interference occurs change channel/location or stop use; consult dealer/service if unsure.
- Avoid microwaves, static/radiating equipment, reinforced-concrete/steel buildings, metal furniture, people and walls obstructing radio paths.
- Small repositioning can improve reflected reception.
- Bluetooth and wireless LAN can interfere.
- Third parties may intercept traffic; do not use for confidential or life-critical matters.
- Do not use where prohibited such as aircraft/hospitals or near sensitive electronic equipment.
- Users of medical devices should consult their doctor/manufacturer.
- Keep detached adapter away from infants to prevent swallowing/choking.
その他のご注意
Instructions from the manualStorage and image-quality precautions7 steps
Japan-domestic XJ-UT351WN network WXGA model; main cover and current exact model listing.
- Avoid static, extreme temperature, humidity, rapid temperature change, dust, unstable/tilted surfaces, water, oil/smoke, salt damage and corrosive gases.
- Keep strong fluorescent light and sunlight off the remote receiver.
- Do not trap a hand beneath the projector during installation or underside adjustments.
- Keystone correction compresses the picture and may lower quality.
- Place it as squarely as possible to the screen; if picture quality matters use a placement needing no correction and cancel correction.
- Continuous 24-hour operation or ignoring installation requirements may incur paid repair even within warranty.
- High heat, dust, oil/tobacco smoke can shorten optical-engine replacement intervals; ask service about timing and cost.
内容物のご確認
Instructions from the manualCheck the supplied items4 steps
Japan-domestic XJ-UT351WN network WXGA model; main cover and current exact model listing.
- Package: projector, YT-131 remote, two trial AAA batteries, power cord, cable cover, safety notes, before-use notes and warranty.
- Use alkaline batteries.
- YT-160 belongs to the nonnetwork models.
- The Japan model uses optional YW-40, not an included wireless adapter.
投映までの操作の流れ
Instructions from the manualInitial setup and shutdown12 steps
Japan-domestic XJ-UT351WN network WXGA model; main cover and current exact model listing.
- Insert the supplied two AAA alkaline batteries in the remote with the illustrated polarity.
- Place the projector on a firm table or stand with adequate clearance; read the safety/use/placement precautions.
- For wall mounting purchase its dedicated bracket and consult the dealer.
- Adjust its installation angle.
- Connect the supplied cord to AC inlet and specified outlet.
- Connect the source video/audio equipment and turn those devices on.
- Press the power key.
- On first use select the language in the initial-language screen.
- Press INPUT and choose the source.
- Use the focus lever to focus.
- Adjust keystone and light output if needed.
- To finish press the power key to turn off.
各部の名称
Instructions from the manualIdentify parts, controls and model-specific ports6 steps
Japan-domestic XJ-UT351WN network WXGA model; main cover and current exact model listing.
- Exterior: illuminance sensor, control panel, indicators, power key, left exhaust, two intakes, AC inlet, remote receiver, terminal area, focus lever, security bar, Kensington-compatible lock hole and projection lens.
- Body controls: MENU, ENTER, AUTO, INPUT, power, ESC and four cursors.
- Indicators: POWER/STANDBY, LIGHT, TEMP.
- Focus is manual via the lever; lens has fixed zoom.
- XJ-UT351WN ports: LAN; USB-A 5 V/2 A combined host/power port; LOGO Micro-USB Type B; HDMI 1/2; AUDIO IN 1/2; MONITOR OUT; COMPUTER IN 1/2; MIC; AUDIO OUT; AUDIO IN R/L; VIDEO; S-VIDEO; SERIAL.
- The power-only DC port belongs to nonnetwork models.
設置する
Instructions from the manualPlace projector and adjust its feet6 steps
Japan-domestic XJ-UT351WN network WXGA model; main cover and current exact model listing.
- Use a firm table or stand with ample clearance, lens centered and projector perpendicular to the screen.
- Use the test pattern to check size, tilt and other adjustments.
- Turn the one front underside adjustment foot to fine-tune elevation.
- Turn the two rear underside feet to fine-tune side-to-side tilt.
- Keep the plug accessible, 6 cm at the projection front and 30 cm elsewhere.
- If exhaust heat blown toward the lens by air-conditioning causes image shimmer, change air flow direction or projector location.
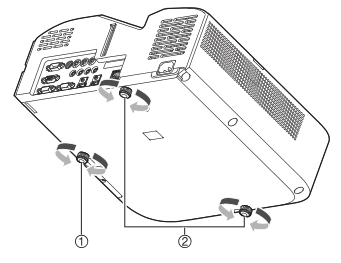
Diagram key
- 1: Turn the one front underside adjustment foot to fine-tune elevation. Both rotation directions are retained.
- 2: Turn the two rear underside adjustment feet to fine-tune side-to-side tilt. Both foot positions and all rotation arrows are retained.
外部機器との接続
Instructions from the manualConnect video and audio source devices13 steps
Japan-domestic XJ-UT351WN network WXGA model; main cover and current exact model listing.
- Connect before projection using cables matching both device terminals; cables not supplied must be obtained separately.
- Multiple video sources may be connected; select with INPUT.
- Computer RGB or component video uses COMPUTER IN 1/2 mini D-sub 15 via an RGB or component cable.
- S-video uses S-VIDEO mini DIN 4; composite uses VIDEO RCA.
- HDMI equipment uses HDMI 1/2 with High Speed HDMI cable.
- Analogue audio uses AUDIO IN 1/2 stereo mini or AUDIO IN R/L RCA.
- MIC accepts a microphone but does not support plug-in-power microphones.
- External analogue RGB display uses MONITOR OUT and RGB cable.
- External speakers use AUDIO OUT and an audio cable; set Device Settings 2 > Audio Output to Line.
- RS-232C uses SERIAL and cross serial cable.
- LAN uses RJ-45 with STP recommended.
- USB-A connects storage, supported calculator/dictionary or the optional YW-40; it also supplies 5 V/2 A.
- Use LOGO Micro-B for firmware/logo transfer.
ケーブルカバーの取り付けと取り外し
Instructions from the manualAttach and remove the cable cover5 steps
Japan-domestic XJ-UT351WN network WXGA model; main cover and current exact model listing.
- Turn off, unplug and wait for the projector to cool before attaching or removing the cover.
- Attachment: turn the projector over; insert cover hooks into body hook holes (Figure 1).
- Rotate the cover in Figure 2’s direction onto the body.
- Align cover screw with body screw receiver (Figure 3) and tighten with a Phillips screwdriver (Figure 4).
- Removal: loosen the cover screw with a Phillips screwdriver and detach it from the body; separate the cover screw side from the body, then withdraw the hooks.
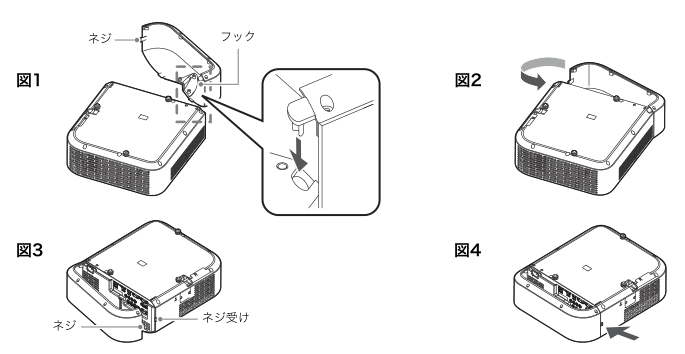
Diagram key
- Figure 1 screw: Cover screw, aligned with the body receiver in Figure 3.
- Figure 1 hooks: Insert the cover hooks into the body hook holes. The complete enlarged inset retains its insertion arrow and both ends of the callout.
- Figure 2 rotation arrow: Rotate the cover onto the body in this direction after inserting the hooks.
- Figure 3 screw: Align the same cover screw with its receiver.
- Figure 3 screw receiver: Body receiver for the cover screw.
- Figure 4 arrow: Tighten with a Phillips screwdriver. Removal: loosen and detach the screw, separate the screw side, then withdraw the hooks.
無線アダプターカバー(yw-40付属品)について
Instructions from the manualProtect the wireless adapter with the cable cover2 steps
- The optional YW-40 adapter’s supplied anti-theft cover cannot attach to this projector.
- Use the projector’s supplied cable cover to protect the connected adapter; follow the reviewed turn-off, unplug and cooling sequence before cover changes.
リモコンについて
Instructions from the manualUse the supplied YT-131 remote5 steps
Japan-domestic XJ-UT351WN network WXGA model; main cover and current exact model listing.
- Aim the YT-131 emitter at a projector remote receiver from within approximately 5 m.
- Avoid held keys in storage, which drains batteries.
- Grouped controls: emitter, power, ESC, ID buttons 1–4, four cursors and ENTER, function keys and the network-model media playback keys.
- Power toggles on/off; ESC exits/cancels; cursors navigate/change settings; ENTER confirms/executes.
- Network playback keys operate File Viewer as specified in its reviewed instructions.
基本操作一覧
Instructions from the manualSelect the input source6 steps
Japan-domestic XJ-UT351WN network WXGA model; main cover and current exact model listing.
- Press INPUT; use INPUT or Up/Down to select the desired source; press ENTER.
- Without ENTER the source switches after approximately 3 seconds.
- The source name shows briefly in the upper right.
- If no signal is detected, 「入力信号がありません」 appears.
- Choose Computer 1/2 RGB or component, Video, S-Video, HDMI 1/2, File Viewer, CASIO USB Tool or Network.
- Computer 1 defaults to AUDIO IN 1, Computer 2 to AUDIO IN 2, Video/S-Video to AUDIO IN R/L, HDMI 1/2 to its own audio, File Viewer to USB-A, CASIO USB Tool to AUDIO IN 1, Network to USB-A or LAN audio.
Manually correct keystone distortion4 steps
Japan-domestic XJ-UT351WN network WXGA model; main cover and current exact model listing.
- With no onscreen menu/dialog press body Up/Down or remote KEYSTONE+/−.
- Use Up/Down for vertical and Left/Right for horizontal correction.
- Both adjust within±5 degrees.
- Press ESC to finish.
Enlarge and pan part of the imageView
Japan-domestic XJ-UT351WN network WXGA model; main cover and current exact model listing.
Press D-ZOOM+ to enlarge the image centre. Use D-ZOOM+ to increase or D-ZOOM− to reduce magnification. Use Up/Down/Left/Right to pan the enlarged image. Press ESC to finish.Temporarily blank picture and sound4 steps
Japan-domestic XJ-UT351WN network WXGA model; main cover and current exact model listing.
- Press BLANK to interrupt picture and sound and show the configured Blank Screen.
- If Black is selected, the projection light turns off.
- Auto Power Off is disabled until blank is cancelled.
- Press BLANK or ESC to restore; the power key also restores only when the Blank Screen setting is Black.
Freeze the pictureView
Japan-domestic XJ-UT351WN network WXGA model; main cover and current exact model listing.
Press FREEZE to hold the current frame. Press FREEZE or ESC to return to live source video.Automatically adjust RGB videoView
Japan-domestic XJ-UT351WN network WXGA model; main cover and current exact model listing.
During RGB projection press AUTO to automatically adjust frequency and phase, which may reduce flicker. This does not apply to other inputs.Choose an aspect ratio6 steps
Japan-domestic XJ-UT351WN network WXGA model; main cover and current exact model listing.
- Press ASPECT repeatedly.
- WXGA Computer RGB/HDMI-PC cycles Standard, Full, 16:9, 4:3, Real; Video, S-Video, Component/HDMI-DTV cycles Standard, 16:9, 16:10, 4:3, Letterbox.
- Standard preserves aspect at maximum fit; Full stretches to maximum size.16:9 corrects 16:9 squeezed into 4:3; 16:10 fits a 16:10 screen; 4:3 forces 4:3.
- Real maps one input dot to one output pixel, cropping excess resolution; RGB below SVGA is enlarged to SVGA.
- Letterbox preserves ratio, resizes width to 1280 dots and projects the central 800 rows.
- Public/commercial screen resizing may infringe copyright.
Select a colour mode3 steps
Japan-domestic XJ-UT351WN network WXGA model; main cover and current exact model listing.
- Press FUNC, select Colour Mode, ENTER; choose with Up/Down and ENTER.
- Colour mode cannot be selected when Light Control is Off.
- Choices: Standard (default for PC), Graphics, Theater (default for S-Video, Video, Component, HDMI-DTV), Blackboard, Natural.
Adjust volume or muteView
Japan-domestic XJ-UT351WN network WXGA model; main cover and current exact model listing.
Press VOLUME+ or− to open the volume dialog; use+ to raise or− to lower. To mute, open the volume dialog and press ENTER. Restore audio with VOLUME+ or−.入力ソースについて
Instructions from the manualMatch computer resolution to the projector2 steps
Japan-domestic XJ-UT351WN network WXGA model; main cover and current exact model listing.
- If images are rough, text unclear or moiré appears, set computer output to the native WXGA 1280×800 of XJ-UT351WN following the computer instructions.
- Alternatively select Real aspect on this WXGA model for pixel-mapped projection.
ライトコントロール
Instructions from the manualAdjust light output and brightness sensing5 steps
Japan-domestic XJ-UT351WN network WXGA model; main cover and current exact model listing.
- Light Control On (default) allows seven output levels 1–7.
- With no menu/dialog press Left/Right to show the current level and use Left/Right to adjust; ESC finishes.
- MENU > Device Settings 1 > Light Control > Brightness Sensor On enables ambient-light adjustment; default Off.
- For maximum source brightness set Light Control Off, which disables level adjustment and sensing.
- Light Control Off Mode offers Bright (brightness priority) or Normal (default, colour priority).
デジタルスクリーンシフト
Instructions from the manualChange or reset digital screen shift5 steps
Japan-domestic XJ-UT351WN network WXGA model; main cover and current exact model listing.
- MENU > Screen Settings > Digital Screen Shift > Change Digital Screen Shift, ENTER.
- Use D-ZOOM−/+ to resize 84–100 percent.
- Below 100 percent use Up/Down to move vertically and Left/Right horizontally; at 100 percent skip movement.
- ESC closes the dialog; MENU closes the settings.
- To reset: MENU > Screen Settings > Digital Screen Shift > Reset Digital Screen Shift, ENTER; Up selects Yes, then ENTER.
テストパターンの投映
Instructions from the manualProject a test pattern4 steps
Japan-domestic XJ-UT351WN network WXGA model; main cover and current exact model listing.
- MENU > Screen Settings > No Signal Screen or Blank Screen; use Left/Right to select Test Pattern; MENU closes.
- For No Signal Screen choose an input with no signal using INPUT; for Blank Screen press BLANK.
- Use for position, size, keystone, focus, aspect and digital screen shift adjustments after wall installation.
- Auto Power Off is disabled while test pattern is projected.
音声入力の変更
Instructions from the manualAssign or reset audio inputs5 steps
Japan-domestic XJ-UT351WN network WXGA model; main cover and current exact model listing.
- MENU > Device Settings 2 > Audio Input, ENTER; choose the source with Up/Down; use Left/Right to assign its audio input.
- Repeat for other sources as needed, then MENU closes.
- AUDIO IN 1, AUDIO IN 2 or AUDIO IN R/L may replace the default assignment.
- To reset all assignments, run Device Settings 2 > Initialize Device Settings 2.
- This resets ALL settings in Device Settings 2, not just audio.
操作パネルロック
Instructions from the manualLock or unlock the body controls4 steps
Japan-domestic XJ-UT351WN network WXGA model; main cover and current exact model listing.
- To enable: MENU > Device Settings 2 > Control Panel Lock; Left selects On; ENTER confirms the dialog; MENU closes.
- All body keys except power are locked; remote control still works.
- To unlock with body keys: with no menu/dialog hold Down until the unlock message appears, then release.
- Or use the remote in the above menu path, Right selects Off, then MENU.
リモコンidとプロジェクターidの設定
Instructions from the manualSet and inspect remote and projector IDs6 steps
Japan-domestic XJ-UT351WN network WXGA model; main cover and current exact model listing.
- IDs 1–4 avoid cross control for up to four nearby projectors.
- Both default All, which communicates regardless of other ID.
- Matching IDs or All are necessary for all normal remote operations.
- Remote only, even with projector off: hold ESC and press 1, 2, 3 or 4 to set that remote ID; ESC+MENU sets All.
- During projection set projector ID: MENU > Device Settings 1 > Projector ID, ENTER; Up/Down chooses 1–4 or All; ENTER.
- Hold ESC and press INPUT to display both IDs for approximately 10 seconds, even when IDs conflict.
プレゼンテーションタイマーを使う(timer)
Instructions from the manualConfigure the presentation countdown8 steps
Japan-domestic XJ-UT351WN network WXGA model; main cover and current exact model listing.
- With no timer displayed, press TIMER once to show it.
- With Continuous Display Off it disappears after about 5 seconds.
- To open timer functions, press TIMER twice if hidden or once if visible.
- Use Up/Down to select Display Position, Continuous Display or Set Time; Left/Right change selection.
- Position: bottom right (default), top right, top left, bottom left.
- Continuous Off (default) hides after 5 seconds; On keeps it until another dialog or ESC.
- Set Time is 5–60 minutes in 5-minute increments (default 20 minutes).
- ESC saves and closes; to immediately start choose Start Timer and ENTER before ESC.
計時の各種操作
Instructions from the manualStart, pause, resume or reset the timer4 steps
Japan-domestic XJ-UT351WN network WXGA model; main cover and current exact model listing.
- Open the timer functions menu.
- Select Start Timer and ENTER to start countdown and close the menu.
- At 00:00 it counts up in red for 60 minutes from−00:01 to−60:00.
- Select Pause Timer and ENTER to pause; Resume Timer and ENTER to resume; Reset Timer and ENTER to return to the configured countdown time.
設定メニュー項目一覧
Instructions from the manualUse settings and adjust picture quality10 steps
Japan-domestic XJ-UT351WN network WXGA model; main cover and current exact model listing.
- Press MENU to open/close Settings.
- Asterisk marks defaults.
- R=RGB, C=Component, V=S-Video/Video, H=HDMI-PC, D=HDMI-DTV, F=File Viewer, T=CASIO USB Tool, N=Network; items apply only to indicated sources.
- The N symbol marks network-model-only settings, which apply to this model.
- Image Adjustment 1: Brightness, Contrast; V-only Sharpness (higher sharper), Colour Saturation (higher richer) and Tint (higher bluer, lower redder; NTSC/NTSC 4.43 only).
- Colour Balance offers Warm, Standard (default), Cool and individual RGB adjustments.
- Image Adjustment 2: Vertical/Horizontal Position for RGB/Component/Video; Frequency for RGB vertical bands, Phase for RGB flicker.
- If manual frequency makes RGB disappear, press AUTO.
- Overscan for Component/Video/HDMI-DTV is 0–5 percent (default 5); lower values display more of the input.
- Initialize Image Adjustment 1/2 or Volume Adjustment resets all items in that group for the current source.
Screen and projection settings9 steps
Japan-domestic XJ-UT351WN network WXGA model; main cover and current exact model listing.
- Screen Settings vertical/horizontal keystone correct distortion.
- Correction Priority Shape reduces keystone-related distortion but slightly narrows projection; Size (default) keeps normal area but may distort.
- Aspect and Digital Screen Shift use the reviewed guides.
- Projection Method Front (default) projects from in front; Rear horizontally mirrors for rear projection.
- Ceiling Projection On is for upside-down wall mounting and flips both axes; Off (default) is for table top.
- No Signal Screen choices Blue (default), Black, Logo (built-in or user logo), Test Pattern.
- Blank Screen has the same choices with Black default.
- Test Pattern disables Auto Power Off.
- Initialize Screen Settings resets all current-source screen items.
Input signal and automatic adjustment settings6 steps
Japan-domestic XJ-UT351WN network WXGA model; main cover and current exact model listing.
- Input Settings > COMPUTER 1/2 Terminal: Auto (default) detects RGB/Component; RGB or Component forces that interpretation.
- RGB 1/2 Level Adjustment On (default) usually optimizes RGB; if image is disturbed change to Off.
- Video/S-Video Signal: Auto (default) or NTSC, NTSC 4.43, PAL, PAL-M, PAL-N, PAL 60, SECAM.
- Signal Name Display On (default) shows input name after INPUT selection; Off hides it.
- Initialize Input Settings resets current-source input items.
- Device Settings 1 > Auto Adjustment On (default) detects RGB resolution/frequency and adjusts; Off preserves manual vertical/horizontal position, frequency and phase across power cycles.
Power, language and device settings13 steps
Japan-domestic XJ-UT351WN network WXGA model; main cover and current exact model listing.
- Auto Power Off acts after both no key activity and no input for 5, 10 (default), 15, 20 or 30 minutes; Off disables it.
- Direct Power On set to On starts upon connecting mains; default Off.
- Device Settings 1 > Language selects English, French, German, Italian, Spanish, Swedish, Portuguese, Dutch, Norwegian, Polish, Finnish, Czech, Turkish, Russian, Lithuanian, Vietnamese, Thai, Malay, Indonesian, Arabic, Simplified Chinese, Traditional Chinese, Korean or Japanese.
- Initialize Device Settings 1 resets all current-source items in that group.
- Device Settings 2 > Audio Output: Speaker (default) or Line (AUDIO OUT).
- High Altitude On for 1500–3000 m improves fan cooling; Off (default) below 1500 m.
- Never use above 3000 m.
- Closed Captions for Video with captions: Off (default), CC 1, CC 2, CC 3, CC 4.
- Timer Function opens timer functions.
- Microphone Input Level 0 (default, mute)–3 (maximum).
- Initialize Device Settings 2 resets all current-source items in that group.
- Device Settings 2 > Plug and Play On automatically switches input when a supported USB device is connected or the projector powers on with it attached; default Off leaves the source unchanged.
- Some network menus/messages remain English regardless of selected display language.
Enable standby RGB and audio output4 steps
Japan-domestic XJ-UT351WN network WXGA model; main cover and current exact model listing.
- Device Settings 2 > Standby RGB/Audio: Output enables MONITOR OUT and AUDIO OUT while powered but in standby; Do Not Output is default.
- Standby video is only COMPUTER IN 1; audio is that assigned to Computer 1 plus MIC.
- Standby audio always uses AUDIO OUT regardless of Audio Output Speaker/Line.
- COMPUTER IN 2 video cannot output during standby.
Inspect information and initialize settings4 steps
Japan-domestic XJ-UT351WN network WXGA model; main cover and current exact model listing.
- Information lists input signal, signal name, resolution, horizontal/vertical frequency, scanning method, audio input, projector ID, light use time and Version (ROM version).
- Unit Use Time is cumulative and cannot be reset.
- All Initialization resets Settings except Language, Password, Light Use Time, Version and Unit Use Time.
- Transferred user logo is not erased.
Inspect and configure projector network settings9 steps
- Network Settings > Wired LAN Information shows IP/DHCP state.
- Wireless LAN Information shows IP/DHCP/security and external access-point connection state.
- Projector Wired LAN Settings configures IP.
- Projector Wireless LAN Settings configures its access-point SSID and IP; apply wireless changes with Update Network Settings.
- Network Settings Initialization restores defaults.
- The complete Network Function Guide gives the step-by-step operations.
- Remote On Enabled allows wired-LAN power-on from powered standby; Disabled is default.
- Standby power is 1.9 W enabled, 0.12 W disabled.
- PJLink Authentication defaults enabled.
パスワード機能の利用
Instructions from the manualChange or enable the power-on password14 steps
Japan-domestic XJ-UT351WN network WXGA model; main cover and current exact model listing.
- Password protection discourages unauthorized use but does not prevent theft.
- Keep the remote, replace weak batteries and match IDs or set either to All.
- Record the password separately and change the factory password promptly.
- MENU > Device Settings 1 > Password, ENTER.
- Enter current password then ENTER.
- Factory sequence: Up, Down, Left, Right, Up, Down, Left, Right.
- Down selects Change Password, ENTER.
- Enter up to eight key operations, ENTER; re-enter the same password, ENTER.
- On registered message press ESC.
- If mismatch message appears, ESC and retry the new password entry.
- Permitted keys: INPUT, MENU, BLANK, FREEZE, the printed light-control key, VOLUME+/−, D-ZOOM+/−, KEYSTONE+/−, four cursors, TIMER, AUTO, ASPECT, FUNC.
- To enable/disable, repeat the current-password menu steps; with Power On Password selected use Left/Right to choose On/Off.
- When Off→On, ENTER confirms asking at power-on or ESC cancels.
- MENU closes.
ご自分のパスワードを忘れてしまった場合には
Instructions from the manualForgotten password service procedure2 steps
Japan-domestic XJ-UT351WN network WXGA model; main cover and current exact model listing.
- Take projector and identification (employee ID, driving licence, etc.; copy accepted) to the repair enquiry service and request paid password removal.
- This resets all settings except light use time.
Usbメモリーデバイスからの投映(ネットワークモデルのみ)
Instructions from the manualChoose supported USB storage and media11 steps
- Use FAT/FAT32 USB memory, cards through a USB card reader, or a USB Mass Storage Class camera. exFAT/NTFS are unsupported.
- Connect Type A to USB-A; insert card in reader first, then connect reader USB.
- For cameras follow its own connection/settings guide.
- JPEG: about 15 megapixels baseline or 8 megapixels progressive.
- PNG/GIF: under 6 MB and about 8 megapixels; BMP: under 6 MB/about 8 megapixels at 24-bit colour.
- Only baseline JPEG projects up to 1280×800; other images max 1024×768 even on this WXGA model.
- Transparent PNG/GIF areas show black; animated GIF shows as a still.
- AVI: max 20 Mbps 720/30P, MJPEG video/ADPCM audio.
- MOV: max 20 Mbps 1080/30P, H.264 with ADPCM/AAC.
- MP4: max 20 Mbps 1080/30P, H.264/AAC.
- High bitrates can slow/interrupt fast transport; at maximum bitrate normal playback is possible but fast forward/rewind is unavailable.
Usbメモリーデバイス上のファイルを投映する
Instructions from the manualStart File Viewer and project a USB file5 steps
- Connect supported USB storage.
- Press INPUT repeatedly for File Viewer and ENTER.
- Select Slide for images or Movie for videos with Up/Down, ENTER; choose a file with Up/Down.
- ENTER or Play starts it.
- For images ENTER projects one file, while Play starts a slideshow from the selected file.
Configure File Viewer11 steps
- From File Viewer main screen select Viewer Settings, ENTER.
- Up/Down selects a setting, ENTER; Left/Right changes its option.
- Repeat for other settings.
- Display order: filename ascending(default), descending, extension ascending, newest or oldest time.
- Startup mode: List(default) or Icon.
- Thumbnails: Show(default) or Hide.
- Slideshow Advance: Manual(default) or Automatic.
- Automatic interval: 5 seconds(default), 10 seconds, 30 seconds, 1 minute or 5 minutes.
- Repeat: Repeat or Do Not Repeat(default).
- Movie Audio Output: Output(default) or Do Not Output.
- Initialize Viewer Settings resets all viewer settings.
画像ファイル投映中の操作
Instructions from the manualControl projected images and slideshowsView
動画ファイル投映中の操作
Instructions from the manualControl USB movie playback6 steps
- ENTER or Play toggles pause/resume.
- FUNC > Play from Beginning, ENTER restarts; FUNC > Time Display On/Off, ENTER toggles elapsed time.
- Right or Forward cycles 2×, 8×, 32× fast forward; Left or Rewind cycles the same rewind speeds.
- ENTER or Play returns to normal speed.
- FUNC > Move to End, ENTER moves to final frame.
- ESC stops playback and returns to file list.
ファイル一覧表示中の各種操作
Instructions from the manualオートラン機能
Instructions from the manualPrepare and use USB autorun6 steps
- Set Multimedia Settings > Autorun Enabled and Device Settings 2 > Plug and Play On.
- Create AUTORUNC, all uppercase, at the USB root.
- Copy supported images or video there.
- Multiple images may form a slideshow.
- To autorun video put exactly one movie and no other files in AUTORUNC; mixed image/movie content prioritizes images and does not play the movie.
- Connect prepared USB while powered on, or connect with power off and then turn on.
関数電卓画面の投映
Instructions from the manualProject a supported calculator screen6 steps
- Supported calculators: fx-9860G, fx-9860GII and fx-CG20.
- With projector on connect USB-A to calculator mini-B using the matching cable.
- Press INPUT; select CASIO USB Tool using Up/Down, ENTER.
- Start the calculator’s projection operation as explained in its manual.
- If the calculator malfunctions, unplug/reinsert its USB cable.
- If still faulty remove USB from both devices, turn projector off/on, and reconnect.
本機外部のクリーニング
Instructions from the manualClean the projector exterior3 steps
Japan-domestic XJ-UT351WN network WXGA model; main cover and current exact model listing.
- Turn off, unplug and allow it to cool fully before cleaning.
- Wipe the exterior using a soft cloth dampened with diluted neutral detergent and wrung out firmly.
- Never use benzine, alcohol, thinner or other chemicals.
レンズのクリーニング
Instructions from the manualClean the projection lensView
Japan-domestic XJ-UT351WN network WXGA model; main cover and current exact model listing.
Turn off, unplug and allow it to cool fully. Wipe with commercial spectacle-cleaning cloth or lens cleaning paper. Do not apply excessive force or scratch the lens.吸気口などのクリーニング
Instructions from the manualVacuum intake and exhaust vents4 steps
Japan-domestic XJ-UT351WN network WXGA model; main cover and current exact model listing.
- Turn off, unplug and allow it to cool fully.
- Carefully vacuum dust from both illustrated intakes approximately monthly.
- Dust can overheat the interior and cause failure.
- Depending on environment dust may also accumulate on the exhaust; clean it in the same way.
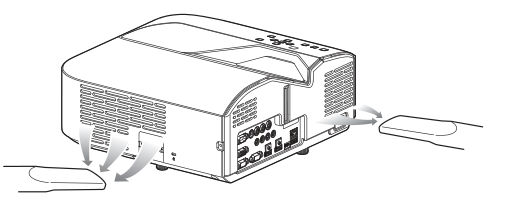
Diagram key
- Left nozzle and arrows: Carefully vacuum the first illustrated intake approximately monthly.
- Right nozzle and arrows: Carefully vacuum the second illustrated intake approximately monthly. Turn off, unplug and cool fully before cleaning; treat dusty exhaust in the same way.
インジケーター表示について
Instructions from the manualRead normal indicator combinations9 steps
Japan-domestic XJ-UT351WN network WXGA model; main cover and current exact model listing.
- Read POWER/STANDBY, LIGHT, TEMP together: solid red/solid orange/solid orange immediately after connection; wait for standby before turning on.
- Solid red/off/off is standby.
- Blinking green/solid orange/solid orange is warm-up.
- Solid green/off/off is ready with Light Control Off; solid green/solid green/off is ready with Light Control On.
- Blinking red/off/off is internal processing just after shutdown.
- Solid dot means lit, double circle blinking, open circle off.
- Error-table em-dash means unspecified, not a guessed off state.
- Before unplugging after an error wait for the fan to stop, otherwise it may not recover at reconnection.
- ESC dismisses warning messages.
外部機器への給電について
Instructions from the manualSupply power to an external USB device7 steps
Japan-domestic XJ-UT351WN network WXGA model; main cover and current exact model listing.
- USB-A 5 V/2 A on XJ-UT351WN combines host and power functions.
- Before powering an external device set Device Settings 1 > Auto Power Off to Off.
- Shutdown, self-check restart, Auto Power Off or error stops power and may erase/damage unsaved external data; save often.
- Use CASIO-tested devices where possible; other devices up to DC 5 V/2 A may work with limited functions and are not guaranteed.
- Follow the external device instructions, especially for rechargeable batteries: wrong connection risks rupture, smoke or fire.
- CASIO disclaims responsibility for connected device/data failures.
- To interrupt projection while continuing supply press BLANK.
ファームウェア更新、ユーザーロゴ転送について
Instructions from the manualConnect for firmware or user-logo transfer2 steps
Japan-domestic XJ-UT351WN network WXGA model; main cover and current exact model listing.
- Connect computer USB to the projector LOGO Micro-USB Type B terminal using a matching commercial cable.
- Follow the separate firmware/user-logo transfer guide; USB-A host is not the firmware transfer port.
本機を壁に設置する
Instructions from the manualWall-installation precautions5 steps
Japan-domestic XJ-UT351WN network WXGA model; main cover and current exact model listing.
- Use the dedicated wall bracket with the projector upside-down; ask the dealer for details.
- Keep as far as possible and at least 1 m from fire detectors/alarms to avoid false activation from hot exhaust.
- Avoid strong lights/fluorescent lamps near the receiver and test remote operation at the proposed position before mounting.
- Set upside-down projection with Screen Settings > Ceiling Projection On; Off is for table top.
- No mounting screw dimensions or vertical projection permission is inferred.
Monitor out端子の利用について
Instructions from the manualUse MONITOR OUT4 steps
Japan-domestic XJ-UT351WN network WXGA model; main cover and current exact model listing.
- While on, Computer 1 sends COMPUTER IN 1 through MONITOR OUT; Computer 2 sends COMPUTER IN 2.
- For Video, S-Video, HDMI 1/2, File Viewer, CASIO USB Tool or Network it continues the later-selected Computer 1/2 input, e.g.
- Computer 1→S-Video keeps IN 1.
- Standby can output only COMPUTER IN 1 when Standby RGB/Audio is enabled; IN 2 cannot output in standby.
投映距離と投映サイズについて
Instructions from the manualProjection-distance and geometry reference3 steps
Japan-domestic XJ-UT351WN network WXGA model; main cover and current exact model listing.
- Approximate WXGA installation guides: screen inches/diagonal cm/Lcm/hcm: 50/127/6/24; 60/152/13/27; 80/203/27/32; 100/254/40/38; 110/279/47/40.
- L is measured from the product front to the projection surface; h from product bottom to picture bottom.
- Use only the WXGA branch for XJ-UT351WN.
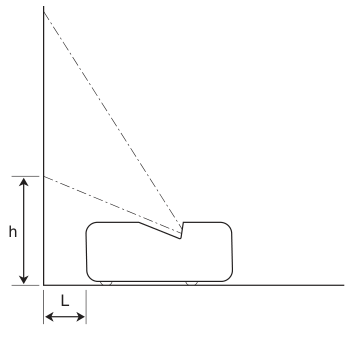
Diagram key
- h: Height from the product bottom to the picture bottom, shown by the complete vertical two-ended arrow.
- L: Distance from the product front to the projection surface, shown by the complete horizontal two-ended arrow. Approximate screen inches/L cm/h cm: 50/6/24; 60/13/27; 80/27/32; 100/40/38; 110/47/40.
プロジェクターのrs-232c制御について
Instructions from the manualRS-232C connection and protocol10 steps
Japan-domestic XJ-UT351WN network WXGA model; main cover and current exact model listing.
- Connect computer and SERIAL with a commercial cross serial cable.
- Use 19200 bps, 8 data bits, no parity, 1 stop bit, no flow control.
- Commands use ASCII and decimal integers.
- Read format (COMMAND?) returns (setting-range, current-value); write (COMMAND value).
- Example (VOL?) returns (0-30, 15); (VOL 0) mutes.
- Unrecognized command returns?; unsupported setting values are ignored.
- Wait for the previous command or body/remote key operation to complete before sending the next.
- While off send only PWR?, LMP? or PWR 1.
- BLK and ARZ require a valid input signal.
- Only model-supported commands/values apply.
コマンド一覧
Instructions from the manualRS-232C picture and audio command values13 steps
Japan-domestic XJ-UT351WN network WXGA model; main cover and current exact model listing.
- PWR 0/1 Off/On.
- SRC 0 RGB1, 1 Component1, 2 Video, 3 RGB2, 4 Component2, 6 Auto1, 7 HDMI1, 8 Network, 9 S-Video, 10 Auto2, 11 File Viewer, 13 CASIO USB Tool, 14 HDMI2.
- AIS 1 AUDIO IN1, 2 AUDIO IN2, 3 AUDIO IN R/L, 4 HDMI1 audio, 5 HDMI2 audio, 6 Viewer audio, 7 Network audio.
- BLK 0/1 blank; VOL 0–30 mute–max; VLP/VLM raise/lower by sent amount; MUT 0/1 mute.
- PST 1 Graphics, 2 Theater, 3 Standard, 4 Blackboard, 5 Natural.
- ARZ 0 Standard for RGB/HDMI-PC, 2 Standard for Component/HDMI-DTV/Video/S-Video; 1=16:9, 3 Letterbox, 4 Full, 5 Real, 6=4:3, 7=16:10 subject to source-supported choices.
- LMP reads cumulative light hours.
- PMD 0 Bright, 1 Normal (only Light Control Off); 2 brightness sensor On; 3–9 Light Output 7, 6, 5, 4, 3, 2, 1.
- FRZ 0/1 Freeze.
- KST 0–120 is vertical keystone (GUI−60..60); KSP/KSM increment/decrement by amount.
- HKS 0–120 horizontal keystone (GUI−60..60); HKP/HKM increment/decrement by amount.
- MIC 0–3 microphone level.
- Audio adjustment applies to the current source.
RS-232C key, status and installation commands6 steps
Japan-domestic XJ-UT351WN network WXGA model; main cover and current exact model listing.
- KEY values correspond to the remote key operations and must follow the same operation order: 1 Up, 2 Down, 3 Left, 4 Right, 5 ENTER, 6 ESC, 10 FUNC, 11 MENU, 12 POWER, 13 AUTO, 14 INPUT, 15 TIMER, 16 ASPECT, 17 BLANK, 18 FREEZE, 19 printed light-control key, 20 KEYSTONE+, 21 KEYSTONE−, 22 D-ZOOM+, 23 D-ZOOM−, 24 VOLUME+, 25 VOLUME−.
- KEY 26 Play, 27 Rewind, 28 Forward, 29 Previous, 30 Next operate media as the corresponding remote keys.
- POS 0 top-up/front, 1 top-down/rear, 2 top-up/rear, 3 top-down/front; these implement Projection Method/Ceiling Projection.
- APO 0 Off, 1=5 min, 2=10 min, 3=15 min, 4=20 min, 5=30 min.
- STS queries error status: 0 normal, 1 fan, 2 temperature, 7 light, 16 other; these are serial query values, not display codes.
- IDS 0 All, 1–4 corresponding projector ID.
仕様
Instructions from the manualVerified specifications and environment7 steps
Japan-domestic XJ-UT351WN network WXGA model; main cover and current exact model listing.
- XJ-UT351WN: 1-chip DLP, 0.65-inch WXGA 1280×800, 16:10; fixed zoom/manual focus F 2.3/f 4.2; laser/LED; 50–110 inch images; 3500 lm, 20000:1 under Light Control Off Bright/JIS X 6911:2015 conditions, not a guarantee of every unit.
- Native 1280×800; maximum compressed RGB/HDMI 1920×1200, component 1920×1080.
- Horizontal 15–91 kHz, vertical 50–85 Hz; 16 W mono speaker.
- Operate 5–35°C, 20–80 percent humidity without condensation, altitude 0–3000 m with High Altitude On at 1500–3000 m.
- Japan 100 V AC 50/60 Hz.
- Light Control On output 7=185 W, output 1=105 W; Off Bright 225 W, Off Normal 200 W; standby 0.12 W with Remote On disabled, 1.9 W enabled.
- Approx 338 mm width×333 mm depth×153 mm thickness including protrusions, 5.7 kg; dimensions/weight exclude cable cover.
ネットワーク機能の利用に必要なソフトウェアについて
Instructions from the manualPrepare network projection software5 steps
- Download the appropriate Network Connection for Windows or Mac from CASIO.
- Before installing check its current operating environment, download/use conditions and precautions on the manufacturer download page; follow that page’s installation instructions.
- This guide describes Windows Network Connection operations.
- Other equipment/software uses its own applicable operating instructions.
- Do not substitute the newer C-Connection interface.
プロジェクターに無線アダプターを接続する
Instructions from the manualConnect optional wireless adapter for network projection6 steps
- Connect the model-specified optional YW-40 to USB-A.
- With Plug and Play On the Network input and LAN standby screen appear automatically.
- Otherwise press INPUT repeatedly to Network, ENTER.
- Built-in Easy Connection SSIDs work only with Windows Network Connection and use WPA-PSK AES.
- General built-in SSIDs ask for a passphrase and use WPA-PSK AES; casiolpj0101 is default.
- User SSIDs require creation first.
プロジェクターとパソコンを直接無線lan接続する
Instructions from the manualConnect directly by wireless LAN20 steps
- Connect wireless adapter and turn on.
- INPUT > Network, ENTER shows LAN standby.
- For an existing user SSID skip built-in selection and go to the computer steps.
- For built-ins MENU > Network Settings > Projector Wireless LAN Settings > SSID.
- Choose an Easy SSID casiolpj0001/0002/0003/0004 or General casiolpj0101/0102/0103/0104.
- ESC twice to Network Settings; Down to Update Network Settings, ENTER; Up selects Yes, ENTER.
- Wait for LAN standby.
- Assign distinct SSIDs to nearby projectors.
- Start Network Connection.
- Cancel any Set Network Location dialog.
- If none found check adapter connection, projector power and LAN standby screen, then Reconnect.
- If several found choose the intended SSID and OK.
- Easy SSID: enter a username of at most 12 characters and the current four-digit login code at the upper-left of the projection screen, then OK.
- General SSID: enter username and matching passphrase in both Passphrase/WEP Key and Confirmation: casiolpj0101→casiolpj01, 0102→casiolpj02, 0103→casiolpj03, 0104→casiolpj04.
- OK; enter current projected login code and OK.
- User SSID: enter username and chosen passphrase in both fields, OK; enter current projected login code and OK.
- The code changes at each projector start; check anew for every connection.
- After connection the main PC screen projects.
- General/user passphrases are remembered for the same PC/projector if SSID is unchanged.
- Login-code requirement can be changed in the reviewed administration settings.
プロジェクターとパソコンを直接無線lan接続したままプロジェ クターを無線lanアクセスポイントに接続するには
Instructions from the manualRelay a direct wireless connection through an external access point17 steps
- First establish direct wireless projection.
- External network requires a DHCP server; available services depend on the access point/router.
- Open Network Connection function menu > Administration Screen.
- In the browser choose Projector Administration, enter its password(initial admin), Login.
- Select Network Settings; only change the indicated connection items.
- Select Obtain IP Address Automatically and DHCP Automatic.
- Under External Access Point choose Enabled, then Scan Access Points.
- Select the desired SSID; the list includes detected access points and up to eight recent ones.
- For manual SSID choose Keyboard Input and type it.
- Enter the external access point’s passphrase/WEP key if required.
- Characters are masked; clear Hide Characters to inspect them.
- Apply saves.
- With correct credentials, connection usually takes one to several minutes.
- On remote MENU > Network Settings > Wireless LAN Information, inspect External AP Connection State.
- Connected confirms success; if Disconnected repeat from the beginning.
- An external DHCP server assigns a new projector IP after connection.
- Subsequently selecting Network automatically reconnects to the same access point if within range and settings remain unchanged.
プロジェクターとパソコンを直接無線lan接続したままプロジェ クターをルーターに有線lan接続するには
Instructions from the manualRelay direct wireless projection through a wired router2 steps
- Establish direct wireless PC/projector connection, then connect projector to the external router by LAN cable; STP is recommended.
- The external network must run DHCP; accessible services depend on the router.
無線lanアクセスポイント経由でプロジェクターとパソコン を接続する
Instructions from the manualConfigure projection through an existing access point11 steps
- Both PC and projector connect through the existing access point/network with DHCP available.
- Follow the external access-point connection setup, but replace its DHCP Automatic selection with Access Point Function Disabled.
- Applying the changes disconnects a direct wireless PC/projector link.
- For projection the PC must already be connected to that access point, wirelessly or by LAN.
- If PC is wired, turn its wireless function off.
- The projector must have completed access-point setup, be in range, and settings must remain unchanged.
- Connect projector adapter, turn on and select INPUT > Network, ENTER.
- Start Network Connection on PC; cancel Set Network Location if shown.
- If multiple projectors appear select its IP, shown as Server IP at lower-left of standby, then OK.
- Enter current four-digit login code from upper-left of standby, OK.
- PC main screen projects; login-code requirement may be changed in administration settings.
プロジェクターとパソコンを直接lanケーブルで接続し投映する
Instructions from the manualProject through a direct LAN cable8 steps
- Connect PC and projector by LAN cable, STP recommended.
- INPUT > Network, ENTER.
- Check Server IP at lower-left of standby; this example assumes default 192.168.100.10.
- Set PC to obtain its IP automatically.
- If manually setting PC address use 192.168.100.1–9 or 11–254, excluding projector .10.
- Start Network Connection; cancel Set Network Location if shown.
- Enter current upper-left four-digit login code and OK; PC main screen projects.
- Login-code requirement may be changed in administration settings.
ルーター経由でプロジェクターとパソコンを有線lan接続し投映 する
Instructions from the manualProject over a wired DHCP router8 steps
- A DHCP server must run on the network and PC must already be connected by LAN to the router.
- Connect projector by LAN to that same router; STP recommended.
- MENU > Network Settings > Projector Wired LAN Settings.
- Left sets IP Settings Automatic.
- ESC returns; Update Network Settings, ENTER.
- Up selects Yes in confirmation, ENTER.
- Start Network Connection on PC, cancel Set Network Location if shown; if multiple projectors select its projected Server IP and OK.
- Enter the current four-digit projected login code and OK.
プロジェクターの設定メニューを使う
Instructions from the manualInspect wired and wireless network information4 steps
- MENU > Network Settings > Wired LAN Information, ENTER shows projector name(initially last six MAC digits), wired MAC, IP and DHCP Automatic/Disabled.
- Name can be changed in browser control panel.
- Wireless LAN Information shows SSID, adapter MAC, IP, DHCP and encryption.
- When External AP is enabled it also shows external SSID(or No Connection) and Connected/Disconnected state.
Change built-in SSID at the projector4 steps
- After a user SSID exists the projector menu cannot change SSID.
- MENU > Network Settings > Projector Wireless LAN Settings > SSID, ENTER.
- Select built-in SSID with Up/Down, ENTER.
- ESC back to Network Settings; Down selects Update Network Settings, ENTER; Up selects Yes, ENTER.
Reset projector network settingsView
プロジェクター管理ページへのログイン
Instructions from the manualLog in to administration over wireless LAN4 steps
- Establish direct wireless PC/projector connection.
- Open Network Connection function menu > Administration Screen.
- In browser select Projector Administration, enter password(initial admin), Login.
- System Status appears.
Open administration through wired LAN14 steps
- Choose one connection method: direct automatic PC address; direct manually assigned PC address; or a router with DHCP, to which PC is already wired.
- Use STP LAN cable where possible.
- For direct connection connect PC/projector.
- MENU > Network Settings > Projector Wired LAN Settings; Right selects Manual.
- ESC to Network Settings; Update Network Settings, ENTER; Up selects Yes, ENTER.
- PC automatic-IP mode then receives an appropriate address from the projector.
- For manual PC addressing perform the same projector steps, then set first three octets equal to projector and fourth to a different number 1–254.
- For projector 192.168.100.10 use 192.168.100.1–9 or 11–254.
- For router method connect projector to PC’s router; MENU > Network Settings > Projector Wired LAN Settings; Left selects Automatic.
- ESC, Update Network Settings, ENTER, Up Yes, ENTER.
- INPUT > Network, ENTER.
- Read Server IP.
- In PC browser open http:// followed by that IP.
- Projector Administration > password(initial admin) > Login.
プロジェクター管理ページを使った各種操作
Instructions from the manualInspect network administration status3 steps
- After administration login click System Status.
- It shows firmware version, IP/subnet/default gateway, wired and adapter MACs, projection standby/projecting status, projected user count and current login code.
- Logout at upper-right returns to CASIO Projector home.
Change browser control-panel network settings11 steps
- Log in and select Control Panel.
- Changes apply only within one group at a time: group 1 Projector Name/Login Code; group 2 User Name Display/Remote On/PJLink Authentication/IEEE802.11n/Channel Width.
- Name allows at most 16 alphanumeric characters, no symbols.
- Login Code On requires entry, Off does not.
- User Name Display On/Off shows/hides projecting user name.
- Remote On Enabled permits wired-LAN wake from standby, Disabled prevents it.
- PJLink authentication and IEEE802.11n may be enabled/disabled.
- Channel Width is fixed 20 MHz or Automatic.
- Change only group 1 or group 2.
- Click Apply below Login Code for group 1 or below Channel Width for group 2.
- Confirm OK only when ready to restart: applying restarts projector and disconnects PC LAN link.
Change browser network addresses and radio settings10 steps
- Log in > Network Settings.
- For automatic IP select Obtain IP Address Automatically.
- For manual choose Use Following IP Address, fill projector IP(default 192.168.100.10), subnet(default 255.255.255.0) and gateway(default 192.168.100.10).
- DHCP Automatic assigns client addresses; optional start/end fourth octets may be 11–254, with other octets fixed.
- DHCP Disabled does not assign addresses.
- Access Point Function Enabled permits wireless clients; Disabled prevents them.
- SSID Broadcast Enabled/Disabled controls broadcast.
- Channel may be 1–11 or Auto.
- External Access Point Enabled requires the reviewed external AP settings; Disabled prevents that external connection.
- Apply opens restart confirmation; OK applies and restarts projector, disconnecting LAN.
Change administration login passwordView
Create a user SSID9 steps
- After login select Network Settings.
- Enter SSID suffix up to 23 alphanumeric characters; complete SSID is casiolpj0 plus suffix.
- Do not use 001,002,003,004,101,102,103,104, which collide with built-ins.
- Select Security WPA-PSK AES, WPA2-PSK AES or Disable(no encryption).
- Disable skips passphrase entry.
- Otherwise enter 8–63 alphanumeric characters or exactly 64 hexadecimal digits as Passphrase/WEP Key.
- Clear Hide Characters to inspect; remember the passphrase for subsequent wireless login.
- Apply creates and activates the SSID.
- A wireless PC/projector connection disconnects and projection returns to LAN standby.
Reset all administration settingsView
Configure Crestron controller connectionView
Lan接続でプロジェクターをリモート操作する
Instructions from the manualControl projector through LAN and read network status categories10 steps
- Log in to administration, select Control Panel.
- Refresh updates displayed information.
- Projector State shows On/Standby.
- Error Information categories are No Error, Temperature Error, Fan Error, Light Error or Other Error; these identify category only and supply no additional remedy.
- Follow applicable reviewed main-manual fault instructions.
- Power Off shuts down; Power On works only with Remote On enabled.
- Available controls depend on model: input, colour mode, blank On/Off, aspect, brightness and contrast numeric fields plus Apply, light-control/off-mode selection, volume number plus Apply, audio mute, Speaker/Line audio output, current-source audio input and projector ID.
- Initialize returns all panel items except Projector State to factory defaults.
- Logout finishes.
- Supported external commands: all PJLink Class 1 version 1.00, Crestron controllers/RoomView and AMX Device Discovery.
Viewer controlページを表示する
Instructions from the manualControl File Viewer from a wired browser8 steps
- Viewer Control is available only over wired LAN.
- Establish a reviewed wired connection, select Network and read Server IP, open http:// plus IP in browser.
- Click Viewer Control on the left; projector displays File Viewer main screen.
- Start Viewer starts projection.
- Buttons below it duplicate the corresponding remote keys only during File Viewer projection.
- Use the reviewed File Viewer instructions for their actions.
- Upper-left CASIO Projector or EXIT returns to browser home.
- EXIT does not stop a running File Viewer projection.
各種機器からの無線lan接続による投映について
Instructions from the manualProject from Mac OS or C-Assist devices4 steps
- For Mac Network Connection select a General SSID(casiolpj0101–0104) or a user SSID at the projector, start Mac Network Connection and log in.
- Check manufacturer operating-environment guidance because OS versions can limit functions.
- For Android/iOS, this guide describes C-Assist installation and login with a General/user SSID for projecting images and remotely controlling the connected PC.
- Check the applicable software download/operating guide; no current OS/store compatibility is asserted.
Network connectionウィンドウ
Instructions from the manualUse Network Connection projection buttons7 steps
- First establish LAN projection using the reviewed Network Function Guide.
- This guide uses Windows screenshots; Mac may differ.
- One-screen Projection displays PC full screen.
- Four divided buttons 1–4 put PC image in upper-left, upper-right, lower-left or lower-right quarter respectively.
- Pause toggles projected freeze without freezing the PC.
- Stop ends projection, Exit closes Network Connection.
- Video Streaming projects a movie while PC retains its desktop.
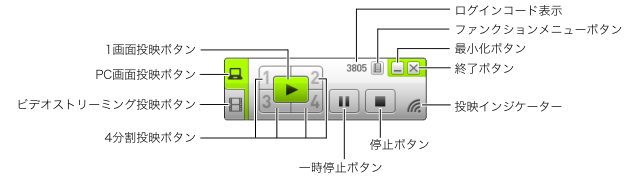
Diagram key
- One-screen Projection: Project PC full-screen.
- PC Screen Projection: Return from movie streaming to ordinary PC-screen projection.
- Video Streaming: Select network movie-streaming mode.
- Four divided-screen buttons1–4: Project PC in upper-left1,upper-right2,lower-left3 or lower-right4 quarter.
- Pause: Freeze/unfreeze the projected PC image.
- Login-code display: Shows current login code.
- Function menu: Opens the menu for projection, audio, administration and other reviewed functions.
- Minimize: Minimize the software window.
- Exit: Close Network Connection.
- Projection indicator: Indicates current projection state.
- Stop: End PC projection.
Network connectionのファンクションメニュー操作
Instructions from the manualパソコンの音声をプロジェクターのスピーカーから出力する
Instructions from the manualRoute PC audio and install required extra drivers8 steps
- During network PC-screen projection select function menu > Audio Output to check it.
- Audio comes from projector and PC speakers mute.
- Select again to uncheck and restore PC speakers.
- Each Network Connection start leaves Audio Output unchecked.
- Extended display requires VDD driver on Windows 8/8.1/10 or Syphon-Virtual-Screen on Mac.
- Mac audio requires Sound Flower.
- Get drivers from CASIO; Mac installation asks whether to install the two extras: choose Yes to use these functions, Skip leaves them unavailable.
- These are the guide’s historical OS conditions.
ビデオストリーミング投映を行う
Instructions from the manualStream a movie over the network7 steps
- Supported AVI: max 20 Mbps 720/30P MJPEG/ADPCM; MOV: max 20 Mbps 1080/30P H.264 with ADPCM/AAC; MP4: max 20 Mbps 1080/30P H.264/AAC.
- Click Video Streaming, then File Select.
- Choose supported movie and Open; it starts full-screen while PC desktop remains visible locally.
- Stop ends playback.
- Play restarts the same stopped file from beginning.
- PC Screen Projection returns to ordinary projection.
- Streaming always uses full projector screen, cannot use quarter-screen, and movie audio always outputs from projector.
スマートデバイスからパソコンをリモート操作する(pcリモート)
Instructions from the manualStart or stop PC Remote with C-Assist7 steps
- Install applicable C-Assist on the smart device.
- Establish direct wireless PC/projector connection using reviewed guide.
- Start C-Assist, log in to projector and enter PC Remote standby.
- On PC open Network Connection function menu > PC Remote to check it.
- Device touch screen shows PC screen and enables mouse/touch-keyboard input/editing.
- Operate as needed.
- To stop uncheck PC Remote in the PC function menu.
その他のnetwork connection操作
Instructions from the manualDisconnect and search another projector3 steps
- Select Server Search in Network Connection function menu.
- Current wireless link disconnects; projector returns to LAN standby.
- Repeat reviewed direct wireless connection for the desired projector.
Erase Network Connection remembered passphrases4 steps
- Windows only: function menu > Initialize.
- OK confirms reset; Cancel abandons it.
- Restart Network Connection.
- This disconnects wireless link; reconnect using the reviewed direct-wireless procedure.
トークンウィザードを使う(windows版のみ)
Instructions from the manualCreate and use a Windows USB token9 steps
- Windows Token Wizard copies Network Connection to USB for PCs without installation.
- It creates root autorun.inf; an existing file is renamed with .bak or a three-digit suffix(.001,.002,etc.).
- USB volume name becomes USB Token and its icon changes.
- Open function menu > Token Wizard, Next.
- If USB is not detected connect it and wait for its drive name.
- With multiple drives select intended target from USB Drive dropdown.
- Next installs; on successful completion click Finish.
- To use token connect it to PC and double-click its Network Connection icon.
- Remaining connection steps match installed Network Connection.
はじめに
Instructions from the manualCheck firmware version and update requirements6 steps
- Check the official CASIO support page for firmware for this exact projector and note its version.
- While projecting, press MENU, select Information with Up/Down and read Version.
- Update is possible only if the published version is newer.
- The guide lists Windows 8, Windows 7 SP1, Vista SP2 and XP SP3 (32-bit), on a compatible PC with its preinstalled listed OS, Pentium M 1.6 GHz or higher plus OS-recommended CPU/memory, full-colour display at least 1024 × 768, keyboard and pointing device.
- It does not establish support for newer operating systems.
- Obtain a suitable USB cable, USB DRIVER for CASIO Projector, CASIO Projector Flash Loader and the exact model’s .cpr firmware from official support.
Prepare user-logo transfer software and image6 steps
- The generic guide lists possible startup/blank/no-signal uses; this model’s operation guide confirms blank/no-signal Logo settings.
- Obtain USB DRIVER for CASIO Projector, CASIO Projector LOGO Loader, model-specific .cph header and the image from the official support service.
- Use a USB cable matching the LOGO MicroUSB TypeB port.
- Published environment: Windows 8 / 7 SP1 / Vista SP2/XP SP3 (32-bit), preinstalled IBM PC/AT-compatible computer, Pentium M 1.6 GHz or higher and the OS-recommended CPU, OS-recommended memory, full-colour 1024×768 or higher display, keyboard and pointer.
- These are historic guide requirements, not a claim of current support.
- Use RGB 24-bit full-colour BMP, 640×480 through 1280×800; 1280×800 matches this model’s native resolution.
Usbドライバーをインストールするには
Instructions from the manualInstall the firmware USB driver6 steps
- Install the driver before USB-connecting the projector.
- Otherwise the PC cannot recognise it or transfer data.
- If connected prematurely, unplug the PC USB cable, install the driver and reconnect.
- Download USB DRIVER for CASIO Projector from official support and double-click PjUsbDriverSetup_EN.exe.
- Follow its dialogs.
- For User Account Control choose Yes on Windows 7/8 or Allow on Vista; on the illustrated XP prompt choose Continue.
Install the user-logo USB driver before connection4 steps
- Before USB connection download USB DRIVER for CASIO Projector.
- Run PjUsbDriverSetup_EN.exe and follow dialogs.
- Windows 7/8: choose Yes at UAC; Vista: Allow; XP: Continue at its warning.
- If USB was connected first, unplug USB, install the driver, then reconnect; without the driver transfer cannot work.
プロジェクターのファームウェアを更新するには
Instructions from the manualUpdate the projector firmware14 steps
- On the update PC, download the Flash Loader and exact-model firmware ZIPs from official support.
- Extract both into the same folder.
- Unplug the projector power cord from the outlet.
- Connect the computer USB port to the projector’s firmware/ROM-update USB port with a suitable cable; for XJ-UT351WN this is the Micro-USB LOGO terminal documented in the operation guide.
- Connect the projector power cord to the outlet and turn on.
- POWER flashes orange in the guide’s one-second-on/one-second-off pattern.
- Close all running PC applications.
- Double-click PjFlashLoader_EN.exe.
- Click Choose, select the exact .cpr firmware in the Open dialog, then Open.
- Click Upload.
- During transfer the projector POWER indicator goes out and the PC progress bar shows progress; on completion a dialog appears and POWER flashes orange.
- Never turn off the projector or PC, or disconnect USB, during data transfer.
- After completion click OK, then the window’s upper-right X to close the Flash Loader.
- Remove the USB cable from both projector and PC, then unplug the projector power cord from the outlet.
プロジェクターにユーザーロゴを転送するには
Instructions from the manualTransfer the user-logo image18 steps
- Transfer erases the previously stored logo.
- Download LOGO Loader and exact-model header ZIP files; extract both to the same computer folder.
- Put the chosen BMP there.
- Unplug projector mains if connected.
- Connect computer USB to the LOGO firmware/ROM-update port.
- Plug mains in and power on; POWER flashes orange 1 second on / 1 second off.
- Close all computer applications.
- Run PjLogoLoader_EN.exe.
- Click upper Choose, select exact-model .cph and Open.
- Check LOGO Header File Format: OK.
- If absent, obtain an uncorrupted exact-model header and repeat from upper Choose.
- Click lower Choose, select image and Open.
- Check Image File Format: OK.
- If absent use a BMP meeting the complete requirements and repeat from lower Choose.
- Click Upload.
- During transfer POWER goes off and progress appears; completion shows a dialog and POWER resumes orange flashing.
- Never interrupt either power supply or unplug USB during transfer.
- Click OK, close LOGO Loader with its top-right close control, remove USB from both devices, then unplug projector mains.
Xj-ut331x/xj-ut311wn/xj-ut351w/xj-ut351wn
Instructions from the manualSupported source timings6 steps
- RGB (VESA): 640×480 at 60/72/75/85 Hz; 800×600 at 56/60/72/75/85 Hz; 1024×768 at 60/70/75/85 Hz; 1152×864/75; 1280×720/60; 1280×768/60; 1280×800/60; 1280×960/60; 1280×1024 at 60/75/85; 1366×768/60; 1400×1050/60; 1440×900/60; 1600×1200/60; 1680×1050/60; 1920×1080/60; 1920×1200 RB/60.
- Component HDTV: 1080 p 50/60,720 p 50/60, 1080 i 50/60.
- Component SDTV: 576 p 50,576 i 50,480 p 60,480 i 60.
- HDMI: 640×480/60,800×600/60, 1024×768/60, 1280×720/60, 1280×768/60, 1280×800/60, 1280×960/60, 1280×1024/60, 1400×1050/60, 1920×1080/60, 1920×1200 RB/60; SDTV 480 p, 576 p; HDTV 720 p 50/60, 1080 i 50/60, 1080 p 50/60.
- Video: NTSC, NTSC 4.43, PAL, PAL-M, PAL-N, PAL 60, SECAM.
- Native XJ-UT351WN projection remains 1280×800.
Controls and parts
See the manual diagrams 1 diagram
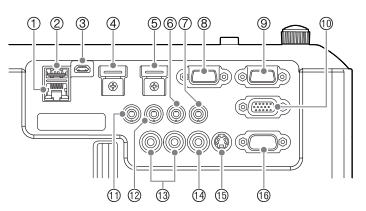
Diagram key
- 1: LAN RJ-45 port; network models only.
- 2: USB-A 5 V/2 A host and power port on XJ-UT351WN. The shared source’s power-only DC port belongs to XJ-UT331X/XJ-UT351W.
- 3: LOGO Micro-USB Type B port for firmware updates and user-logo transfer.
- 4: HDMI 2, provided on XJ-UT351W and XJ-UT351WN.
- 5: HDMI 1.
- 6: AUDIO IN 1.
- 7: AUDIO IN 2.
- 8: MONITOR OUT analogue RGB output.
- 9: COMPUTER IN 1.
- 10: COMPUTER IN 2.
- 11: MIC input; plug-in-power microphones unsupported.
- 12: AUDIO OUT.
- 13: AUDIO IN R/L.
- 14: VIDEO composite input.
- 15: S-VIDEO input.
- 16: SERIAL RS-232C control.
Model details
Model and compatibility
- Native resolution
- WXGA 1280×800,16:10,0.65-inch DLP; fixed zoom/manual focus F2.3/f4.2. [1]
- Power supply
- 100 V AC,50/60 Hz; Japan only. [1]
- Environment
- 5–35°C;20–80% non-condensing humidity;0–3000 m altitude. [1]
- Size and mass
- Approximately338×333×153 mm including projections,5.7 kg; excluding cable cover. [1]
- Network and USB
- LAN RJ-45 and one USB-A host/power port5 V/2 A. Wireless requires optional YW-40. [1]
- Speaker
- 16 W mono; plug-in-power microphones unsupported. [1]