MODEL REFERENCE
CASIO XJ-V10X
17 errors · 16 troubleshooting topics · 60 guides

The checks and guides below come from the official manuals for this model.
No matches for this wording. Try a light name, error code or a shorter phrase.
Errors and indicators
Light patterns and messages documented in the manualFind the indicator lights
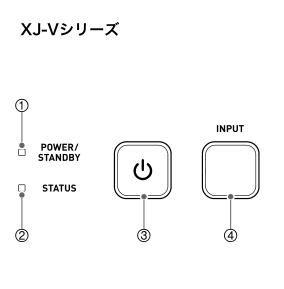
Diagram key
- 1: POWER/STANDBY indicator; interpret its colour and steady/flashing state using the reviewed table.
- 2: STATUS indicator; interpret it together with POWER/STANDBY.
- 3: ON/Stand-by power key; turn projector power on or off.
- 4: INPUT key; select the input source.
入力信号がありませんno input signal message
- If 入力信号がありません appears, no input signal was detected.
- Check the source is powered and operating normally, and select the correct source with INPUT.
- For a component source, some equipment may not project correctly; the table supplies no further individual remedy.
パスワードが正しくありません。password entries do not match
- When confirming a changed password, パスワードが正しくありません。 means the re-entered sequence did not match.
- Press ESC and repeat from the new-password entry step.
POWER steady green / STATUS green if Light Control Onhigh internal temperature warning
- POWER steady green / STATUS green if Light Control On.
- Wait for fans to stop before unplugging after an error; press ESC to dismiss a warning.
- The interior is extremely hot.
- Check for blocked intake/exhaust and sufficient surrounding space.
- If the vents are dusty, turn off and clean them; unplug and cool sufficiently before cleaning.
POWER green to steady red / STATUS unspecifiedoverheating automatic shutdown
- POWER green to steady red / STATUS unspecified.
- Wait for fans to stop before unplugging after an error; press ESC to dismiss a warning.
- Extreme internal heat has shut power off.
- Check vent obstruction/clearance and clean dusty vents, with power unplugged and sufficiently cooled.
- If these checks reveal no problem, wait until POWER/STANDBY is steady red, then turn on again.
- If restarting produces the error again, contact the repair enquiry service or dealer.
POWER steady red / STATUS flashing orange approximately 0.5-second cyclefan fault automatic shutdown
- POWER steady red / STATUS flashing orange approximately 0.5-second cycle.
- Wait for fans to stop before unplugging after an error; press ESC to dismiss a warning.
- A fan fault shut power off.
- Confirm POWER/STANDBY has become steady red and fans have stopped.
- Unplug from the projector; after the indicators go out, wait a while, reconnect and turn on.
- If restarting produces the error again, contact the repair enquiry service or dealer.
POWER steady red / STATUS not specifiedsystem fault automatic shutdown
- POWER steady red / STATUS not specified.
- Wait for fans to stop before unplugging after an error; press ESC to dismiss a warning.
- A system fault automatically shut power off.
- Confirm steady-red POWER/STANDBY, unplug the projector cord, wait a while after the indicators go out, reconnect and turn on.
- If the error recurs, contact the dealer or repair enquiry service.
POWER steady red / STATUS steady redexternal-noise malfunction shutdown
- POWER steady red / STATUS steady red.
- Wait for fans to stop before unplugging after an error; press ESC to dismiss a warning.
- External noise or another factor may have caused automatic shutdown.
- Confirm steady-red POWER/STANDBY, unplug from the projector, wait a while after indicators go out, reconnect and turn on.
- If restarting produces the error again, contact the repair enquiry service or dealer.
POWER steady red / STATUS flashing red approximately 0.5-second cyclelight-source failure shutdown
- POWER steady red / STATUS flashing red approximately 0.5-second cycle.
- Wait for fans to stop before unplugging after an error; press ESC to dismiss a warning.
- The light source went out or failed to light, shutting the projector off.
- Confirm steady-red POWER/STANDBY, disconnect the power cord once, wait a while, reconnect and turn on.
- If restarting produces the error again, contact the repair enquiry service or dealer.
POWER steady red / STATUS flashing red approximately 2-second or 1-second cycleinternal-memory error shutdown
- POWER steady red / STATUS flashing red approximately 2-second or 1-second cycle.
- Wait for fans to stop before unplugging after an error; press ESC to dismiss a warning.
- An internal-memory error shut power off.
- Confirm steady-red POWER/STANDBY, unplug from the projector, wait a while after indicators go out, reconnect and turn on.
- If restarting produces the error again, contact the repair enquiry service or dealer.
STS 1serial status 1 — fan error
- RS-232C STS read value 1 means fan error.
- Consult the matching complete warning/indicator table; for an unresolved problem contact the repair enquiry service or dealer.
- The serial table gives no separate component repair.
STS 2serial status 2 — temperature error
- RS-232C STS read value 2 means temperature error.
- Consult the matching complete warning/indicator table; for an unresolved problem contact the repair enquiry service or dealer.
- The serial table gives no separate component repair.
STS 7serial status 7 — light-source error
- RS-232C STS read value 7 means light-source error.
- Consult the matching complete warning/indicator table; for an unresolved problem contact the repair enquiry service or dealer.
- The serial table gives no separate component repair.
STS 16serial status 16 — other error
- RS-232C STS read value 16 means other error.
- Consult the matching complete warning/indicator table; for an unresolved problem contact the repair enquiry service or dealer.
- The serial table gives no separate component repair.
ID-01firmware file-format problem
There is a problem with the file format. Re-download the exact projector’s firmware from official support and repeat the update procedure.
ID-02no firmware USB connection3 checks
ID-03firmware version is not newer
This is not a new ROM version. The attempted firmware is the same or older than the installed version; install newer firmware data.
ID-04firmware belongs to another model
This ROM data is for a different model. Use the correct exact-model firmware data.
Troubleshooting
Find the problem you are experiencingMissing image dots are not necessarily a faultView
The setup guide notes that some non-illuminating image dots can occur despite the manufacturing technology; this is not a fault.
Image discolouration after impact4 steps
- Avoid impact during projection.
- If an impact interrupts the picture and changes colours, select the previously projected source again with INPUT on the projector or remote.
- If colours do not recover, turn off and on again.
- For an error, follow the operation guide’s error table.
Blur after condensation3 steps
- Sudden cold-to-warm movement or rapid room heating can cause condensation on the lens or inside.
- Turn off, leave it for a while, then turn on again.
- The guide specifies no fixed wait time.
The projector does not turn on2 checks
- POWER/STANDBY unlit
- Connect the power cord correctly.
- POWER/STANDBY steady red with STATUS red/orange steady or flashing
- An error has occurred; check the complete error-indicator table.
No picture or incorrect projection3 checks
- Connected computer/video source off or not outputting normally
- Confirm it is on and operating normally.
- Incorrect source selected
- Choose the source matching the connected equipment.
- Video component output connected to COMPUTER
- Some source devices may not project correctly through this connection; the row supplies no further remedy.
Colours or display severely displaced1 check
- COMPUTER input incorrectly set to Component for RGB or RGB for component
- Set Input Settings > COMPUTER Terminal to Auto.
No sound from AUDIO OUT3 checks
- Projector volume low or muted
- Adjust with remote VOLUME +/−.
- Connected device quiet or not outputting
- Adjust that device’s volume.
- Device audio output not connected correctly to AUDIO IN
- Check the connection.
Incorrect picture colours1 check
- Signal and settings do not match
- Use FUNC > Brightness, FUNC > Color Mode, or Image Adjustment 1 > Color Balance to adjust the picture.
Blurred text3 checks
- Focus incorrect
- Adjust focus.
- Frequency/phase do not match RGB input
- For RGB only, press AUTO for automatic adjustment.
- RGB frequency/phase need adjustment
- For RGB only, adjust Image Adjustment 2 > Frequency and Phase.
Cannot pass the password prompt1 check
- Device Settings 1 > Password enabled
- Enter the correct password and press ENTER.
Remote control does not work2 checks
- Batteries exhausted
- Replace them.
- Outside operating range
- Operate within approximately five metres.
Red power light with red or orange status light1 check
- POWER/STANDBY red and STATUS red/orange steady or flashing
- An error has occurred; consult the complete error table.
Light-source unit no longer lights2 checks
- BLANK has temporarily switched off the light source
- Press BLANK or ESC to restore it.
- Light-source life exhausted or unit failed
- Ask the repair application service or dealer to replace it.
Unexpected automatic restart2 checks
- Rare self-check restart
- The guide describes this as normal; continue use.
- Repeated consecutive restarts
- Treat this as a possible fault and contact repair enquiry service or dealer.
General recovery when operation remains abnormal4 steps
- Disconnect the power cord and leave it for at least ten minutes.
- Reconnect the cord and turn on.
- If operation is not restored, contact the repair enquiry service or dealer.
- For an error, observe the fan-stop precaution before unplugging.
Guides
安全上のご注意
Instructions from the manualStop for smoke, unusual smell or abnormal heat4 steps
- Use adult supervision where children can approach or touch the projector.
- If smoke, an unusual smell or abnormal heat occurs, stop using it: continued use risks fire or electric shock.
- Unplug the power plug from the outlet.
- Contact the repair enquiry service or the dealer.
Stop for malfunction, water ingress or impact damage8 steps
- Do not continue using a malfunctioning projector even when operated according to the manual.
- If water, liquid or foreign objects enter, or it is dropped or damaged, stop using it.
- Turn off power.
- Unplug from the outlet.
- Contact the repair enquiry service or dealer.
- Keep water and liquid containers away.
- Do not disassemble or modify the projector: internal high voltage risks shock, burns and injury, and modification voids warranty/repair eligibility.
- Ask the repair service or dealer for internal inspection, adjustment and repair.
Japan-only model and mains connection12 steps
- This reference covers Japan-domestic XJ-V10X in the Japanese MA2107-H setup and MA2008-F operation guides.
- The setup guide prohibits using this domestic unit overseas.
- Use its specified 100 V AC, 50/60 Hz supply; international electrical variants are outside this reference.
- Use the supplied power cord only with this projector.
- Use the specified, grounded 100 V AC outlet in Japan.
- Connect earth before plugging into the outlet; disconnect earth only after unplugging.
- Keep the plug accessible and free of objects.
- Avoid overloaded multi-plug wiring and sharing the outlet with other equipment.
- If using an extension cord, observe its current rating.
- Do not use the cord bundled, near heaters, or covered by rugs; do not trap it in racks or walls, load it, heat it, modify, cut, bend forcibly, twist or pull it.
- Never handle the cord or plug with wet hands.
- When leaving, keep animals away and unplug the cord: chewing can cause a short circuit and fire.
Safe placement, ventilation and projection light19 steps
- Use a firm, flat, stable surface; keep at least 30 cm from walls, with unobstructed intake and exhaust.
- Do not use in a confined space, cover with cloth, place on carpets, bedding, towels or soft seats, or stand it vertically.
- Lock cart wheels when using a cart.
- Operate at 5–35 °C.
- Avoid vibration, moisture, dust, cooking fumes, heaters, heated carpets, direct sun, unstable stands/high shelves, and wet locations such as bathrooms.
- Do not put heavy objects on it or stand on it.
- Never throw it into fire.
- Do not look into the illuminated lens, intake or exhaust.
- Before switching on, check that nobody is looking into them.
- Do not put magnifying glasses, mirrors or other refracting/reflecting objects in the projection beam.
- Supervise children.
- Do not touch or obstruct the hot exhaust.
- Keep heat-sensitive plastic and similar objects away and do not place them underneath.
- Do not open the cabinet.
- Before care, turn off and unplug.
- Do not touch the power plug during a thunderstorm.
- Do not place a fish tank or other lens-like object, or any object blocking light, in front of the operating lens; fire can result.
- Do not touch the projection lens or put foreign objects inside.
- Do not use flammable-gas sprays inside or around the projector.
Power-cord care and safe movement8 steps
- Unplug by holding the plug, not pulling the cable.
- Insert the plug fully.
- Unplug after use or during long non-use.
- At least once a year, unplug and remove dust from plug blades and their surrounding area with a dry cloth or vacuum.
- Do not use detergent on the cord, especially its plug.
- Before moving the projector, turn off and remove its power cord.
- The exhaust and surrounding area remain hot during operation and immediately after shutdown: carry it by both sides as illustrated, avoiding that hot area.
- Keep a separate written record of important stored settings; malfunction or repair may erase them.
Remote and battery safety12 steps
- Do not disassemble or modify the remote; have the repair service or dealer inspect, adjust or repair it.
- Keep it away from water.
- Use only the specified batteries.
- Do not disassemble, short-circuit, heat, burn or charge them.
- Do not mix old/new batteries or different types.
- Insert with correct polarity.
- Remove exhausted batteries immediately and remove them for long non-use.
- If alkaline-battery fluid enters an eye, do not rub: immediately rinse with clean water and obtain medical treatment.
- Dispose of batteries according to local rules.
- Replace remote batteries at least once yearly regardless of use frequency.
- Do not leave exhausted batteries installed, because leaking can damage it.
- Avoid unapproved replacement types, incineration, crushing, cutting, extreme high/low temperature during use/storage/transport and extremely low air pressure: these can cause explosion or flammable liquid/gas leakage.
Magnets, annual internal cleaning and disposal7 steps
- The projector contains magnets.
- People using pacemakers or other medical electrical equipment should keep it away from their equipment.
- If an abnormality is felt, move away immediately and consult a doctor.
- Keep magnetic recording media such as floppy disks, magnetic cards/tapes, prepaid cards and tickets away to avoid erasure.
- Arrange paid internal cleaning with the repair service or dealer once yearly; accumulated internal dust can reduce brightness or cause fire/failure.
- The guide especially recommends cleaning before the humid rainy season.
- Dispose of the projector without dismantling it, following local authority rules.
光源ユニットについて
Instructions from the manualLight-source life and laser precautions9 steps
- The laser/LED light-source life is approximately 20,000 hours, varying with the individual unit, use and menu settings.
- Its warranty ends at the earlier of the product warranty period or 6,000 hours.
- If it no longer lights or becomes markedly dim, ask the repair service or dealer to replace the light-source unit.
- Never dismantle or modify the projector.
- The label marked Except for USA states Class 1, IEC 60825-1:2014.
- The separate USA label states Class 2, IEC 60825-1:2007; it does not change this Japan-domestic unit’s use restriction.
- Do not use procedures or adjustments outside the manual, because hazardous laser exposure may result.
- The projection-light warning is Risk Group 2 under IEC62471.
- Do not look into the beam or start power while looking into the lens from the front.
その他のご注意
Instructions from the manualStorage, environment and handling precautions7 steps
- Avoid static-prone locations, extreme temperatures, high humidity, abrupt temperature changes, dust, unstable/tilted surfaces, water, oil fumes, smoke, salt damage.
- Use within 5–35 °C.
- Keep strong fluorescent light and direct sunlight off the remote receiver to avoid malfunction.
- Do not put heavy objects, water containers or foreign objects on/in it; do not stand on it.
- Avoid trapping hands underneath during installation or underside adjustment.
- Continuous operation such as 24-hour use, or ignoring the installation conditions, can result in chargeable repair even during warranty.
- High temperature, dust, oil fumes or tobacco smoke may shorten optical-engine replacement intervals; ask the repair enquiry service about replacement timing and cost.
使用上のご注意
Instructions from the manualRoutine cleaning and image quality precautions7 steps
- Clean regularly with a dry, soft cloth; for severe dirt use a well-wrung cloth with neutral detergent.
- Do not use thinner, benzine or other volatile solvents, which may erase markings or stain the case.
- Clean lens gently without excessive pressure or scratches.
- Vacuum intake dust carefully about once a month; clean exhaust similarly when dusty.
- Accumulated intake dust can cause excessive internal heat and failure.
- Keystone correction compresses the image and may reduce quality.
- Move toward the illustrated square-on setup to minimise correction; for best quality use a placement requiring no keystone correction and cancel it.
各部の名称
Instructions from the manualProjector controls and terminals6 steps
- The XJ-V-series branch identifies POWER/STANDBY and STATUS indicators, ON/Stand-by power and INPUT keys.
- The shared exterior identifies two exhaust labels, two intake labels, projection lens, focus ring, zoom ring, remote receiver and control/indicator panel.
- XJ-F cursor/ENTER/MENU/ESC/brightness-sensor controls do not apply.
- The XJ-V-series rear branch identifies the security lock hole, SERIAL, COMPUTER, HDMI, AUDIO OUT/AUDIO IN, SERVICE, rear remote receiver and power inlet.
- The lock hole accepts a security chain or similar attachment; the source refers to Kensington information.
- XJ-F network, logo, USB-power, microphone and video connectors are excluded.
クイックガイド
Instructions from the manualQuick-start setup and shutdown16 steps
- Install the two AAA alkaline remote batteries with correct polarity.
- Place the projector on a firm desk or stand with enough space; read all safety, use and placement precautions.
- Press the release button and extend the front foot.
- Adjust height and release the button to lock it.
- If necessary turn the adjustable rear foot for side-to-side tilt: only one rear foot adjusts, approximately ±3 mm.
- Its click-stop position indicates approximately the same height as the other rear foot.
- Use the supplied power cord to connect the projector to the specified Japan outlet.
- Connect the source device and turn that device on.
- Press the projector power key.
- On first start choose a language in the initial-language screen.
- Press INPUT to choose the source.
- Use the zoom ring for image size, then the focus ring for focus.
- For XJ-V10X use the remote Left/Right keys for light output, then KEYSTONE +/− for vertical correction.
- The projector-body arrow instructions apply only to XJ-F models.
- To finish projecting, press the power key to turn off.
- If operation is abnormal, consult the operation guide troubleshooting.
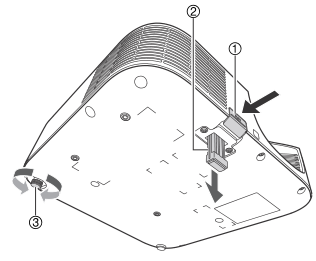
Diagram key
- 1: Press the release button to extend the front foot; the complete upper arrow shows the button press.
- 2: Adjust front-foot height, then release the button to lock it at that position; the downward arrow shows extension.
- 3: If needed turn the adjustable rear foot to fine-tune left/right tilt. Only one rear foot adjusts, approximately ±3mm. The click-stop position indicates roughly the same height as the other rear foot; both rotation arrows are retained.
仕様
Instructions from the manualJapan XJ-V10X specifications and limits14 steps
- The XJ-V10X column specifies single-chip DLP, 0.55-inch 4:3 XGA with 1024 × 768 pixels, manual 1.5× optical zoom/focus, F2.31–2.73 / f18.9–27.2 and laser/LED light source.
- Image range is 30–300 inches; approximate distances are 1.95–2.87 m at 60 inches and 3.33–4.85 m at 100 inches, minimum 0.93 m at 30 inches.
- XJ-V10X brightness is 3300 lm and full-white/full-black contrast 20,000:1 under Light Control Off Bright and the source measurement conditions.
- XJ-V100W/V110W and all XJ-F columns are excluded.
- Native RGB projection is 1024 × 768; compressed RGB and HDMI support is up to 1920 × 1200, and analogue component up to 1920 × 1080/1080p.
- Horizontal scanning is 15–91 kHz and vertical 50–85 Hz.
- Use the complete signal timing rows and their limitations.
- Connections are one 15-pin mini D-sub COMPUTER RGB/shared analogue component input; one HDCP/audio-capable HDMI Type A input; one stereo mini audio input and output; Micro-USB Type B for firmware; RS-232C D-sub nine-pin control.
- There is no built-in speaker; AUDIO OUT feeds amplified external speakers.
- Operate at 5–35 °C, 20–80% non-condensing humidity and 0–3000 m altitude.
- Japan supply is 100 V AC, 50/60 Hz.
- XJ-V10X power is 145 W at Light Control On output7, 75 W at output1, 180 W Off Bright, 155 W Off Normal; standby0.12 W.
- Dimensions including projections are approximately 299 × 299 × 97 mm; XJ-V10X mass is approximately3.5 kg.
- Specifications may change with improvements.
設置する
Instructions from the manualPlace and connect the projector7 steps
- Use a sturdy desk or stand with sufficient space, square to the screen.
- Keep the power plug reachable and no objects within 30 cm, especially around intake/exhaust.
- If air-conditioning directs exhaust heat near the lens and makes the picture waver, change airflow direction or projector position.
- Connect mains with the supplied cord.
- Connect computer RGB using the RGB cable or computer/video HDMI using a High Speed HDMI cable.
- XJ-V10X has a single HDMI input.
- Use the component, RS-232C and firmware sections for their supported connections.
リモコンについて
Instructions from the manualUse the remote control4 steps
- Point its emitter toward the projector receiver and operate within approximately five metres.
- Power switches on/off; ESC closes menus or cancels; arrows move/select or adjust values, and ENTER confirms or executes.
- Use each labelled function button as described in the relevant operation section.
- During storage avoid pressing buttons, which consumes the batteries.
リモコンに電池を入れるには
Instructions from the manualInstall or replace remote batteries5 steps
- Use alkaline batteries.
- Open the rear battery cover.
- Insert new batteries with the marked +/− polarity, then close the cover.
- For replacement, open in the same way and exchange the old batteries for new ones.
- The setup guide specifies two AAA batteries and its complete battery warnings apply.
入力ソースを切り替えるには
Instructions from the manualSelect the input source7 steps
- XJ-V10X offers Computer for RGB/analogue component with AUDIO IN, and HDMI for digital image/audio.
- XJ-F and network-source entries do not apply.
- Press INPUT.
- In the input dialog use INPUT, Up or Down to select the source and press ENTER.
- Even without ENTER, selection takes effect after about three seconds.
- The source name appears briefly at upper right.
- If no input signal is detected, the message 入力信号がありません (no input signal) appears.
解像度について
Instructions from the manualMatch the computer to native resolution2 steps
- The projector is fixed at XGA 1024 × 768.
- If a different computer output makes images coarse, text unclear or moiré patterns visible, set the computer output to match the projector’s native resolution; consult the computer instructions.
手動で台形補正するには(keystone)
Instructions from the manualCorrect vertical keystone manually3 steps
- The projector automatically detects vertical tilt and corrects the trapezoidal picture.
- If automatic correction is insufficient, press remote KEYSTONE + or − for manual correction.
- XJ-F body-arrow controls do not apply to XJ-V10X.
投映中の映像の一部を拡大するには(d-zoom)
Instructions from the manualMagnify and pan part of the picture4 steps
- Press D-ZOOM + to enlarge the centre by one step.
- Press + again to enlarge or − to reduce; holding a key changes magnification continuously.
- While enlarged, use Up/Down/Left/Right to scroll.
- Press ESC to leave enlargement.
入力ソースからの映像と音声を一時的に遮断するには(blank)
Instructions from the manualBlank picture and audioView
Press BLANK: the source image is replaced by the selected blank-screen setting and source audio is blocked. Press BLANK again or ESC to restore both.
映像を静止させるには(freeze)
Instructions from the manualFreeze the pictureView
Press FREEZE to hold the current source image. Press FREEZE again or ESC to return to the source picture.
映像を自動調整するには(auto)
Instructions from the manualAutomatically adjust RGB frequency and phaseView
With Computer (RGB) selected, press AUTO to automatically adjust frequency and phase to the input signal; this may reduce flicker. This operation is available for RGB input only.
投映画面の縦横比(アスペクト比)を切り替えるには(aspect)
Instructions from the manualChange image aspect ratio7 steps
- Press ASPECT to cycle: RGB or HDMI (PC) offers Normal → Full → 16:9 → 16:10; component or HDMI (DTV) offers Normal → 16:9 → 16:10 → 4:3.
- The Screen Settings aspect item also changes it.
- Normal preserves input proportions at the largest available size.
- Full fills the available projection area by enlargement/reduction.
- 16:9 suits film/high-definition and restores a 16:9 image squeezed into 4:3; 16:10 fits that screen; 4:3 forces 4:3 regardless of input.
- Changing enlargement/reduction for commercial or public viewing may infringe the image copyright holder’s rights.
- The manual’s illustration table shows the source-specific results.
映像の明るさを調節するには(func)
Instructions from the manualAdjust image brightness4 steps
- Press FUNC, choose 明るさ (Brightness), ENTER.
- Use Left/Right to adjust.
- Press ESC to close.
- This fine-tunes image brightness without changing the light-source output; use Light Control for light-source brightness.
映像に適した色調(カラーモード)を選ぶには(func)
Instructions from the manualChoose a colour mode6 steps
- Press FUNC, select カラーモード (Color Mode), ENTER.
- The mark identifies the current mode.
- Use Up/Down to choose, ENTER to confirm, ESC to close.
- Modes are Standard, Graphics, Theatre, Blackboard and Natural.
- Standard defaults for RGB/HDMI PC, Theatre for component/HDMI DTV.
- Colour-mode selection is unavailable when Light Control is Off.
音量を調整するには
Instructions from the manualAdjust AUDIO OUT volume3 steps
- Press VOLUME + or − to display volume.
- Press + to raise or − to lower AUDIO OUT level, then ESC.
- Audio entering HDMI or AUDIO IN leaves through AUDIO OUT; connect amplified speakers there for external sound.
消音(ミュート)するには
Instructions from the manualMute and restore audioView
Press VOLUME + or − to show volume, then ENTER to mute output. Press VOLUME + or − to restore it.
ライトコントロールのオン/オフを切り替えるには
Instructions from the manualEnable or disable Light Control8 steps
- Light Control On is the default and allows seven light-output levels.
- Off uses maximum light-source brightness and prevents changing the light-output level; XJ-F brightness sensing does not apply.
- Press MENU.
- Select 機器設定1 (Device Settings1) with Down and ENTER.
- Select ライトコントロール (Light Control) with Down and ENTER.
- In the dialog select ライトコントロール with Down, then Left/Right to choose On or Off.
- Press ESC to close.
- For Light Control Off, Image Adjustment1 > Light Control Off Mode offers Bright (brightness first) or Normal (colour first; default).
ライト出力を調節するには
Instructions from the manualAdjust the light-output level7 steps
- With no menu/dialog displayed, press remote Left or Right.
- Left reduces light output by one; Right raises it by one.
- The dialog displays current output1–7.
- Press Left/Right again for further adjustment.
- Press ESC to end and close; after approximately five seconds without a key action it closes automatically.
- This operation is unavailable when Light Control is Off.
- XJ-V10X has no XJ-F ambient brightness sensor.
節電レベルを確認するには
Instructions from the manualCheck the power-saving level5 steps
- Press the remote leaf-symbol Light Control key to show its dialog.
- The top row shows the current power-saving level; more leaf symbols mean more saving.
- Use Left/Right here to adjust light output if needed.
- Press ESC to close.
- This operation is unavailable when Light Control is Off.

Diagram key
- Leaf-symbol key: Press this remote key to show the Light Control dialog and current power-saving level; use Left/Right to adjust if needed and ESC to close. Light Control must be On.
プレゼンテーションタイマーを使う(timer)
Instructions from the manualDisplay and configure the presentation timer9 steps
- If the timer is hidden, press TIMER once to show it.
- It disappears after about five seconds when Continuous Display is Off.
- To open the timer function menu, press TIMER twice when hidden or once when visible.
- Use Up/Down to choose Display Position, Continuous Display or Start Time, then Left/Right to change.
- Position options are lower right (default), upper right, upper left or lower left.
- Continuous On leaves it visible until another dialog or ESC; Off (default) hides it after five seconds.
- Countdown time is 5–60 minutes in five-minute increments, default 20 minutes.
- Press ESC to save/close.
- To start immediately with the changed settings, select Timer Start with Up/Down and press ENTER before ESC.
計時を開始するには
Instructions from the manualStart presentation countdown4 steps
- Open the timer function menu.
- Select タイマー開始 and press ENTER.
- The menu disappears and countdown begins.
- At 00:00 it counts upward for 60 minutes, from −00:01 to −60:00, with red time text.
計時を一時停止するには
Instructions from the manualPause presentation countdownView
Open the timer function menu. Select タイマー一時停止 and press ENTER.
一時停止中の計時を再開するには
Instructions from the manualResume presentation countdownView
Open the timer function menu. Select タイマー再開 and press ENTER.
タイマーをリセットするには
Instructions from the manualReset presentation countdownView
Open the timer function menu. Select タイマーリセット and press ENTER. The timer returns to its configured countdown time.
設定メニューの基本操作
Instructions from the manual設定メニュー項目一覧
Instructions from the manualDevice settings, altitude, information and resets15 steps
- Automatic Keystone On (default) adjusts to installation angle; Off disables it.
- When Ceiling Projection is On, Automatic Keystone cannot be selected and is always disabled.
- For RGB, Auto Adjustment On (default) automatically identifies resolution/frequency and adjusts the image.
- Choose Off to preserve manually changed vertical/horizontal position, frequency and phase at the next power-on.
- Auto Power Off offers5/10(default)/15/20/30 minutes without key operation/input signal, or Off.
- Device Settings1 also includes Light Control, Password, Direct Power On (automatic startup on mains connection; default Off), Language and that menu initialization for the current source.
- Languages are English, French, German, Italian, Spanish, Swedish, Portuguese, Dutch, Norwegian, Polish, Finnish, Czech, Turkish, Russian, Lithuanian, Vietnamese, Thai, Malay, Indonesian, Arabic, simplified/traditional Chinese, Korean and Japanese.
- Device Settings2 > High Altitude Mode is On at1500–3000 m for increased fan cooling, Off(default) below1500 m.
- Never use above3000 m.
- Device Settings2 also opens Timer Function and resets that menu for the current source.
- XJ-F and network-specific options are absent.
- Information shows input signal/name, resolution, horizontal/vertical frequency, scanning system, light-use hours and ROM Version.
- All Initialization shows cumulative unit hours, which cannot be reset.
- All Initialization resets all menu settings except Language, Password, Light Use Time, Version and Unit Use Time.
- XJ-V10X does not support user-logo transfer.
パスワード機能のご利用にあたり
Instructions from the manualPassword precautions and forgotten-password assistance7 steps
- Use Device Settings 1 > Password to register/change a password or require it at power-on.
- It deters unauthorised use, not theft.
- Change the factory password promptly; keep the remote and working batteries because password entry needs them.
- Keep a safe written password record.
- If forgotten, bring both identification (employee ID/driving licence; copy accepted) and the projector to the repair enquiry service for paid unlocking.
- Without both items it cannot be unlocked; retain the warranty document.
- Service unlocking resets settings to factory defaults except light-use time.
パスワードを変更するには
Instructions from the manualChange the password12 steps
- Press MENU.
- Select 機器設定1 (Device Settings 1) with Down, ENTER; select パスワード (Password) with Down, ENTER.
- Enter the current remote-key sequence.
- If still at factory setting, enter Up, Down, Left, Right, Up, Down, Left, Right.
- These are button presses, not typed characters.
- Press ENTER.
- Select パスワード変更 (Change Password) with Down and ENTER.
- Enter a new sequence of at most eight key presses.
- Permitted keys are INPUT, MENU, BLANK, FREEZE, the leaf-symbol Light Control key, VOLUME +/−, D-ZOOM +/−, KEYSTONE +/−, Up, Down, Left, Right, TIMER, AUTO, ASPECT and FUNC.
- Press ENTER, then enter the same new sequence again and ENTER.
- On the successful-registration message press ESC.
- If パスワードが正しくありません。 (password incorrect) appears because the two new entries differ, press ESC and repeat from the new-sequence entry.
電源を入れた直後のパスワード保護設定を切り替えるには
Instructions from the manualEnable or disable power-on password protection4 steps
- Follow password-change steps 1–5 to open the Power On Password settings.
- Confirm パワーオンパスワード is selected, then Left/Right to choose On or Off.
- When changing Off to On, confirm with ENTER to require a password on startup or ESC to cancel the change.
- Press MENU to finish.
本機外部のクリーニング
Instructions from the manualClean the case3 steps
- Before cleaning, unplug and let the projector dissipate heat sufficiently.
- Wipe the exterior with a soft cloth soaked in dilute neutral detergent and wrung out firmly.
- Never use benzine, alcohol, thinner or other such chemicals.
レンズのクリーニング
Instructions from the manualClean the lensView
Before cleaning, unplug and let it dissipate heat sufficiently. Use commercially available eyeglass cloth or cleaning paper; do not apply excessive force or scratch the lens.
吸気口などのクリーニング
Instructions from the manualVacuum intake and exhaust vents4 steps
- Before cleaning, unplug and let it dissipate heat sufficiently.
- Carefully vacuum intake dust periodically, about once a month, as illustrated.
- Dust accumulation can overheat the interior and cause failure.
- If exhaust vents accumulate dust in the operating environment, clean them similarly.
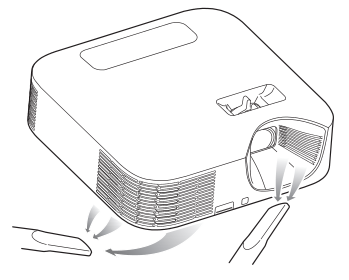
Diagram key
- Left nozzle and arrows: Carefully vacuum the illustrated front-left intake, about monthly.
- Right nozzle and arrows: Carefully vacuum the illustrated lens-side intake, about monthly. Accumulated intake dust can overheat the projector; clean dusty exhaust similarly when needed.
インジケーター表示について
Instructions from the manualInterpret normal indicator states6 steps
- POWER/STANDBY steady red means connected standby, flashing green startup warm-up, steady green normal power-on, flashing red internal processing immediately after shutdown.
- STATUS steady green means Light Control On; steady/flashing red or orange means some error.
- Immediately after mains connection both indicators light orange.
- For errors, wait until fans stop before unplugging.
- Unplugging while a fan runs and reconnecting may prevent recovery.
- Press ESC to dismiss a warning message.
コンポーネントビデオ出力との接続
Instructions from the manualConnect analogue component video and audio4 steps
- Use analogue component outputs Y/Cb/Cr or Y/Pb/Pr; digital component output is unsupported.
- Connect the component cable to COMPUTER and match green–Y, blue–Cb/Pb, red–Cr/Pr at the source.
- For source audio use the illustrated stereo mini-plug to RCA cable to AUDIO IN, matching the red/white source audio outputs.
- AUDIO OUT can feed amplified speakers.
ファームウェアを更新/ユーザーロゴを転送するには
Instructions from the manualConnect the firmware service USB port3 steps
- For XJ-V10X firmware updating, connect the SERVICE Micro-USB Type B port to a computer USB port with a suitable commercially available USB cable.
- Follow the complete separate firmware-update guide.
- User-logo transfer and the LOGO port apply only to XJ-F models.
本機を天井から吊して設置する
Instructions from the manualCeiling installation precautions9 steps
- For ceiling suspension the manual permits an upside-down projector or a lens pointing directly downward; ask the dealer for details.
- Keep at least one metre, and as far as possible, from fire detectors/alarms to prevent exhaust-triggered false alarms.
- This does not authorize standing the unit vertically on a surface, which the setup guide prohibits.
- Do not install near fluorescent lamps or strong light, which can prevent remote operation or reduce its range.
- Test remote operation at the planned position before installation.
- Set Screen Settings > Ceiling Projection for the upside-down picture.
- Use double-SEMS screws with washer and spring washer, diameter M4.
- Total screw length is washer/spring-washer thickness plus bracket thickness plus 5–8 mm engagement.
- Too long can damage the inside; too short cannot hold securely.
投映距離と投映サイズについて
Instructions from the manualProjection-distance and geometry reference4 steps
- Distances are approximate installation guides. h is the lens-centre-to-picture-bottom height.
- Use the XJ-V10X/XJ-F10X/XJ-F20XN column; other models’ distances do not apply.
- Screen inches / diagonal cm / shortest–longest metres / h centimetres:30/76/0.93–1.38/0;40/102/1.27–1.88/0;60/152/1.95–2.87/0;77/196/2.54–3.72/0;80/203/2.64–3.86/0;100/254/3.33–4.85/0;150/381/5.04–7.33/0;200/508/6.76–9.82/0;300/762/10.18–14.78/0.
- The35-inch row is not specified for XJ-V10X.
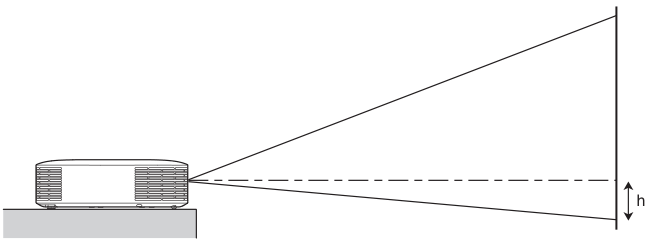
Diagram key
- h: Height from the projector lens centre to the projected picture bottom. The complete distance table gives h=0cm for the specified XJ-V10X rows; values and distances are approximate installation guides.
表示可能な信号について
Instructions from the manualSupported source timing reference8 steps
- These are the complete printed applicable signal rows.
- Even listed signals may fail with some source equipment.
- Native XJ-V10X output remains1024×768.
- Rows below are name:horizontal kHz/vertical Hz.
- The name640×480/72 has a printed vertical value73; preserve the name and measured value without inventing a correction.
- RGB: 640×480/60: 31.5/60; 640×480/72: 37.9/73; 640×480/75: 37.5/75; 640×480/85: 43.3/85; 800×600/56: 35.2/56; 800×600/60: 37.9/60; 800×600/72: 48.1/72; 800×600/75: 46.9/75; 800×600/85: 53.7/85; 1024×768/60: 48.4/60; 1024×768/70: 56.5/70; 1024×768/75: 60.0/75; 1024×768/85: 68.7/85; 1152×864/75: 67.5/75; 1280×720/60: 45.0/60; 1280×768/60: 47.8/60; 1280×800/60: 49.7/60; 1280×960/60: 60.0/60; 1280×1024/60: 64.0/60; 1280×1024/75: 80.0/75; 1280×1024/85: 91.1/85; 1366×768/60: 47.7/60; 1400×1050/60: 65.3/60; 1440×900/60: 55.9/60; 1600×1200/60: 75.0/60; 1680×1050/60: 65.3/60; 1920×1080/60: 67.5/60; 1920×1200RB/60: 74.0/60.
- Analogue component: 1080p/50: 56.3/50; 1080p/60: 67.5/60; 720p/50: 37.5/50; 720p/60: 45.0/60; 1080i/50: 28.1/50; 1080i/60: 33.7/60; 576p/50: 31.3/50; 576i/50: 16.6/50; 480p/60: 31.5/60; 480i/60: 15.7/60.
- HDMI: 640×480/60: 31.5/60; 800×600/60: 37.9/60; 1024×768/60: 48.4/60; 1280×720/60: 45.0/60; 1280×768/60: 47.8/60; 1280×800/60: 49.7/60; 1280×960/60: 60/60; 1280×1024/60: 64/60; 1400×1050/60: 65.3/60; 1920×1080/60: 67.5/60; 1920×1200RB/60: 74.0/60; 480p: 31.5/60; 576p: 31.25/50; 720p50: 37.5/50; 720p60: 45/60; 1080i50: 28.13/50; 1080i60: 33.75/60; 1080p50: 56.25/50; 1080p60: 67.5/60.
本機とコンピューターをシリアル接続するには
Instructions from the manualConnect RS-232C serial controlView
Connect the projector SERIAL terminal to the computer serial terminal with a commercially available cross-type serial cable, using the illustrated D-sub nine-pin female cable ends.
制御コマンドを使う
Instructions from the manualRS-232C communication and command syntax9 steps
- Set the computer serial port to 19200 bps, eight data bits, no parity, one stop bit and no flow control.
- Use ASCII commands and decimal integers.
- Reading uses (command?) and returns (allowed range,current setting); for example (VOL?) returns (0-30,15).
- Writing uses (command value); for example (VOL0) sets volume to zero.
- Unrecognised commands return ?.
- Out-of-range values are ignored.
- Wait for each command to finish before sending another; also wait for a projector/remote key action to finish.
- While power is off, only power-status read, power-on write and light-use-time read are permitted.
- Blanking and aspect changes require a valid input signal.
コマンド一覧
Instructions from the manualRS-232C settings command reference20 steps
- The original table marks R read and W write.
- PWR RW: 0 Off, 1 On.
- SRC RW: 0 COMPUTER/RGB, 1 COMPUTER/component, 6 COMPUTER/Auto, 7 HDMI.
- BLK RW: 0 Off, 1 On.
- VOL RW: 0–30 for the currently projected source.
- PST RW: 1 Graphics, 2 Theatre, 3 Standard, 4 Blackboard, 5 Natural.
- ARZ RW for RGB/HDMI PC: 0 Normal, 1 16:9, 4 Full, 7 16:10; for component/HDMI DTV: 1 16:9, 2 Normal, 6 4:3, 7 16:10.
- LMP R reads light-use hours.
- PMD RW: 0 Light Control Off Bright, 1 Light Control Off Normal, 3/4/5/6/7/8/9 Light Control On output levels 7/6/5/4/3/2/1.
- FRZ RW: 0 Off, 1 On.
- KST RW accepts 0–120, corresponding to menu keystone −60 through +60; 60 corresponds to zero and 65 to +5.
- KSP W and KSM W increase/decrease by one, with range 0–120.
- These menu-unit values do not establish projection-angle degrees.
- POS RW 0–3: 0 front/top-up, 1 rear ceiling/top-down, 2 rear/top-up, 3 front ceiling/top-down.
- APO RW: 0 disabled; 1/2/3/4/5 for 5/10/15/20/30 minutes.
- VLP W and VLM W increase/decrease volume by one within 0–30.
- MUT RW: 0 Off, 1 On.
- XJ-F/network-only SRC values2,8,9,11–14 and PMD2 do not apply.
- MIC commands are network-only.
- Preserve the source-dependent ARZ choices documented for the XJ-V10X branch; do not apply WXGA-only Real/Letterbox values.
RS-232C key and error-status commands6 steps
- KEY W simulates the listed button: 1 Up, 2 Down, 3 Left, 4 Right, 5 ENTER, 6 ESC, 10 FUNC, 11 MENU, 12 POWER, 13 AUTO, 14 INPUT, 15 TIMER, 16 ASPECT, 17 BLANK, 18 FREEZE, 19 leaf-symbol Light Control, 20 KEYSTONE +, 21 KEYSTONE −, 22 D-ZOOM +, 23 D-ZOOM −, 24 VOLUME +, 25 VOLUME −.
- STS R reads error status: 0 normal, 1 fan error, 2 temperature error, 7 light-source error, 16 other error.
- These are serial response values, not an inferred on-screen numeric display.
- The table supplies no separate component repair procedure.
- KEY26–30 playback commands are network-model-only and do not apply.
- Each supported KEY command acts exactly like its matching remote button; use the same sequence.
はじめに
Instructions from the manualCheck firmware version and update requirements6 steps
- Check the official CASIO support page for firmware for this exact projector and note its version.
- While projecting, press MENU, select Information with Up/Down and read Version.
- Update is possible only if the published version is newer.
- The guide lists Windows 8, Windows 7 SP1, Vista SP2 and XP SP3 (32-bit), on a compatible PC with its preinstalled listed OS, Pentium M 1.6 GHz or higher plus OS-recommended CPU/memory, full-colour display at least 1024 × 768, keyboard and pointing device.
- It does not establish support for newer operating systems.
- Obtain a suitable USB cable, USB DRIVER for CASIO Projector, CASIO Projector Flash Loader and the exact model’s .cpr firmware from official support.
Usbドライバーをインストールするには
Instructions from the manualInstall the firmware USB driver6 steps
- Install the driver before USB-connecting the projector.
- Otherwise the PC cannot recognise it or transfer data.
- If connected prematurely, unplug the PC USB cable, install the driver and reconnect.
- Download USB DRIVER for CASIO Projector from official support and double-click PjUsbDriverSetup_EN.exe.
- Follow its dialogs.
- For User Account Control choose Yes on Windows 7/8 or Allow on Vista; on the illustrated XP prompt choose Continue.
プロジェクターのファームウェアを更新するには
Instructions from the manualUpdate the projector firmware14 steps
- On the update PC, download the Flash Loader and exact-model firmware ZIPs from official support.
- Extract both into the same folder.
- Unplug the projector power cord from the outlet.
- Connect the computer USB port to the projector’s firmware/ROM-update USB port with a suitable cable; for XJ-V10X this is the Micro-USB SERVICE terminal documented in the operation guide.
- Connect the projector power cord to the outlet and turn on.
- POWER flashes orange in the guide’s one-second-on/one-second-off pattern.
- Close all running PC applications.
- Double-click PjFlashLoader_EN.exe.
- Click Choose, select the exact .cpr firmware in the Open dialog, then Open.
- Click Upload.
- During transfer the projector POWER indicator goes out and the PC progress bar shows progress; on completion a dialog appears and POWER flashes orange.
- Never turn off the projector or PC, or disconnect USB, during data transfer.
- After completion click OK, then the window’s upper-right X to close the Flash Loader.
- Remove the USB cable from both projector and PC, then unplug the projector power cord from the outlet.
Controls and parts
See the manual diagrams 2 diagrams
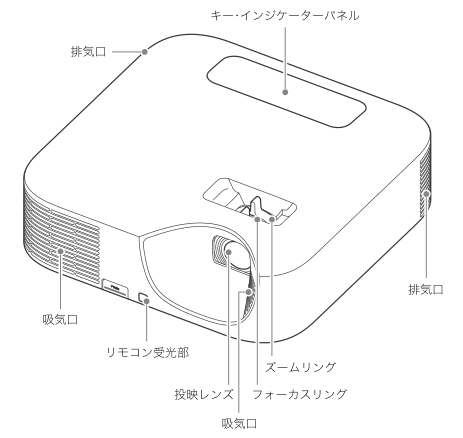
Diagram key
- Control/indicator panel: Top control and indicator panel; use the separate XJ-V-series panel diagram.
- Left upper exhaust: First printed exhaust callout, on the upper-left side of the drawing; keep it unobstructed and do not touch the hot exhaust.
- Right exhaust: Second printed exhaust callout, on the right side of the drawing; the same hot-exhaust precautions apply.
- Front-left intake: First printed intake callout at the front-left grille; keep it unobstructed and remove accumulated dust.
- Front remote receiver: Front remote-control receiver.
- Projection lens: Projection lens; do not look into it while illuminated or touch its surface.
- Focus ring: Manual focus ring; adjust picture sharpness.
- Zoom ring: Manual zoom ring; adjust projected picture size.
- Lens-side intake: Second printed intake callout beside the lens; the intake-clearing and cleaning precautions apply.
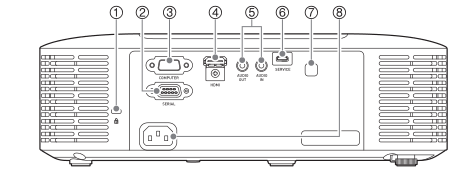
Diagram key
- 1: Security lock hole for a theft-prevention chain or similar attachment; the manual refers to Kensington information.
- 2: SERIAL terminal for RS-232C control.
- 3: COMPUTER terminal for computer RGB or analogue component input.
- 4: HDMI terminal for image/audio input.
- 5: AUDIO OUT and AUDIO IN terminals; both sockets belong to this printed grouped callout.
- 6: SERVICE terminal for firmware updates.
- 7: Rear remote-control receiver.
- 8: Power inlet; use the supplied cord and the specified Japan-domestic100V supply.
Model details
Model and compatibility
- Reference scope
- Japan-domestic XJ-V10X only; do not use this domestic unit overseas. International electrical, WXGA, XJ-F and network variants excluded.
- Power in Japan
- 100V AC,50/60Hz. XJ-V10X:145W at Light Control On output7;75W at output1;180W Off Bright;155W Off Normal.
- Native image and lens
- XGA1024×768,4:3; manual1.5× optical zoom/focus; laser/LED source;3300lm under the stated measurement conditions.
- Operating environment
- 5–35°C,20–80% non-condensing humidity; altitude0–3000m.
- Connections
- COMPUTER,HDMI,AUDIO IN/OUT,SERVICE and SERIAL; no network/video/microphone inputs.
- Size and mass
- Approximately299×299×97mm including projections; approximately3.5kg.