MODEL REFERENCE
CZUR Aura Pro
4 errors · 7 troubleshooting topics · 33 guides

The checks and guides below come from the official manuals for this model.
No matches for this wording. Try a light name, error code or a shorter phrase.
Error messages
Messages and indicator states from the manual —Serial number error message
Recheck every letter and number in the serial number; I and 1 may be mistaken for each other. The manual states that the S/N contains no digit 1.
—Mac: Looking for device
- If Scan cannot detect the device and shows Looking for device, try another USB port, reboot the device and restart the computer.
- If it still cannot be detected, contact customer service.
—Mac: Serial number verification fails
Reenter the correct serial number and confirm again. You cannot continue until verification succeeds.
—Mac: Batch operation requests target files
Select the target files on the right list before clicking a batch function and try again.
Troubleshooting
Find the problem you are experiencingTable lamp will not turn on; power indicator is off3 checks
- Power supply
- Check the outlet and proper adapter connection.
- Knob press duration
- Hold the knob for more than 1.5 seconds.
- Firmware update failure
- If a firmware update failed, contact CZUR customer support using the contact details at the end of the manual.
App voice control does not operate the lamp2 checks
- Phone audio
- Check whether the phone played the voice-control sound.
- Active mode
- Check that table lamp mode is active. If scanner mode is active, briefly press the knob to select lamp mode and retry.
Lamp brightness cannot be adjusted2 checks
- Smart night light mode
- Smart night light mode does not support app control or brightness adjustment.
- Brightness limit
- Check whether the lamp is already at its brightest or dimmest setting; it cannot increase beyond the maximum or decrease below the minimum.
Scanner will not turn on; power indicator is off2 checks
- Power supply
- Check the outlet and proper adapter connection.
- Firmware update failure
- If a firmware update failed, contact CZUR customer support using the contact details at the end of the manual.
CZUR Aura software cannot install or reports an error4 checks
- Supported software version
- The operation-guide edition lists XP/Windows 7/8/10/11 and some Mac versions; choose a compatible software release.
- Current Mac requirements are recorded separately from its software guide.
- Serial number
- Check that the serial number was entered correctly.
- Security software interference
- Check whether antivirus or a firewall blocks installation.
- The manual offers closing antivirus or trusting Aura software, and disabling the firewall or lowering its security setting.
- Incomplete download
- Confirm that the official software download completed before installing.
First startup has no image and cannot scan6 checks
- USB or application
- Reconnect USB or restart Aura, and restart CZUR Aura software.
- USB port
- Try a different computer USB port; port performance varies.
- Security software
- Close antivirus, security or other defensive background software.
- Device recognition
- In Device Manager check whether CZUR Aura is recognized.
- For a yellow exclamation mark or unknown device, update the driver or disable and reactivate the device; restart CZUR Aura and retry.
- Other imaging devices
- Disable other scanners, monitors and cameras in Device Manager and retry.
- Computer
- Restart the computer or try another computer.
Scanned image is distorted, curved or stretched3 checks
- Mat placement
- Align the mat notch with Aura and keep the entire preview within the black mat; see Pre-scanning preparations.
- Material outside preview
- Keep documents, books, files, sheets, notes, identification, cards or objects completely inside the preview area.
- Other objects
- Remove unrelated objects from the preview, such as USB cable, phone or pen; they affect the scan.
Guides
Product illustration
Instructions from the manualUse the knob and recognize the mode indicators5 steps
- Hold the knob for more than 1 second to switch device power on or off; briefly press it to change between scanner and lamp mode.
- Rotate left to dim or right to brighten.
- The scanner or lamp indicator identifies the active mode.
- The power indicator lights when the adapter supplies power.
- If operation is abnormal, hold RESET for 6 seconds to force power off and standby.
Connect the ports and use the foot pedal2 steps
- Connect the foot pedal to the Type A USB port, the computer to Type B USB, and the 9 V/1.5 A adapter to DC.
- For pedal scanning, keep your heel on the ground and press gently with your toes; this frees your hands to turn pages.
Read the preview and optional battery indicators6 steps
- The LCD provides the scanning preview, the USB connection-success symbol, and X/Y counts for images pending transfer and already transferred to the computer.
- Family variants with the optional battery show flashing LEDs while charging.
- Charge promptly when only one LED remains.
- One, two, three and four lit LEDs represent 25%,50%, 75% and 100% respectively.
- This optional battery instruction does not assert a battery in Aura Pro.
- The side-light interface and touch button are identified in the source figure.
Table lamp mode
Instructions from the manualStart the table lamp and adjust brightness9 steps
- Connect the adapter and hold the knob for more than 1 second.
- The default mode is the table lamp.
- Turn right for brighter light and left for dimmer light.
- Use the QR code to obtain the CZUR app, register and add Aura Pro lamp functions.
- Start the lamp with the knob before app control; when the device is powered off it does not respond to the app.
- In the app choose Natural light, Reading/Writing, Computer/Phone or Smart night light mode.
- The ordinary modes allow lamp on/off and brightness control; mode changes restore default brightness.
- Smart night light mode varies brightness automatically with ambient sound.
- It does not support app control or manual brightness adjustment.
Pre-scanning preparations
Instructions from the manualPrepare the scanner and install its software6 steps
- Connect the computer USB cable and the foot pedal to Aura.
- Align the black work-mat notch securely with the base and unfold the head to 90 degrees relative to the base.
- Connect the adapter, hold the knob for more than 1 second to turn on, and briefly press it again for scanner mode.
- At the official CZUR Support page select the matching product and install CZUR Aura software.
- Windows may be installed from the CD with automatic upgrade checks; Mac software must be downloaded from the official site.
- Open the application.
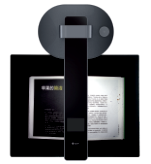
Position documents and books before scanning9 steps
- Check the top LCD preview: the black mat must cover the entire view without desktop or edges showing.
- The mat is required by image-processing algorithms.
- Avoid bright conditions or a nearby window; external light interferes with the laser and scan quality.
- For books focus all three laser lines on the curved pages.
- Wear the supplied finger cots when pressing a book so finger erasure can work.
- Keep documents still from pressing Scan until the laser switches off.
- Move or turn pages only after the laser is off.
- Use the pedal for easier scanning.
- Switch on the side lights for magazines, coated paper or other reflective material.
Function introduction
Instructions from the manualScan and adjust scanner-mode lighting5 steps
- Scanner mode starts with the LED at its brightest level.
- Turn right to brighten or left to dim through high, medium, low and off.
- In CZUR Aura click the lower-right scan icon, choose the appropriate color mode and processing method on the right, and start scanning.
- An inappropriate method affects the result.
- Consult the matching official software guide for application details.
After sales service and warranty
Instructions from the manualContact methods
Instructions from the manualContact CZUR support for firmware failuresView
For a failed firmware update, contact CZUR customer support. Obtain technical assistance from CZUR at support@czur.com or its official website.
Software startup
Instructions from the manualWindows: Software StartupView
After installation, start CZUR Aura; wait for the startup animation to finish to enter the scanner interface.
Mac: Software StartupView
Start CZUR Aura and choose Scanner from the startup window to open its main interface.
Batch
Instructions from the manualWindows: Batch20 steps
- Select the target images for batch processing.
- Color mode offers Auto Enhance, Color, B&W, Grayscale, Stamps, Patterns, Antiquarian and Non-filter.
- Rotate selected images left 90°, right 90°, vertically, horizontally or 180°; the default choice is left 90°.
- Quality adjusts contrast, sharpness and thickness in the preview; completion is reported after processing.
- For facing-page images, Overlapping Edge Cropping offers page-width cropping, hinge-line cropping and upper/lower edge clearing.
- Larger page-width values crop less width; larger hinge or upper/lower values crop more.
- A baseline dragged outside the preview applies to all selected images; inside applies only to the current image.
- Crop supports single or facing pages.
- Larger Crop N Pixels values remove more pixels; larger Keep N Pixels values preserve more pixels.
- Top, bottom, left and right edges may be cleared white or cut.
- Baseline scope follows the same inside/outside rule.
- Standardize configures background size, orientation, DPI, color, horizontal/vertical alignment and Match with BG: Unchanged, Maximize or Overspread.
- Rename selected files by rules and save copies in another folder.
- Blank page detection identifies suspected blank pages for selection and deletion.
- Holes filling previews repairs and accepts minimum/maximum radii from 20 to 80 pixels, default 20 minimum and 80 maximum.
- Confirm saves settings.
- Handwritten erase removes handwritten text, answers and ticks; Background color purification refines the result.
- Watermark defaults to Confidential; confirm it or customize a text/image watermark.
- Set file size in KB or MB, then choose image-clarity or image-size compression.
- Print previews images and allows paper size, orientation, landscape/portrait layout, ratio and copy count.
Mac: Batch28 steps
- Select target files on the right before batch operations; an unselected-file prompt requires selecting files and trying again.
- Color mode offers Auto Enhance, Color, B&W, Grayscale, Stamps, Patterns, Antiquarian and Non-filter.
- Preview updates immediately; some modes provide a gradient-intensity slider.
- Confirm processes all selected files and reports completion.
- Rotate left 90°(default), right 90°, flip vertically/horizontally or rotate 180°; Confirm applies batch rotation and completion is reported.
- Quality uses plus/minus controls for contrast, sharpness and thickness; preview, and Confirm.
- Select book-page images for Overlapping Edge Cropping.
- Larger page-width values crop less; larger hinge or upper/lower values crop more.
- A baseline outside preview applies to all selected images; inside applies only to the current image.
- Completion is reported.
- Crop uses Crop N Pixels or Keep N Pixels; larger values respectively remove or preserve more pixels.
- Edgescan be cleared white or cut.
- Baseline scope follows the same inside/outside rule; Confirm processes, and Video guideline supplies more instructions.
- Standardize sets background size (A3/A4 portrait/landscape), orientation, DPI and color; preview updates live.
- Horizontal alignment is left/center/right and vertical alignment is top/center/bottom.
- Match with BG offers Unchanged, Maximize and Overspread; the manual describes keeping content page ratio.
- Confirm applies the batch.
- Rename selected files by rules and save copies in another folder.
- Detect suspected blank pages and delete as needed.
- Holes filling previews results with adjustable minimum/maximum hole radii.
- Watermark defaults to Confidential.
- Use the + icon to customize text or image.
- Text allows font, size, color, layout, horizontal/vertical alignment and opacity; image watermarks allow position and opacity.
- Set file size in KB/MB and choose Compress or Image Size Compression.
- Print uses the system print interface.
- Handwritten erase removes handwriting, answers and ticks; optionally purify the background.
- The batch Delete control asks whether to permanently delete files.
- Confirm removes selected files from the list and their folder; Cancel returns to the main interface.
Export
Instructions from the manualWindows: Export10 steps
- Word OCR recognizes image text for a Word file and supports background recognition.
- The default language is the installation language or the last manually chosen OCR language; choose other languages if needed.
- Word page sizes are Auto, A3, A4, A5, B3, B4 and B5.
- Excel OCR uses the same language-selection process to create an Excel file.
- PDF exports selected images together or one file per image, with High, Medium or Low quality and customizable settings.
- Use default size or standardized A3, A4, A5, B3, B4, B5, portrait or landscape.
- Searchable PDF recognizes text for searchable PDF output using the Word OCR language-selection process.
- TIFF supports Color/Grayscale and No compression, LZW, JPEG or Group 4.
- Combine output or create files individually; confirm parameters, choose a path and filename, and export.
- TXT recognizes image text and uses the Word OCR language-selection process to create a text document.
Mac: Export14 steps
- Word OCR converts image text to a Word document.
- Select current or other languages using keyword search and ticks.
- Choose Auto, A3, A4, A5, B3, B4 or B5 paper size and No Processing or Auto Adjustment.
- Show Sort window lets you reorder images.
- Confirm the language, size, processing and sort; name the document, choose a path, and Save to start OCR.
- Move to background displays recognition progress.
- Excel OCR uses Word OCR language selection.
- Searchable PDF recognizes text with Low, Medium or High quality and the same language selection.
- PDF exports selected images combined or one by one.
- Quality options are 50%, 75% and 100% with respectively smallest, medium and largest storage space.
- Use original size or standardized A3/A4 portrait/landscape; PDF/A is available.
- TIFF supports Color/Grayscale, No compression/LZW/JPEG/Group 4, and combined or individual output.
- Confirm, select a saving path and filename, and export.
- TXT uses Word OCR language selection to create a text file.
Edit bar
Instructions from the manualWindows: Edit Bar15 steps
- Use Fit Height to switch display modes.
- Manual Select lets you drag a selected image area or copy it with Ctrl + C; dragging leaves the original area blank.
- Delete clears the selection white; Save commits the result.
- Crop uses a mouse-drag selection and defaults to Clear: whiteout preserves page size and whitens the unselected background; Cut retains only the selection.
- Rotate left/right 90°, flip horizontally/vertically or rotate 180°.
- Custom rotation is limited to ±15°.
- Quality adjusts contrast, sharpness and thickness within ±5 with live preview.
- Color mode offers Auto Enhance, Color, B&W, Grayscale, Stamps, Patterns, Antiquarian and Non-filter.
- Undo is available in the illustrated edit interface.
- Print previews and configures paper size, orientation, landscape/portrait layout, ratio and copies.
- One-key OCR operates only on the current image, not a batch; select Auto, A3, A4, A5, B3, B4 or B5 for Word, confirm and choose a path for PDF, Word or Excel.
- QR Code/Barcode recognizes ISBNs and QR codes; copy results to the clipboard.
- Auxiliary Correction applies to Flat Single Page or Facing Pages.
- Drag border points to correct cropping, preview, and cancel or save.
- Facing-page correction adjusts the central seam or the laser line.
Mac: Edit Bar13 steps
- Fit switches the display options;1:1 Display shows the current image at actual scale.
- Box Select uses mouse-drag; move or drag selection, copy with Command + C, and Delete clears it white.
- Dragging leaves original area blank; Save commits the result.
- Crop uses Clear (whiteout, default) or Cut: Clear preserves original page size and whitens unselected areas; Cut retains only selection.
- Rotating offers left/right 90°, horizontal/vertical flip,180° and Custom Rotation.
- Quality adjusts contrast, sharpness and thickness within ±5 with live preview.
- Choose Auto Enhance, Color, B&W, Grayscale, Stamps, Patterns, Antiquarian or Non-filter.
- Undo applies only to the current file; it is invalid after batch operations.
- Print uses the system to print the current image.
- OCR accepts recognition language, PDF/Word/Excel format and saving path.
- Scan QR Code recognizes QR codes/barcodes; copy one or selected results, then click again to close recognition.
- Auxiliary Correction for Flat Single Page uses dragged border points; Preview, readjust if unsatisfactory, Confirm to save or Cancel to exit.
- Facing Pages (laser) corrects central seams or laser lines with the same preview/confirm/cancel process.
File list
Instructions from the manualWindows: File List7 steps
- Import JPG files with the upper-right + icon; the adjacent folder icon opens the location of the current image or video.
- Select All selects the file list; click again to deselect.
- List Mode displays names; Thumbnail Mode displays thumbnails.
- Delete moves or removes only the current image, not a batch.
- Reproduce rescans and replaces the current image.
- Insert scans a new image before the current one.
- Details shows width, height, modification time and file size.
Mac: File List8 steps
- Import JPG files with the upper-right + icon; select a folder from ~/CZURImages to import its JPGs.
- The folder icon opens the current file location.
- Select All selects all listed files; click again to deselect.
- List Mode shows names and Thumbnail Mode shows images.
- Delete affects one current image, not a batch.
- Reproduce returns to scan preview; a rescan replaces the original, and Back returns to the list.
- Insert adds a new scan before the current image; Add adds one after it.
- Details provides size, dimensions, creation and last-modification time.
Scan
Instructions from the manualWindows: Scan10 steps
- Click the lower-right Scan icon.
- Choose an appropriate color mode: Auto Enhance strengthens color and black/white; Color preserves color without special enhancement; Patterns preserves watermarks/background patterns; Stamps whitens the background and enhances stamps; Grayscale retains grayscale while reducing space; B&W reduces space for black-on-white text; Antiquarian preserves ancient-book colors; Picture favors image reproduction with less noise; Non-filter leaves color unchanged.
- Flat Single Page crops and corrects tilt; rounded ID cornerscan be preserved via Settings.
- Facing Pages flattens curves, removes finger cots, corrects tilt and crops edges; configure with/without finger-cot removal and page order.
- Combine Sides places both document sides together horizontally or vertically; configure rounded-corner blanks if needed.
- Manual Selection saves only the mouse-selected area; No Processing preserves the original.
- Enable Auto Scan to detect page turns and scan automatically.
- With the device connected, use Photo to take a scan and set manual or automatic exposure.
- The left side shows scanned and processed counts and real-time images; double-click a processed image to open it.
- Set the saving path, open the containing folder and preset image naming rules.
System settings
Instructions from the manualWindows: System Settings2 steps
- Open Settings at the top right.
- Change and save the Serial No. to restart the software; view software version and current-device firmware version, switch language, and set hotkeys with Alt + number.
Mac: System Settings5 steps
- View Software version and download updates from the official site; change Serial No. if needed.
- Connected devices show Firmware version.
- Language offers 12 languages including Simplified Chinese, Traditional Chinese and English.
- Help opens the official support page.
- Privacy displays the software statement; disable Send network request to close all software network requests.
Scanner settings
Instructions from the manualWindows: Scanner Settings6 steps
- Choose 50 Hz or 60 Hz.
- Select the device default resolution, a lower standard resolution or a custom value.
- The manual displays the device default DPI and lists 96, 320 (default) and 350 DPI, with custom DPI from 72 to 1000.
- These are software-version choices, not a replacement for the device-specific product DPI.
- Use JPG output at Low, Medium or Best quality.
- Configure automatic facing-page splitting and which page comes first.
Mac: Scanner Settings4 steps
- Frequency switches 50 Hz/60 Hz.
- Resolution changes photo dimensions; DPI sets scanned image DPI.
- Image format sets quality.
- Paging settings enables/disables automatic separate pages after Facing Pages correction and selects Left to right or Right to left.
Visual presenter
Instructions from the manualWindows: Visual Presenter3 steps
- After startup loads, choose Visual Presenter.
- Click Display for live view; use markup, brush, rectangle and text tools.
- Screenshot and video recording controls are illustrated in this guide.
Mac: Visual Presenter5 steps
- In Visual Presenter, view saved screenshots or play recorded video; live view supports recording, comments, freeze and screenshots.
- Display opens the live interface.
- The recording icon shows the recording bar; the red button records video and right-side drawing tools mark content.
- For a video file, use play, pause or stop at bottom.
- For an image, choose Fit Width (as printed Fit With), Fit Height or 1:1; tick the image and use the upper-right PDF icon to convert it.
Mac: Visual Presenter saving settingsView
Format and Path set the saving path for videos and images.
Part ii software installation
Instructions from the manualMac: Part II Software Installation4 steps
- This linked Mac guide requires macOS 13+ on Apple Silicon or macOS 12+ on Intel.
- Open the .dmg and drag the installer icon to Applications.
- At first startup, enter and confirm the correct serial number.
- If verification fails, reenter it; software use cannot continue until validation succeeds.
Go to scan preview
Instructions from the manualMac: Go to Scan PreviewView
Click the lower-right Scan icon. With the device connected, preview shows live video; Color and Flat Single Page are the defaults.
File saving
Instructions from the manualMac: File Saving4 steps
- Use Browse for Folder to set the image saving path; default is ~/CZURImages on the system disk.
- Open Containing Folder shows the current image folder,~/CZURImages/XXXX.
- Preset naming rules include a prefix and serial number.
- Back exits preview and returns to the main interface.
Color mode
Instructions from the manualMac: Color Mode6 steps
- Preset a color mode in the preview; Back and reopening preview retains the last choice.
- Auto Enhance strengthens colors and black/white; Color preserves rich color and slightly increases brightness; B&W reduces storage for black-on-white text; Grayscale keeps richer grayscale and reduces space.
- Stamps whitens background and enhances stamp colors.
- Patterns purifies background while preserving watermarks and patterns.
- Antiquarian retains ancient-book colors and mends missing parts.
- Non-filter leaves the image unchanged.
Processing method
Instructions from the manualMac: Processing Method14 steps
- Flat Single Page automatically crops paper edges; place the document on a black soft pad.
- In its Settings, cropping adjustment positive values remove more pixels and negative values preserve more.
- Smart black edge optimization identifies/enhances borders and removes black edges.
- White space for round corners of ID preserves rounded corners with white background.
- Multi-target paging recognizes multiple objects and creates separate pages.
- Auto page mending restores missing parts as far as possible.
- ClickScan; a processing thumbnail appears on the left.
- Facing Pages flattens curved books, removes fingers/cots, corrects tilt and crops edges.
- Configure with or without finger-cots; keep both pages (select order) or save only left/right.
- Auto page mending and positive/negative cropping adjustment work as described.
- Scans show dynamic thumbnails.
- Combine Sides merges front/back document images into one; enable rounded-corner whitespace where appropriate.
- Manual Selection saves only the selected preview area.
- No Processing leaves images unflattened and uncropped.
Auto scan
Instructions from the manualMac: Auto ScanView
Tick Auto Scan to automatically detect page-turning and take pictures.
Controls and parts
See the manual diagrams 1 diagram
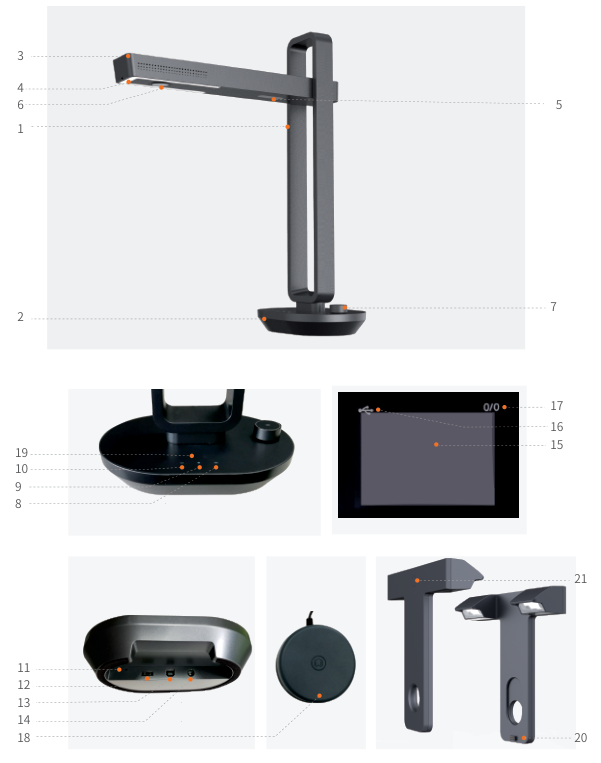
Diagram key
- 1: Support.
- 2: Base.
- 3: Top shell.
- 4: LED bulbs.
- 5: Laser light.
- 6: HD CMOS lens.
- 7: Knob: hold more than 1 second for power; short press changes lamp/scanner mode; turn left to dim and right to brighten.
- 8: Scanner-mode indicator; lights when scanner mode is active.
- 9: Lamp-mode indicator; lights when lamp mode is active.
- 10: Power indicator; lights when the adapter supplies power.
- 11: RESET button; hold 6 seconds for forced power-off and standby if operation is abnormal.
- 12: Type A USB port for the foot pedal.
- 13: Type B USB port for the computer.
- 14: DC power port for the 9 V/1.5 A adapter.
- 15: Scanning preview area.
- 16: Successful USB connection logo.
- 17: X/Y counts: pending transfer/transferred to computer.
- 18: Foot pedal: heel on ground, press gently with toes; useful for freeing hands during multiple-page scanning.
- 19: Optional battery indicator, only for equipped family variants: flashing LEDs mean charging; one/two/three/four lit LEDs mean 25/50/75/100%. Connect the adapter promptly when only one LED remains. Aura Pro is not presented as battery-equipped.
- 20: Side-light interface.
- 21: Side-light touch button.
- USB logo: Successful USB connection, corresponding to callout 16.
- 0/0: Display of pending-transfer/transferred image counts, corresponding to X/Y in callout 17.