MODEL REFERENCE
CZUR Fancy Pro
4 troubleshooting topics · 6 guides

The checks and guides below come from the official manuals for this model.
No matches for this wording. Try a light name, error code or a shorter phrase.
Troubleshooting
Find the problem you are experiencingThe power indicator does not work2 checks
- USB connection
- Check that the USB cable is properly connected to the computer.
- Computer USB port
- Check that the computer USB port works well. For help contact CZUR at support@czur.com.
Software cannot be installed or an error occurs4 checks
- Operating system
- Check the software against the manual-version systems:XP/Windows 7/8/10/11, 32-bit or 64-bit, and macOS10.13 or later.
- Current release requirements may differ; use a matching version.
- Antivirus interference
- If antivirus software wrongly stops the camera software, temporarily close it and whitelist CZUR software.
- Download completion
- If downloading from the official website, confirm that the software download completed successfully before installing it.
- Manufacturer help
- For help contact CZUR at support@czur.com.
Unable to take photos normally7 checks
- USB connection or application
- Reconnect the USB cable or restart the computer software.
- USB port performance
- Try another computer USB port;port performance may differ.
- Security software interference
- Exit antivirus software, security guards or defensive background software.
- Camera driver recognition
- In Device Manager > Camera, check whether CZUR Fxxxx is recognized.
- If a yellow exclamation mark or unknown device appears, right-click to update the driver, or disable it and then enable it.
- Restart the software and try again.
- Camera resource conflict
- If another device occupies the computer camera resource, use Device Manager to disable other scanner, monitor or camera drivers.
- Computer problem
- Restart the computer or try another computer.
- Manufacturer help
- For help contact CZUR at support@czur.com.
Images are blurred2 checks
- Stained or scratched camera lens
- Check the lens for stains or scratches.
- If stained, wipe gently from the middle toward the edge with a soft cotton cloth or lens wipes dampened with alcohol or lens-cleaning solution.
- Do not press the lens surface or use too much solution.
- The cloth must be moist but release no liquid when squeezed.
- If still dirty, repeat several times with new wipes.
- Insufficient light
- Check that lighting is sufficient. If insufficient, turn on and adjust the fill light to suit the current situation.
Guides
Software installation
Instructions from the manualInstall CZUR Visualizer4 steps
- The 20230916A manual lists XP/Windows 7/8/10/11, 32-bit or 64-bit systems, and macOS10.13 or later.
- Select a matching software version; this historical manual does not establish the requirements of every current software release.
- Go to the official CZUR website, open Download Software, select your device model, and download and install its software.
- Follow the installation prompts.
Preparation before use
Instructions from the manualPrepare the camera for use3 steps
- Download and install CZUR Visualizer from the official CZUR website using Download Software at the upper right.
- Place Fancy on a flat surface, connect it to the computer with the USB cable, and open CZUR Visualizer.
- The software detects the device automatically.
Product details
Instructions from the manualIdentify USB and focus controls4 steps
- Control 1 is the USB port for computer connection and data transmission.
- Press control 2 once for manual focus.
- Control 3 selects continuous autofocus for moving objects.
- Control 4 selects single-area autofocus for nonmoving objects.
Adjust exposure, image rotation and fill light4 steps
- Control 5 increases exposure and brightness.
- Control 6 decreases exposure and brightness.
- Control 7 rotates the image 180 degrees, described by the manual as 180-degree mirror rotation.
- Control 8 adjusts the fill light through three brightness levels.
After sales services and warranty
Instructions from the manualPrepare the device for manufacturer repair5 steps
- When sending the device for repair, complete the Warranty Card and pack the device properly to ensure safe transportation and maintenance quality.
- The guide describes a seven-day quality-issue return and one-year device warranty, subject to national laws.
- Consumables and external appearance are excluded.
- Maximum working temperature is 40°C.
- The warranty exclusions cover incorrect installation or unsuitable hot/humid environments, non-CZUR components or user replacement, natural disasters/accidents/human factors, inappropriate storage including rodents or liquid, unauthorized repairs/modifications/abuse, unauthorized service centers, and computer viruses or software installation/settings failures.
Contact
Instructions from the manualGet technical supportView
Contact CZUR for technical support through its official website or support@czur.com.
Controls and parts
See the manual diagrams 1 diagram
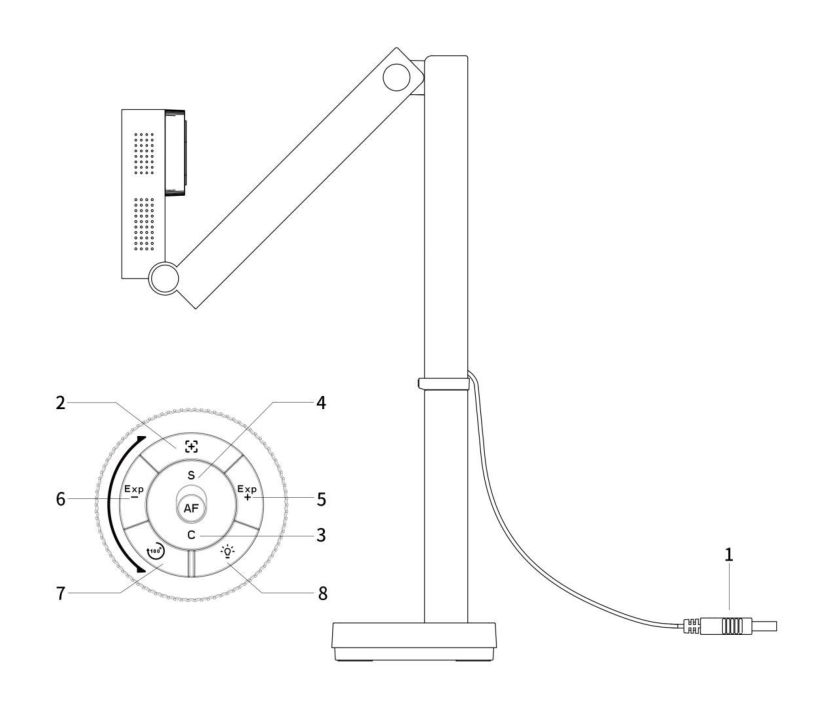
Diagram key
- 1: USB connection to the computer for data transmission.
- 2: Manual focus; press the focus-target control once to focus.
- 3: Continuous autofocus (C / AF-C), for moving objects.
- 4: Single-area autofocus (S / AF-S), for nonmoving objects.
- 5: Increase exposure and brightness (Exp +).
- 6: Decrease exposure and brightness (Exp −).
- 7: Rotate the image 180 degrees; the manual calls this 180-degree mirror rotation (180° arrow).
- 8: Adjust the fill light through three brightness levels (light symbol).
- AF: Autofocus selection, with C for continuous autofocus of moving objects and S for single-area autofocus of nonmoving objects.
- C: Continuous autofocus for moving objects.
- S: Single-area autofocus for nonmoving objects.
- Exp +: Increase exposure and brightness.
- Exp −: Decrease exposure and brightness.
- 180° arrow: Rotate the image 180 degrees; described as 180-degree mirror rotation.
- Light symbol: Three adjustable fill-light brightness levels.
- Focus target: Manual focus; click once to focus.