MODEL REFERENCE
Elna Sew Fun
9 troubleshooting topics · 39 guides

The checks and guides below come from the official manuals for this model.
No matches for this wording. Try a light name, error code or a shorter phrase.
Troubleshooting
Find the problem you are experiencingThe needle thread breaks.6 checks
- The needle thread is not threaded properly.
- Follow the reviewed six-step upper-threading procedure.
- The needle thread tension is too tight.
- Turn the needle-tension dial to a lower number.
- The needle is bent or blunt.
- Inspect and replace the needle following the reviewed safety and needle-change instructions.
- The needle is incorrectly inserted.
- Insert the needle fully with its flat side away from you and firmly tighten the clamp screw.
- The fabric is not being drawn to the back when sewing is finished.
- Raise the foot and remove fabric with the threads drawn backwards.
- The thread is either too heavy or too fine for the needle.
- Use the reviewed thread and needle chart for the fabric.
The bobbin thread breaks.3 checks
- The bobbin thread is not threaded properly in the bobbin case.
- Follow the reviewed bobbin-case threading procedure.
- Lint has collected in the bobbin case.
- Clean the bobbin case.
- The bobbin is damaged and doesn't turn smoothly.
- Replace the bobbin.
The needle breaks.7 checks
- The needle is incorrectly inserted.
- Insert the needle fully with the flat side away from you and tighten the clamp screw.
- The needle is bent or blunt.
- Inspect and replace the needle using the reviewed instructions.
- The needle clamp screw is loose.
- Firmly tighten the clamp screw with a screwdriver.
- The tension of the needle thread is too tight.
- Turn the tension dial to a lower number.
- The fabric is not drawn to the back when sewing is finished.
- Raise the foot and remove fabric with threads drawn backwards.
- The needle is too fine for the fabric being sewn.
- Match fabric and needle using the reviewed chart.
- The pattern selector dial had been turned while the needle was in the material.
- Raise the needle and foot before turning the selector; never turn it with the needle in the material.
Skipped stitches4 checks
- The needle is incorrectly inserted.
- Insert the needle fully with its flat side away from you and tighten the clamp screw.
- The needle is bent or blunt.
- Inspect and replace the needle using the reviewed instructions.
- The needle and/or threads are not suitable for the work being sewn.
- Match fabric, thread and needle using the reviewed chart.
- The needle thread is not threaded properly.
- Follow the reviewed complete upper-threading procedure.
Seam puckering4 checks
- The needle thread tension is too tight.
- Turn the tension dial to a lower number.
- The machine is not threaded correctly.
- Follow the reviewed upper-threading procedure.
- The needle is too heavy for the fabric being sewn.
- Choose the needle using the reviewed fabric/thread chart.
- The stitches are too coarse for the fabric being new line sewn.
- Make the stitches denser. For extremely lightweight materials, put a sheet of paper under the fabric.
Stitches form loops below the work2 checks
- The needle thread tension is too loose.
- Turn the tension dial to a higher number.
- The needle is either too heavy or too fine for the thread.
- Match fabric, thread and needle using the reviewed chart.
The cloth is not feeding smoothly.2 checks
- The feed dog is packed with lint.
- Clean the feed dog using the reviewed maintenance and safety instructions.
- The stitches are too fine.
- Make the stitches coarser.
The machine does not work.3 checks
- The machine is not plugged in.
- Check voltage/frequency and follow the reviewed power connection sequence.
- Thread is caught in the hook race.
- Clean and reassemble the shuttle race using the reviewed safety instructions.
- Handwheel has been disengaged for bobbin winding.
- Return the spindle left when stopped and push the handwheel left into its original position.
The machine does not run smoothly and is noisy.2 checks
- Threads have been caught in hook mechanism.
- Clean and reassemble the shuttle race using the reviewed safety instructions.
- The feed dog is packed with lint.
- Clean the feed dog using the reviewed maintenance and safety instructions.
Guides
Important safety instructions
Instructions from the manualUse the machine safely16 steps
- Read all instructions before using this household machine.
- It is not a toy; do not let children play with it.
- Children and people requiring assistance need supervision; pay close attention when used by or near children.
- Use only its intended manual-described purposes and manufacturer-recommended attachments.
- Never leave it plugged in unattended; unplug immediately after use and before cleaning.
- Never operate with a damaged cord or plug, faulty operation, drop damage or water exposure.
- Keep machine and foot-control ventilation clear of lint, dust and loose cloth.
- Never drop or insert objects into openings, use outdoors or operate where aerosol sprays or oxygen are used.
- Set all controls to O before unplugging, and grasp the plug rather than pulling the cord.
- Keep fingers away from moving parts, especially the needle.
- Use the proper needle plate and straight needles; never push or pull fabric while stitching.
- Switch off before needle-area adjustments, including threading, needle changes, bobbin threading and foot changes.
- Unplug before removing covers, lubricating or other manual adjustments.
- If the appliance falls into water, unplug immediately; do not reach for it.
- Never place or store it where it can fall or be pulled into a tub or sink; do not put it in water or other liquid.
- In the EU, recycle safely according to national electrical/electronic-product legislation and ask the retailer if unsure.
Section 1. essential parts
Instructions from the manualIdentify the machine parts25 steps
- The manual identifies: 1.
- Reverse stitch button; 2.
- Pattern selector dial; 3.
- Stitch length dial; 4.
- Bobbin winder stopper; 5.
- Bobbin winder spindle; 6.
- Spool pins; 7.
- Bobbin winder thread guide; 8.
- Thread guide; 9.
- Thread take-up lever; 10.
- Thread tension dial; 11.
- Face plate; 12.
- Needle plate; 13.
- Extension table; 14.
- Presser foot holder; 15.
- Needle clamp screw; 16.
- Needle; 17.
- Presser foot; 18.
- Carrying handle; 19.
- Balance wheel; 20.
- Power switch; 21.
- Machine socket; 22.
- Free arm; 23.
- Presser foot lifter.
- Specifications may change without prior notice.
Section 2. getting ready to sew
Instructions from the manualRemove the extension table and use the free arm4 steps
- Pull the table away to remove it for free-arm sewing; push it back until it snaps into the machine.
- The free arm avoids fabric bunching near the needle when bartacking pockets, plackets and waistlines.
- Use it for sleeves, waistbands, trouser legs and other circular garment areas, or for darning socks and mending knees, elbows and worn areas of children’s clothes.
- The table provides extra sewing surface.
Identify and store the standard accessories2 steps
- The manual lists bobbins, seam ripper/buttonhole opener, needle set, buttonhole foot, darning plate and zigzag foot.
- Sewing accessories are stored in the extension table’s accessory storage box.
Connect the power supply7 steps
- Check that the machine voltage and frequency match the electrical supply before connecting.
- Turn the switch off.
- Insert the machine plug in its socket, then the supply plug in the outlet.
- Turn the switch on for power and sewing light.
- While operating, watch the sewing area and do not touch moving parts such as the take-up lever, handwheel or needle.
- Always switch off and unplug when leaving unattended, attaching/removing parts or cleaning.
- Place nothing on the foot control: it could start the machine or cause intermittent running.
Control sewing speed2 steps
- Press the foot control to vary sewing speed: pressing harder makes the machine run faster.
- Place nothing on the foot control, which could start the machine or cause intermittent running.
Raise the presser footView
The lifter raises and lowers the foot. Raise it about 0.6 cm (1/4 inch) above normal up position to remove the foot easily or place heavy fabric beneath it.
Change the presser foot4 steps
- Switch off before changing the foot; unplug before attaching or removing parts.
- Turn the handwheel toward you to raise the needle fully, and raise the foot.
- Press the lever behind the holder to release the foot.
- To attach, position the foot pin beneath the holder groove and lower the holder to lock it in place.
Change and inspect the needle7 steps
- Switch off before changing the needle; unplug before attaching or removing parts.
- Raise the needle with the handwheel toward you and lower the foot.
- Loosen the clamp screw counterclockwise and remove the needle.
- Insert the new needle with its flat side away from you, push it fully up and firmly tighten the clamp screw with a screwdriver.
- Check often for barbed or blunt points: damage can permanently snag or run knits, fine silk and similar fabrics.
- To check straightness, rest the flat side on a flat needle plate, glass or similar surface; clearance must be consistent.
- Never use a bent or blunt needle.
Match fabric, thread and needle3 steps
- For lightweight crepe de Chine, voile, lawn, organdy, georgette and tricot, use fine silk, cotton, synthetic or cotton-covered polyester thread and needle size 9 or 10.
- For medium linen, cotton, pique, serge, double knits and percale, use 50 silk, 50–80 cotton, 50–60 synthetic or cotton-covered polyester with needle 11 or 14.
- For heavy denim, tweed, gabardine, coating, drapery and upholstery fabric, use 50 silk, 40–50 cotton, 40–50 synthetic or cotton-covered polyester with needle 14 or 16.
Set the spool pinsView
The pins hold thread spools to feed the machine. Pull a pin up to use it and push down for storage.
Remove or insert the bobbin case4 steps
- Switch off for bobbin threading.
- Open the hook cover and raise the needle by turning the handwheel toward you.
- Hold the case latch to remove it.
- When inserting the case, put its horn in the hook-race recess.
Wind the bobbin10 steps
- Pull the handwheel out.
- Draw thread from the spool around the bobbin-winder thread guide.
- Pass it through the bobbin hole from inside to outside.
- Align the bobbin notch with the spindle rib and put the bobbin on the spindle.
- Push the spindle right.
- Hold the free end and press the foot control.
- Stop after a few turns and cut thread close to the hole.
- Press the control again; stop when the bobbin is full.
- With the machine stopped, move the spindle left to its original position and cut thread.
- Push the handwheel left into its original position.
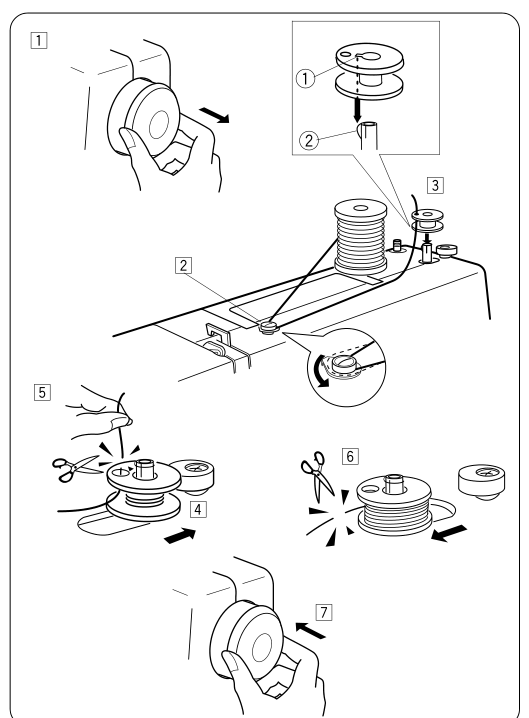
Diagram key
- Box 1: Pull the handwheel out.
- Box 2: Draw thread around the bobbin-winder guide.
- Box 3: Pass thread through the bobbin from inside to outside; align notch with spindle rib and put it on the spindle.
- Circle 1: Bobbin notch
- Circle 2: Bobbin-winder spindle rib
- Box 4: Move the spindle right.
- Box 5: Hold the thread end, run a few turns, stop and cut the tail near the hole.
- Box 6: Wind until full, stop, move the spindle left and cut thread.
- Box 7: Push the handwheel left into its original position.
Thread the bobbin case4 steps
- Switch off for bobbin threading.
- Insert the bobbin with thread unwinding in the illustrated arrow direction.
- Pull thread into the case slot, then beneath the tension spring and into the delivery eye.
- Leave about 10 cm (4 inches) free.
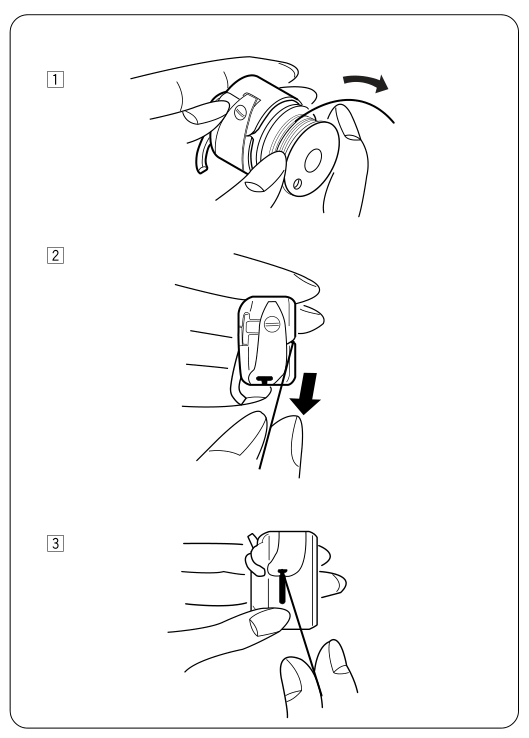
Diagram key
- Box 1: Insert the bobbin with thread unwinding in the arrow direction.
- Box 2: Pull thread into the bobbin-case slot.
- Box 3: Draw it beneath the tension spring into the delivery eye; leave about 10 cm (4 inches) free.
Thread the machine9 steps
- Switch off before needle threading.
- Raise the take-up lever fully by turning the handwheel toward you, and raise the foot.
- Put a spool on its pin with thread coming from the back.
- Draw thread into the guide with both hands.
- Hold it near the spool and draw down into the tension area and around the check-spring holder.
- Draw it firmly up through the take-up lever from right to left.
- Draw down into the lower thread guide, then into the left-side needle-bar guide.
- Thread the eye from front to back.
- A sharp-scissor cut at the thread end can ease threading.
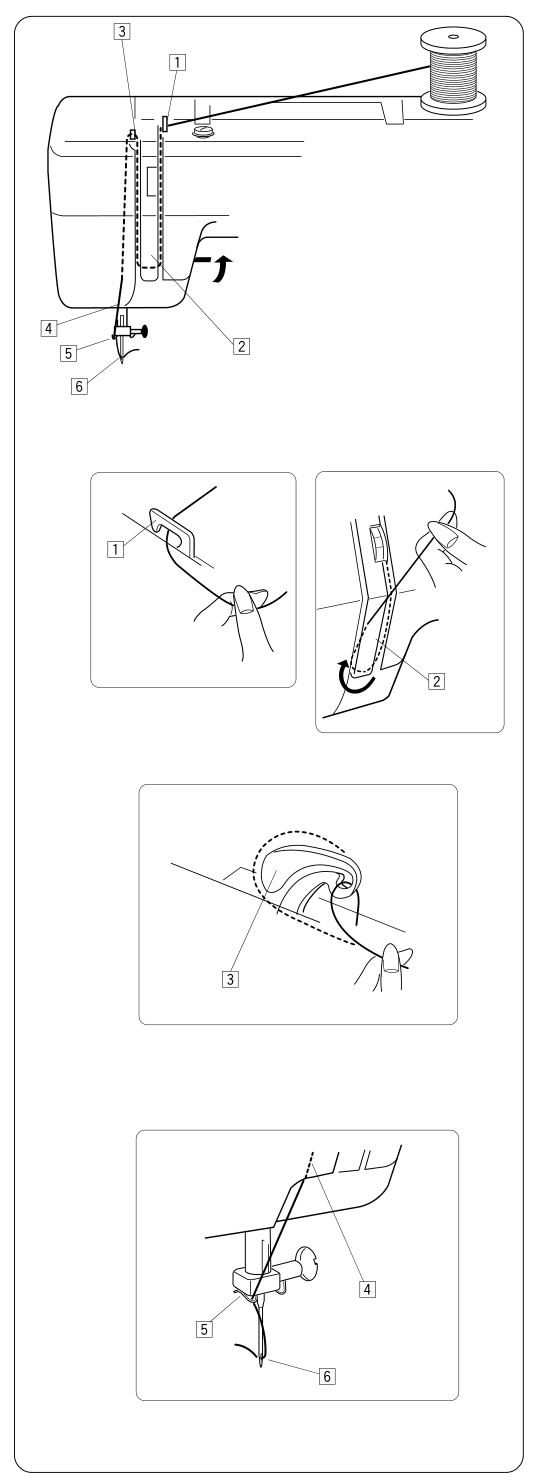
Diagram key
- Box 1: Draw thread into the guide with both hands.
- Box 2: Draw it down into the tension area and around the check-spring holder while holding near the spool.
- Box 3: Draw firmly up through the take-up lever from right to left.
- Box 4: Draw down into the lower guide.
- Box 5: Slip into the left-side needle-bar guide.
- Box 6: Thread the needle front to back.
Draw up the bobbin thread4 steps
- Raise the foot and hold the needle thread lightly in your left hand.
- Turn the handwheel slowly toward you with your right hand until the needle descends, then continue until the take-up lever is fully up.
- Draw the needle thread up lightly to form a bobbin-thread loop.
- Pull 15 cm (6 inches) of both threads back beneath the foot.
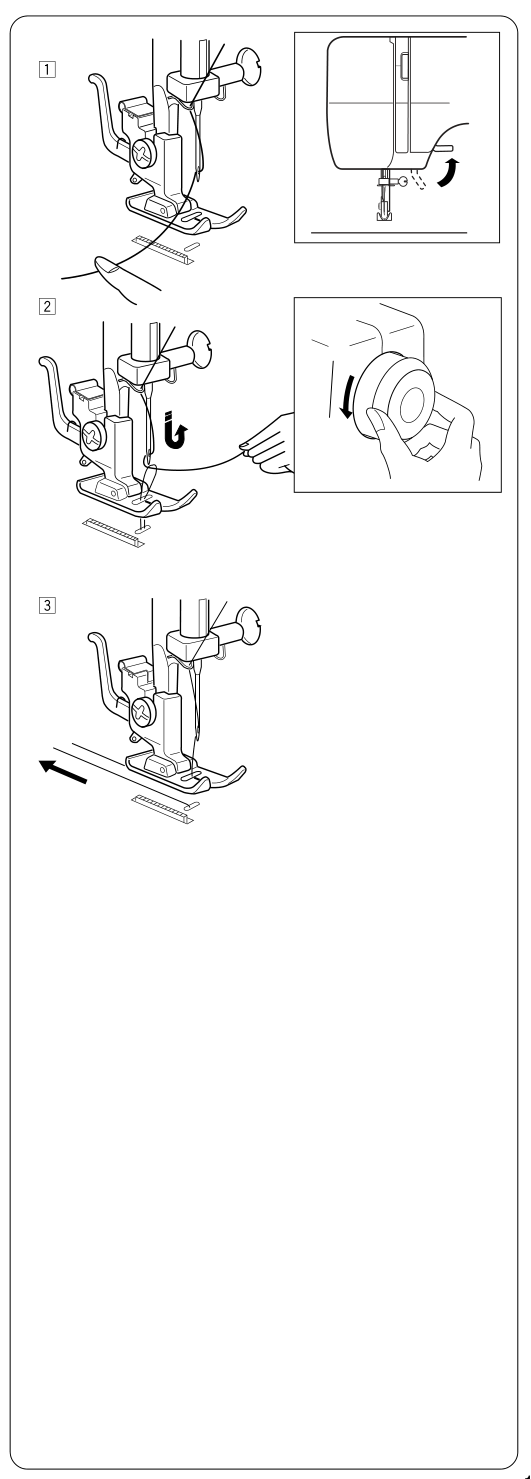
Diagram key
- Box 1: Raise the foot and hold needle thread lightly in the left hand.
- Box 2: Turn the handwheel slowly toward you until the needle descends and the take-up lever returns fully up; draw needle thread up lightly to form the bobbin-thread loop.
- Box 3: Pull both threads 15 cm (6 inches) back under the foot.
Balance needle thread tension5 steps
- Adjust tension for the materials, number of fabric layers and sewing method.
- An ideal straight stitch locks the threads between the two layers.
- For an ideal zigzag, bobbin thread stays off the right/top fabric side and needle thread shows slightly on the wrong/bottom side.
- If tension is too tight, bobbin thread appears on the right side: turn to a lower number.
- If tension is too loose, needle thread appears on the wrong side: turn to a higher number.
Select the stitch patternView
Raise the needle and presser foot, then turn the selector to put the desired letter at the setting mark. Never turn the selector while the needle is in the material.
Set stitch length and stretch balance5 steps
- Turn the stitch-length dial to the desired length at the setting mark: higher numbers mean longer stitches.
- The marked buttonhole range is recommended for buttonholes.
- Use 0.5–4 for zigzag stitching.
- Set S.S. for stretch patterns.
- If stretch stitches are uneven, turn toward minus to compress the pattern or plus to expand it.
Sew in reverseView
Hold the reverse-stitch button down to sew backwards. The machine sews backwards as long as it remains depressed.
Fit the darning plate3 steps
- Switch off and unplug before attaching parts.
- Position the darning plate with its three pins underneath and fit them into the needle-plate holes.
- The feed dogs show through the darning-plate holes.
Section 3. basic sewing
Instructions from the manualSew a straight seam7 steps
- Set selector A or B, zigzag foot, tension 2–6 and length 1.5–4.
- Raise the foot and align the fabric edge with a needle-plate seam guide.
- Lower the needle into the fabric, lower the foot and smooth threads toward the back.
- Press the foot control and gently guide along the line, letting the fabric feed itself.
- Fasten the seam end with several reverse stitches using the reverse button.
- Raise the foot, remove fabric with threads drawn back, then draw threads up into the cutter.
- The cut length is suitable for the next seam.
Change sewing direction2 steps
- Stop and turn the balance wheel toward you to lower the needle into the fabric.
- Raise the foot, pivot fabric around the needle to the desired direction, lower the foot and continue sewing.
Use the seam guide lines3 steps
- Needle-plate numbers give distance from the center needle position to the guide.
- Front numbers are centimeters; back numbers are inch fractions.
- The printed table gives 10: 1.0 cm; 15: 1.5 cm; 20: 2.0 cm; 3/8 inch: 1.0 cm; 4/8 inch: 1.3 cm; 5/8 inch: 1.6 cm; 6/8 inch: 1.9 cm.
Turn a square corner3 steps
- For a corner 5/8 inch (1.6 cm) from the edge, line up the fabric edge facing you with the illustrated cornering guide.
- Stop and lower the needle by turning the handwheel counterclockwise.
- Raise the foot, turn fabric to align its edge with the 5/8 inch (1.6 cm) guide, then lower the foot and sew in the new direction.
Sew zigzag stitchesView
Set selector C, zigzag foot, tension 2–5 and length 0.5–4. Simple zigzag is used for overcasting, sewing buttons and similar work.
Sew tricot stitches4 steps
- Set selector D, zigzag foot, tension 1–4 and length 0.5–4.
- Place the edge just inside the right edge of the foot.
- Guide so the right-hand stitches fall off the fabric edge.
- Take care not to cut the stitches.
Sew overedge stitches4 steps
- Set selector G, zigzag foot, tension 1–4 and length S.S.
- This stitch provides elasticity and strength for swimwear and stretch velour.
- It works best when the right zigzag stitches fall slightly off the fabric edge.
- Allow a 1.6 cm (5/8 inch) seam; trim its allowance after sewing without cutting stitches.
Sew triple stitches3 steps
- Set selector A or B, zigzag foot, tension 2–6 and length S.S.
- The stitch takes two forward stitches and one backward for a seam that does not rip easily.
- Baste garments for fitting before seaming.
Sew a blind hem4 steps
- Set selector E or F, zigzag foot, tension 2–4 and length 1–3.
- First overcast heavyweight fabric that ravels, then fold the hem as illustrated, leaving the manual’s stated 1/4 inch (0.7 cm) edge showing.
- Position it so the needle at its leftmost position just pierces the fold.
- After hemming, press both sides together; only blind stitches should show on top.
Section 4. decorative stitches
Instructions from the manualSew shell tucksView
Set selector G, buttonhole foot, tension 6–8 and length 2–3. Put the folded edge along the foot slot; the needle should fall off the right fabric edge to form a tuck.
Sew and balance stretch patterns3 steps
- Set selector A–G, zigzag foot, tension 1–4 and length S.S.
- If the fabric makes forward/reverse feeds unbalanced, restore balance with the length dial: turn toward plus for compressed patterns and minus for drawn-out patterns.
- The manual prints a Page 27 cross-reference; the actual length/balance instructions are on printed page 13.
Sew smocking5 steps
- Use selector D, zigzag foot, tension 1–4 and length S.S. for the decorative stitching.
- First set length 4 and sew straight gathering lines 1 cm (3/8 inch) apart across the area.
- Loosen needle tension to ease gathering.
- Knot threads along one edge, pull bobbin threads to distribute gathers evenly and secure threads at the other edge.
- Sew the decorative stitch between gathering lines, then remove gathering stitches.
Sew applique4 steps
- Set selector C, zigzag foot, tension 1–4 and length 0.5–1.
- Baste applique pieces, or fuse with an iron-on fabric joiner.
- Stitch around them so the needle falls along the outer edge.
- At corners, lower the needle into fabric, raise the foot and pivot right or left.
Section 5. care of your machine
Instructions from the manualClean and reassemble the shuttle race8 steps
- Switch off and unplug before removing covers, attaching/removing parts or cleaning.
- Raise the needle fully and open the hook cover.
- Open the bobbin-case hinged latch and remove the case.
- Open the race-ring holders, remove the ring and remove the hook.
- Clean the hook race with a brush and soft dry cloth.
- Hold the hook by its center pin and fit it carefully into the race, forming a complete circle with the shuttle driver.
- Fit the ring with its bottom pin in the notch.
- Turn the holders back to lock the ring, then insert the case.
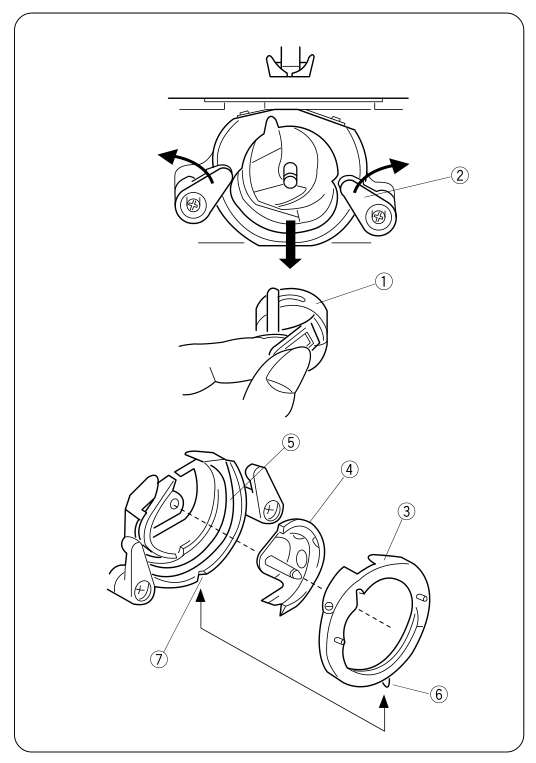
Diagram key
- 1: Bobbin case
- 2: Shuttle race ring holder
- 3: Shuttle race ring
- 4: Shuttle (printed key misspells this as Shtuule)
- 5: Shuttle race
- 6: Pin
- 7: Notch
Clean the feed dog3 steps
- Switch off and unplug before removing parts or cleaning.
- Remove the needle and foot, remove the needle-plate setscrew and plate, then brush dust and lint from the feed-dog teeth.
- Refit the needle plate.
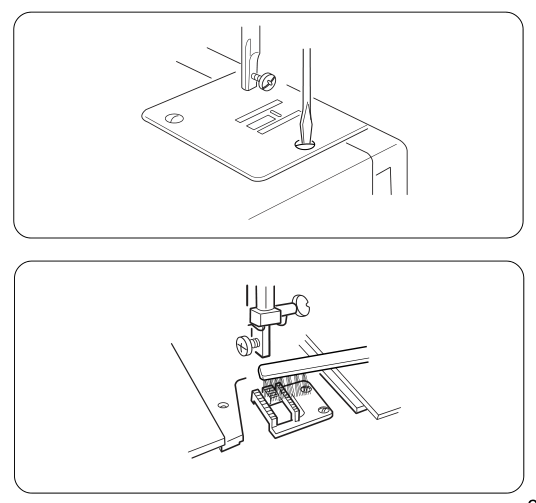
Diagram key
- Plate screw: Remove the needle-plate set screw and plate.
- Brush: Brush dust and lint from the feed-dog teeth, then refit the plate.
Replace the sewing light bulb5 steps
- Unplug before replacing the bulb.
- The bulb may be hot; protect your fingers when handling it.
- The light is behind the face plate; remove the setscrew and face plate.
- Turn the bulb left to remove it and right to attach.
- Use the same bulb type rated 15 watts.
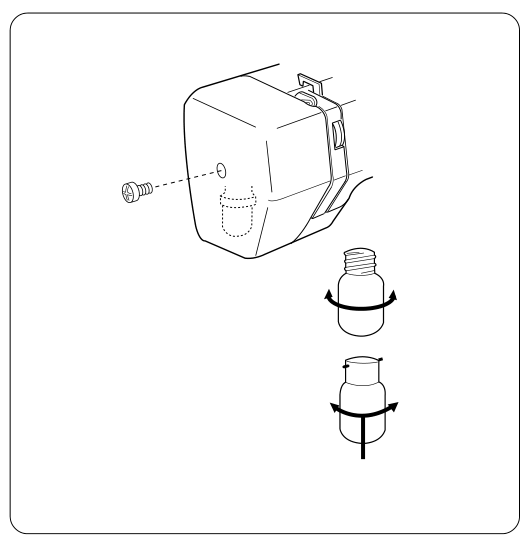
Diagram key
- Face-plate screw: Remove the set screw and face plate to reach the bulb.
- Left-turn arrow: Turn the bulb to the left to remove it.
- Right-turn arrow: Turn the bulb to the right to attach it.
Controls and parts
See the manual diagrams 1 diagram
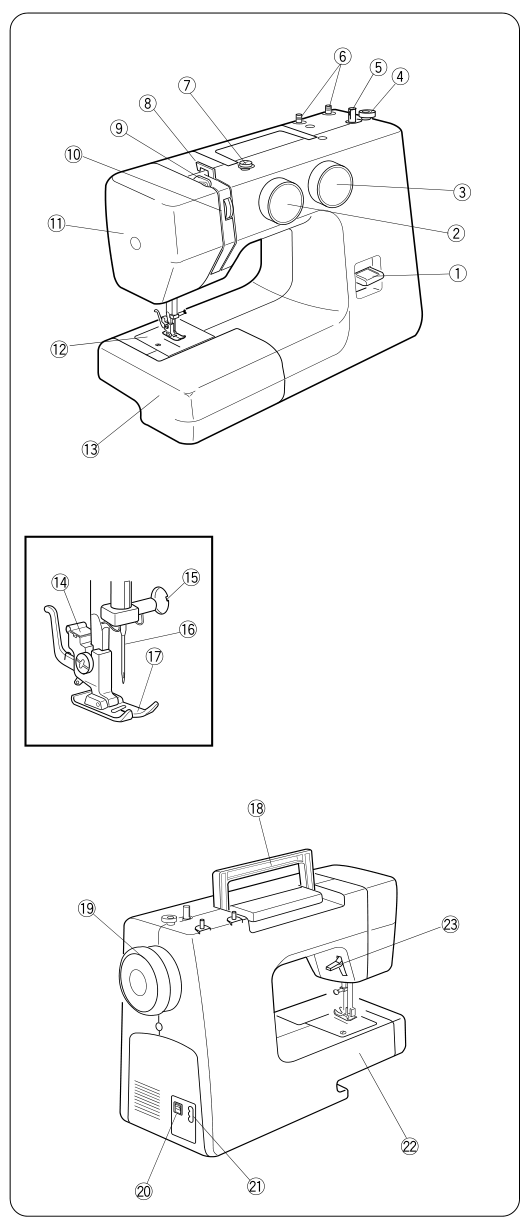
Diagram key
- 1: Reverse stitch button
- 2: Pattern selector dial
- 3: Stitch length dial
- 4: Bobbin winder stopper
- 5: Bobbin winder spindle
- 6: Spool pins
- 7: Bobbin winder thread guide
- 8: Thread guide
- 9: Thread take-up lever
- 10: Thread tension dial
- 11: Face plate
- 12: Needle plate
- 13: Extension table
- 14: Presser foot holder
- 15: Needle clamp screw
- 16: Needle
- 17: Presser foot
- 18: Carrying handle
- 19: Balance wheel
- 20: Power switch
- 21: Machine socket
- 22: Free arm
- 23: Presser foot lifter