MODEL REFERENCE
Epson EX9230
35 errors · 17 troubleshooting topics · 5 guides
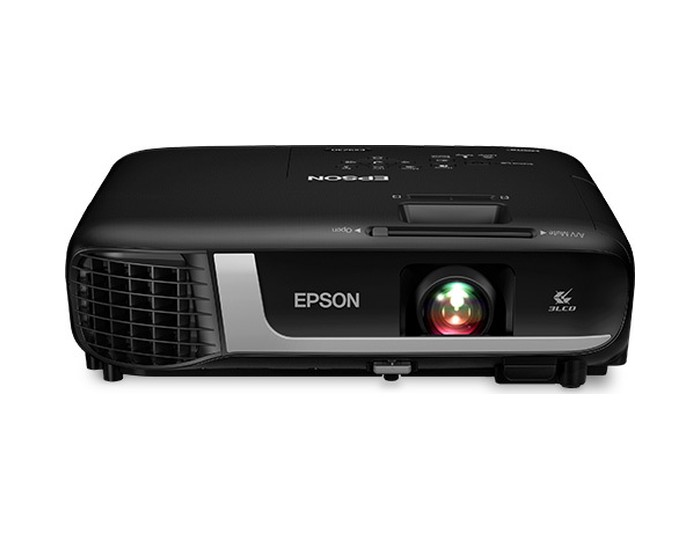
The checks and guides below come from the official manuals for this model.
No matches for this wording. Try a light name, error code or a shorter phrase.
Errors and indicators
Light patterns and messages documented in the manualFind the indicator lights
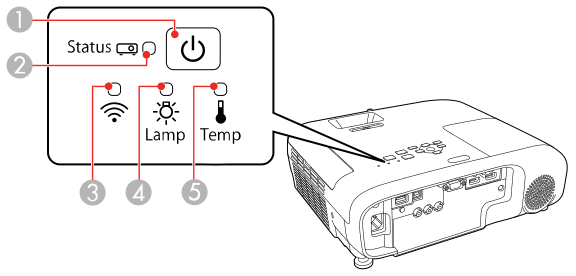
Diagram key
- 1: Power light
- 2: Status light
- 3: Wireless LAN light
- 4: Lamp light
- 5: Temperature light
Power flashing blue; Temp flashing orangeprojector is too hot
- Check that vents and the air filter are clear and that nearby objects do not obstruct airflow.
- Clean or replace the filter and check room temperature.
- Turn off and unplug before filter maintenance.
Power off; Status flashing blue; Lamp off; Temp orangeprojector overheated and shut down
- Leave it off for about five minutes to cool.
- Check ventilation, clean or replace the filter, and enable High Altitude Mode when operating at high altitude.
- If the fault persists, unplug and contact Epson.
Power off; Status flashing blue; Lamp orange; Temp offlamp or lamp-cover problem
- Turn off, unplug, and allow at least one hour for the lamp to cool before inspecting its seating or replacing it.
- Secure the lamp cover, clean or replace the filter, and use High Altitude Mode where needed.
- Contact Epson if the problem persists.
- A broken lamp can release glass, so follow the manual’s handling precautions.
Power flashing blue; Lamp flashing orangelamp replacement is due
Stop using the projector and replace the lamp soon. Turn it off, unplug it, and let the lamp cool for at least one hour before the replacement procedure below.
Power off; Status flashing blue; Lamp off; Temp flashing orangefan or temperature-sensor fault
Turn off the projector, unplug its power cord, and contact Epson service.
Power off; Status flashing blue; Lamp flashing orange; Temp offinternal projector fault
Turn the projector off, unplug it, and contact Epson service.
Power off; Status flashing blue; Lamp and Temp flashing orangeauto iris fault
Switch off, unplug the projector, and contact Epson service.
Power off; Status flashing blue; Lamp and Temp orangepower-system fault
Turn off, unplug the projector, and contact Epson service.
Wireless LAN light flashing blue slowlywireless LAN error
Turn the projector off and back on. Wireless operation on the EX9230 requires the optional Epson ELPAP11 module.
Wireless LAN light offwireless LAN is unavailable
- Check wireless network settings and the optional Epson ELPAP11 module; the EX9230 has no built-in wireless module.
- Do not remove the module while its indicator is blue or flashing, or during wireless projection.
0432network software did not start
Turn the projector off and back on.
0435network software did not start
Turn the projector off and back on.
0433transferred images cannot be displayed
Restart the computer’s network projection software.
0434network connection is unstable
Check network communication, wait briefly, and try reconnecting.
0481network connection is unstable
Check network communication, wait briefly, and try reconnecting.
0482network connection is unstable
Check network communication, wait briefly, and try reconnecting.
0485network connection is unstable
Check network communication, wait briefly, and try reconnecting.
0483network software stopped unexpectedly
Check network communication, then restart the projector.
04FEnetwork software stopped unexpectedly
Check network communication, then restart the projector.
0484computer connection was lost
Restart the network projection software on the computer.
0479projector system error
Restart the projector.
04FFprojector system error
Restart the projector.
0891wireless access point was not found
Set the computer, access point and projector to the same wireless network name, or SSID.
0892wireless authentication type does not match
Check that the projector’s wireless security configuration matches the network authentication type.
0893wireless encryption type does not match
Check the network security configuration for matching TKIP or AES encryption.
0894unauthorized access point connection ended
Ask your network administrator to check access permissions.
0895connected device communication ended
Check the connected device’s connection status.
0898dHCP address could not be obtained
- Check that the DHCP server is operating.
- If the network uses a static address instead, turn DHCP off in the projector’s Network menus and use the network administrator’s correct addressing settings.
0899communication error
The Event ID table identifies a communication error but gives no code-specific action. Use the wireless connection checks below and contact Epson if the problem continues.
089AeAP authentication type mismatch
Check the wireless LAN security settings and that the security certificate is installed correctly.
089BeAP server authentication failed
Check the wireless LAN security configuration and the security certificate installation.
089CeAP client authentication failed
Check the wireless LAN security configuration and the security certificate installation.
089Dsecurity key exchange failed
Check the wireless LAN security configuration and the security certificate installation.
No Signalno Signal
- Press Source Search and wait, or use Home to select an input.
- Turn on the source and start playback if needed.
- Check cables and enable external display or mirroring on the computer.
- Restart both devices, try a shorter HDMI cable or another video cable, and only then consider Reset All Config.
- For Windows, Windows+P and Duplicate is the manual’s shortcut; on Mac, enable display mirroring in the operating system’s display settings.
Not Supportednot Supported
- Choose the correct input signal and a computer resolution and refresh rate within the projector’s supported formats.
- As a test, reduce the computer resolution and raise it gradually.
Troubleshooting
Find the problem you are experiencingNo image appears6 steps
- Open the lens cover completely and press A/V Mute to restore a muted picture.
- Check source power and cable seating, wake the projector and computer from sleep, then open Menu: a visible menu points toward the source, cable or input.
- Match Signal settings to the input, check brightness and Normal power mode, and enable display messages.
- Hold the control-panel Enter button for seven seconds to unlock controls if needed, or enable the remote receiver.
- For the legacy Windows Media Center or DirectX cases in the guide, leave fullscreen mode or disable DirectX.
- Copyright-protected computer video may not project.
USB Display image is missing or incorrect4 steps
- Select USB on the remote and check USB Display installation; on Mac, open its Dock or Applications icon.
- Use the latest Epson USB Display software.
- For the legacy applications cited in the manual, leave Windows Media Center fullscreen or disable DirectX.
- If the cursor flickers, enable smooth mouse-pointer movement in USB Display Settings; turn off Transfer layered window.
Only part of the image is visible4 steps
- Press Auto for a computer input, check Resolution and Position in the Signal menu, and try another Aspect setting.
- Cancel E-Zoom with Esc, inspect or replace source cables, and disable a computer’s dual-display mode if it causes the problem.
- Match computer and presentation-file resolutions to supported formats and check the Projection setting.
- Reset projector settings only if these checks do not help.
Image is not rectangular2 steps
- Place the projector squarely in front of the screen.
- Enable automatic keystone correction, use the keystone buttons after changing foot height, adjust the horizontal keystone slider, or use Quick Corner to correct individual corners.
Image has noise or static6 steps
- Secure both ends of source cables, separate them from the power cord and avoid extension cables.
- After keystone changes, adjust Sharpness.
- Match Signal options to the source, including available Deinterlacing, Noise Reduction and Auto Resolution settings.
- Use a supported computer resolution and refresh rate, press Auto for tracking/sync, and adjust those settings manually using a uniform test image if needed.
- Try another cable or remove an extension power cable.
- For USB Display, disable Transfer layered window.
Image is fuzzy or blurry5 steps
- Adjust the focus ring, clean the lens using the lens-care guide, and allow a cold projector to reach room temperature before use.
- Keep projector distance within range and avoid extreme keystone angles.
- Enable automatic keystone adjustment and adjust Sharpness.
- For computer inputs, use Auto tracking/sync and, if necessary, manual adjustments with a uniform test pattern.
- Try a lower or native-resolution signal.
Brightness or colors are wrong7 steps
- Try another Color Mode and check source settings.
- Adjust the input’s available Brightness, Contrast, Tint, Color Temperature and Saturation controls; match Video Range or Video Signal where available.
- Secure cables or shorten long ones.
- Switch ECO power consumption to Normal when available, and check screen distance.
- Heat or altitude can limit brightness and power settings.
- Gradual darkening can mean the lamp needs replacement.
- Consider Reset All Config only after these checks.
Sound is missing, distorted or at the wrong volume8 steps
- Adjust projector volume, cancel A/V Mute, and check source volume and selected output.
- Reseat the audio cable and check connections; the manual specifies No Resistance audio cables.
- Set an HDMI source to PCM.
- For USB Display, enable Output audio from the projector.
- If a Mac lacks HDMI audio output, use an audio connection.
- Raise computer volume while reducing an excessively high projector volume, and check Extended-menu A/V Settings.
- A networked Windows 10 computer producing hiss may need its playback format set to 16-bit, 44,100 Hz.
- Brief high-speed fan noise immediately after a restart is normal.
Projector will not power on or shuts off6 steps
- Secure the power cord in a working socket.
- Wake standby with Power and adjust the Sleep Mode Timer if necessary.
- Check A/V Mute Timer and Lens Cover Timer in ECO settings.
- Check remote batteries and Remote Receiver if the remote power button fails.
- Try an appropriate replacement power cord for a suspected faulty cord, then disconnect and contact Epson if that fails.
- Check lamp and cover seating only after unplugging and allowing the lamp to cool for at least one hour.
Remote control does not work5 steps
- Check battery power and orientation, reception range and angle, and whether the projector is warming up or shutting down.
- Release a stuck button.
- Reduce interference from direct sun, fluorescent lighting and infrared equipment.
- Enable the remote receiver and match a configured projector ID if necessary.
- An authorized Epson reseller can supply a replacement remote.
Password is forgotten or rejected4 steps
- If protection was enabled without setting a new password, the guide lists 0000 as the factory projector password.
- If repeated attempts show a request code, stop trying, record the code, and contact Epson with proof of ownership.
- A remote is required for entry.
- For unchanged web-control defaults, the guide lists EPSONWEB/admin and EPSONREMOTE/guest; use your configured password if changed, and check letter case.
Wireless authentication fails4 steps
- Fit the optional Epson ELPAP11 wireless module, enable Wireless LAN Power and match network security and passphrase settings.
- Check the Event ID in Info against the code list above, and ensure the connected device is on and operating.
- If an access point uses WPA3-EAP, the guide specifies changing it to WPA2/WPA3-EAP.
- Date & Time adjustment applies only if the menu offers it.
Projector web control is inaccessible5 steps
- Use a device on the projector’s network without a proxy.
- Login names and passwords are case sensitive.
- Web Control uses EPSONWEB and the password in the Network menu; its documented unchanged default is admin.
- Web Remote uses EPSONREMOTE with its configured password; the unchanged default is guest.
- User IDs cannot be changed.
Network alert emails are not received3 steps
- Check that the projector is powered and correctly connected to the network, and inspect mail notification settings in Network Notifications or the network software.
- Use Communication On for standby monitoring and the correct Port setting.
- A fault that shuts the projector down can prevent it from sending an email.
Network projection has static2 steps
- Reduce distance and obstacles between the access point, computer, mobile device and projector.
- Move interfering Bluetooth equipment or microwaves away, increase wireless bandwidth where possible, and reduce the number of connected devices when throughput falls.
Read normal projector-light states6 steps
- With Power and Status steady blue and Lamp/Temp off, operation is normal.
- Power blue with Status flashing blue means warming or cooling, when buttons are disabled.
- Power blue with Status, Lamp and Temp off means standby/sleep.
- Power flashing blue with Status, Lamp and Temp off means preparation for network monitoring.
- A steady blue wireless light means available; fast flashing blue means connecting.
- For any unlisted fault pattern, switch off, unplug and contact Epson.
Use the built-in Help display3 steps
- With the projector on, press Home, select Help with the arrow buttons and press Enter.
- Highlight the problem and press Enter to read the proposed solution.
- Use Esc to choose another problem or Home to leave Help.
Guides
Maintaining and transporting the projector
Instructions from the manualClean the lens and case5 steps
- Turn the projector off and unplug it before cleaning.
- Wipe lens dust with lens-cleaning paper; for stubborn marks, lightly moisten a soft lint-free cloth with appropriate lens cleaner, never spray the lens.
- Do not use flammable-gas cleaner, glass cleaner, harsh materials, canned air, or bare fingers.
- Clean the case with a soft dry cloth or mild soap and water on a cloth for stubborn dirt.
- Do not spray liquid or use alcohol, solvents or wax.
Air filter and vent maintenance
Instructions from the manualClean or replace the air filter6 steps
- Switch off and unplug the projector.
- Remove dust gently using a small computer vacuum or a very soft brush; the removable filter can be cleaned on both sides.
- Never wash it, use detergent or solvent, or use canned air.
- Replace it if damaged, hard to clean, or still triggering a warning after cleaning.
- Open the filter cover, pull out the old filter, insert the replacement until it clicks, and close the cover.
- Dispose of the old ABS/polyurethane filter under local rules.
Projector maintenance
Instructions from the manualReplace the lamp and reset its timer8 steps
- Switch off, unplug, and let the lamp cool for at least one hour.
- Use the supplied screwdriver to loosen the lamp-cover screw, slide and lift the cover off, loosen the captive lamp screws and gently lift the lamp by its raised section.
- If glass has broken, handle fragments carefully; for a ceiling-mounted projector, stand beside the cover rather than underneath it.
- Insert a genuine compatible lamp in the correct orientation without touching its glass, seat it firmly and tighten screws without overtightening.
- Refit and secure the cover.
- Recycle the mercury-containing lamp under local rules, never in ordinary trash.
- Only after replacing it, turn on and select Menu, Reset, Reset Lamp Hours, then Yes, and exit with Menu or Esc.
- Do not reset hours for an unchanged lamp.
Replace remote batteries and transport the projector4 steps
- The projector remote uses two AA manganese or alkaline batteries, with the polarity shown inside the compartment.
- Do not mix types or old and new batteries; dispose of them under local rules and keep them away from children, heat and flame.
- Before transport, switch off, wait for Power steady blue and Status off, unplug, close the lens cover, and disconnect accessories.
- Use a carrying case and a cushioned rigid box for long trips or shipping.
Installing the wireless lan module
Instructions from the manualConnect the optional wireless module4 steps
- The EX9230 requires the optional Epson ELPAP11 module for wireless network projection.
- Remove its cover screw, fit the module in USB-A, and secure the cover again.
- Never remove it while its light is blue or flashing, or during wireless projection.
- Configure the Network menus and use Epson iProjection for static images and presentations; this connection is not recommended for streaming video.
Model details
Model and compatibility
- Resolution
- EX9230 has a native Full HD resolution of 1920 × 1080 pixels. [1]
- Wireless networking
- Wireless projection requires the optional Epson ELPAP11 module in USB-A. The built-in wireless and Screen Mirroring branches in the guide apply to other models. [1]
- Image correction
- EX9230 supports automatic vertical keystone correction, a horizontal keystone slider and Quick Corner. [1]