MODEL REFERENCE
Epson Home Cinema 2350
7 errors · 16 troubleshooting topics · 49 guides
The checks and guides below come from the official manuals for this model.
No matches for this wording. Try a light name, error code or a shorter phrase.
Errors and indicators
Light patterns and messages documented in the manualFind the indicator lights
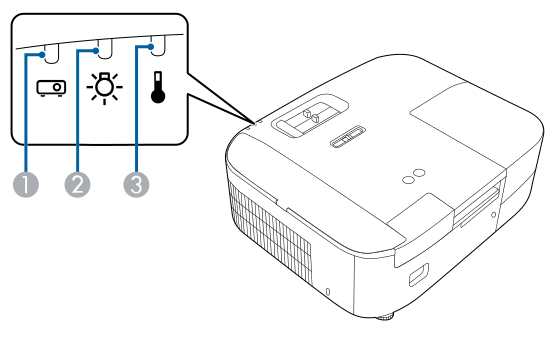
Diagram key
- 1: Status light.
- 2: Lamp light.
- 3: Temp (temperature) light.
Status: varies; Lamp: off; Temp: flashing orangeprojector is too hot3 checks
Status: off; Lamp: off; Temp: orangeprojector overheated and turned off6 checks
Status: off; Lamp: orange; Temp: offlamp or lamp cover has a problem5 checks
No Signalno Signal7 checks
Not Supportednot Supported3 checks
Troubleshooting
Find the problem you are experiencingUnlisted light pattern1 check
Manual section: Projector Light Status.
- Service required
- If the lights show a combination absent from the manual table, switch off, unplug the projector and contact Epson.
No image appears12 checks
Manual section: Solving Image or Sound Problems.
- Lens cover
- Remove the lens cover.
- A/V mute
- Press A/V mute on the projector remote to restore an image that was temporarily hidden.
- Indicator status
- Check the lights for normal operation.
- Power and cables
- Check that the necessary cables are firmly connected and that the projector and video source are powered on.
- HDMI cable length
- Try a shorter HDMI cable.
- Direct video connection
- Connect the video source directly to the projector as a test.
- Sleep or standby
- Press the projector power button to wake it. Check whether the computer is asleep or showing a blank screen saver.
- Streaming device
- For a streaming device, check its internal USB power cable. Switch on the streaming device or video source and start playback if needed.
- HDMI CEC
- Check the connected device documentation for HDMI CEC support. Reconfigure CEC and restart the device if needed; switch the projector and source off, then on again.
- Laptop display
- Set a connected laptop to output to an external monitor.
- Computer resolution
- Keep the computer display resolution and frequency within the projector limits; change the computer resolution if needed.
- Reset
- If the other checks do not help, reset projector settings through the Reset menu.
Display from a PC laptop3 checks
Manual section: Solving Image or Sound Problems.
- External display
- Hold Fn and press the laptop key marked with a monitor or CRT/LCD symbol; consult the laptop manual and wait a few seconds.
- Repeat if needed to display on both screens.
- On Windows 7 or later, Windows+P followed by Duplicate is another documented option.
- Windows display settings
- If the screens still differ, use Windows Display settings to enable the external monitor port and disable extended desktop; consult the computer or Windows instructions.
- Graphics settings
- If needed, select Clone, Mirror or Duplicate in the graphics-card multiple-display options.
Display from a Mac laptop1 check
Manual section: Solving Image or Sound Problems.
- Mirrored display
- For No Signal from a Mac laptop, open System Preferences and choose Displays, Display or Color LCD.
- Open Arrange or Arrangement and select Mirror Displays.
- Refer to the laptop instructions.
Only part of the image appears5 checks
Manual section: Solving Image or Sound Problems.
- Aspect ratio
- Choose another image aspect ratio in the Signal menu.
- Zoom
- Adjust image size with the zoom slider.
- Computer display
- Disable dual display and set a supported computer resolution.
- Presentation resolution
- Check whether the presentation files were created at a different resolution; consult the software help.
- Projection mode
- Check the Projection selection in the Extended menu.
Image is not rectangular3 checks
Manual section: Solving Image or Sound Problems.
- Position
- Where possible, put the projector squarely in front of the center of the screen.
- Keystone settings
- Correct image shape through the projector keystone settings.
- Horizontal slider
- Adjust the horizontal keystone slider.
Image contains noise or static5 checks
Manual section: Solving Image or Sound Problems.
- Cables
- Keep signal cables separate from the power cord, secure at both ends and free of extension cables. HDMI cables should be no longer than 24 feet (7.3 m).
- Sharpness
- Try reducing Sharpness in the Image menu.
- Noise reduction
- Try Noise Reduction or MPEG Noise Reduction in the Image menu.
- Computer format
- Choose a compatible computer video resolution and refresh rate.
- Power extension
- If using an extension power cable, test without it for interference.
Image is fuzzy or blurry6 checks
Manual section: Solving Image or Sound Problems.
- Focus
- Adjust the focus slider.
- Lens
- Clean the lens according to the reviewed instructions. After bringing the projector from a cold place, let it reach room temperature before use to avoid condensation.
- Screen distance
- Place the projector close enough to the screen.
- Keystone angle
- Reduce an excessive keystone adjustment angle that is distorting the image.
- Sharpness
- Adjust Sharpness.
- Computer resolution
- Try a lower computer resolution or one matching the projector native resolution.
Image brightness or colors are incorrect8 checks
Manual section: Solving Image or Sound Problems.
- Color Mode
- Try a Color Mode suited to the content and surroundings.
- Video source
- Check the video source settings.
- Image menu
- Adjust available Brightness, Contrast, Tint and Color Saturation settings for the current source.
- Video Range
- Choose the correct Signal > Video Range setting when available for the source.
- Large screen
- For images above 300 inches, a high-gain screen and controlled room lighting may be needed.
- Cables
- Secure the source cables; replace long runs with shorter cables as a test.
- Screen distance
- Put the projector close enough to the screen.
- Progressive darkening
- If brightness has gradually deteriorated, the lamp may need replacement soon.
Image is upside down1 check
Manual section: Solving Image or Sound Problems.
- Projection mode
- Select the correct Projection option in the Extended menu.
Sound is absent or the volume is wrong7 checks
Manual section: Solving Image or Sound Problems.
- Volume
- Adjust projector volume.
- A/V mute
- Press A/V mute on the projector remote to resume picture and sound if temporarily stopped.
- Output device
- Check Audio Out Device settings.
- Source audio
- Check the computer or video source volume and selected audio output.
- External speaker cable
- Check the cable from Audio Out to the external speakers.
- HDMI format
- For silent HDMI audio, set the source to PCM output.
- Older Mac audio
- Check that the Mac supports HDMI audio. If it does not, connect its audio directly to the speaker system.
Projector does not start or shuts off unexpectedly7 checks
Manual section: Solving Projector or Remote Control Operation Problems.
- Power connection
- Secure the power cord at the projector and a working outlet.
- Child Lock
- Unlock the projector power button or use the projector remote.
- Remote batteries
- Check batteries if remote power does not start the projector.
- Correct remote
- Use the projector remote, not the separate Android TV remote.
- Sleep Mode
- Perform an operation to wake the projector. To prevent sleep, set Sleep Mode to Off.
- Power cord fault
- Try a different power cord. If that fails, disconnect it and contact Epson.
- Fan behavior
- Cooling fans may run in standby or sound unexpectedly when waking, depending on settings; the manual identifies this as normal.
Projector remote does not respond8 checks
Manual section: Solving Projector or Remote Control Operation Problems.
- Batteries
- Check battery charge and polarity; replace batteries if needed.
- Range and angle
- Operate within the documented reception range and angles.
- Startup or shutdown
- Wait if the projector is warming up or shutting down.
- Stuck button
- Release any stuck button that has put the remote into sleep mode.
- Android TV pairing
- Pair the projector remote with the streaming device for Android TV operation.
- Correct remote
- Use the projector remote rather than the separate Android TV remote.
- Infrared interference
- Dim strong fluorescent lights or move the projector away from direct sunlight or interfering infrared devices.
- Lost remote
- Obtain a replacement through an Epson parts distributor.
HDMI Link does not control the connected device8 checks
Manual section: Solving Problems.
- Connections and power
- Secure all required cables and power on the projector and source.
- CEC cable
- Check that the HDMI cable meets the HDMI CEC standard.
- CEC device
- Check the device documentation for HDMI CEC compliance.
- Cable test
- Replace the HDMI cable or try a shorter one.
- HDMI Link setting
- Set HDMI Link to On.
- Device list
- Check Settings > Device Connections. If the device is absent, the guide identifies it as not meeting HDMI CEC standards; try another device.
- Device readiness
- Check that the connected device is powered and in its documented standby state.
- Changed connections
- After adding a device or changing connections, set its CEC function again and restart it if needed.
Read the normal projector light states7 steps
Manual section: Projector Light Status.
- The source diagram identifies Status, Lamp and Temp lights.
- Status blue with Lamp and Temp off is normal operation.
- Status flashing blue with the other two off means warmup or cooling.
- All three off means standby or sleep.
- Extended > Operation > Illumination can turn the power and status indicators off.
- Use the complete reviewed abnormal-light list for faults.
- If the pattern is not listed, switch off, unplug and contact Epson.
Problem remains after the documented checks2 checks
Manual section: Solving Problems.
- Restart test
- Switch the projector off and unplug it, reconnect power and turn it on. Check the light table and the relevant troubleshooting instructions.
- Support
- If the problem remains, contact Epson.
- Before repair, note each online service account because the projector may be returned reset.
- Have model, serial number, proof/date of purchase, source configuration and a problem description ready.
Guides
Setting up the projector
Instructions from the manualPlace and install the projector10 steps
- Use a sturdy, level surface or compatible mount, parallel and square to the screen.
- Keep vents unobstructed and stay within reach of a grounded outlet.
- If centering is impossible, use lens shift rather than keystone for better image quality.
- Front, rear, front-ceiling and rear-ceiling arrangements are documented.
- Select the matching Projection setting for rear or ceiling installation.
- Leave the source-diagram clearances: 10 cm (3.94 inches), 20 cm (7.87 inches) and 30 cm (11.81 inches) at their illustrated sides; use the complete placement figure rather than inferring sides.
- Ceiling or wall installation requires specialist knowledge; have the dealer carry it out.
- Secure every fixing point of the supported Epson mount and use a safety wire strong enough for the projector.
- Do not use screw-locking adhesive, oil or lubricant.
- Do not install vertically, operate on the side, or tilt more than 10 degrees forward or back.
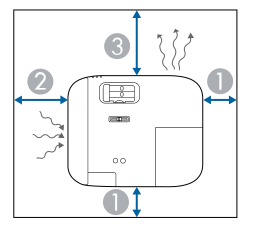
Diagram key
- 1: Leave 3.94 inches (10 cm) at both positions marked 1.
- 2: Leave 7.87 inches (20 cm) at position 2.
- 3: Leave 11.81 inches (30 cm) at position 3.
- Wavy lines: Keep the illustrated air exhaust and intake vent areas unobstructed.
Use the projection distance table6 steps
- Distance, zoom, aspect ratio and other settings determine approximate image size.
- Use the manual’s 16:9 table and Epson projection calculator; the manual explicitly notes that converted figures may be rounded.
- The table covers 40, 60, 80, 100, 120, 150, 200, 300, 400 and 500-inch images.
- For example, its native 100-inch row gives a wide-to-tele distance of 115.7–187.8 inches (294–477 cm).
- Use the illustrated lens center and offset definitions when positioning the image.
- For screens larger than 300 inches, a high-gain screen and a light-controlled environment may be necessary.
Install the safety wire3 steps
- For a ceiling or shelf installation, pass the optional safety wire through the projector security-cable attachment point.
- Fix its other end to a structure strong enough to carry the projector.
- Loop an overly long wire to minimize slack.
Install or replace remote batteries12 steps
- Use two AAA alkaline or manganese batteries.
- Do not mix types or combine old and new batteries.
- Remove the battery cover and, when replacing, remove the old cells.
- If battery fluid has leaked, wipe it away with a soft cloth without getting it on your hands.
- Wash your hands immediately if contact occurs.
- Fit the batteries with the indicated plus and minus polarity.
- Incorrect polarity can cause leakage or explosion, fire, injury or product damage.
- Refit the cover until it clicks.
- Dispose of cells under local rules.
- Keep them away from heat, flame and children: they are choking and swallowing hazards.
- Seek immediate medical attention if one is swallowed.
- Remove cells for long-term storage.
Connect an HDMI video source11 steps
- Connect projector and source before connecting the projector power cord.
- Do not turn on the video source before connecting it; this can damage the projector.
- Match connector shape and orientation without forcing a plug.
- Connect an optional HDMI cable from the source HDMI output to the projector HDMI port.
- For 4K Enhancement at 60 Hz, the guide specifies an HDMI 2.1 ultra-high-speed rated cable.
- If incompatible-cable images are incorrect, try changing Signal > EDID.
- The internal speaker receives mono analog audio converted from HDMI; external speakers can receive stereo.
- If sound is wrong, check Settings > Audio Out Device.
- For gaming lag, set the console to a progressive 480p, 720p or higher output according to its instructions; Fast Image Processing can reduce lag.
- A game-console source change can take a few seconds.
- HDMI CEC-compliant sources can be controlled by enabling HDMI Link; both cable and device must support it.
Connect a computer for HDMI video and audio6 steps
- Connect an optional HDMI cable from the computer HDMI output to the projector HDMI port.
- For a Mac without a compatible output, ask Apple about an adapter; ask the device manufacturer about smartphone or tablet adapters.
- HDMI audio is converted to mono for the internal speaker or stereo for external speakers.
- Select EPSON PJ as the computer HDMI audio playback device.
- If audio is missing, check Settings > Audio Out Device.
- Older Macs may not support HDMI audio.
Connect external speakers or headphones7 steps
- Connect the computer or video source to the projector with the required audio/video connections.
- Obtain an appropriate stereo mini-jack cable or adapter for the speakers or headphones.
- Connect the speaker end, then plug the stereo mini-jack into Audio Out.
- A self-powered speaker system or an amplifier with speakers can be used; connecting external speakers disables the internal speaker.
- Set HDMI Link to On and Audio Out Device to AV System as directed in the connection section.
- Without an attached A/V system, external Audio Out speakers still receive audio with AV System selected.
- Lower volume before playback or shutdown and increase it gradually after startup to protect hearing.
Connect HDMI ARC speakers or a receiver3 steps
- Use ARC-compatible external speakers or an A/V receiver and an optional HDMI cable.
- Enable Settings > HDMI Link and select AV System for Audio Out Device.
- Connect the cable to the external system’s ARC-compatible HDMI port and the projector HDMI1 (ARC) port.
Connect another streaming media player5 steps
- The built-in streaming device can be replaced with another player.
- Remove the rear cover and connect the alternative player to HDMI2.
- If needed, connect the player power cable to the projector USB-A port and its other end to the player.
- Extended > USB Power > Always On keeps it powered while the projector is not projecting.
- Fit the alternate rear cover.
Set up Android TV10 steps
- At first use, turn on the projector.
- When prompted, hold Enter and Home together on the projector remote until pairing completes; its light flashes while pairing.
- Use the arrows and Enter to select a language.
- Choose Continue to use an Android phone for Wi-Fi and Google-account setup, follow the prompts and then continue the final setup.
- Or choose Skip for manual setup.
- For manual setup, select the wireless network and follow its prompts.
- Choose Sign In at the Google-account screen and follow the prompts, or Skip to proceed without an account.
- Finish the on-screen settings to reach the Home screen.
- Some features need a Google account and some apps need paid subscriptions.
- Later Android TV settings are under the icon at the Home screen’s upper right.
Using basic projector features
Instructions from the manualTurn the projector on7 steps
- After connecting the source safely, turn on the computer or video equipment first.
- Remove the lens cover, connect the power cord to the projector and plug it into an outlet.
- With Direct Power On enabled, plugging in starts the projector.
- Otherwise press power on the projector or projector remote.
- The status light flashes blue during warmup and becomes steady blue when ready.
- Never look into the illuminated lens; it can injure eyes, especially children’s.
- If no image appears, check source power and playback, laptop external output and source selection.
Turn the projector off8 steps
- Shut down a connected computer first so its shutdown remains visible.
- Press projector or remote power, then press power again at the confirmation screen.
- Another button cancels shutdown.
- The lamp and status light turn off.
- Do not immediately restart or repeatedly cycle power; this shortens lamp life.
- Turn the product off when unused; lamp brightness and life depend on use and conditions.
- For transport or storage, wait until the status light is off, unplug the cord and replace the lens cover.
- USB Power > Always On can keep the streaming player powered for faster startup and network updates.
Aim the projector remote3 steps
- Aim at a projector receiver or the screen within 6 m (19.7 feet), observing the illustrated horizontal ±30-degree and vertical ±15-degree limits.
- Avoid strong fluorescent light and direct sunlight.
- Remove batteries if the remote will be unused for a long time.
Pair the projector remote4 steps
- Turn on the projector.
- Hold Home and Enter together on the projector remote until its command light flashes.
- Wait for the on-screen pairing confirmation.
- Pairing is needed for Android TV and video-on-demand functions.
Pair the separate Android TV remote7 steps
- This procedure applies when the built-in streaming device has been moved to another device or projector.
- If already paired, do not repeat it.
- Turn on the host and choose its correct input if necessary.
- Using the projector remote, press Home, open Android TV settings, choose Remote & accessories and Add accessory.
- Now put the projector remote down.
- On the Android TV remote, hold volume down and Enter until its command light flashes, then choose EPSON ATV REMOTE on screen.
- The light stops flashing when paired.
Adjust image height4 steps
- Turn on the projector and display an image.
- Pull the front foot-release lever while lifting the front; release the lever to lock the extended foot.
- Rotate the rear feet to level a tilted image.
- If still not rectangular, use the reviewed image-shape controls.
Adjust image position with lens shift6 steps
- Turn on the projector and display an image.
- Use the vertical lens-shift dial when the projector cannot sit directly in front of the screen.
- When adjusting height, start below the desired image position and move upward to reduce later downward movement.
- Keep the dial centered for the clearest picture.
- Turn the dial to position the image.
- The source figure identifies the lens center, home-position image and maximum range V × 60%.
Correct horizontal shape with the slider4 steps
- For best quality, reposition the projector squarely before using digital correction.
- The horizontal slider is documented for projection angles about 30 degrees left or right.
- Turn on the projector, display an image and adjust the horizontal keystone slider until it is rectangular.
- Correction slightly reduces image size.
Correct shape with H/V Keystone6 steps
- First improve projector position if possible.
- Turn on the projector and display an image, then press keystone on the projector remote.
- Use arrows to choose horizontal or vertical correction and adjust shape; finish with return.
- The same controls are under Settings > Keystone > H/V Keystone.
- Keystone cannot be combined with other shape-correction methods and slightly reduces the image.
- Automatic vertical correction works only with Projection set to Front; it corrects up to 30 degrees up or down.
Correct shape with Quick Corner8 steps
- Reposition for best quality first.
- Turn on the projector, display an image and open menu > Settings > Keystone > Quick Corner.
- Press Enter twice as directed to open adjustment.
- Choose a corner with the arrow keys, press Enter, adjust it and press Enter to return to corner selection.
- A gray arrow means that direction has reached its limit.
- To reset adjustments, hold return for at least two seconds and choose Yes.
- Finish with return.
- The corrected image is smaller; keystone then opens Quick Corner next time.
Resize and focus the imageView
Select an image source3 steps
- Turn on the desired source and start its video playback if needed.
- Press source on the projector or remote, then use up/down to select the input.
- If no signal is found, check the source-to-projector cables.
Choose the projection mode4 steps
- For a normal front table installation use Front.
- Front/Ceiling flips vertically; Rear flips horizontally for a translucent screen; Rear/Ceiling flips both ways.
- Turn on the projector and display an image.
- Open menu > Extended > Projection, select the required mode with Enter, then exit with menu or return.
Choose an image aspect ratio9 steps
- Turn on the projector, select the source and open menu > Signal > Aspect.
- Select a ratio available for that input with Enter; exit with menu or return.
- Auto follows the signal.
- Normal uses the full projection area while preserving shape.
- Zoom uses full width while preserving shape.
- Full uses full width without preserving shape.
- HDMI input determines available ratios; Full HD HDMI fixes the ratio to Normal.
- Depending on source shape and resolution, black bands or cropping can remain.
- Commercial or public image resizing may affect copyright rights.
Choose a Color Mode3 steps
- Turn on the projector, select the source and start any required video playback.
- Open menu > Image > Color Mode, choose a mode using arrows and Enter, then finish with menu or return.
- Dynamic prioritizes brightness; Vivid suits bright surroundings; Cinema suits natural-tone movies in a dark room; Natural suits color adjustment.
Adjust picture quality13 steps
- Turn on the projector and select the source.
- Open menu > Image > Expert Settings.
- Brightness changes overall color brightness, Contrast the light/dark difference, Color Saturation density, Tint green/magenta balance and Sharpness image detail.
- White Balance > Color Temp makes higher values bluer and lower values redder; Custom adjusts RGB offset and gain.
- Frame Interpolation adds intermediate frames.
- Larger Scene Adaptive Gamma values increase contrast.
- Gamma adjusts correction values or a graph; RGBCMY adjusts each color; Auto Iris varies luminance with image brightness.
- Brightness does not change lamp brightness: use Image > Light Output.
- Under Image Enhancement, 4K Enhancement doubles resolution, Image Preset Mode selects enhancement presets, Noise Reduction reduces flicker, MPEG Noise Reduction reduces MPEG noise and Detail Enhancement clarifies outlines.
- Noise Reduction and MPEG Noise Reduction require Image Processing > Fine, an active Image Preset Mode and an input other than 4K or 21:9 (2560 × 1080).
- Detail Enhancement needs an active preset.
- Frame Interpolation requires Fine processing and an active preset, no 4K input, and 4K Enhancement off except for 1080p 24 Hz.
- Finish with return.
Adjust gamma7 steps
- Use a still image; moving video cannot be adjusted properly.
- Medical images may reproduce incorrectly depending on the screen and environment.
- Turn on the projector, select the source and open menu > Image > Expert Settings > Gamma.
- Select a correction value: smaller values darken and sharpen overall appearance; larger values brighten dark areas but may weaken light-area saturation.
- For finer control choose Custom.
- Select a tone with left/right, alter it with up/down and confirm with Enter.
- Exit with menu or return.
Control volume and sound mode8 steps
- Lower volume before shutdown or playback, then increase it gradually after startup.
- Set volume separately for each input.
- The volume buttons control internal, Audio Out or connected Bluetooth audio devices.
- For an A/V system, enable HDMI Link and select AV System as Audio Out Device.
- If Android TV volume was reduced to zero with its separate remote, raise it with that remote before adjusting with the projector remote.
- To choose sound processing, play a video and open menu > Settings > Sound > Sound Mode.
- Standard is normal, Vocal emphasizes speech, Music clarifies high and low sounds, and Movie emphasizes them.
- Confirm with Enter and exit with menu or return.
Adjusting projector features
Instructions from the manualControl HDMI CEC devices with HDMI Link11 steps
- Both the device and cable must meet HDMI CEC requirements, and the device must be configured.
- Some compliant functions may still not operate; consult its instructions.
- Open menu > Settings > HDMI Link.
- Select HDMI Link > On, return, then choose Device Connections and the desired device.
- Blue identifies the active linked source; an unavailable device name remains blank.
- Choose Audio Out Device: Projector for internal or Audio Out speakers; AV System for a compliant amplifier.
- Power On Link > PJ -> Device starts the device with the projector; Device -> PJ starts the projector with the device; Bidirectional enables both.
- Power Off Link controls whether shutting off the projector turns linked devices off.
- It needs the device CEC power-link function, may not stop a recording device, and does not cause source-device shutdown to turn the projector off.
- For smart speakers the guide recommends HDMI Link On, Power On Link Bidirectional or Device -> PJ, Power Off Link On and USB Power Always On.
- Finish with return.
Temporarily mute picture and sound3 steps
- Press A/V mute on the projector remote to hide the picture and mute audio.
- Playback continues, so resuming will not return to the point at which you muted.
- Press A/V mute again to restore picture and sound.
Attach a security cableView
Align red and blue color panels14 steps
- Panel Alignment adjusts red or blue convergence only; green is the fixed reference.
- Warm up for at least 10–15 minutes and focus first.
- For best results use a non-colored, untextured surface, a dark room and an image at least 60 inches (152 cm) diagonally.
- Adjustment is limited to ±3 pixels in 0.125-pixel increments, and image quality can decline.
- Turn on the projector.
- Open menu > Extended > Display > Panel Alignment, select Panel Alignment again and choose On.
- Choose Select Color > R or B, then Pattern Color and the required pattern.
- Choose Start Adjustments.
- For the whole-panel option, select Shift the whole panel, press Enter, adjust the selected color with arrows and press Enter.
- This is not recommended when only local areas need adjustment; it shifts the entire grid.
- To adjust corners, choose Adjust the four corners, use arrows to align the orange-box corner and press Enter to move through all corners.
- After the last corner, press Enter.
- If correct, select Exit and Enter.
- For further work choose Select intersection and adjust; highlight a misaligned-box corner, press Enter, adjust, press Enter and repeat for other intersections as needed.
Save and reuse image settings6 steps
- Turn on the projector, display an image and open menu > Settings > Memory.
- Load Memory overwrites current settings; Save Memory stores them; Erase Memory deletes the chosen entry; Rename Memory changes its name.
- A blue mark identifies a used name; saving there overwrites the previous settings.
- Each name also shows the saved Color Mode.
- Reset > Reset Memory deletes all saved memories.
- Finish with menu or return.
Maintaining and transporting the projector
Instructions from the manualClean the lens safely7 steps
- Turn off and unplug the projector before cleaning.
- Do not wipe the lens immediately after shutdown; allow it to cool.
- For dust or smudges, wipe gently with lens-cleaning paper.
- For stubborn marks, moisten a soft lint-free cloth with lens cleaner and wipe gently.
- Never spray liquid directly onto the lens.
- Do not use cleaner containing flammable gas, glass cleaner, harsh materials or canned air.
- Avoid impacts and bare-finger contact with the lens.
Clean the projector case6 steps
- Turn the projector off, unplug it and let it cool.
- Remove dust with a soft, dry, lint-free cloth.
- For stubborn dirt use a soft cloth moistened with water and mild soap, wrung dry.
- Never spray liquid directly on the case.
- Do not use wax, alcohol, benzine, thinner, other chemical solvents, liquid/aerosol cleaners or canned air.
- Do not let water enter the housing.
Clean the air intake vent and maintain the filter8 steps
- Check and maintain the air filter and vents regularly according to dust conditions; do not wait for an overheating warning.
- Neglected filters can shorten projector or lamp life and resulting damage may fall outside warranty.
- Turn off and unplug the projector.
- Gently clean the intake vent with a small computer vacuum or very soft brush, such as a paintbrush.
- Do not vacuum the filter itself.
- Do not wash the filter or use detergent, solvent or canned air; gases can leave flammable residue or drive dust into sensitive parts.
- If no streaming player is installed, disconnect the HDMI and USB power cables during cleaning so their ports do not collect dust.
- Replace the filter when damaged or when dust cannot be removed.
Replace the air filter8 steps
- Replace a torn/damaged filter or one with persistent dust.
- Replacement is possible on a table or with the projector ceiling-mounted.
- Turn off and unplug first.
- Remove the rear cover and air filter cover.
- Pull the filter out.
- Insert the new filter in the shown direction and gently push until it clicks.
- Refit both covers.
- Used filters contain ABS resin and polyurethane foam; dispose of them under local rules.
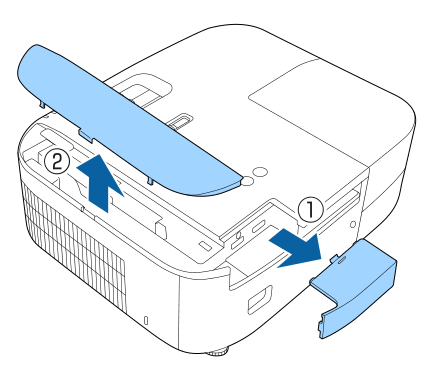
Diagram key
- 1: Remove the rear cover.
- 2: Remove the air filter cover.
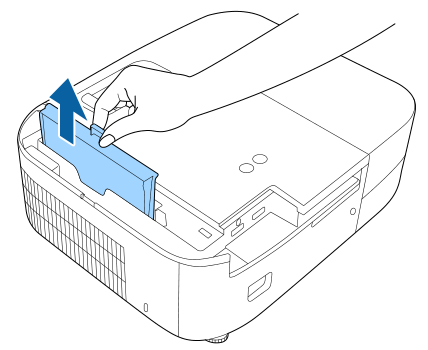
Diagram key
- Arrow: Pull the air filter out of the projector.
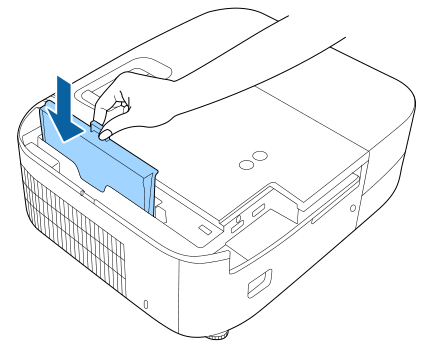
Diagram key
- Arrow: Place the new air filter in the orientation shown and push gently until it clicks into place.
Replace the projector lamp20 steps
- Replace the lamp promptly when picture quality deteriorates, a replacement message appears, or the lamp-replacement light pattern occurs.
- Stop continued use after the replacement warning: explosion risk rises.
- Keep a spare genuine Epson lamp ready; non-genuine lamps may affect safety, image quality and warranty.
- Turn off and unplug the projector and wait at least one hour for the lamp to cool fully.
- Replacement is possible while ceiling-mounted.
- Use the screwdriver supplied with the new lamp to loosen the lamp-cover screw.
- If the lamp is broken, handle glass carefully.
- For a ceiling installation stand beside, not beneath, the cover so fragments cannot enter eyes or mouth.
- If the lamp breaks, ventilate the room; seek medical help for glass inhaled or entering eyes/mouth.
- Contact Epson if the lamp is cracked.
- Slide the cover out and lift it off.
- Loosen the lamp-retaining screws; they remain captive.
- Grasp the raised portion and gently withdraw the lamp.
- Insert the new lamp gently in the correct orientation.
- Do not touch its glass with bare hands; use a cloth or glove when handling.
- Push the lamp firmly into place and tighten its screws without overtightening.
- Refit the cover and secure its screw.
- An unsecured cover prevents the lamp from lighting.
- Reset the lamp timer after replacement.
- The mercury-containing lamp must be recycled/disposed of under local rules, not put in household trash.
Reset the lamp timer after replacement4 steps
- Reset only after fitting a new lamp; resetting without replacement makes usage information inaccurate.
- Turn on the projector and open menu > Reset > Reset Lamp Hours.
- Press Enter, choose Yes at the prompt and confirm with Enter.
- Exit with menu or return.
Remove the built-in streaming device7 steps
- Remove the player if sending it to Epson for repair or connecting it to another host.
- Repair may reset it and require app-account details again.
- Use the separate Android TV remote when it is connected elsewhere.
- Turn off and unplug the projector.
- Remove the rear cover and air filter cover, then lift out the player.
- Disconnect its USB power and HDMI cables.
- Refit both covers.
Transport or store the projector8 steps
- Turn off, unplug and disconnect attached equipment before moving.
- Protect the precision and glass parts.
- For long transport or checked luggage, use a firm cushioned box marked Fragile.
- For repair shipment, use original or equivalent cushioned packaging and mark it Fragile.
- Epson disclaims transit damage liability.
- Remove remote batteries before storage.
- Store within −10 to 60°C (14 to 140°F), 10–90% non-condensing humidity, away from direct sun, smoke, steam, corrosive gas, dust, vibration and shock.
- Fit the lens cover when unused.
Important safety instructions
Instructions from the manualObserve operating limits and stop for unsafe conditions10 steps
- Use at 5–35°C (41–95°F) up to 2286 m (7500 feet), or 5–30°C (41–86°F) from 2286 to 3048 m (7500–10000 feet), with 20–80% non-condensing humidity.
- Enable High Altitude Mode above 1500 m (4921 feet).
- Keep the exhaust at least 30 cm (11.8 inches) from a wall and other wall-facing sides at least 20 cm (7.9 inches), while following the full placement figure.
- Do not block the beam or vents, use a soft surface/closed cabinet without ventilation, or bring hands/face or heat-sensitive objects near the exhaust.
- Unplug and obtain qualified service for abnormal operation, smoke, strange smells/noises, damaged cord/plug, liquid or foreign-object ingress, rain/water exposure, or a dropped/damaged unit.
- Do not disassemble or service beyond procedures specifically described by the manual.
- Do not look into the bright lens or through optical viewing aids.
- Keep bags and batteries away from children.
- Do not touch the plug during storms; unplug for extended non-use.
- Keep away from water, flammable/explosive gases, smoke, oil, steam, corrosive gas, excessive dust, shocks and sudden temperature changes.
Controls and parts
See the manual diagrams 1 diagram
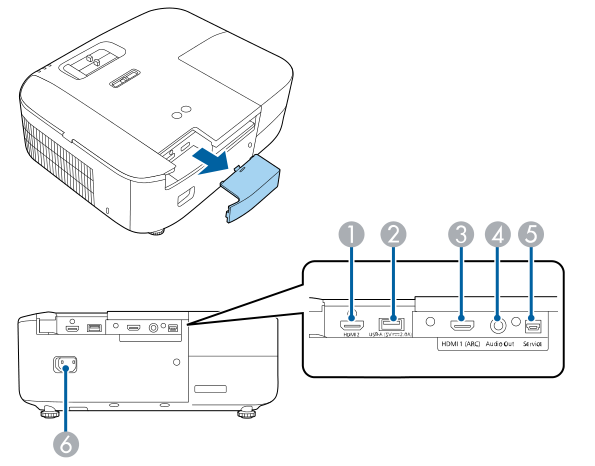
Diagram key
- 1: HDMI2 port.
- 2: USB-A port (5VDC @ 2.0A).
- 3: HDMI1 (ARC) port.
- 4: Audio Out port (3.5mm stereo).
- 5: Service port.
- 6: Power inlet.
- Arrow: Remove the rear cover to expose the rear connections.
Model details
Model and compatibility
- Resolution
- Native resolution is 1920 × 1080 pixels; 4K Enhancement provides 3840 × 2160 pixels. [1]
- Replacement lamp
- Use the genuine Epson ELPLP97 replacement lamp, part V13H010L97. [1]
- Air filter
- The reviewed replacement filter is ELPAF54, part V13H134A54. [1]
- Remote controls
- Use the paired projector remote with this projector. The separate Android TV remote is for the streaming device when connected to another host. [1]