MODEL REFERENCE
GL.iNet GL-USB150
28 guides

The checks and guides below come from the official manuals for this model.
No matches for this wording. Try a light name, error code or a shorter phrase.
Guides
Microuter usb150 初始设置
Instructions from the manualUSB connector, reset and indicator locations2 steps
- The complete source figure labels USB 2.0 to Ethernet, Reset, Power and Wireless Network.
- Power and Wireless Network identify the two indicator positions; the manual gives no fault colors or blinking combinations.
开机
Instructions from the manualPower on MicrouterView
Insert the router into a powered USB port.
连接
Instructions from the manualConnect through USB Ethernet or Wi-Fi5 steps
- This step establishes only a local LAN connection; complete initial setup and Internet settings before expecting Internet access.
- For USB Ethernet, use a computer with a USB port.
- Insert the router; the computer installs its driver automatically and creates a USB-to-Ethernet network.
- For Wi-Fi, find the router SSID and enter the default password goodlife.
- Its bottom label gives the SSID in the GL-USB150-XXX format.
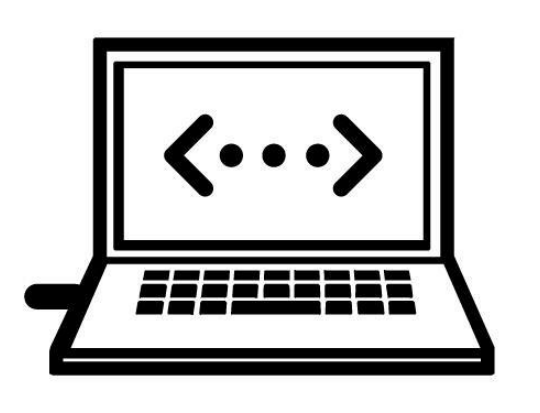
Diagram key
- USB router beside computer: Insert the router into a computer USB port; the computer automatically installs the driver and creates a USB-to-Ethernet network.
- Angle brackets and three dots: The complete screen symbol illustrates the local Ethernet connection described immediately above; this connection alone does not provide Internet access.
访问web 管理界面
Instructions from the manualOpen administration and select a language4 steps
- Open Chrome or Firefox, as recommended by this manual, and visit http://192.168.8.1.
- Choose the administration language.
- This edition lists English, Simplified Chinese, Traditional Chinese, German, French, Spanish, Italian and Japanese.
- If the browser repeatedly opens LuCI at http://192.168.8.1/cgi-bin/luci, visit http://192.168.8.1/index.html instead.
管理员密码设置
Instructions from the manualSet the initial administrator password3 steps
- There is no default administration password.
- Set your own password of at least 5 characters and click Submit.
- This password applies to the web interface and embedded Linux system; it does not change the Wi-Fi password.
Web 管理界面
Instructions from the manualUse the administration panelView
After initial setup, use the web administration panel to inspect connection status and manage router settings.
网络
Instructions from the manualInternet connection overview4 steps
- Microuter connects to an existing wireless network as a Wi-Fi repeater.
- Its usual WISP mode creates a subnet and a firewall separating it from the public network.
- Click Network to create a connection.
- In Repeater, click Scan to find nearby wireless networks.
中继
Instructions from the manualJoin an upstream Wi-Fi network5 steps
- Use Repeater to connect to an existing network, such as hotel or café Wi-Fi.
- The default WISP mode creates your own subnet and firewall.
- In Repeater, click Scan to search nearby wireless networks.
- Select an SSID and enter its password.
- Optionally enable Save Network, then click Join.
无线
Instructions from the manualInspect and change wireless settings10 steps
- Use Wireless to inspect the current state and edit the router-created network.
- Use ON/OFF to switch it on or off; click Modify to change settings.
- SSID is the network name; Wireless Security is its encryption method.
- This manual edition specifies a Wi-Fi password of at least 6 characters and recommends changing it when you receive the router.
- Use SSID Visibility to show or hide the name.
- Select the channel manually: the router does not choose the best channel by itself.
- When repeating another Wi-Fi network, the channel is fixed by that upstream network.
- Rate describes wireless speed.
- Transmit Power controls signal strength; this edition describes 20dBm as the default.
- The illustrated 18dBm setting is an example, not a second default.
客户端
Instructions from the manualInspect and block connected clientsView
Inspect each client name, IP address, MAC address and connection method. Use the button on the right to block an unwanted client.
在线升级
Instructions from the manualCheck for online firmware updates4 steps
- Click Upgrade to inspect available updates and the current firmware version.
- When connected to the Internet, the router checks for the newest downloadable firmware.
- The manual recommends clearing Keep Configuration.
- If retaining configuration causes an upgrade problem, reset the router.
本地升级
Instructions from the manualUpload local firmware6 steps
- Open Local Upgrade and upload firmware by dragging its file into the displayed area.
- Select firmware for GL-USB150 from the manufacturer firmware directory.
- V1 contains official GL.iNet OpenWrt firmware; Clean contains OpenWrt/LEDE firmware with only LuCI; Testing contains official beta firmware.
- This edition also describes compiling firmware from the manufacturer source repository or trying third-party firmware such as DDWRT.
- If incompatible uploaded firmware bricks the router, the manual directs using Uboot to reinstall correct firmware.
- It supplies no detailed Uboot recovery sequence here.
自动升级
Instructions from the manualSchedule automatic firmware upgradesView
Enable Auto Upgrade and set a time; the router then searches for and installs available updates at the specified time.
防火墙
Instructions from the manualFirewall rule categoriesView
Use Firewall to manage port forwarding, open router ports and DMZ settings.
端口转发
Instructions from the manualConfigure port forwarding6 steps
- Port forwarding lets remote computers reach a LAN computer or service behind the firewall, such as a web or FTP server.
- Click Port Forwarding and enter parameters, or choose Add a New Configuration.
- Set a rule name and the internal IP assigned to the target device.
- Enter an external port or range; the manual gives 1–65535 as its example.
- Enter the internal service port; leave it blank if it is the same as the external port.
- Choose TCP/UDP, TCP or UDP and set enabled or disabled status.
打开路由器端口
Instructions from the manualOpen a service port on the router3 steps
- If a web or FTP server runs on the router itself, open the router port to let WAN users reach that resource.
- Click Open Router Ports and enter parameters, or choose Add a New Configuration.
- Enter a rule name and port, choose TCP/UDP, TCP or UDP, and choose enabled or disabled status.
Dmz
Instructions from the manualConfigure a DMZ hostView
A DMZ host is fully exposed to the WAN for providing services. Enable DMZ and enter the internal host IP, for example 192.168.8.200. That device receives all incoming packets.
软件包
Instructions from the manualInstall or remove software packagesView
Use Packages to install or uninstall OpenWrt packages. Click Update each time you visit the package library.
远程访问
Instructions from the manualGoodCloud management and dynamic DNS9 steps
- GoodCloud offers remote router status checks, Wi-Fi password changes, client controls and email alerts for online or offline state.
- It is included by default in firmware 3.021 or later; other 3.0 versions require installing its application package.
- Enable Dynamic DNS for remote device access.
- The manual refers to DDNS for detailed operation rather than giving a full registration sequence.
- The illustrated GoodCloud panel also supports grouped management, real-time status, remote settings, batch operations and connected-client monitoring.
- Use the displayed device ID to add the router to your cloud account; the printed ID is only an example.
- DDNS requires a public IP address.
- If this router is behind a firewall, configure port forwarding on the main router.
- The illustrated panel offers HTTP, HTTPS and SSH external access switches and a terms/privacy acknowledgement.
上网认证
Instructions from the manualRequire captive-portal authentication5 steps
- Configure a captive portal so new Wi-Fi users must pass through a web page before Internet access.
- This feature requires firmware 3.022 or later.
- Enable the Guest network first: the screenshot warns that captive-portal authentication is unavailable without it.
- The same screenshot warns that enabling authentication makes its network-blocking function ineffective; preserve this edition’s warning without substituting a different feature.
- The illustrated fields include the virtual interface, access duration of 1–1440 minutes, and an optional success redirect page.
管理员密码
Instructions from the manualChange the administrator passwordView
Enter the current login password before setting a new web administration password. The new password must contain at least 5 characters.
局域网ip
Instructions from the manualChange the LAN administration addressView
The default LAN administration IP is 192.168.8.1. Change it if it conflicts with the main router IP.
时区
Instructions from the manualSet the time zoneView
Set the router time according to your location’s time zone.
Mac 地址克隆
Instructions from the manualClone the client MAC address2 steps
- Clone the current client MAC address to the router when required by the upstream network.
- For example, if a hotel network has already registered your phone MAC, clone that MAC to the router so it can connect.
自定义dns 服务
Instructions from the manualConfigure DNS and captive-portal recovery6 steps
- Configure DNS to address DNS leakage or other requirements.
- Some networks require captive-portal authentication.
- If the authentication page cannot be opened, try disabling DNS Rebind Protection and retry.
- Override All Client DNS Settings accepts DNS requests from all connected clients.
- Cloudflare DNS over TLS encrypts DNS queries using TLS to improve privacy and deter eavesdropping.
- Alternatively, enter custom DNS servers manually.
网络模式
Instructions from the manualChange operating mode and recover administration8 steps
- Choose the mode for your use and reconnect all clients after changing it.
- Wireless Router mode creates a private network with NAT, firewall and DHCP.
- Wireless Extender extends existing Wi-Fi coverage.
- WDS resembles extender mode; choose it when the main router supports WDS.
- In AP, extender or WDS operation, 192.168.8.1 may no longer open administration.
- Use the IP assigned by the main router.
- The screenshot also directs holding Reset for 4 seconds to return to router mode.
- The selected mode list supplies Router, Wireless Extender and WDS; its general AP warning does not establish a separate AP selection for this model.
恢复固件
Instructions from the manualRestore factory firmware settings3 steps
- If a fault cannot otherwise be resolved, try restoring factory defaults.
- Restoration erases all current settings, applications and data.
- Allow approximately 3 minutes; do not disconnect power during restoration.
高级功能
Instructions from the manualOpen LuCI advanced functions2 steps
- Click Advanced Functions to open LuCI, the default OpenWrt web interface, for detailed logs and additional settings.
- Use username root and the same password as the web administration interface.
Controls and parts
See the manual diagrams 1 diagram
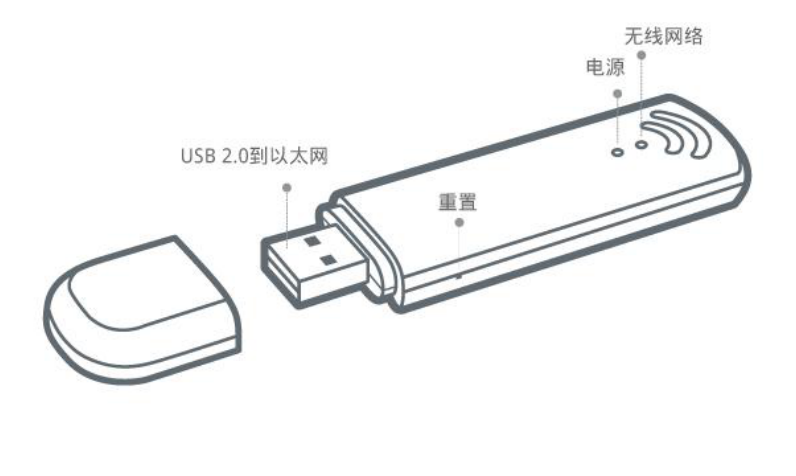
Diagram key
- USB 2.0到以太网: USB 2.0-to-Ethernet connector; the USB client connection is described in the Connection section.
- 重置: Reset control; the Network Mode screenshot describes holding Reset for 4 seconds to return to router mode.
- 电源: Power indicator location. No color or blinking meaning is given in this manual.
- 无线网络: Wireless Network indicator location. No color or blinking meaning is given in this manual.
Model details
Model and compatibility
- Local administration
- http://192.168.8.1
- Factory Wi-Fi password
- goodlife
- Cloud management requirement
- Included by default in 3.021 or later; other 3.0 versions require the application package.
- Captive portal requirement
- Firmware 3.022 or later.