MODEL REFERENCE
iRobot Roomba 960
30 guides

The checks and guides below come from the official manuals for this model.
No matches for this wording. Try a light name, error code or a shorter phrase.
Guides
Important safety instructions
Instructions from the manualSafety before using or maintaining the robot6 steps
- Read the safety precautions before setup, use or maintenance.
- Children aged eight and older and people with reduced physical, sensory or mental capabilities or limited experience may use the appliance only with supervision or instruction in safe use and understanding of the hazards.
- Children must not play with it or clean or maintain it without supervision.
- Do not expose the robot electronics or integrated Home Base charger.
- There are no user-serviceable parts inside; qualified personnel must service them.
- Do not handle the robot or Home Base with wet hands.
Safe dry-floor operation11 steps
- Heed all robot warnings.
- Use indoors in dry locations and room-temperature environments; this robot is for dry floors only.
- Do not sit or stand on the robot or place anything on it.
- Supervise small children and pets during operation.
- Do not pick up sharp objects, glass, burning or smoking material, liquids, bleach, paint, chemicals or anything wet.
- Never spray or pour liquids onto the robot.
- Clear clothing, loose papers, blind or curtain cords, power cords and fragile objects before cleaning.
- A dragged cord can pull an object off a table or shelf.
- Use a physical barrier to prevent access to a balcony.
- Take care around the moving robot to avoid stepping on it.
- Do not operate near exposed floor outlets.
Power cord and Home Base electrical safety5 steps
- Use the supplied region-approved cord; contact Customer Care for a replacement appropriate to the country.
- Connect only to a standard outlet; do not use a power converter, which also voids the warranty.
- Do not use a Home Base with a damaged cord or plug; replace damaged parts.
- Disconnect the robot from the Home Base before any cleaning or maintenance.
- Additional surge protection is recommended in areas prone to electrical storms; the Home Base may be protected with a surge protector.
Battery charging, damage and disposal safety11 steps
- Do not use non-rechargeable batteries.
- Use the rechargeable battery supplied with the product; obtain an identical iRobot battery or ask Customer Care about alternatives.
- Only charge the specified iRobot batteries: maximum 14.8 V, maximum 3000 mAh Ni-MH, or maximum 3300 mAh lithium-ion.
- Other types may burst; contact Customer Care for correct replacements.
- Before every use, check for damage or leakage.
- Do not charge a damaged or leaking pack.
- If battery liquid contacts skin or eyes, wash the area with copious water and seek medical advice.
- Put a leaking battery in a sealed plastic bag and arrange safe disposal under local rules or through an authorized iRobot Service Center.
- Do not crush or dismantle batteries, expose them to heat or direct sunlight, incinerate or short-circuit them, mechanically shock them or immerse them in liquid.
- Remove the battery before disposing of the robot.
- Use separate electrical-appliance and battery collection facilities rather than unsorted municipal waste; contact local waste authorities for recycling and collection rules.
Using your roomba
Instructions from the manualPositioning the Home Base3 steps
- Put the Home Base in an open, uncluttered area.
- Leave at least 1.5 feet (0.5 metres) at each side, at least 4 feet (1.2 metres) in front and between it and stairs, and at least 8 feet (2.4 metres) from Virtual Wall barriers.
- Keep it plugged in and within consistent Wi-Fi coverage for the iRobot HOME App.
First activation and charging4 steps
- Turn the robot over and remove the bin insert and battery pull tabs.
- Place it on the Home Base to activate the battery.
- The shipped partial charge allows initial cleaning, but starting before a full charge may cause an earlier return to the base.
- For a full charge before the first cycle, charge on the Home Base for three hours.
Using the iRobot HOME App4 steps
- Download the iRobot HOME App and connect to Wi-Fi.
- Use its overview video for setup and operation instructions.
- Set an automatic cleaning schedule up to seven times per week and customize cleaning preferences.
- Enable automatic software updates and access tips and frequently asked questions.
Pausing and ending a cleaning cycle4 steps
- Clear excess floor clutter, including clothing and toys, before cleaning; use the robot frequently to maintain the floors.
- Press CLEAN to pause a cleaning cycle and CLEAN again to resume.
- To end the cycle and enter standby, hold CLEAN until the indicators turn off.
- After each use, empty the bin and clean the filter.
Returning to the Home Base2 steps
- During cleaning, press CLEAN followed by DOCK on the robot, or press CLEAN on the iRobot HOME App main screen, to send it back and end the cleaning cycle.
- After a completed cycle, the robot plays a series of tones when returning to recharge.
Low battery during cleaning3 steps
- If the battery gets low before the cycle is finished, the robot returns to charge without a docking tone; CLEAN pulses with the battery indicator.
- After recharging, it returns to the point where it stopped and completes the cycle.
- Check current status in the iRobot HOME App.
Dirt Detect cleaning movementView
A concentrated area of debris causes forward-and-backward cleaning movement and illuminates the Dirt Detect indicator.
SPOT CleaningView
Place the robot on the localized debris and press SPOT. It spirals outward to approximately 3 feet (1 metre) in diameter, then inward to the starting position.
Full Bin indicator and cleaning preferences4 steps
- The default setting finishes the cleaning cycle when the bin becomes full.
- Adjust this under Cleaning Preferences in the iRobot HOME App.
- The robot will not leave the Home Base to clean with a full bin.
- Remove and empty the bin, then reinsert it before starting or resuming.
Storage and transportation preparation3 steps
- Store the robot on the Home Base to keep it charged and ready.
- If storing it away from the base, remove the battery first and keep the robot and battery in a cool, dry place.
- Always charge and remove the battery from the robot and accessories before long-term storage or transportation.
Using dual mode virtual wall barriers
Instructions from the manualVirtual Wall and Halo modes5 steps
- The Dual Mode Virtual Wall is an optional accessory for all models; leave it in position between cycles as needed.
- With the switch up, Virtual Wall mode blocks openings up to 10 feet (3 metres) with an invisible cone-shaped barrier that widens farther from the device.
- With the switch down, Halo mode protects an area extending approximately 24 inches (60 centimetres) from the device centre, for example around a bowl or vase.
- Batteries typically last eight to ten months.
- For extended storage, move the switch to the middle Off position.
Regular robot care
Instructions from the manualReduced debris pickupView
If debris pickup decreases, empty the bin, clean the filter and clean the extractors.
Regular Robot Care schedule6 steps
- Empty the bin after each use.
- Clean the filter weekly, or twice weekly in homes with pets, and replace it every two months.
- Clean the Full Bin sensors and front caster wheel every two weeks; replace the front caster wheel every twelve months.
- Clean the side brush, cliff sensors, charging contacts, iAdapt localization camera and floor tracking sensor monthly.
- Clean the extractors every four months, or every three months in homes with pets; replace them every six to twelve months.
- Contact iRobot Customer Care for information about replacement parts and assemblies.
Emptying the Bin5 steps
- Disconnect the robot from the Home Base before cleaning or maintenance.
- Press the bin release button and remove the bin.
- Open the bin door to empty it.
- Empty after each use.
- If Full Bin illuminates during cleaning, pause the job to empty the bin and then continue.
Full Bin indicator with an apparently empty binView
If the Full Bin indicator is illuminated while the bin does not appear full, follow the Full Bin sensor cleaning instructions.
Cleaning the Filter5 steps
- Disconnect the robot from the Home Base before cleaning or maintenance.
- Remove the filter by its tab.
- Tap it against the trash container to shake off debris.
- Reinsert it with the tab facing up; the filter door cannot close without the filter.
- Clean weekly, or twice weekly in homes with pets, and replace every two months.
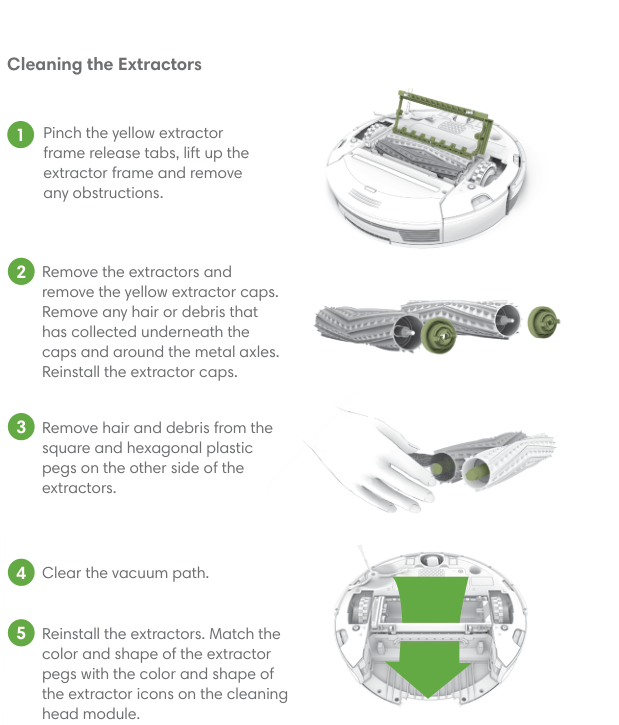
Cleaning the Full Bin Sensors4 steps
- Disconnect the robot from the Home Base before cleaning or maintenance.
- Remove and empty the bin.
- Wipe its inner and outer sensor ports with a clean, dry cloth.
- Clean these sensors every two weeks.
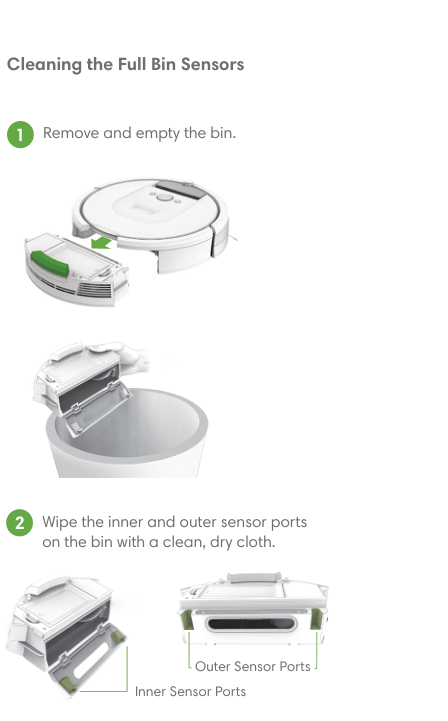
Cleaning the Front Caster Wheel8 steps
- Disconnect the robot from the Home Base before cleaning or maintenance.
- Pull firmly on the front wheel to remove it.
- Remove debris from the wheel cavity.
- Spin it by hand.
- If rotation is restricted, remove the wheel from its housing, push firmly to remove the axle, and clear debris or wrapped hair.
- Reinstall all parts and make sure the wheel clicks into place.
- Hair and debris clogging the front wheel can damage floors.
- Clean every two weeks and replace every twelve months.
Cleaning the Side Brush4 steps
- Disconnect the robot from the Home Base before cleaning or maintenance.
- Use a coin or small screwdriver to remove the screw.
- Remove the brush, clean it and its post, and reinstall it.
- Clean monthly.
Cleaning the Sensors and Charging Contacts5 steps
- Disconnect the robot from the Home Base before cleaning or maintenance.
- Wipe the sensors with a clean, dry cloth.
- Do not spray cleaning solution directly onto sensors or their openings.
- Wipe the charging contacts on the robot and Home Base with a clean, dry cloth.
- Clean the cliff sensors, charging contacts, iAdapt localization camera and floor tracking sensor monthly.
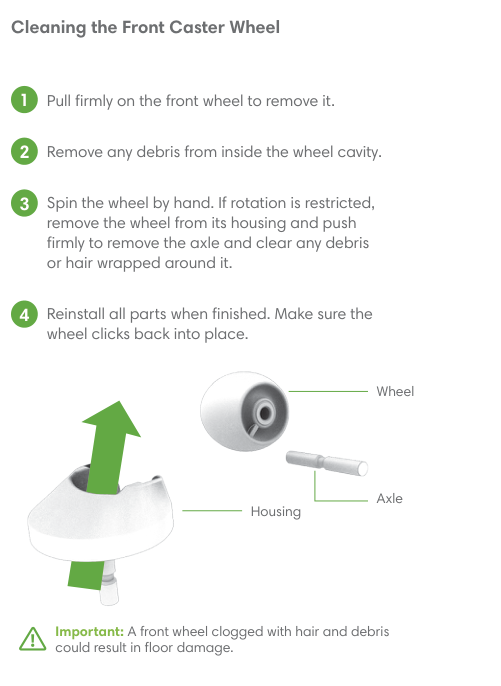
Cleaning the Extractors8 steps
- Disconnect the robot from the Home Base before cleaning or maintenance.
- Pinch the yellow extractor frame release tabs, lift the frame and remove obstructions.
- Remove the extractors and yellow caps.
- Remove hair or debris beneath the caps and around the metal axles, then reinstall the caps.
- Remove hair and debris from the square and hexagonal plastic pegs at the other ends.
- Clear the vacuum path.
- Reinstall the extractors by matching their peg colours and shapes to the extractor icons on the cleaning head module.
- Clean every four months, or every three months in homes with pets; replace every six to twelve months.
Troubleshooting
Instructions from the manualDistress sound, spoken message and blinking troubleshooting indicator6 steps
- A two-tone distress sound followed by a spoken message and blinking troubleshooting indicator means something is wrong.
- Find more detailed support and videos in the iRobot HOME App or online.
- If the problem remains unresolved, visit iRobot Roomba 900 support.
- For some errors, a reboot may resolve the problem: hold CLEAN for ten seconds until all indicators illuminate, then release.
- A tone confirms the reboot.
- If scheduling is used, reopen the app and confirm the schedule remains intact.
Rebooting Instructions3 steps
- Hold CLEAN for ten seconds until all indicators illuminate, then release it.
- A tone indicates a successful reboot.
- If the scheduling feature is used, open the iRobot HOME App after rebooting and confirm the schedule remains intact.
Reduced Power Standby Mode3 steps
- The Home Base normally keeps the robot ready and maintains Wi-Fi connectivity while using a small amount of power.
- For instructions on a further-reduced standby power state when not in use, refer to the iRobot HOME App.
- No button sequence is provided in this manual.
Lithium Ion Battery and shipping6 steps
- For best results use the supplied iRobot lithium-ion battery.
- Older-model batteries limit performance; follow the battery types and replacement advice in the safety instructions.
- For service, travel or any other shipment of a lithium-ion-equipped product, remove the battery and tape over its metal charging contacts.
- Reinstall the taped battery and secure the battery door.
- Use the original packaging or other packaging that prevents movement.
- Ship by ground transportation only; do not ship by air.
Irobot customer care
Instructions from the manualiRobot Customer Care6 steps
- Contact iRobot before a retailer about questions or comments.
- The iRobot HOME App and official support site provide tips, FAQs and accessories information.
- For further assistance in the USA or Canada, call (877) 855-8593.
- The manual lists Monday to Friday 9 AM–9 PM and Saturday/Sunday 9 AM–6 PM Eastern Time.
- Outside the USA and Canada, use the iRobot global site to find local guidance and a local support centre.
- EU declaration information is available from iRobot compliance.
Controls and parts
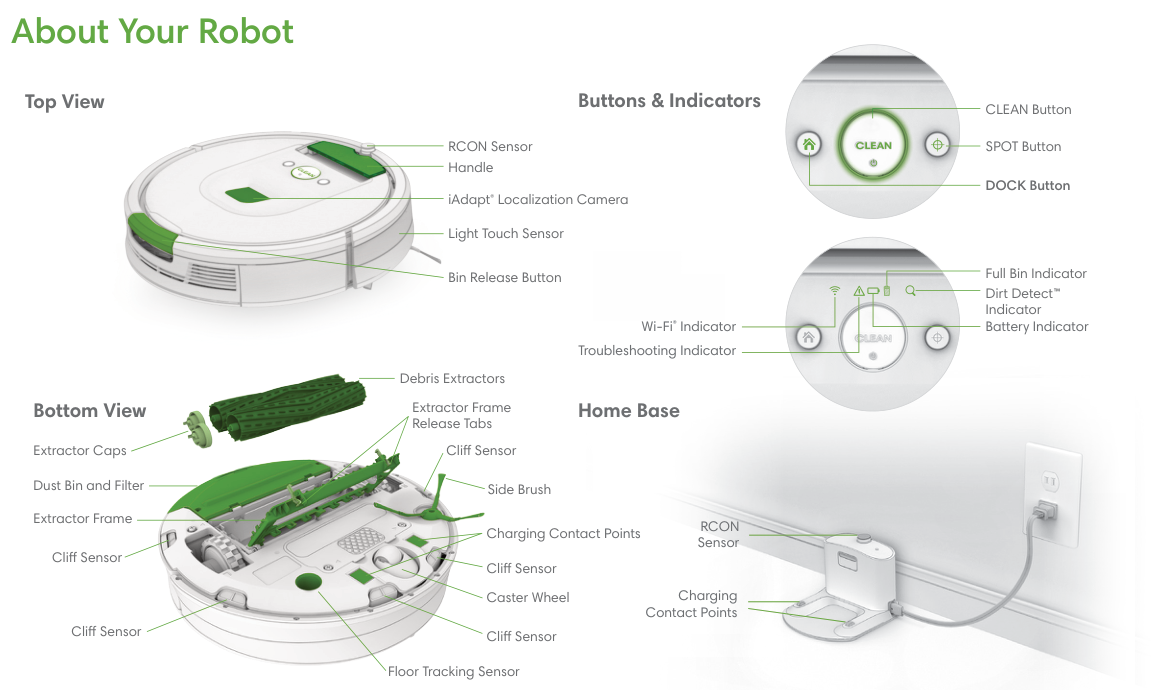
See the manual diagrams 1 diagram