MODEL REFERENCE
Linksys E8450
8 errors · 2 troubleshooting topics · 19 guides

The checks and guides below come from the official manuals for this model.
No matches for this wording. Try a light name, error code or a shorter phrase.
Errors and indicators
Light patterns and messages documented in the manualFind the indicator lights
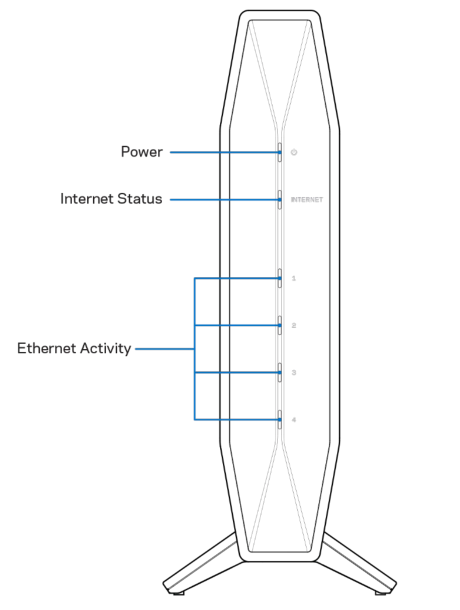
Diagram key
- Power: Blinks blue during startup and WPS pairing; blinks yellow if WPS pairing fails. Wait for solid blue during installation. On an EasyMesh child, solid yellow means it is too far from a working node; blinking yellow means it lost connection. Move a too-distant child closer until solid blue.
- Internet Status: Solid blue with internet access; solid yellow without an internet connection, including a modem connection without an internet signal. Blinking yellow means no cable is in the Internet port during traditional-router or EasyMesh-parent setup.
- Ethernet Activity: A light is solid blue with a cable in its corresponding port and blinks blue with activity.
- 1: Ethernet activity for port 1.
- 2: Ethernet activity for port 2.
- 3: Ethernet activity for port 3.
- 4: Ethernet activity for port 4.
—Power blinks yellow during WPS pairing
This state means WPS pairing failed. The guide gives no separate failed-WPS remedy. Linksys lists its model support service for further help.
—Internet Status is solid yellow
- The router is not connected to the internet, including when it is properly connected to the modem but has no internet signal.
- If several known-correct internet addresses fail, check network and power cables, outlet power, the reviewed router/modem restart sequence and ISP outages.
—Internet Status blinks yellow during setup
- For traditional-router or EasyMesh-parent setup, this state means no Ethernet cable is plugged into the Internet port.
- Secure the Ethernet cable between the rear yellow Internet port and the appropriate modem port, usually labelled Ethernet.
—EasyMesh child Power light is solid yellow
The child is too far from another working node. Move it nearer to a working node until its Power light is solid blue.
—EasyMesh child Power light blinks yellow3 checks
Your Internet cable is not plugged inyour Internet cable is not plugged in4 checks
Cannot access your routercannot access your router2 checks
Cannot find [internet address]the internet appears to be unavailable4 checks
Troubleshooting
Find the problem you are experiencingYour router was not successfully set up4 checks
- Setup cannot be completed
- Use a paperclip or pin to hold Reset until the front Power light goes off and begins blinking, about 10 seconds. Enter 192.168.1.1 in a browser to retry setup.
- Modem-router already uses the 192.168.1.x subnet
- Try 10.0.1.1. If neither address opens the setup wizard, use the Linksys setup-IP help named in the manual.
- Setup still fails
- Temporarily disable the computer firewall according to its security-software instructions, then install the router again.
- Another computer is available
- Use another computer to install the router if one is available.
Restart using the power cord4 steps
- Unplug the power cords from both the router and modem.
- Wait 10 seconds, reconnect modem power and check that it has power.
- Wait until the modem’s online indicator stops blinking, about two minutes, then reconnect router power.
- Wait until the blue front Power and Internet lights are solid, about two minutes, then try internet access from a computer.
Guides
Front
Instructions from the manualFront indicator states7 steps
- The Power light blinks blue during startup and WPS pairing.
- During installation, wait for it to stop blinking and become solid blue before connecting to Wi-Fi.
- The Internet Status light is solid blue with an internet connection.
- It is solid yellow when there is no internet connection, including a proper modem connection without an internet signal.
- It blinks yellow when no Ethernet cable is plugged into the Internet port during traditional-router or EasyMesh-parent setup.
- Each front Ethernet activity light is solid blue when a cable is connected to its corresponding port, and blinks blue when that port has activity.
- Failed WPS pairing and EasyMesh child-node yellow Power states have separate meanings; use their reviewed entries.
Back
Instructions from the manualBack controls and connections13 steps
- Press Wi-Fi Protected Setup (WPS), callout 1, to configure wireless security on WPS-enabled devices.
- The front Power light blinks blue during pairing.
- Hold Reset, callout 2, until the Power LED starts flashing to restore factory settings.
- The setup and mesh instructions specify about 10 seconds.
- Connect wired network devices to the gigabit Ethernet (10/100/1000) ports, callout 3.
- Their front activity lights turn blue with connected cables.
- An EasyMesh parent can connect child nodes wirelessly or through these ports.
- Connect the modem to the Internet port, callout 4.
- Its front status light is blue only when the router is connected to a modem with internet access.
- For a child node, this port can connect to a parent Ethernet port that has already been set up.
- Use USB 2.0, callout 5, to connect and share a USB drive.
- Connect the included AC adapter to the power port, callout 6.
- Press the power switch, callout 7, to I (ON) to turn on the router.
How to install your router
Instructions from the manualInstall a traditional router or EasyMesh parent16 steps
- Disconnect the existing router first if replacing one.
- Connect this router to power and set its switch to I (ON).
- Plug one end of the included Ethernet cable into the yellow Internet port.
- For a modem, connect the other end to its Ethernet (LAN) port.
- For a modem-router, connect the other end to any available port.
- Wait until the front Power light stops blinking and becomes solid blue before continuing.
- Connect to the network name supplied in the Quick Start Guide and select automatic connection to it in future.
- You can change its name and password later.
- Consult your device documentation if you need help joining; internet access is unavailable until setup is complete.
- Enter http://myrouter.local in a browser and follow the setup prompts.
- You can also use 192.168.1.1.
- If a modem-router already uses the 192.168.1.x subnet, 10.0.1.1 may be needed.
- If none opens the wizard, use the Linksys setup-IP support instructions named in the manual.
- Register the router after setup for security updates, recalls and other product information.
- Setup makes the router an EasyMesh parent.
- For traditional Wi-Fi, turn off EasyMesh Parent Node in Basic Wireless Settings.
Add this router to existing E8450 EasyMesh9 steps
- If this router has already been used, first restore factory settings in Administration or by holding the rear Reset button for 10 seconds.
- Connect a computer or mobile device by Wi-Fi or Ethernet to the parent router that is connected to the modem.
- Visit myrouter.local or 192.168.1.1 to open the parent settings.
- If neither opens the login, use the Linksys setup-IP help named in the manual.
- Enter the parent router password; its default is admin.
- Ensure EasyMesh Parent Node is enabled on the parent, then go to Wi-Fi > Basic Wireless Settings and click Add a new node.
- Follow the prompts.
- For a parent from another manufacturer, follow that manufacturer’s instructions.
- This router cannot be added to a Linksys Velop or Max-Stream mesh Wi-Fi system.
How to open the browser-based utility
Instructions from the manualOpen the browser-based utility5 steps
- Connect to the router, open a browser and enter http://myrouter.local or 192.168.1.1.
- If a modem-router already uses the 192.168.1.x subnet, 10.0.1.1 may be needed.
- If none opens settings, use the Linksys setup-IP help named in the manual.
- Enter the router password changed during setup and click LOGIN.
- If it was unchanged or setup was skipped, the default is admin.
Language
Instructions from the manualSelect utility languageView
Choose a language from the drop-down menu. The browser-based utility changes language within five seconds.
Internet setup
Instructions from the manualChoose Internet connection type10 steps
- Ask the ISP for the connection information and select its Internet Connection Type from the drop-down menu.
- Retain Automatic Configuration – DHCP only if the ISP supports DHCP or a dynamic IP address; this usually applies to cable connections.
- Select Static IP when the ISP requires a fixed address.
- Select PPPoE for a DSL connection where the ISP uses Point-to-Point Protocol over Ethernet.
- PPTP generally applies in Europe: choose Obtain an IP Address Automatically for DHCP/dynamic addressing, or Specify an IP Address and the displayed options for a required fixed address.
- L2TP generally applies in Israel.
- For PPPoE, PPTP and L2TP, select Connect on Demand to connect as needed, useful if the ISP charges for connect time, or Keep Alive for continuous connection.
- Choose the option appropriate to your service.
- Bridge Mode makes the router an access point: routing, DHCP server, built-in firewall and NAT cease to operate.
- Wireless Bridge connects wirelessly to the main router and shares that internet connection with devices on the bridge Ethernet ports.
Easymesh settings
Instructions from the manualAdd and manage EasyMesh child nodes10 steps
- If EasyMesh is absent from settings, upgrade to the latest firmware; the guide requires version 1.1.00 or above.
- A previously configured E8450 must first be factory-reset: hold the rear Reset button for 10 seconds or reset it in Administration.
- Enable EasyMesh Parent Node on the router connected to the modem.
- Click Add a new node and press WPS on the child for three seconds.
- Joining normally takes 70–80 seconds; monitor progress on the parent’s settings screen.
- Once added, click Mesh information to see the nodes and connected devices across the mesh.
- If a child fails to join, move it closer to the parent and follow the prompts to retry.
- After adding the child wirelessly, you may use wired backhaul: connect a parent port labelled Ethernet to the child port labelled Internet.
- Turning off EasyMesh Parent Mode makes the parent a traditional router and disconnects all child nodes from Wi-Fi.
- Control mesh settings through the parent; changes apply to all child nodes.
EasyMesh option is missingView
Upgrade to the latest firmware. The current guide requires firmware version 1.1.00 or above for EasyMesh.
EasyMesh child fails to join2 steps
- Move the child nearer to the parent and follow the parent’s settings prompts to retry.
- A previously used router must first be factory-reset by holding its rear Reset button for 10 seconds or resetting it in Administration.
5ghz network mode
Instructions from the manualSelect 5 GHz network mode4 steps
- Keep Mixed, the default, for Wireless-A, N, AC or AX devices, or when unsure which mode to select.
- Choose Wireless-AC Mixed for Wireless-A, N or AC devices.
- Choose Wireless-A Only or Wireless-N Only when the network contains only that standard.
- If there are no Wireless-A, N, AC or AX 5 GHz devices, select Disabled; this switches off the 5 GHz radio.
4ghz network mode
Instructions from the manualSelect 2.4 GHz network mode3 steps
- Keep Mixed, the default, for Wireless-B, G and N 2.4 GHz devices, or when unsure which mode to select.
- Choose Wireless-B/G Only for B and G devices, Wireless-B Only for only B devices, Wireless-G Only for only G devices, or Wireless-N Only for only N 2.4 GHz devices.
- If there are no Wireless-B, G or N 2.4 GHz devices, select Disabled; this switches off the 2.4 GHz radio.
Network name (ssid)
Instructions from the manualSet network names and reconnect after reset5 steps
- SSIDs are case-sensitive and must be no longer than 32 characters.
- The default 2.4 GHz name is LinksysXXXXX and the 5 GHz name is LinksysXXXXX_5GHz; XXXXX means the last five serial-number digits, found underneath the router.
- Changing the SSID gives both bands new names; the browser utility can give them different names.
- A Reset-button reset or Configuration > Administration > Device Reset restores the default network name.
- Change it back to the original name or reconnect every wireless device to the new name.
Channel width
Instructions from the manualChoose channel width2 steps
- For a 2.4 GHz network using B, G or N devices, keep Auto (20 MHz or 40 MHz) for the recommended performance, or select 20 MHz only when that width is wanted.
- For 5 GHz, keep Auto (20, 40 or 80 MHz) for the recommended performance.
Channel
Instructions from the manualChoose wireless channelView
Select a channel from the drop-down list. Keep Auto if unsure which channel to select.
Ssid broadcast
Instructions from the manualControl SSID broadcasting3 steps
- Keep Enabled to broadcast the network name for discovery by wireless clients.
- Hiding the name does not make Wi-Fi more secure; someone interested can still find it.
- If you still do not want broadcasting, choose Disabled.
Wireless security
Instructions from the manualWireless security optionsView
The guide lists WPA2 Personal, WPA3 Personal, WPA2/WPA3 Mixed Personal, WPA2 Enterprise and WPA3 Enterprise. It identifies WPA3 as the strongest option.
Wpa2 personal
Instructions from the manualConfigure WPA2 Personal or mixed Personal security4 steps
- When selecting WPA2 Personal, every wireless device must use WPA2 Personal and the same passphrase.
- If unsure whether a device supports WPA2 or WPA3 Personal, choose WPA2/WPA3 Mixed Personal in Security Mode.
- Enter a passphrase of 8–63 characters.
- This is the Wi-Fi access password and may be the password supplied during setup.
Disabled
Instructions from the manualWireless security disabled warning2 steps
- If wireless security is disabled, the first attempt to access the internet gives a warning.
- Choose to enable security, or confirm that you understand the risks if you wish to continue without it.
Model details
Model and compatibility
- Radio bands
- 2.4 GHz and 5 GHz. [1]
- Ethernet
- Four LAN ports and one Internet port; gigabit Ethernet at 10/100/1000 Mbps. [1]
- USB storage
- USB 2.0; supported file systems FAT, FAT32, NTFS and HFS+. [1]
- Power supply
- 12 V, 2 A. [1]
- Operating temperature
- 0–40 °C (32–104 °F). [1]
- Operating humidity
- 10–80% relative humidity, non-condensing. [1]