MODEL REFERENCE
Magnasonic FS60
23 guides

The checks and guides below come from the official manuals for this model.
No matches for this wording. Try a light name, error code or a shorter phrase.
Guides
Inserting an sd card
Instructions from the manualInsert and remove the SD card3 steps
- Scanning requires an SD card up to 32 GB; the manual lists an included card.
- Insert the SD card face down into the rear SD card slot until it clicks into place.
- To remove it, press it in until it clicks and pops out, then remove it from the slot.
Powering your film scanner
Instructions from the manualPower the scanner and choose PC-to-SD Link6 steps
- Connect the included cable’s microUSB plug to the scanner’s rear MicroUSB port.
- Connect its other end to the included USB power adapter.
- Connect the adapter to a power outlet.
- Press Power to turn on the scanner; a red LED lights.
- At “PC-to-SD Link?” select the default No by pressing OK(camera-symbol button).
- The screen turns off after 3 minutes without activity; press any button to restore it.
Scanning film/slides
Instructions from the manualScan developed film and slides12 steps
- For best results, ensure the film/slides are clean and clean the scanner inside with the included brush.
- Follow Cleaning and Care for brush placement.
- Move both the top Photo/Film switch and front focus switch to FILM.
- The FILM indicator turns blue.
- Place the photo holder on the scanner bottom, rubber feet down, to prevent additional light affecting the scan.
- The lower-left screen icon identifies film type; default is 35 mm negative.
- Press Film Type/Up(TYPE/up triangle) until the applicable icon appears:135 positive slide, 35 mmnegative, 35 mmblack-and-white, 110 negative or 126 negative.
- Choose the matching film/slide holder.
- Place the film/slides inside.
- Close the holder until it clicks.
- Insert the holder matching its A side to the scanner’s A side.
- Press OK(camera symbol) to scan; the image stores automatically on the SD card.
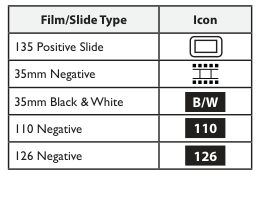
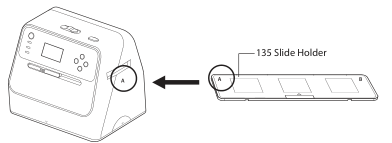
Diagram key
- A (scanner): Scanner side marking to match with the holder A side.
- A (holder): Holder side marking to match with the scanner A side.
- 135 Slide Holder: Holder for 135 positive slides.
- insertion arrow: Insert the holder into the scanner with both A-side markings matched.
Scanning photos
Instructions from the manualScan photo prints5 steps
- Set both the top and front Photo/Film switches to PHOTO.
- The PHOTO indicator turns green.
- Place the photo in the photo holder in the appropriate orientation.
- Select 3.5×5, 4×6, 4×4, 4.2×3.2 or 3.4×2.1 inch photo size with Photo Size/Down(SIZE/down triangle).
- Press OK(camera symbol) to scan; the image stores automatically on the SD card.
Adjusting brightness
Instructions from the manualAdjust image brightness4 steps
- Brightness is automatic by default.
- In scan mode, press EV/Delete(EV/trash symbol).
- Use Film Type/Up(TYPE/up triangle) for brighter or Photo Size/Down(SIZE/down triangle) for darker on the right-hand display scale.
- Press EV/Delete again to save the setting.
Viewing saved images
Instructions from the manualView saved imagesView
Press Playback(play/fast-forward symbol) to enter playback mode. Use Film Type/Up and Photo Size/Down to move forward or backward through saved images.
Downloading images to your computer
Instructions from the manualDownload images to a computer7 steps
- All images are stored on the inserted SD card.
- Connect the scanner to the computer with the included microUSB cable.
- Turn on both the computer and scanner.
- At “PC to SD Link?” press Film Type/Up to highlight YES.
- Press OK(camera symbol) to select YES.
- The scanner screen turns off while connected to the computer.
- A folder containing the scanned/saved images opens on the computer; save images from it directly to the computer.
Deleting saved images
Instructions from the manualDelete one image or all saved images3 steps
- Press Playback to enter playback mode.
- To delete the displayed image, press EV/Delete once, press Film Type/Up to select YES, and press OK(camera symbol) to delete that image.
- To delete all saved images, press EV/Delete twice, press Film Type/Up to select YES, and press OK to delete all saved images.
Formatting sd card
Instructions from the manualFormat the SD card2 steps
- Warning: formatting deletes every file stored on the SD card.
- In playback mode, press EV/Delete three times, press Film Type/Up to select YES, and press OK(camera symbol) to format the card.
Faq / troubleshooting
Instructions from the manualGet the best possible scan1 check
- Film/slide quality or scanner cleanliness
- Ensure the film/slides are not faded or scratched. Clean the scanner inside using its included brush immediately before scanning; follow the Cleaning and Care procedure onPDF 18.
Prepare film and slides for scanning1 check
- Dust or fingerprints
- Keep the film/slide free of dust and fingerprints using an appropriate cleaning cloth.
A consistent spot appears on every scanned slide1 check
- Possible dust inside the unit
- Use the included cleaning brush to remove foreign debris from the scanner; follow the source-backed brush placement instructions.
Scanning without a computer1 check
- Computer availability
- Scan directly to an SD card up to 32 GB without a computer; export to a computer later when convenient.
Scanned image file format1 check
- File format question
- Scanned files save automatically in JPG format.
Raw film versus developed negatives1 check
- Film development requirement
- Use developed film only; the scanner does not scan raw undeveloped film.
Supported photo prints1 check
- Print scanning question
- The scanner supports 3.5×5, 4×6, 4×4, 4.2×3.2 and 3.4×2.1 inch photos.
Product information
Instructions from the manualRead the display and status indicators3 steps
- The display shows the film/slide type, brightness setting, number of saved images andbattery/power indicator.
- Battery is not included.
- The manual does not supply numeric error codes; use the actual PC-to-SD prompts and source-backed operating/FAQ instructions.
Getting started
Instructions from the manualObserve startup and automatic shutdown guidance5 steps
- Read all warnings and follow the manual.
- Use only standard-size films and manufacturer-specified attachments/accessories.
- After 30 minutes without activity, the scanner shuts down automatically to save energy; press Power to turn it back on.
- This differs from 3 minute screen sleep.
- Slight warmth during use is not a malfunction.
Safety alerts
Instructions from the manualStop for unsafe or abnormal operationView
Stop using immediately, unplug the power cord, and refer the product to a qualified service professional if there is smoke or unusual smell; exposure to rain, water or other liquids; failure to operate normally when following the instructions; a distinct performance change; or any dropping/damage.
Best practices for safe use
Instructions from the manualUse the scanner safely7 steps
- Unwind and straighten the USB cord before use.
- Check that the rating-label power voltage matches your local supply.
- Unplug the power adapter for extended nonuse and during thunderstorms.
- Do not use near water or immerse the product, cord or accessories in water or other liquid.
- Do not obstruct ventilation; install according to manufacturer instructions.
- Keep away from radiators, heat registers, stoves, amplifiers or other heat sources.
- Do not service or disassemble it yourself; opening/removing covers can expose dangerous voltages or other hazards.
Cleaning and care
Instructions from the manualClean the scanner with its included brush7 steps
- Ensure the scanner is clean before use.
- Do not use liquid cleaners.
- Wipe only the outside with a dry cloth.
- Clean the inside only with the included cleaning brush.
- Set both top and front Photo/Film switches to Film.
- Insert the soft brush end face down into the film/slide holder slot.
- Carefully move the brush inside to remove dust/debris on the lens.
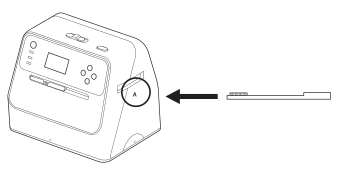
Diagram key
- A: Scanner A-side film/slide holder slot shown in the source cleaning figure; the matching A-side rule is stated onPDF 9.
- insertion arrow: Insert the soft brush end face down into the film/slide holder slot.
- cleaning brush: Use only the included brush inside; carefully move it to remove lens dust or debris.
Magnasonic® warranty
Instructions from the manualArrange manufacturer warranty service8 steps
- The guide supplies a one-year parts/labour warranty against material/workmanship defects; proof of purchase from an authorized dealer is required.
- Manufacturer repair is free under applicable coverage; if repair is impossible, the product is replaced with the same, newest or current equivalent.
- Replacement-parts coverage lasts the unexpired original warranty term.
- Exclusions include abusive operation, negligence, accident, improper installation/use; unauthorized tampering/modification/adjustment/repair; cosmetic wear; environmental/external damage including voltage/liquid; missing model, serial orcertification markings;rental/commercial use;installation/setup/programming costs;and connection to incorrect voltage.
- Use voltage converters where applicable.
- For covered defects, deliver the product with proof of purchase.
- Ship prepaid, in its original container or equivalent; the customer bears transit loss/damage risk.
- Seek assistance through the manufacturer support page.
Fcc information
Instructions from the manualResolve radio or television interference and rare lockup2 steps
- For harmful radio/TV interference, try reorienting/relocating the receiving antenna, increasing separation, connecting to a different electrical circuit from the receiver, or consulting the dealer/an experienced radio/TV technician.
- In rare lockup caused by severe interference, external noise or static electricity, turn off the unit, wait at least 5 seconds, and turn it back on.
Controls and parts
See the manual diagrams 2 diagrams
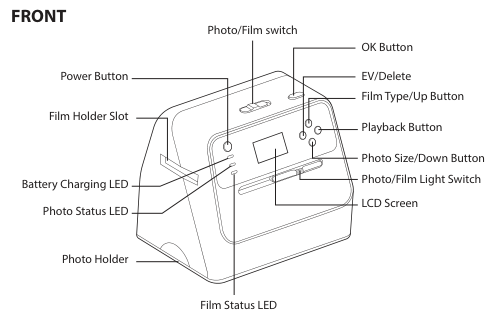
Diagram key
- Photo/Film switch: Select Film or Photo mode with this top switch; set the front switch to the same mode.
- Power Button: Press to turn on; press to restart after automatic shutdown.
- OK Button: OK / camera-symbol control: confirm a choice or capture and save a scan.
- EV/Delete: EV / trash-symbol control: adjust brightness in scan mode; select deletion or formatting in playback mode as instructed.
- Film Holder Slot: Slot for the selected film or slide holder.
- Film Type/Up Button: TYPE / up-triangle control: select film type, brighten the exposure setting, browse images or select YES as instructed.
- Playback Button: Play / fast-forward symbol: enter playback mode to view saved images.
- Battery Charging LED: Manufacturer-labelled battery charging indicator; optional battery is not included.
- Photo Size/Down Button: SIZE / down-triangle control: select photo size, darken the exposure setting or browse saved images as instructed.
- Photo Status LED: Green indicates Photo mode after setting both switches to PHOTO.
- Photo/Film Light Switch: Front Photo/Film switch: set to the same Film or Photo mode as the top switch.
- LCD Screen: Display for film/slide type, brightness, saved-image count and battery/power status.
- Photo Holder: Holder for supported photo prints; also fit it below the scanner with rubber feet down for film scanning to block stray light.
- Film Status LED: Blue indicates Film mode after setting both switches to FILM.
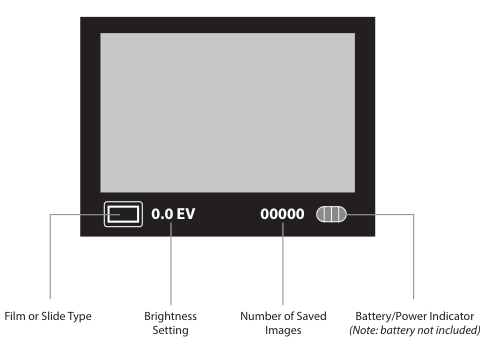
Diagram key
- Film or Slide Type: Identifies the selected film or slide type; see the complete five-icon table.
- Brightness Setting / 0.0 EV: Current exposure setting; the example shows 0.0 EV.
- Number of Saved Images / 00000: Count of saved images; the example shows 00000.
- Battery/Power Indicator: Battery/power status; battery is not included.