MODEL REFERENCE
Melitta Easy Therm
9 guides

The checks and guides below come from the official manuals for this model.
No matches for this wording. Try a light name, error code or a shorter phrase.
Guides
Safety notice
Instructions from the manualSafe use and stopping for service21 steps
- Use the appliance only in households or similar areas: kitchens for employees in shops, offices and other commercial areas; agricultural companies; motels, hotels, other residential facilities and bed-and-breakfast establishments.
- Other use is improper and may cause injury or property damage.
- Read the safety notes and operating manual in full and follow the safety and operating instructions to avoid danger.
- Melitta does not accept liability for damage caused by ignoring these instructions or improper use.
- Do not operate the appliance in a cupboard.
- Connect it only to a properly installed earthed socket.
- Disconnect it from power when unsupervised and before assembly, disassembly or cleaning.
- During operation, parts such as the steam outlet at the filter become very hot.
- Avoid touching these parts and avoid contact with hot steam.
- Do not open the filter holder during brewing.
- Do not use the appliance if the power cable is damaged.
- Keep the cable away from liquids.
- Never immerse the appliance in water.
- Do not clean food-contact parts with aggressive cleaning agents or scouring cream.
- Remove detergent residues with clean water and follow the external cleaning and descaling instructions.
- Children aged eight or older may use the appliance only with supervision or instruction in safe use and an understanding of the potential hazards.
- Children may clean or maintain it only if aged eight or older and supervised.
- Keep the appliance and cable away from younger children.
- People with reduced physical, sensory or mental abilities, or lacking experience or knowledge, need supervision or instruction in safe use and an understanding of the potential hazards.
- Children must not play with the appliance.
- Have the power cable replaced and all other repairs carried out only by Melitta Customer Service or an authorised repair shop.
Insulated jug
Instructions from the manualInsulated jug safety4 steps
- Do not use the jug in a microwave or place it on a hot stove.
- Do not store dairy products or baby food in the jug because of the risk of bacterial growth.
- Do not lay the filled jug on its side: liquid may escape.
- Clean the outer casing with a soft, damp cloth.
Only for plastic jugs with glass insert
Instructions from the manualPlastic jug with glass insert precautions4 steps
- These precautions apply only to plastic jugs with a glass insert.
- To avoid damaging the glass flask, do not use hard or sharp-edged objects, such as cutlery or dishwashing brushes, for stirring or cleaning.
- Do not fill it with ice cubes or carbonated liquids.
- Do not expose the glass flask to large temperature fluctuations.
Before first use
Instructions from the manualBefore first use5 steps
- Check that the home power supply matches the model plate on the appliance base.
- Connect the appliance to power.
- Store unused cable in the appliance base, as shown in figure 1.
- Production testing may leave water deposits.
- To clean the appliance, rinse it twice with the maximum amount of water, without a coffee filter or ground coffee.
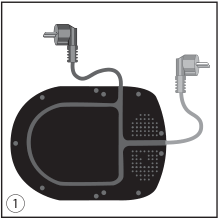
Diagram key
- 1: Unused cable can be stored in the base of the appliance.
- Left plug and cable: Connect the appliance to a power source; unused cable can be stored in the base.
- Right plug and cable: The repeated cable drawing illustrates storing unused cable in the appliance base.
Making coffee
Instructions from the manualMaking coffee15 steps
- Ensure that the appliance is connected to power.
- Open the water-tank lid.
- Fill the tank with the desired amount of water using the insulated jug.
- Use the tank water-level display to choose the correct number of cups.
- Close the tank lid and place the jug in the appliance with its lid closed.
- Open the swivel filter to the left.
- Fold a Melitta 1x4 filter bag at the embossed seam and put it in the holder.
- Press it into the holder by hand for a good fit.
- Add ground coffee according to taste.
- The manual recommends 6–8 g per large cup.
- Swivel the filter back into the appliance.
- Turn the appliance on; brewing begins.
- The appliance switches off automatically 15 minutes after being turned on, avoiding unnecessary electricity use.
- You can switch it off manually at any time.
- The drip stop prevents coffee from dripping when you remove the jug.
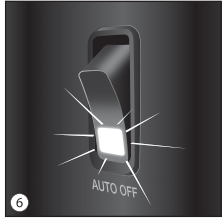
Diagram key
- 6: Turn the appliance on to begin brewing.
- Switch highlighting: The source drawing highlights the operating switch used to start brewing.
- AUTO OFF: The appliance switches off automatically 15 minutes after it is turned on; you can also switch it off manually at any time.
Using the insulated pot
Instructions from the manualUsing the insulated pot3 steps
- Brewed coffee flows through the central valve in the insulated lid into the pot.
- To pour coffee, press down on the sealing lever.
- To remove the lid, press the seals on its sides while lifting the lid upward.
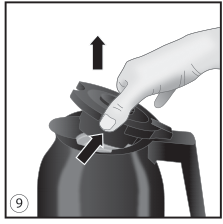
Diagram key
- 9: Remove the lid by pressing its side seals while lifting it upward.
- Left inward arrow: Press the seal on this side while lifting the lid.
- Right inward arrow: Press the seal on this side while lifting the lid.
- Upward arrow: Lift the lid while pressing the side seals.
External cleaning
Instructions from the manualExternal cleaning5 steps
- Clean the appliance housing and the outside of the insulated jug with a soft, damp cloth.
- The swivel filter is detachable and can be washed in the dishwasher.
- Rinse the insulated jug with hot water after each use.
- Remove stubborn coffee stains with Melitta Perfect Clean Accessories.
- Do not use hard or abrasive objects, which could damage the glass flask.
Descaling
Instructions from the manualDescaling and rinsing13 steps
- Water hardness can cause scale to accumulate during use.
- Scale on the heating element prevents effective water heating and increases energy consumption.
- Descale regularly to avoid damage.
- Complete both descaling and rinsing.
- Follow the descaler manufacturer’s amounts and pour the descaler into the water tank.
- The manual recommends Melitta Anti Calc Liquid for Filter Coffee & Aqua Machines.
- Turn the appliance on and follow the descaler manufacturer’s instructions.
- Turn it off when all the descaler liquid has run through.
- After descaling, let the machine cool for about two minutes.
- Fill it with the maximum amount of fresh water.
- Turn the appliance on and let all the water flow through.
- Turn it off immediately afterward.
- Repeat the rinsing process once more.
Note on disposal
Instructions from the manualDisposal4 steps
- Appliances marked with the WEEE symbol are subject to European Waste Electrical and Electronic Equipment guidelines.
- Do not put electrical appliances in household waste.
- Dispose of the appliance responsibly through suitable collection systems.
- Recycle the packaging materials.