MODEL REFERENCE
Melitta LOOK V Timer
10 guides

The checks and guides below come from the official manuals for this model.
No matches for this wording. Try a light name, error code or a shorter phrase.
Guides
Safety notice
Instructions from the manualSafe use and stopping for service27 steps
- Read the complete safety and operating instructions and follow them to avoid danger.
- Melitta accepts no liability for damage caused by ignoring them.
- Use this appliance in households and similar areas, such as employee kitchens in shops, offices and other commercial areas; agricultural establishments; motels, hotels, other residential facilities and bed-and-breakfast establishments.
- Other use is improper and may cause personal injury or property damage.
- Melitta is not liable for damage caused by improper use.
- Do not place the appliance in a cupboard during operation.
- Connect it only to a properly installed earthed socket.
- Disconnect it from power when unsupervised and before assembly, disassembly or cleaning.
- During operation, parts such as the steam outlet at the filter become very hot.
- Avoid touching them and avoid contact with hot steam.
- Do not open the filter holder during brewing.
- The hotplate becomes very hot during use and remains hot for a long time after brewing.
- Avoid touching it because it can cause burns.
- Keep the power cable away from the hotplate.
- Do not use the appliance if its power cable is damaged.
- Keep the cable away from liquids.
- Never immerse the appliance in water.
- Do not use the jug in a microwave.
- Do not clean food-contact parts with aggressive cleaners or scouring cream.
- Remove detergent residues with clean water.
- See the reviewed cleaning instructions.
- Children aged eight or older may use the appliance only with supervision or instruction in safe use and an understanding of the hazards.
- Children may clean or maintain it only if aged eight or older and supervised.
- Keep the appliance and power cable away from children under eight.
- People with reduced physical, sensory or mental abilities, or lacking experience or knowledge, need supervision or instruction in safe use and an understanding of the hazards.
- Children must not play with the appliance.
- Only Melitta Customer Service or an authorised repair shop may replace the power cable or carry out other repairs.
Before first use
Instructions from the manualBefore first use9 steps
- Check that your home power supply matches the model plate on the base of the appliance.
- Place the appliance on a dry, level, stable surface.
- Connect it to power and store unused cable in its base.
- Set the current time with the h and m buttons.
- Hold down a button to advance faster.
- The appliance is ready for use only after the time has been set.
- To switch the display light on or off, press h and m together for longer than two seconds.
- Production testing may leave water deposits.
- Before first use, rinse the appliance twice with the maximum amount of water, without a filter bag or ground coffee.
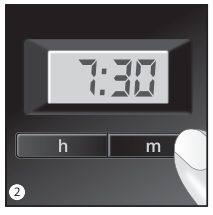
Diagram key
- 7:30: Example time shown on the display; set your current time before using the appliance.
- h: Hours button.
- m: Minutes button.
- Finger on m: Press the minutes button to set the current time.
- 2: Hold a time button to advance faster. Press h and m together for longer than two seconds to switch display lighting on or off.
Set water hardness
Instructions from the manualSet water hardness13 steps
- Limescale can prevent effective heating, increase energy consumption and cause damage.
- Descale regularly.
- A permanently lit CALC button means descaling is needed.
- The factory setting is high water hardness, level 4.
- Ask your local water provider or use a shop-bought water-hardness strip to determine your local hardness.
- For softer water, adjust the descaling display to prompt less often.
- Hold CALC and briefly press m to select the required hardness.
- The selected setting appears in the display.
- Release CALC to save the setting.
- The hardness table pairs I with below 7 °dH and display 1; II with 7–14 °dH and display 2; III with 14–21 °dH and display 3; IV with above 21 °dH and display 4.
- Preserve the printed boundary ranges.
- Do not program water hardness while brewing.
- The last setting remains after unplugging.
Setting the hotplate
Instructions from the manualSetting the hotplate7 steps
- Keeping coffee warm changes its taste.
- Enjoy coffee as soon as possible after brewing; unnecessary warming uses energy.
- The factory setting is 40 minutes, after which the hotplate switches off automatically.
- Hold ON/OFF and briefly press m to set 20, 40 or 60 minutes.
- The current warming time appears in the display.
- Release the button to save the setting.
- The last setting remains after unplugging.
Making coffee
Instructions from the manualMaking coffee19 steps
- Ensure that the appliance is connected to power.
- To fill the water tank, hold its recessed grip and pull it straight up.
- Remove its lid and fill with the required amount of fresh tap water, using the tank indicator to choose the number of cups.
- Replace the tank lid and insert the tank upright.
- Use the guide rails on the appliance to the left of the tank.
- Alternatively, pour water from the glass jug into the tank while it remains in the appliance.
- Read the amount on the tank indicator: the small-cup symbol represents approximately 85 ml of coffee per cup; the large-cup symbol represents approximately 125 ml per cup.
- Close the tank lid and place the glass jug with its lid closed in the appliance.
- Open the swivel filter to the left.
- Fold a Melitta 1x4 filter bag at its embossed seam and put it in the filter holder.
- Press it into the holder by hand for a good fit.
- Add ground coffee.
- The manual recommends 6–8 g per large cup with the AromaSelector at its medium setting.
- With the same quantity of coffee, turn the AromaSelector left for milder coffee or right for stronger coffee, as shown by the printed symbols.
- Turn the appliance on with ON/OFF to begin brewing.
- After brewing, the hotplate keeps coffee warm and switches off after the selected warming time.
- You may switch the machine off manually at any time.
- The drip stop prevents dripping when you remove the jug.
- The removable inner filter makes disposing of the filter bag easier.
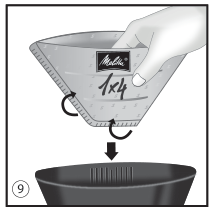
Diagram key
- Melitta1x4: Use a Melitta1x4 filter bag, folded at its embossed seam.
- Two curved fold arrows: Fold the filter bag at its embossed seam.
- Downward arrow: Place the bag in the holder and press it in by hand for a good fit.
- 9: Filter-bag insertion panel.
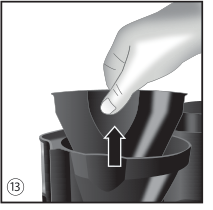
Diagram key
- Upward arrow: Lift the removable inner filter to dispose of the used filter bag easily.
- 13: Removable inner-filter panel.
Timer feature
Instructions from the manualTimer feature13 steps
- Prepare the appliance using the reviewed Making coffee instructions, but do not press ON/OFF.
- Hold TIMER to set the desired start time.
- The first time you program it, the display shows 00:00.
- Set the time by pressing h and m repeatedly; hold a button to advance faster.
- Release TIMER.
- The current time appears, and the chosen start time remains saved until you change it or disconnect power.
- Briefly press TIMER to activate the next brewing cycle.
- The TIMER button lights up and the programmed start time appears briefly.
- The appliance starts brewing automatically at the selected time.
- The previous start time remains saved while power stays connected and you do not select another time.
- To deactivate the timer at any time, briefly press TIMER again; its light goes off.
- To brew before the programmed time, press ON/OFF.
- This deactivates the timer feature.
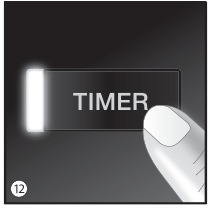
Diagram key
- TIMER: Hold to set a start time. Briefly press to activate the next cycle, when the button lights up; press again to deactivate, when its light goes off.
- Finger on button: Operate TIMER as described in the reviewed instructions.
- 12: TIMER button and light location.
External cleaning
Instructions from the manualExternal cleaning7 steps
- Switch off the machine and disconnect its power cable before cleaning.
- Allow it to cool completely.
- Clean parts that touch coffee, including the jug and filter holder, after each use.
- Clean the housing with a soft damp cloth.
- The glass jug and lid, filter insert and swivel filter are dishwasher-safe.
- Clean the cold hotplate with a soft damp cloth.
- Do not use harsh or abrasive cleaning agents.
Descaling
Instructions from the manualDescaling10 steps
- Run descaling promptly when CALC lights up, according to the water-hardness setting.
- Follow the descaler manufacturer’s quantity instructions and pour the descaler into the water tank.
- The manual recommends Melitta Anti Calc Liquid for Filter Coffee & Aqua Machines.
- Briefly press CALC; it begins to flash.
- The automatic descaling program takes 25 minutes to remove stubborn deposits.
- The display shows the remaining time.
- Complete the full 25-minute program without interruption.
- Only a complete cycle removes the deposits and turns off the CALC light.
- When descaling finishes, CALC goes off and the appliance switches off automatically.
- For rinsing after descaling, run the appliance twice with the maximum amount of water and no coffee to remove remaining deposits.
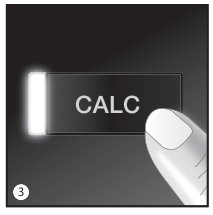
Diagram key
- CALC: A lit button prompts descaling. Briefly press it to start the25-minute program; it flashes during descaling and goes off after the complete cycle.
- Finger on button: Briefly press CALC to start descaling.
- 3: CALC button and light location.
Notes on disposal
Instructions from the manualDisposal4 steps
- Appliances carrying the WEEE symbol are subject to European waste electrical and electronic equipment guidelines.
- Do not put electrical appliances in household waste.
- Use suitable collection systems for environmentally responsible disposal.
- Recycle the packaging materials.
Terms of guarantee
Instructions from the manualUK guarantee and service11 steps
- In addition to legal claims against the seller, Melitta grants a manufacturer guarantee for a device purchased from an authorised dealer.
- The 24-month period starts on the sale date, which must be proved by a receipt.
- The device was designed for household use, not commercial use.
- Guarantee work neither extends nor restarts the period for the device or installed spare parts.
- Within the period, Melitta corrects material or manufacturing defects by repair or replacement at its discretion.
- Replaced parts become Melitta’s property.
- The guarantee excludes improper connection or handling, unauthorised repair attempts, failure to follow use/care/maintenance instructions, and consumables such as cleaners, descalers or water filters that do not meet original specifications.
- Wear parts such as seals and valves and fragile parts such as glass are excluded.
- Service is processed through the country’s hotline.
- These terms apply to devices bought and used in the UK; products bought or taken abroad are serviced under that country’s applicable terms.
- The manual lists Melitta UK Ltd., Hortonwood 45, Telford, Shropshire TF1 7FA, United Kingdom; +44(0)800 0288002; www.melitta.co.uk.
Model details
Model and compatibility
- Filter size
- Melitta1x4 filter bag.
- Coffee dose
- 6–8g per large cup at medium AromaSelector setting.
- Warming time
- 20,40 or60minutes; factory setting40minutes.
- Descaling cycle
- Complete25-minute program without interruption, followed by two maximum-water rinses without coffee.