MODEL REFERENCE
MERCUSYS Halo H47BE V1
2 errors · 39 guides

The checks and guides below come from the official manuals for this model.
No matches for this wording. Try a light name, error code or a shorter phrase.
Errors and indicators
Light patterns and messages documented in the manualFind the indicator lights
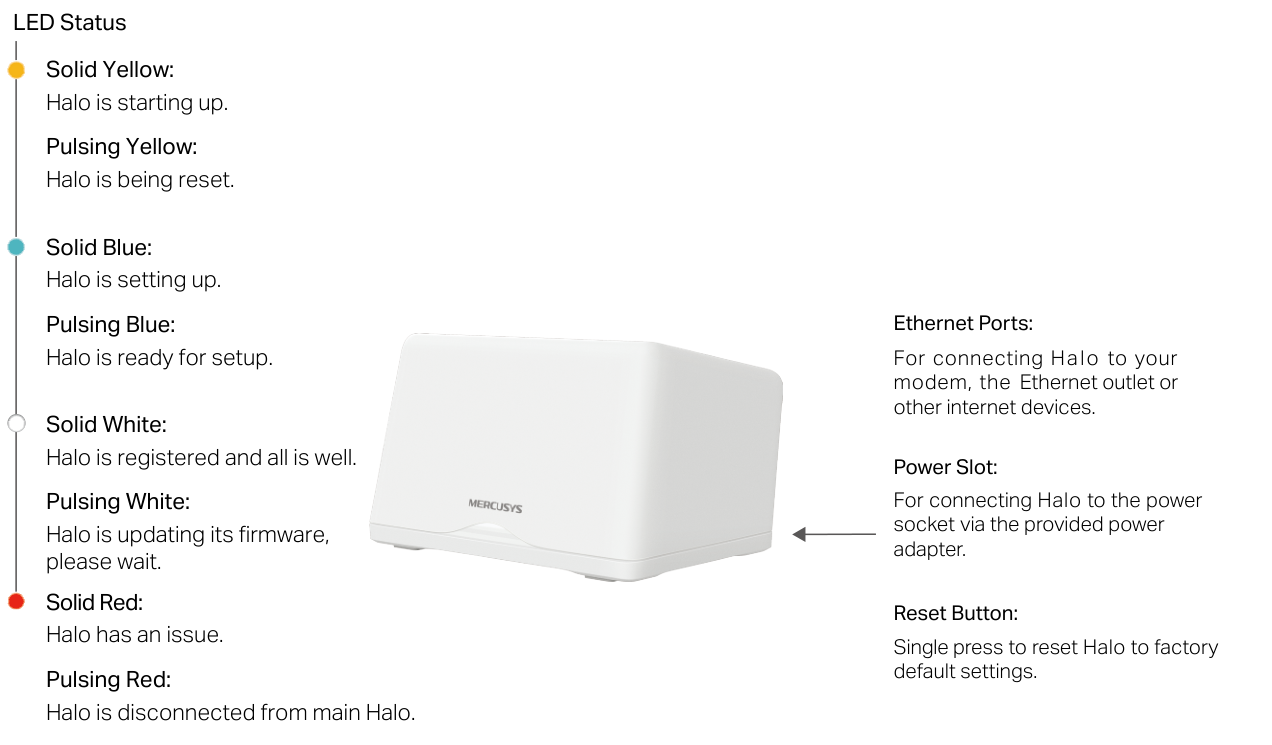
Diagram key
- LED Status: The complete list of solid and pulsing indicator meanings.
- Solid Yellow: Halo is starting up.
- Pulsing Yellow: Halo is being reset.
- Solid Blue: Halo is being set up.
- Pulsing Blue: Halo is ready for setup.
- Solid White: Halo is registered and working normally.
- Pulsing White: Halo is updating firmware; wait.
- Solid Red: Halo has an issue.
- Pulsing Red: Halo is disconnected from the main Halo.
- Ethernet Ports: Connect Halo to a modem, Ethernet outlet or other internet devices.
- Power Slot: Connect to a power socket with the provided power adapter.
- Reset Button: A single press restores factory-default settings; the guide supplies no timed hold.
- MERCUSYS: Manufacturer wordmark on the source unit illustration.
Solid Redhalo has an issue
- Halo has an issue.
- The complete operation guide supplies no separate repair sequence for this indicator.
- Contact MERCUSYS if service is needed; do not disassemble, repair or modify the device yourself.
Pulsing Redhalo is disconnected from the main Halo
- Halo is disconnected from the main Halo.
- The complete operation guide supplies no separate repair sequence for this indicator.
- Contact MERCUSYS if service is needed; do not disassemble, repair or modify the device yourself.
Guides
About this guide
Instructions from the manualScope and mesh compatibility6 steps
- This reference covers Halo H47BE EU hardware V1, using its exact English operation guide and two-pack datasheet.
- Available features and experience can vary by model, software, region or ISP; illustrations and steps are examples.
- H-series and S-series Halos cannot work together.
- Seamless roaming needs clients supporting 802.11k/v/r and may require additional setup; performance depends on the client.
- Wi-Fi 7, Wi-Fi 6, MLO, 320 MHz bandwidth, 4K-QAM, Multi-RUs, OFDMA and MU-MIMO require clients supporting the corresponding features.
- Maximum wireless rates are physical IEEE rates; throughput, coverage and device capacity are not guaranteed and depend on network conditions, clients and the environment.
Appearance
Instructions from the manualRead all Halo indicator states8 steps
- Solid yellow: starting up.
- Pulsing yellow: being reset.
- Solid blue: setting up.
- Pulsing blue: ready for setup.
- Solid white: registered and all is well.
- Pulsing white: firmware update in progress; wait.
- Solid red: Halo has an issue.
- Pulsing red: disconnected from the main Halo.
Connections and factory reset6 steps
- Use the three WAN/LAN auto-sensing Ethernet ports for a modem, Ethernet outlet or other internet devices.
- Each port is 2.5 Gbps, as recorded separately in the exact datasheet.
- Connect the power slot to a socket with the provided power adapter.
- A single press of Reset restores factory settings.
- Pulsing yellow indicates resetting and pulsing blue indicates readiness for setup.
- The exact guide does not specify a timed hold.
Set up your halo
Instructions from the manualSet up Halo and add units7 steps
- Download MERCUSYS from Google Play or the Apple App Store, or use the manual’s QR code.
- Install it on your phone or tablet.
- Open the app and log in with your Mercusys ID.
- If you do not have one, tap Sign Up and follow the prompts.
- Tap LET’S BEGIN and follow the app instructions to connect and configure Halo.
- When the network is ready, connect your devices to it.
- Tap ADD ANOTHER HALO to add more units, or I’M DONE FOR NOW to finish.
Dashboard
Instructions from the manualCheck Halo and connected-device details7 steps
- After setup, use the Dashboard to check Halo status and manage connected devices.
- Tap the device/network entry to see connected devices; use the globe control to check all Halo units and select one for details.
- Tap a connected device for its details and connection preference, family member, priority and Mesh Technology controls.
- Turning Mesh Technology off disables seamless roaming between Halos for that device.
- Tap More for additional features.
- Use the menu icon for the manager menu, Help and About.
- Use the plus button at the upper right to add devices, then choose Halo in the illustrated device-type list.
Wi-fi settings
Instructions from the manualChange Wi-Fi and MLO settings10 steps
- Open Wi-Fi settings and tap the network name to configure the 2.4 GHz and 5 GHz network or the 6 GHz network.
- Change the network name, password or security setting.
- The example recommends a password combining letters, numbers and symbols.
- Use Share to share network details.
- The pictured names and settings are examples.
- Use Advanced > Hide Network to hide the name from Wi-Fi lists.
- When hidden, clients must enter the name and password manually, and WPS is unavailable.
- Enable MLO Network to send and receive data simultaneously across different bands.
- MLO and Dedicated Backhaul cannot be enabled together.
- The 6 GHz screenshot notes that only Wi-Fi 6E-compatible devices can find and join that network.
Guest network
Instructions from the manualConfigure guest networks and bandwidth limits5 steps
- Open Guest Network and enable the 2.4 GHz/5 GHz or 6 GHz guest network.
- Set its name, password and turn-on duration.
- The illustrated prompt recommends a password; leaving its password field blank creates a guest network that does not require a password.
- Open Advanced > Bandwidth Limit, enable the limit, and enter download and upload limits in Mbps, then save.
- Use Share to share the guest-network details.
Blacklist
Instructions from the manualBlock or unblock devices5 steps
- Open More > Blacklist; the illustrated app calls this Device Deny List.
- Devices on the list cannot access the network.
- Tap the upper-right plus button and select Clients to add a connected client, selecting it and using Done.
- If the device is absent from the client list, enter its MAC address in Add Device and save.
- Use the three-dot control beside a listed client to remove it from the deny list.
Online update
Instructions from the manualUpdate Halo firmware online4 steps
- When prompted by MERCUSYS, open More > Update Halo and follow its prompts.
- The illustrated Auto Update option, when enabled, updates Halo automatically during the selected time.
- The guide does not show its subsequent scheduling screen.
- A pulsing-white LED means firmware is updating; wait.
Advanced features
Instructions from the manualInternet and IPv6 settings4 steps
- Open More > Advanced to modify IPv4 or IPv6 WAN settings or IPv6 firewall rules.
- The illustrated screens show connection type, IP address and DNS fields; the IPv4 screen also shows Ignore Ping from WAN, subnet mask and gateway.
- The guide supplies no full ISP-specific configuration sequence.
- Its pictured addresses and connection types are examples.
Enable dedicated backhaul4 steps
- In Advanced, open Dedicated Backhaul and enable it to use 6 GHz Wi-Fi between mesh nodes.
- Dedicated Backhaul and MLO Network cannot be enabled at the same time.
- With dedicated backhaul on, the 6 GHz network is unavailable for clients.
- Review the confirmation that the 6 GHz network will be disabled, then choose Cancel or Continue Anyway as appropriate.
Change LAN IP and DHCP settings4 steps
- Open More > Advanced > LAN IP, edit the address and subnet mask and save.
- In DHCP Server, set start IP, end IP and default gateway; primary and secondary DNS are optional.
- Save.
- Illustrated IP addresses are examples.
Enable IPTV/VLAN or MAC Clone4 steps
- In Advanced > IPTV/VLAN, enable IPTV/VLAN and select the ISP Profile.
- When IPTV is configured, the selected Halo port can be used only for IPTV service.
- In MAC Clone, enable the feature and use a selected client MAC or a custom MAC.
- Select or enter the address specified by your ISP, then save.
Reserve an address for a device3 steps
- Open Advanced > Address Reservation and use its plus control to begin adding a reservation.
- A reserved device receives the same IP address when it connects to Halo, helping administration and troubleshooting.
- This guide does not show the subsequent reservation-entry screen.
Set up port forwarding3 steps
- Open Advanced > Port Forwarding and use ADD to begin a rule.
- This makes local computers and devices accessible from other devices over the internet.
- The guide does not show subsequent rule fields; it supplies no port or address values to enter.
Register a DDNS domainView
Use Advanced > MERCUSYS DDNS > Register. A DDNS domain can be used instead of an IP address to access Halo and local resources over the internet.
Control SIP ALGView
In Advanced > SIP ALG, enable the feature when needed. When enabled, clients can communicate with SIP servers through NAT.
Enable Fast Roaming and check compatibility3 steps
- In Advanced > Fast Roaming, enable IEEE 802.11r roaming to allow devices to switch seamlessly between Halos.
- Enabling it may disconnect older wireless devices.
- If a device disconnects after enabling or disabling Fast Roaming, forget the Halo network on that device and join it again.
Older device disconnects after changing Fast Roaming1 check
- Enabling Fast Roaming may disconnect older devices.
- If a device disconnects after turning this feature on or off, forget the Halo network on it and join the network again.
Enable BeamformingView
In Advanced > Beamforming, enable the feature. It concentrates the Wi-Fi signal towards connected devices for stronger connections.
Control the indicator and Night Mode4 steps
- Open Advanced > LED Control and use the LED switch to control the indicator.
- Enable Night Mode and set its From and Until times.
- The LED is off each day during that period; the example continues until the next day.
- Illustrated times are examples.
Set the system time zoneView
Open the Advanced features and System Time to set the Time Zone. The shown city, date and time are examples.
Choose Router or Access Point mode5 steps
- Open Advanced > Operation Mode.
- In the illustrated default Router mode, Halo connects directly to internet service using Dynamic IP, Static IP, PPPoE or other supported types and shares access with wired and wireless devices.
- NAT and DHCP server are enabled by default.
- Access Point mode connects by Ethernet to an existing wired or wireless router and extends its wireless coverage.
- NAT, Parental Controls and QoS are not supported in Access Point mode.
Configure notifications2 steps
- Open Advanced > Notifications and configure Update Firmware, New Device Detected and Monthly Report notifications, then save.
- The example reports that system notifications are disabled and directs you to your device’s Settings > Notifications to enable them.
Wps
Instructions from the manualConnect a WPS client3 steps
- Open More > WPS and enable WPS for a nearby Halo in the app, then enable WPS on the client.
- This is an app control; the exact physical controls list only Reset.
- WPS is unavailable when Hide Network is enabled.
Parental controls
Instructions from the manualCreate family profiles and parental controls8 steps
- Open More > Parental Controls and use the plus button to add a named profile for each family member to manage.
- Choose a filter level: Child, Pre-Teen, Teen or Adult.
- Use Categories to choose filtered categories or Websites to add more blocked sites; use Next as illustrated.
- Set daily time limits and Bed Time, selecting weekdays and weekend periods.
- The example separates Monday–Friday and Saturday–Sunday.
- Select the controlled devices in Add Devices and finish with Done.
- Pause internet access when necessary.
- Parental Controls is not supported in Access Point mode.
Qos
Instructions from the manualSet bandwidth and device priority8 steps
- Open More > QoS and choose ENABLE QOS.
- Before using QoS, contact your ISP for accurate download and upload bandwidth.
- Values that are too low or high can affect QoS performance.
- Enter the total download and upload bandwidth in Mbps and use NEXT; the example accepts integers from 1 to 2500.
- Select high-priority devices and add them.
- Tap the priority schedule to set its duration.
- The example illustrates a laptop prioritized for one hour during a video call; the schedule screenshot shows Always as an example choice.
- QoS is unavailable in Access Point mode.
Monthly report
Instructions from the manualView and control monthly reports4 steps
- Open More > Monthly Report to review usage, including security threats and daily connected-device totals.
- Use the Monthly Report switch to enable or disable it.
- When enabled, network activity is recorded and presented monthly.
- Use Clear Report Data to clear report data.
Managers
Instructions from the manualAdd network managers3 steps
- Open More > Managers and use its plus button to add a manager.
- Each friend or family member needs their own Mercusys ID.
- Enter the email address that person used to register their MERCUSYS ID and save.
Authentication
Instructions from the manualEU and UK radio-use restrictions11 steps
- Use this device indoors only in all EU member states, EFTA countries, Northern Ireland and Great Britain.
- Keep it 20 cm from your body for EU RF compliance.
- This Class B device may cause radio interference in a domestic environment, requiring adequate measures.
- For 5150–5250 MHz, the frequency rules prohibit installations and indoor use in road vehicles and train carriages.
- The listed limited-outdoor exception prohibits fixed installations, external road-vehicle mounting, fixed infrastructure or fixed outdoor antennas; unmanned aircraft use is limited to 5170–5250 MHz.
- The separate national indoor-only restriction still applies.
- For 5250–5350 MHz, use inside buildings only; road vehicles, trains, aircraft and outdoor use are prohibited.
- For 5470–5725 MHz, installations and use in road vehicles, trains, aircraft and unmanned aircraft systems are prohibited.
- For 6105–6425 MHz, use indoors, including trains with metal-coated windows and aircraft.
- Outdoor use, including road vehicles, is prohibited.
- These are frequency-scoped limitations, not permission to disregard the national indoor-only rule.
Safety information
Instructions from the manualSafe operation and when to stop13 steps
- Keep the device away from water, fire, humidity and hot environments.
- Operate at 0–40 °C (32–104 °F).
- Do not disassemble, repair or modify the device.
- Contact MERCUSYS if service is needed.
- Do not use a damaged charger or USB cable, or chargers other than those recommended.
- Use only manufacturer-provided power supplies from the product’s original packaging; ask MERCUSYS if uncertain.
- Do not use the device where wireless devices are prohibited.
- Install its adapter near the equipment where it remains accessible.
- Keep the product and adapter more than 15 cm (6 inches) from pacemakers or other implanted medical devices.
- Electromagnetic fields and magnets can interfere with implants.
- If interference is suspected, turn the product off and consult your physician about the implant.
- The separate general EU RF-use distance is 20 cm.
- Read and follow the safety information, use the product carefully and recognize that improper use can cause accidents or damage.
Explanation of the symbols on the product label
Instructions from the manualRead product-label symbols5 steps
- The label is at the bottom of the product and its I.T.E. power supply.
- Symbols may vary by product; this general legend does not establish that every mark is on this unit.
- The legend explains Class II equipment; Class II equipment with functional earthing; alternating current; DC voltage; output-terminal polarity; indoor use only; dangerous voltage; caution, risk of electric shock; energy-efficiency marking; protective earth; earth; frame or chassis; functional earthing; and caution, hot surface.
- Its continuation explains caution; operator’s manual; stand-by; ON/OFF (push-push); fuse; fuse in neutral N; WEEE recycling; caution against listening at high volume for long periods; disconnection of all power plugs; m for a mini-gap switch; µ for a micro-gap switch in the US or micro-gap/micro-disconnection in other versions; and ε for a switch without a contact gap (semiconductor switching).
- These are label meanings, not instructions to modify the equipment.
Dispose of electrical equipment correctly2 steps
- The WEEE selective-sorting symbol means the product is handled under European Directive 2012/19/EU for recycling or dismantling to limit environmental impact.
- Give the product to a competent recycling organization, or return it to the retailer when buying new electrical or electronic equipment.
Specifications
Instructions from the manualIdentify the two-pack hardware6 steps
- The EU V1 two-pack contains two Halo H47BE units, one RJ45 Ethernet cable, two power adapters and a Quick Installation Guide.
- Each unit has three 2.5 Gbps WAN/LAN auto-sensing ports and a Reset button.
- Dimensions are 170 × 122.4 × 103.5 mm (approximately 6.69 × 4.82 × 4.07 inches).
- Only one port can act as WAN at a time.
- Other ports can connect LAN devices or provide wired backhaul between Halo H units.
- 2.5 Gbps internet requires compatible service plans and equipment; actual speed may be limited by Ethernet ports, cables, ISP or environmental conditions.
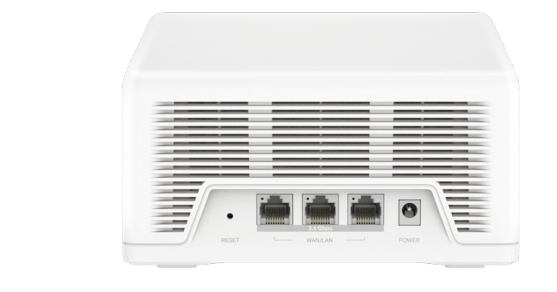
Diagram key
- RESET: Reset control identified by its printed RESET inscription and the same-page Reset-button specification.
- Left Ethernet connector: The leftmost of the three 2.5 Gbps WAN/LAN auto-sensing ports.
- Middle Ethernet connector: The middle of the three 2.5 Gbps WAN/LAN auto-sensing ports.
- Right Ethernet connector: The rightmost of the three 2.5 Gbps WAN/LAN auto-sensing ports.
- 2.5 Gbps: The speed marking applies to all three Ethernet ports, matching the same-page hardware specification.
- WAN/LAN bracket: All three ports auto-sense WAN or LAN use. Only one can serve as WAN at a time; the bracket does not assign one permanent WAN position.
- POWER: The power socket identified by the printed POWER inscription.
Wireless and network capabilities14 steps
- The exact EU V1 datasheet lists IEEE 802.11ax/be at 6 GHz, IEEE 802.11a/n/ac/ax/be at 5 GHz and IEEE 802.11b/g/n/ax at 2.4 GHz.
- Physical signal rates are 5760, 2880 and 574 Mbps respectively; actual performance is not guaranteed.
- Mesh protocol is 802.11k/v/r.
- Security is WPA-PSK/WPA2-PSK/WPA3-SAE; WPA3 requires compatible clients.
- The datasheet lists Router and Access Point modes; Dynamic IP, Static IP, PPPoE, L2TP, PPTP and DS-Lite WAN types; DHCP server/client; WMM QoS; SPI firewall; IPv4/IPv6; one guest network per band; and local/remote/multiple-manager management.
- Listed features include parental controls, QoS, reporting, assisted setup, address reservation, port forwarding, DDNS, VLAN, IPv6 and LED control.
- This specification table supplies no additional configuration steps.
- H47BE can join other H-series units; H-series and S-series cannot work together.
- Roaming needs 802.11k/v/r-compatible clients and may require setup.
- Wi-Fi 7/6, MLO, 320 MHz, 4K-QAM, Multi-RUs, OFDMA and MU-MIMO need compatible clients.
- 320 MHz is only on 6 GHz; 320 MHz at 6 GHz and 160 MHz at 5 GHz may be unavailable under regional restrictions.
- Some mandatory IEEE 802.11be/ax features may not be supported and feature availability may require software upgrades.
- The over-200-device claim is based on laboratory tests of simultaneous 6/5/2.4 GHz applications in one room, including video, downloads, web browsing, IP cameras and IoT.
- Throughput, coverage and device count are not guaranteed and vary with ISP, network, clients, building materials, obstacles, traffic and location.
EU radio specifications3 steps
- The datasheet lists reception sensitivity −96 dBm at 2.4 GHz, −95 dBm at 5 GHz and −96 dBm at 6 GHz.
- EIRP limits are below 23 dBm for 5 GHz bands 1/2, below 30 dBm for 5 GHz band 3 and below 23 dBm for 6 GHz.
- These are specification values, not user-adjustment instructions.
Environmental limitsView
- Operate at 0–40 °C (32–104 °F), with 10–90% non-condensing humidity.
- Storage humidity is 5–90% non-condensing.
- No separate storage-temperature range is supplied in this datasheet.
Get started
Instructions from the manualH-series quick installation3 steps
- Download the MERCUSYS app.
- Open it and sign up with an email address to create a Mercusys ID, then follow the app instructions to configure Halo.
- The English LED Status table confirms solid/pulsing yellow for startup/reset, solid/pulsing blue for setup/readiness, solid white for normal registration,pulsing white for firmware update (wait), solid red for an issue and pulsing red for disconnection from the main Halo.
English: safety information
Instructions from the manualModel details
Model and compatibility
- Connections
- Three WAN/LAN auto-sensing Ethernet ports, power slot and Reset button.
- Factory reset
- A single press of Reset restores factory settings; no timed hold supplied.
- Operating temperature
- 0–40 °C (32–104 °F).