MODEL REFERENCE
NexiGo PJ06
1 troubleshooting topic · 22 guides
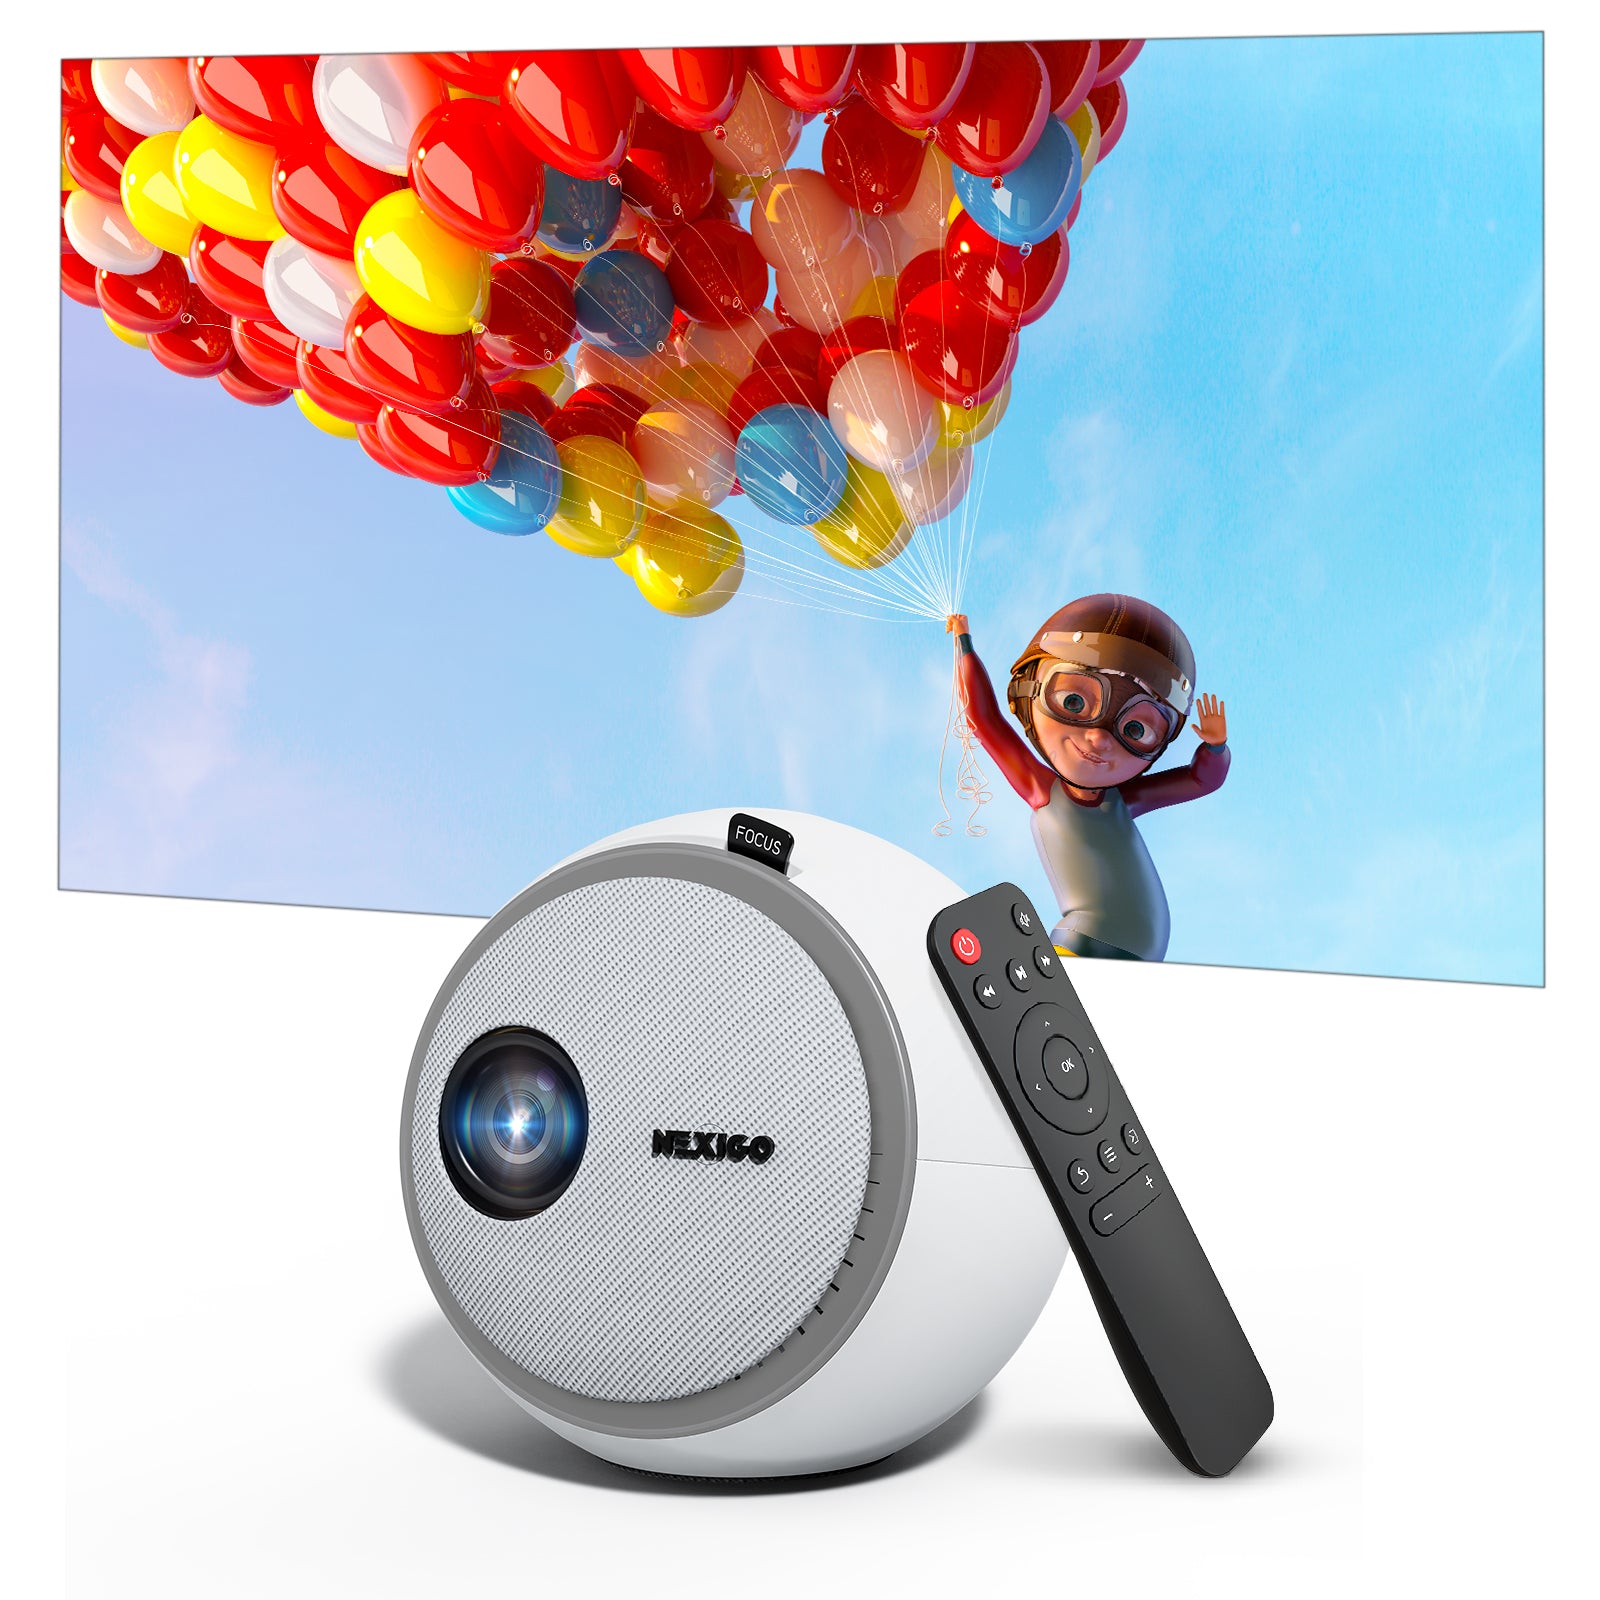
The checks and guides below come from the official manuals for this model.
No matches for this wording. Try a light name, error code or a shorter phrase.
Troubleshooting
Find the problem you are experiencingSmoke, unusual noise, strange odor or other problems1 check
Exact NexiGo PJ06 model; official support link and PDF1/PDF4.
- Smoke, unusual noises, strange odor or another issue
- Unplug immediately; keep in an open ventilated area away from fire hazards and contact Customer Support.
Guides
Welcome to the nexigo family!
Instructions from the manualContact support and review warranty conditions4 steps
Exact NexiGo PJ06 model; official support link and PDF1/PDF4.
- For problems contact cs@nexigo.com or +1 (458) 215-6088.
- The manufacturer is Nexight INC, 11075 SW 11th St, Beaverton, OR 97005, US; website www.nexigo.com.
- The manual states a one-year manufacturer warranty, extended by another year when purchase is registered at nexigo.com/warranty within 14 days of delivery.
- The final manual page repeats this registration limit.
Projector diagram
Instructions from the manualIdentify the projector controls and ports2 steps
Exact NexiGo PJ06 model; official support link and PDF1/PDF4.
- Rear: 1 Power Input Jack, 2 HDMI Input Port, 3 USB Input Port, 4 the 3.5 mm Audio Jack.
- Top/front branch: 5 Lens, 6 Focus Adjustment Knob, 7 Right, 8 OK (press once) / Power Switch (press and hold), 9 Down, 10 Left and 11 Return.
What's in the box?
Instructions from the manualCheck the supplied accessories3 steps
Exact NexiGo PJ06 model; official support link and PDF1/PDF4.
- The box contains one mini LCD projector, one power adapter, one user manual, one cleaning kit and one remote.
- The remote requires two AAA batteries, not included.
- The manual supplies no battery installation or cleaning-kit procedure.
Remote control diagram and functions
Instructions from the manualUse the remote control2 steps
Exact NexiGo PJ06 model; official support link and PDF1/PDF4.
- Power toggles on/off; Mute toggles audio; Rewind goes backward in video/audio; Play/Pause pauses or plays; Fast Forward skips forward or moves quickly through video/audio.
- Left/Right/Up/Down navigate the onscreen display; OK selects the current option; Menu displays the menu; Return goes to the previous screen; Signal Source opens source selection; Vol + increases and Vol − decreases volume.
Connection introduction
Instructions from the manualIdentify compatible connection types4 steps
Exact NexiGo PJ06 model; official support link and PDF1/PDF4.
- HDMI accepts a TV box, TV stick or computer.
- USB accepts a hard drive, USB drive or charges a USB device.
- The 3.5 mm output accepts headphones or speakers.
- The manual gives no USB charging output rating.
Specifications
Instructions from the manualPJ06 specifications and connection limits3 steps
Exact NexiGo PJ06 model; official support link and PDF1/PDF4.
- LCD imaging with LED light source; native 1280 × 720; aspect ratios 4:3 and 16:9; projection ratio 1.4:1.
- Projection size 24–118 inches and distance 2.62–11.48 ft.
- DC input 19 V / 2.5 A, integrated watt use 48 W; one HDMI input, one USB input, one 3.5 mm audio output and one 3 W speaker.
Choosing a location
Instructions from the manualChoose a location and projection orientation6 steps
Exact NexiGo PJ06 model; official support link and PDF1/PDF4.
- Consider the room size/layout, screen size/shape/position, location of a suitable power outlet and sufficient space around the projector for airflow.
- Place it on a stable surface or suspend it from the ceiling using a standard 1/4-inch mounting bracket, sold separately.
- The four layouts are ceiling/front, ceiling/rear, desktop/front and desktop/rear.
- Rear projection requires a specific rear-projection screen.
- Select Projection Mode under Setting > Picture Setting and choose the mode matching the installation.
- Do not use a vertical orientation; keep installation slope within ±15° and keep air vents unobstructed.
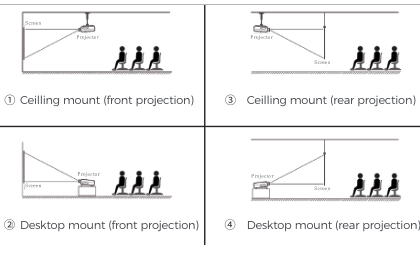
Diagram key
- 1: Ceiling mount with front projection.
- 3: Ceiling mount with rear projection.
- 2: Desktop mount with front projection.
- 4: Desktop mount with rear projection.
- Projector (four positions): The projector position in each of the four layouts.
- Screen (four positions): The projection screen position in each layout; rear projection needs a specific rear-projection screen.
Power on/off
Instructions from the manualPower on and shut down7 steps
Exact NexiGo PJ06 model; official support link and PDF1/PDF4.
- Plug the power adapter into a power outlet.
- Press and hold the projector Power Switch to turn it on.
- Press the Power Switch to turn it off.
- Alternatively use the remote Power Switch for on/off.
- During normal operation do not abruptly turn off mains or unplug the projector.
- Wait for the fan to turn off before powering off fully.
- The abnormal-operation warning requires immediate unplugging when a fault occurs.
Projector distance & size
Instructions from the manualAllow for projection-distance tolerances4 steps
Exact NexiGo PJ06 model; official support link and PDF1/PDF4.
- The distance/size chart is a reference only.
- Manufacturing tolerances can cause up to 3% variance from unit to unit.
- Use actual measurements when installing the device.
- The manual specification range is 24–118 inches at 2.62–11.48 ft.
Focus adjustment
Instructions from the manualAdjust focus for a blurry imageView
Exact NexiGo PJ06 model; official support link and PDF1/PDF4.
Rotate the Focus Adjustment Knob left or right until the image becomes clear and sharp. If the image remains blurry, rotate the knob in the opposite direction until it clears.
Diagram key
- Focus knob: Rotate left or right until the picture is sharp; reverse direction if blurry.
- ABCD before: The sample image before adjustment.
- Arrow: The illustrated change after adjustment.
- ABCD after: The clear sample image.
Usb connections
Instructions from the manualOpen USB mediaView
Exact NexiGo PJ06 model; official support link and PDF1/PDF4.
Insert the USB drive into the USB port. In the onscreen menu choose Movie, Music, Photo or Text for the content you want to open.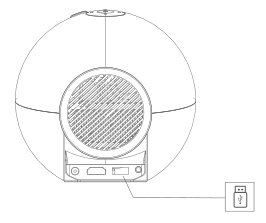
Diagram key
- USB port: Insert the USB drive here.
- USB drive: A USB drive supplies media to the projector.
Supported USB media formats6 steps
Exact NexiGo PJ06 model; official support link and PDF1/PDF4.
- Audio: MP3, AAC, WAV, LOAS, PCM, OGG, FLAC and AC3.
- Photos: JPEG, BMP and PNG.
- Text: TXT.
- Video: DIVX, RM, 3GP, AVI, MKV, FLV, MOV, MP4, MPG, VOB and RMVB.
- The printed list repeats MPG and RM; these repeats do not identify additional formats.
- The manual states no codec/profile or drive filesystem limits.
Hdmi connections
Instructions from the manualConnect an HDMI source2 steps
Exact NexiGo PJ06 model; official support link and PDF1/PDF4.
- Connect one end of an HDMI cable to the source device and the other end to the projector HDMI port.
- Open the onscreen menu and select HDMI in the Input Source tab to display the connected device screen.
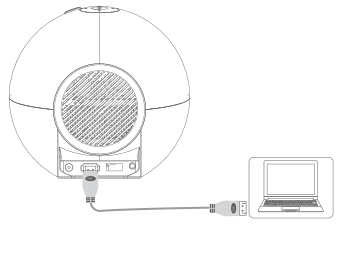
Diagram key
- HDMI port: Connect the HDMI cable to the projector HDMI input.
- HDMI cable: Connect the other end to the source device.
- Computer: The example HDMI source device.
5mm audio connection
Instructions from the manualConnect headphones or external speakersView
Exact NexiGo PJ06 model; official support link and PDF1/PDF4.
Connect headphones or speakers to the 3.5 mm audio output to play source audio.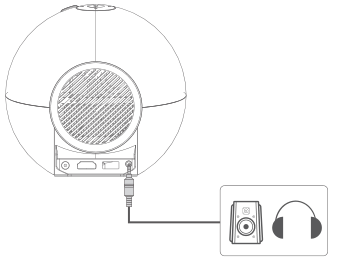
Diagram key
- 3.5 mm audio port: Audio output for the connected headphones or speakers.
- Cable: Connect headphones or speakers to this output.
- Speaker and headphones: The illustrated alternative audio devices.
Picture setting
Instructions from the manualAdjust picture settings4 steps
Exact NexiGo PJ06 model; official support link and PDF1/PDF4.
- Under Setting > Picture Setting, Projection Mode offers Standard, Mirrored, Flipped, and Flipped-and-Mirrored orientations.
- Image Scaling changes displayed object size; Color Range adjusts the color range; Aspect Ratio describes width-to-height with common 4:3 and 16:9 choices.
- Picture Mode offers Standard, Dynamic, Mild or User.
- User mode enables custom contrast, brightness, color and sharpness.
System setting
Instructions from the manualChange the onscreen languageView
Exact NexiGo PJ06 model; official support link and PDF1/PDF4.
Under System Setting, OSD Language chooses the language used in the projector menus.Update firmware only when support instructs8 steps
Exact NexiGo PJ06 model; official support link and PDF1/PDF4.
- Firmware typically need not be updated.
- Proceed only when instructed by NexiGo technical support.
- Check nexigo.com/support for new firmware downloads.
- Download the latest firmware to a USB flash drive and insert it into the projector USB port.
- Select Setting > System Setting > Software Update (USB).
- The update runs automatically.
- Do not use or turn off the projector until it completes; interrupting the update can damage the projector.
- It resets after updating and erases all saved settings.
Restore factory settings3 steps
Exact NexiGo PJ06 model; official support link and PDF1/PDF4.
- Under System Setting, Restore Factory Default resets the projector to factory default settings.
- The manual supplies no further reset sequence or confirmation behavior.
- Firmware updates also reset the projector and erase all saved settings.
Set automatic shutdownView
Exact NexiGo PJ06 model; official support link and PDF1/PDF4.
Under System Setting, Sleep Timer sets the duration before the projector shuts down automatically. The manual provides no timer increments or range.Other setting
Instructions from the manualWarnings
Instructions from the manualSafe handling, placement and operation15 steps
Exact NexiGo PJ06 model; official support link and PDF1/PDF4.
- Read the manual carefully before use.
- Do not modify the equipment, drop or throw it, or point the lens at the sun.
- Use only the provided power cable.
- Do not place it on uneven, unstable or vibrating surfaces, or near strong magnetic fields or heavy electrical loads.
- Do not look into the operating lens; permanent eye damage may result.
- Do not use vertical orientation.
- Keep the slope within ±15° to prevent sliding/falling.
- Keep air vents unobstructed to avoid damage or fire.
- Keep liquids away; liquid damage is excluded from the warranty.
- Unplug when unused for a prolonged period.
- Do not attempt repair; contact NexiGo Support for mechanical issues.
- Operate at +41 to +95°F (+5 to +35°C), 30–90% humidity.
- For smoke, noises, odor or other issues follow the immediate unplugging response.
- For normal shutdown do not abruptly cut mains or unplug during operation; wait for the fan to stop before powering off fully.
- Do not remove the cover because high-voltage circuitry can cause severe electric shock or death.
Fcc requirement
Instructions from the manualRadio-compliance conditions2 steps
Exact NexiGo PJ06 model; official support link and PDF1/PDF4.
- Unapproved changes or modifications could void authority to operate.
- FCC Part 15 operation requires that the device not cause harmful interference and accept received interference, including interference causing undesired operation.
Controls and parts
See the manual diagrams 3 diagrams
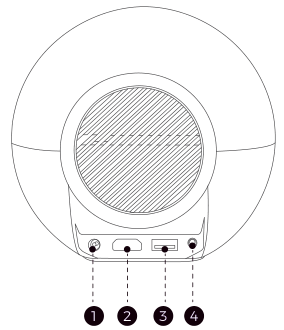
Diagram key
- 1: Power Input Jack.
- 2: HDMI Input Port.
- 3: USB Input Port.
- 4: 3.5 mm Audio Jack.
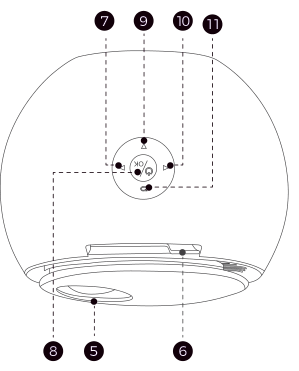
Diagram key
- 7: Right.
- 9: Down.
- 10: Left.
- 11: Return.
- 8: OK (press once) / Power Switch (press and hold).
- 5: Lens.
- 6: Focus Adjustment Knob.
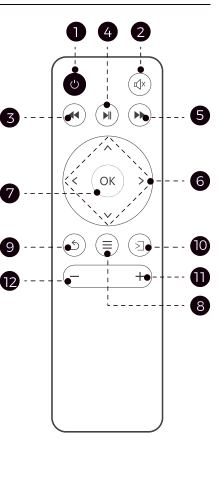
Diagram key
- 1: Power Switch toggles power on/off.
- 4: Play/Pause pauses or plays video.
- 2: Mute toggles audio on/off.
- 3: Rewind goes backward in video/audio.
- 5: Fast Forward skips forward or moves quickly through video/audio.
- 6: Left/Right/Up/Down navigate the onscreen display.
- 7: OK selects the current option.
- 9: Return goes to the previous screen.
- 10: Signal Source displays source selection.
- 12: Vol − decreases volume.
- 11: Vol + increases volume.
- 8: Menu displays the menu.
Model details
Model and compatibility
- Reference scope
- NexiGo PJ06; English user instructions in the original 68-page multilingual manual.
- Native picture
- LCD/LED, 1280 × 720; 4:3 and 16:9; 1.4:1 projection ratio.
- Power and speaker
- DC 19 V / 2.5 A; 48 W integrated use; one 3 W speaker.
- Operating limits
- 5–35°C (41–95°F), 30–90% humidity; keep slope within ±15°; no vertical operation.