MODEL REFERENCE
Presto 0283001
6 troubleshooting topics · 12 guides
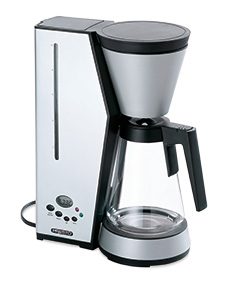
The checks and guides below come from the official manuals for this model.
No matches for this wording. Try a light name, error code or a shorter phrase.
Troubleshooting
Find the problem you are experiencingFilling directly from a bottled-water container1 check
- Direct filling is permitted
- You may pour bottled water directly into the tank. Watch the red ball in the water-level indicator to fill accurately.
Cold carafe and brewed-coffee temperature1 check
- Cold filling water may have a slight temperature effect, particularly for a few cups
- The warming plate starts heating the carafe as soon as the maker turns on, so temperature loss is usually negligible.
- If concerned, rinse the carafe with warm water after filling the tank and before placing it on the warming plate.
A few drips during pause-and-serve1 check
- A few drops when removing the carafe during brewing are normal
- Remove the carafe very slowly to avoid most drips.
- Replace it as soon as pouring finishes because brewing continues and the basket holds about one minute of coffee before overflowing.
Brewing takes longer than before1 check
- Mineral deposits can increase brewing time; buildup varies with the water
- Periodically remove deposits using the reviewed descaling instructions: six-cup level of undiluted white vinegar, paper filter, carafe on plate; switch off after about three cups, wait fifteen minutes, then restart, discard the vinegar and rinse with two water-only brews.
Brewed coffee is below the ten-cup mark1 check
- Grounds retain some water
- The carafe marks measure the water needed for brewing, not the final coffee quantity.
- Brewed volume is lower because some water remains in the grounds; the manual supplies no corrective action.
Cannot program a time1 check
- Already in AUTO mode, shown by the red AUTO light
- Press AUTO ON/OFF twice to switch off, then program the time using the reviewed delayed-brewing instructions.
Guides
Important safeguards
Instructions from the manualSafe use and when to stop20 steps
- Read all instructions.
- Use the appliance only for its intended household purpose and retain the instructions.
- Use handles or knobs instead of touching hot surfaces.
- Use extreme caution when moving the coffee maker with hot liquids.
- Do not immerse the cord, plug or coffee maker in water or another liquid.
- Supervise closely when an appliance is used by or near children.
- Do not operate with a damaged cord or plug, after a malfunction, or after damage of any kind.
- Return it to Presto Factory Service or an authorized service station for examination, repair or adjustment.
- Attachments not recommended by the manufacturer may cause injury.
- Keep the cord off table or counter edges and away from hot surfaces.
- Keep the appliance away from hot gas or electric burners and heated ovens.
- Unplug when not in use and before cleaning.
- Let the appliance cool before fitting or removing parts and before cleaning.
- Before every use, secure the carafe lid.
- Use this carafe only with this appliance; never on a range or in a conventional or microwave oven.
- Do not put a hot carafe on a cold or wet surface.
- Do not use a cracked carafe or one with a loose or broken handle.
- Do not use cleansers, steel wool or other abrasives on it.
- Do not use outdoors.
- Do not remove the bottom panel: this risks fire or electric shock, contains no serviceable parts, and must be repaired only by authorized personnel.
Electrical cord instructions
Instructions from the manualCord placement and polarized plug6 steps
- The short cord reduces entanglement and tripping risks.
- Use an extension only with care; its marked rating must be at least the appliance rating.
- Arrange it so children cannot pull it and it cannot be tripped over, with no draping over the counter or table.
- The polarized plug has one wider blade and fits a polarized outlet in one direction.
- If it does not fit fully, reverse it; if it still does not fit, contact a qualified electrician.
- Do not defeat this safety feature.
Coffee maker features
Instructions from the manualHeating, pause-and-serve and programmable features7 steps
- The top heating element reheats water just before it reaches the grounds; the manual describes about eight minutes for ten cups.
- The positive temperature coefficient keep-warm heater stays on and varies its wattage to keep brewed coffee at serving temperature.
- The coffee maker keeps coffee warm for two hours after brewing, then shuts off automatically.
- Pause-and-serve temporarily retains coffee in the basket while the carafe is removed.
- Follow the reviewed brewing instructions and promptly replace the carafe.
- The clock/timer supports setting the brewing time up to 24 hours ahead.
- A small red ball in the water-level indicator rises during filling to show the level.
Before first use
Instructions from the manualBefore first use and after a long period unused7 steps
- Read and follow the instructions carefully.
- Wash the carafe, lid and removable filter basket on the dishwasher top rack, ensuring enough clearance to prevent carafe breakage, or wash in warm sudsy water and rinse thoroughly.
- To remove the basket, hold the top of the water tank with one hand and the silver basket-holder part with the other.
- Pull the holder clockwise until fully open, then lift the basket using its handle.
- After washing, fit the basket tab into the slot at the back of the holder.
- Before the first brew, or after a long period unused, rinse by following the brewing instructions with water only: no paper filter or grounds, and fill only to the eight-cup level.
- Discard the heated water.
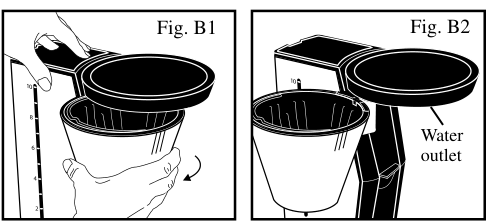
Diagram key
- Fig. B1: Put one hand on the tank top and the other on the silver holder.
- Fig. B2: Pull the holder clockwise until completely open.
- Clockwise arrow in Fig. B1: Indicates the opening direction described on PDF page 3.
- Water-tank marks in Fig. B1: Repeated 10/8/6/4/2 water-level scale, used with the red ball to fill to the desired level.
- Water-tank marks in Fig. B2: The same filling scale is partly obscured by the open holder; follow the visible water-level indicator when filling.
- Water outlet: Wipe this area with a damp cloth during cleaning; do not immerse the appliance.
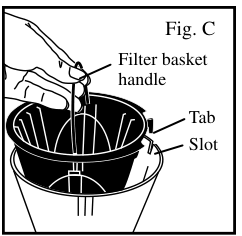
Diagram key
- Fig. C: Lift the basket by its handle; after washing, replace it with the tab in the slot at the back of the holder.
- Filter basket handle: Used to lift the basket. Raise it when seating a paper filter and lower it over part of the filter paper.
- Tab: Fit this basket tab into the holder’s rear slot after washing.
- Slot: Rear holder opening that receives the basket tab.
Brewing coffee
Instructions from the manualBrewing coffee immediately21 steps
- Place on a flat, level surface and plug into a standard AC outlet.
- Remove the ten-cup carafe and fill it with the desired amount of cold water.
- Open the tank lid, pour in the water to the desired level and close the lid.
- Make at least two cups for best flavour.
- Open the holder as in Figures B1 and B2.
- With the basket handle raised, insert a number 4 cone paper filter and press its centre fully into the basket.
- Lower the handle over a portion of the filter paper.
- Add the desired amount of coffee ground for drip coffee makers.
- Use the reviewed amount chart as a starting point and adjust to taste.
- Close the holder directly beneath the black top.
- With its lid fitted, centre the carafe on the warming plate before turning on.
- Otherwise brewed coffee can flow onto the plate or counter.
- For immediate brewing, press AUTO ON/OFF twice.
- The green ON light indicates brewing.
- Ten cups take about eight minutes.
- For delayed brewing, follow the separate timer instructions.
- To pour before brewing finishes, remove the carafe slowly and replace it as soon as pouring finishes.
- Brewing continues; the basket holds about one minute of coffee before deliberately overflowing to prevent damage.
- A few drips are normal.
- After brewing, coffee stays hot for two hours before automatic shutoff.
- To stop the keep-warm function, press AUTO ON/OFF once; the green ON light goes out.
Suggested ground-coffee amounts7 steps
- The chart uses one cup equal to 4.5 ounces of brewed coffee.
- Suggested tablespoons are listed as mild, medium and robust; adjust for personal preference.
- For ten cups: 4, 8 or 13 tablespoons respectively.
- For eight cups: 3, 7 or 10 tablespoons respectively.
- For six cups: 2½, 5 or 8 tablespoons respectively.
- For four cups: 2, 3½ or 5 tablespoons respectively.
- For two cups: 1½, 2 or 4 tablespoons respectively.
To set clock
Instructions from the manualSetting the clock4 steps
- Plug into an outlet.
- Until set, the display flashes PM 12:00.
- Press HR until the correct AM or PM hour appears, then MIN until the correct minute appears.
- The clock keeps time while the unit remains plugged in.
Programming the coffee maker for delayed brewing
Instructions from the manualProgramming delayed brewing19 steps
- Set the clock first.
- The manual recommends leaving the unit plugged in for regular delayed brewing so the clock and programmed time need not be reset each use.
- Prepare the appliance as in brewing steps one through seven: flat level surface, cold water with at least two cups for best flavour, number 4 filter seated with paper under the lowered handle, grounds, closed holder, and lidded carafe centred on the plate.
- Check the current time and correct it if necessary using the clock instructions.
- Turn AUTO ON/OFF off; neither red AUTO nor green ON should be lit.
- Hold PROG so BREW appears.
- While holding it, use HR and MIN to set the desired brewing hour and minute.
- Release PROG.
- The clock returns and BREW disappears.
- Press PROG once to check the programmed start time.
- Press AUTO ON/OFF once.
- AUTO appears and the red AUTO light indicates that automatic brewing is set.
- To change the programmed time while in AUTO, press AUTO ON/OFF twice to switch off, then repeat the PROG-setting, confirmation and AUTO-activation steps.
- At the start time, green ON lights and red AUTO goes out.
- The clock remains displayed during brewing.
- Press AUTO ON/OFF once at any time to stop brewing.
- For the same time daily, prepare the maker again and press AUTO ON/OFF once each day.
- The time is retained only if it has not been unplugged and power has not failed.
- Press PROG to check it and correct with the PROG, HR and MIN sequence if needed.
Cleaning
Instructions from the manualCleaning after use8 steps
- Switch off, unplug as required by the safeguards, and let cool before cleaning.
- Open the holder, lift the basket by its handle and discard the grounds.
- Wash the carafe, lid and basket on the dishwasher top rack with enough carafe clearance to prevent breakage, or wash in warm sudsy water and rinse.
- Do not use cleansers, steel wool or abrasives on the carafe.
- Wipe the holder, water-outlet area and exterior with a damp cloth.
- Do not immerse the coffee maker in water or another liquid.
- Periodically, depending on water hardness, remove mineral deposits from the tank.
- Increased brewing time can indicate buildup; follow the separate descaling instructions.
Descaling instructions:
Instructions from the manualDescaling and rinsing9 steps
- Every few months, remove mineral deposits caused by minerals in the water.
- Fill to the six-cup level with undiluted white vinegar.
- Put a paper filter in the basket.
- Place the carafe on the plate and turn on.
- After about three cups have passed through, switch off and wait fifteen minutes.
- Sputtering during the vinegar cycle is normal.
- Switch on again to pass the remaining vinegar into the carafe, then discard it.
- Before brewing coffee, rinse thoroughly by brewing water only twice.
- Commercial coffee-maker cleansers may also be used; follow their manufacturer’s instructions.
Service information
Instructions from the manualService, repairs and genuine replacement parts11 steps
- The 2004 Form 72-606A lists consumer service at 1-800-877-0441 on weekdays 8:00 AM–4:30 PM Central Time, contact@GoPresto.com, or National Presto Industries, Inc., Consumer Service Department, 3925 N.
- Hastings Way, Eau Claire, WI 54703-3703.
- Written inquiries should include a phone number and a weekday time to reach you if possible.
- Replies may be by telephone, letter or email.
- Maintenance beyond household care and cleaning belongs to Presto Factory Service or an authorized station.
- Include purchase date and defect description with a repair return.
- The manual lists Canton Sales and Storage Company, Presto Factory Service Department, 555 Matthews Drive, Canton, MS 39046-0529; it also refers to authorized stations in the yellow pages.
- Factory service and authorized stations supply genuine Presto parts made to the appliance standards and designed for it.
- Similar-looking parts may differ; Presto guarantees only genuine parts.
- Look for the Presto trademark.
- These are the historical details printed in the 2004 manual, not a claim of current service availability.
Presto limited warranty
Instructions from the manualLimited warranty printed in the 2004 manual7 steps
- The manual pledges to the original owner repair or replacement, at Presto’s option, for material or workmanship defects in the first year under normal household use.
- Shipping damage is excluded.
- For its warranty service, return the appliance shipping prepaid to Factory Service or an authorized station, with the defect description and purchase date.
- Read and follow the enclosed instructions.
- Failure to follow them, improper replacement-part damage, abuse or misuse voids the pledge.
- It gives specific legal rights, with others varying by state, and replaces other express warranties.
- These are Form 72-606A terms, not an assertion of current policy.
Controls and parts
See the manual diagrams 2 diagrams
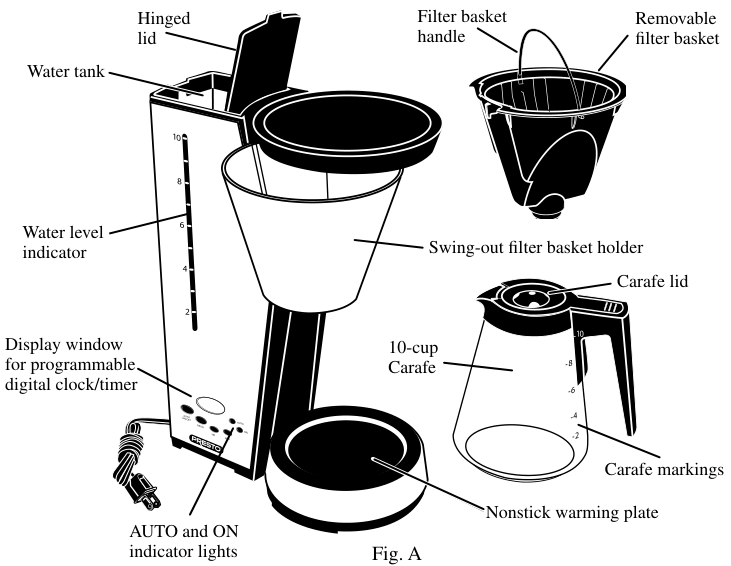
Diagram key
- Fig. A: Complete coffee maker parts layout from Form 72-606A.
- Hinged lid: Open to fill the water tank and close after filling.
- Water tank: Receives cold water from the carafe; use at least two cups for best flavour.
- Water level indicator: A red ball rises during filling to show the water level.
- Water-tank 10 / 8 / 6 / 4 / 2: Printed water-level marks; watch the rising red ball to fill to the desired level. One brewed cup is 4.5 ounces.
- Display window for programmable digital clock/timer: Displays the clock and programmed brewing time.
- AUTO and ON indicator lights: Red AUTO indicates delayed-brewing readiness; green ON indicates brewing. Neither light is lit when switched off.
- Filter basket handle: Lift to remove the basket; lower over part of the paper filter after seating it.
- Removable filter basket: Holds a number 4 cone paper filter and grounds. Wash in warm sudsy water or on the dishwasher top rack.
- Swing-out filter basket holder: Pull clockwise to open, then close directly under the black top before brewing.
- Carafe lid: Secure to the carafe before every use.
- 10-cup Carafe: Use to measure cold filling water; place with its lid centred on the warming plate.
- Carafe markings: Indicate filling water, not final brewed volume, because grounds retain some water.
- Carafe 10 / 8 / 6 / 4 / 2: Printed filling marks repeated on the carafe; they measure water for brewing rather than final coffee volume.
- Nonstick warming plate: Keeps the carafe hot; do not set a hot carafe on a wet or cold surface. Automatic shutoff follows two hours of warming.
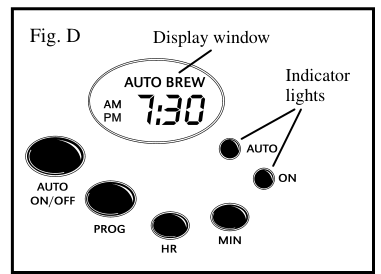
Diagram key
- Fig. D: Clock/timer control panel; follow the reviewed clock and delayed-brewing instructions.
- Display window: Shows the time while plugged in, and the programmed time when PROG is pressed.
- Indicator lights: Red AUTO for a scheduled brew and green ON when brewing starts; neither is lit when off.
- AUTO ON/OFF: Press twice from off for immediate brewing; once from off for AUTO. In AUTO, press twice to turn off before changing time. Once during brewing stops the cycle.
- PROG: Hold while setting HR/MIN; release to return to the clock. Press once to check the stored brewing time.
- HR: Sets the hour with the correct AM/PM indication.
- MIN: Sets the minute.
- AM / PM: Morning/evening clock indicators; select the correct one when setting the hour.
- AUTO in the display: Displayed when delayed brewing is armed.
- AUTO beside the upper light: Identifies the red delayed-brewing indicator; this repeats the display state label.
- ON beside the lower light: Identifies the green brewing indicator.
- BREW: Appears while PROG is held for setting the start time and disappears on release.
- 7:30: Example clock digits printed in the figure; the instructions permit setting the actual desired time.