The checks and guides below come from the official manuals for this model.
No matches for this wording. Try a light name, error code or a shorter phrase.
Errors and spoken alerts
Spoken error numbers documented in the manual
Find the indicator lights
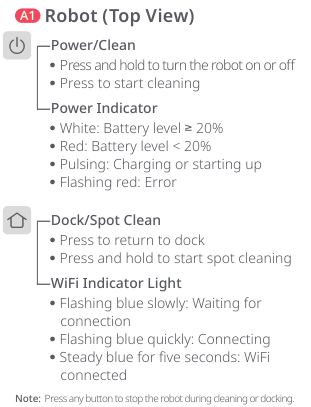
Power, Dock/Spot Clean and WiFi controls with every indicator-state explanation. US/FCC Q5+ (Q5 Plus) with Auto-Empty Dock; other versions are outside this review.
Message or indicatorWhat it meansCheck or action
Error 1liDAR turret or laser blocked
Check for an obstruction and retry.
After resolving the error, relocate the robot and restart cleaning.
After a sensor error, clean the sensor and retry.
If the problem persists, contact Roborock support; a system reset may resolve some problems.
Error 2bumper stuck
Clean the bumper and tap it lightly to release it.
After resolving the error, relocate the robot and restart cleaning.
After a sensor error, clean the sensor and retry.
If the problem persists, contact Roborock support; a system reset may resolve some problems.
Error 3wheels suspended
Move the robot and restart.
After resolving the error, relocate the robot and restart cleaning.
After a sensor error, clean the sensor and retry.
If the problem persists, contact Roborock support; a system reset may resolve some problems.
Error 4cliff sensor error
Clean the cliff sensors, move the robot away from drops and restart.
After resolving the error, relocate the robot and restart cleaning.
After a sensor error, clean the sensor and retry.
If the problem persists, contact Roborock support; a system reset may resolve some problems.
Error 5main brush jammed
Clean the main brush and bearings.
After resolving the error, relocate the robot and restart cleaning.
After a sensor error, clean the sensor and retry.
If the problem persists, contact Roborock support; a system reset may resolve some problems.
Error 6side brush jammed
Remove and clean the side brush.
After resolving the error, relocate the robot and restart cleaning.
After a sensor error, clean the sensor and retry.
If the problem persists, contact Roborock support; a system reset may resolve some problems.
Error 7wheels jammed
Move the robot and restart.
After resolving the error, relocate the robot and restart cleaning.
After a sensor error, clean the sensor and retry.
If the problem persists, contact Roborock support; a system reset may resolve some problems.
Error 8robot trapped
Clear obstacles around the robot.
After resolving the error, relocate the robot and restart cleaning.
After a sensor error, clean the sensor and retry.
If the problem persists, contact Roborock support; a system reset may resolve some problems.
Error 9dustbin missing
Install the dustbin and filter.
After resolving the error, relocate the robot and restart cleaning.
After a sensor error, clean the sensor and retry.
If the problem persists, contact Roborock support; a system reset may resolve some problems.
Error 12battery level is low
Recharge and retry.
After resolving the error, relocate the robot and restart cleaning.
After a sensor error, clean the sensor and retry.
If the problem persists, contact Roborock support; a system reset may resolve some problems.
Error 13charging error
Clean the charging contacts and retry.
After resolving the error, relocate the robot and restart cleaning.
After a sensor error, clean the sensor and retry.
If the problem persists, contact Roborock support; a system reset may resolve some problems.
Error 14battery error
The row supplies no specific battery repair.
If the battery temperature is abnormal, wait until it returns to normal before use.
Contact Roborock support if the problem persists after the documented recommendations.
After resolving the error, relocate the robot and restart cleaning.
After a sensor error, clean the sensor and retry.
If the problem persists, contact Roborock support; a system reset may resolve some problems.
Error 16robot is tilted
Move the robot onto level ground and restart.
After resolving the error, relocate the robot and restart cleaning.
After a sensor error, clean the sensor and retry.
If the problem persists, contact Roborock support; a system reset may resolve some problems.
Error 17side brush error
Reset the robot.
After resolving the error, relocate the robot and restart cleaning.
After a sensor error, clean the sensor and retry.
If the problem persists, contact Roborock support; a system reset may resolve some problems.
Error 18fan error
Reset the robot.
After resolving the error, relocate the robot and restart cleaning.
After a sensor error, clean the sensor and retry.
If the problem persists, contact Roborock support; a system reset may resolve some problems.
Error 21vertical bumper pressed
Move the robot and retry.
After resolving the error, relocate the robot and restart cleaning.
After a sensor error, clean the sensor and retry.
If the problem persists, contact Roborock support; a system reset may resolve some problems.
Error 22dock locator error
Clean the dock locator and retry.
After resolving the error, relocate the robot and restart cleaning.
After a sensor error, clean the sensor and retry.
If the problem persists, contact Roborock support; a system reset may resolve some problems.
Error 23robot could not return to dock
Clean the dock location beacon and retry.
After resolving the error, relocate the robot and restart cleaning.
After a sensor error, clean the sensor and retry.
If the problem persists, contact Roborock support; a system reset may resolve some problems.
Error 26wall sensor is dirty
Clean the wall sensor.
After resolving the error, relocate the robot and restart cleaning.
After a sensor error, clean the sensor and retry.
If the problem persists, contact Roborock support; a system reset may resolve some problems.
Filter blocked or wetfilter blocked or wet
Clean and dry the filter, then retry.
After resolving the error, relocate the robot and restart cleaning.
Contact Roborock support if the problem persists after the documented recommendations.
No-go zone or Invisible Wall detectedno-go zone or Invisible Wall detected
Move the robot away from the detected No-go zone or Invisible Wall.
After resolving the error, relocate the robot and restart cleaning.
Contact Roborock support if the problem persists after the documented recommendations.
Internal errorinternal error
Reset the robot. After resolving the error, relocate the robot and restart cleaning. Contact Roborock support if the problem persists after the documented recommendations.
Troubleshooting
Find the problem you are experiencing
Unable to power on2 checks
Battery level is low
Put the robot on the charging dock and charge it before use.
Battery temperature is too low or high
Only use the robot at 4–40°C (39–104°F).
Unable to charge2 checks
Power or cable connection needs checking
Check that the power indicator turns on and both ends of the power cable are connected properly.
Charging contact is poor
Clean the contact areas on the dock and robot.
Slow charging2 checks
Temperature is high or low
The robot automatically slows charging at high or low temperatures to extend battery life.
Charging contacts may be dirty
Wipe the charging contacts with a dry cloth.
Unable to dock2 checks
Too many obstacles near the dock
Move the dock to an open area.
Robot is too far from the dock
Place the robot closer to the dock and retry.
Abnormal behavior1 check
Robot behaves abnormally
Restart the robot.
Noise during cleaning1 check
Brushes or wheels may be jammed
Turn the robot off and clean the main brush, side brush, main wheels and omni-directional wheel.
Unable to connect to WiFi5 checks
WiFi is disabled
Reset WiFi and retry.
WiFi signal is poor
Move the robot to an area with good WiFi reception.
WiFi connection is abnormal
Reset WiFi, download the latest mobile app and retry.
App may not support the selected robot
Check the app for supported models.
Sudden connection failure may involve router settings
Contact Roborock customer service for further support.
Poor cleaning ability or dust falling out3 checks
Dustbin is full
Empty the dustbin.
Filter is blocked
Clean the filter.
Main brush is jammed
Clean the main brush.
Scheduled cleaning is not working1 check
Battery level may not be above 20%
Keep the robot charged; scheduled cleaning starts only above 20% battery.
Power use while docked1 check
Robot is on the charging dock
It draws a minimal amount of power while docked to maintain battery performance.
First-use charging duration1 check
Question about a 16-hour charge for the first three uses
A 16-hour charge is not required; use the robot any time after it is fully charged.
Cleaning does not resume after recharging1 check
DND mode or manually docking before automatic return
Check DND mode. Cleanup will not resume if a robot needing a top-up charge was manually docked before it returned automatically.
Cannot return to dock after spot cleaning or manual movement1 check
Map is regenerated after spot cleaning or a significant position change
If the dock is too far away for the robot to return, place it on the dock manually.
Robot misses certain spots1 check
Wall or cliff sensors may be dirty
Wipe the wall and cliff sensors with a soft, dry cloth.
Red LED indicator on the Auto-Empty Dock3 checks
Dock dustbin cover is not in place
Check the cover and install it correctly.
Fan may be stopped by overheating protection after frequent starts and stops
Unplug the power cable and retry after 30 minutes.
Voltage error
Check that the local voltage meets the requirements printed on the dock.
Reduced emptying performance or unusual noise2 checks
Main brush or its cover is installed incorrectly
Check and correct installation of the main brush and cover.
Filter, air duct, suction inlet, air inlet or dustbin is blocked
Clean the listed areas to remove blockages.
Auto-emptying does not start when the robot returns6 checks
Auto-emptying is disabled
Check the app settings.
Dock dustbin cover is not in place
Check and install the dock dustbin cover.
Robot was moved to the dock manually
Start emptying manually.
Robot returned without cleaning
Auto-emptying is not triggered after returning without cleaning.
Robot returned while DND mode is active
Adjust cleaning or DND duration, or start emptying manually.
Battery is below 10%
Charge until battery level reaches 10%.
Guides
Warning
Instructions from the manual
Review the operating safety warnings14 steps
Use only the specified Roborock SPCDZ01RR dock with Yingju YJS024W-2001200U supply, or AED03LRR/AED04LRR charger.
Move other appliance cords out of the cleaning area.
Do not clean a room where an infant or child is sleeping, where lit candles or fragile objects are on the floor, or where candles on furniture may be struck.
Do not let children sit on the robot.
Keep the main-brush tool out of children’s reach and use it carefully.
Unplug before adjustments, accessory changes or storage.
Do not carry the product by the dock base or dustbin.
Place the dock on flat flooring away from fire, heat and water; avoid narrow locations or locations where the robot may be suspended.
Switch the product off and unplug it before cleaning or maintaining it.
Children aged eight or above and people with reduced capabilities or insufficient experience need supervision or instruction in safe use and an understanding of the risks.
Children must not play with the product or clean/maintain it without supervision.
Never clean charging contacts with wet cloths, liquids or wet hands.
Do not dismantle, repair or modify the battery or dock.
Protect a dock installed where thunderstorms or unstable voltage occur, and keep it away from heat.
Installation
Instructions from the manual
Prepare the cleaning area3 steps
Tidy cables and loose floor items; move unstable, fragile, precious or dangerous items to prevent entanglement, impact or damage.
Always use a secure physical barrier when the robot operates in a raised area.
Follow the robot throughout its entire first cleaning route and watch for potential problems.
Install and position the Auto-Empty Dock10 steps
Take the screwdriver from the storage bin under the base.
Hold the dustbin cover securely while the dock is upside down.
Put the dock upside down on a soft, flat surface such as carpet, a towel or cloth and attach the base with the six supplied screws.
Connect the power cable and keep excess cable inside its storage slot.
Place the dock on hard, flat flooring such as wood, tile or concrete.
Keep at least 0.5 m (1.6 ft) free on both sides, 1.5 m (4.9 ft) in front and 1 m (3.3 ft) above; the clearance figure labels these distances as more than 0.5 m, 1.5 m and 1 m.
Check WiFi reception and turn the dock on.
Keep the dock away from fire, heat, water, direct sunlight and anything blocking its location beacon.
Avoid narrow locations or suspension; soft carpet or mats can tilt the dock and interfere with docking/departing.
Store the standard robot dock before using the Auto-Empty Dock, which charges and empties.
Power on and charge the robot4 steps
Hold Power/Clean to switch the robot on.
When the power light comes on, place it on the dock to charge.
If a low battery prevents switching on, place the robot directly on the dock.
Keep the robot charged to maintain battery performance.
Connect to the app
Instructions from the manual
Connect the app and reset WiFi8 steps
Install either Roborock or Mi Home from the App Store or Google Play.
Hold Power/Clean and Dock/Spot Clean together until the Resetting WiFi voice alert sounds.
A slowly flashing blue WiFi indicator means the reset is complete and the robot is waiting for connection.
In Roborock, tap Search for device; in Mi Home, tap + at the upper right.
Add the device as instructed in the app.
Only 2.4 GHz WiFi is supported.
Follow current app instructions, which may change with updates.
If router configuration, a forgotten password or another issue prevents connection, reset WiFi and add the robot as a new device.
Product overview
Instructions from the manual
Use the power and WiFi indicators5 steps
Power/Clean: hold to switch the robot on or off; press to start cleaning.
The power light is white at battery level 20% or above, red below 20%, pulsing while charging/starting and flashing red on error.
Dock/Spot Clean: press to return to the dock; hold to start spot cleaning.
The WiFi light flashes blue slowly while waiting for connection, quickly while connecting, and is steady blue for five seconds when connected.
Press any button to stop the robot during cleaning or docking.
Read the Auto-Empty Dock status indicator2 steps
The A9-4 status indicator is steady white in standby, flashes white during emptying and is steady red on malfunction.
The light is off while charging the robot or when the dock is not powered.
Instructions
Instructions from the manual
Switch the robot on or off3 steps
Hold Power/Clean to switch on; the power indicator lights and the robot enters standby.
Hold Power/Clean to switch off and end the cleaning cycle.
The robot cannot be switched off while charging.
Start a cleaning cycle7 steps
Press Power/Clean to start cleaning.
The robot scans, divides the room into zones, follows each zone’s edges and fills it in a zigzag pattern, completing zones in sequence.
Start from the dock to allow automatic vacuuming and return.
Do not move the dock during cleaning.
If the battery is too low to start, charge first.
An area completed in less than ten minutes is cleaned twice.
If the battery runs low during cleaning, the robot returns to recharge and then resumes from where it stopped.
Use spot cleaningView
Hold Dock/Spot Clean to clean a 1.5 m (4.9 ft) × 1.5 m (4.9 ft) square centered on the robot. After spot cleaning, the robot returns to the starting point and enters standby.
Pause and resume cleaning3 steps
Press any button while running to pause.
Press Power/Clean to resume, or Dock/Spot Clean to send the robot to the dock.
Placing a paused robot on the dock manually ends the current cleanup.
Wake the robot from sleep3 steps
A robot paused for over ten minutes enters sleep and its power indicator flashes every few seconds.
Press any button to wake it.
The robot does not sleep while charging and automatically shuts down after more than twelve hours in sleep mode.
Set Do Not Disturb mode3 steps
The default DND period is 22:00–08:00.
Use the app to disable it or change the period.
In DND mode, automatic cleanup resumption stops, the power indicator dims and voice-prompt volume is reduced.
Return the robot to charge4 steps
After cleaning, the robot returns to the dock automatically.
When paused, press Dock/Spot Clean to send it back; its power indicator pulses during charging.
If it cannot find the dock, it returns to its starting position.
Place it on the dock manually to recharge.
Empty the robot using the dock9 steps
Auto-emptying begins when the robot returns after cleaning.
Press Dock/Spot Clean to start emptying manually; press any button to stop it.
Do not use the dock without its dustbin cover or dust bag.
The status light turns off automatically while charging.
Keep the dock on hard, flat flooring away from fire, heat, water, sunlight and obstructions to its beacon.
Avoid narrow locations or suspension.
Keep excess cable in the storage slot and store the standard robot dock.
Maintain the dock as instructed, never with a wet cloth.
Avoid frequent manual emptying.
Respond to an error indication4 steps
A flashing red power indicator and voice alert signal an error.
Follow the Errors table.
After over ten minutes in a malfunctioning state the robot sleeps.
Manually docking it ends the current cleanup.
Reset the systemView
If buttons do not respond or the robot cannot switch off, press Reset; it resets automatically. Scheduled cleaning, WiFi and other settings return to factory defaults.
Restore factory settings3 steps
If the robot still does not work correctly after a system reset, switch it on.
Hold Dock/Spot Clean and press Reset at the same time until Restoring factory settings is announced.
The robot returns to its factory settings.
Use the documented app features3 steps
The app offers multi-map management, real-time vacuum routes, map zoning/editing, scheduled/selective-room/zone cleaning, No-Go Zones and Invisible Wall, suction levels and custom cleaning.
It also displays cleaning history, battery level and care/maintenance, and provides firmware, volume, language and DND options plus voice-assistant support.
Functions and details may change with app updates.
Routine maintenance
Instructions from the manual
Clean the main brush9 steps
Switch the product off and unplug it before cleaning or maintenance.
Clean every two weeks and replace every 6–12 months.
Turn the robot over.
Press the latches to remove the main-brush cover, pull out the brush and remove its bearing.
Use the main-brush cleaning tool to remove tangled hair.
Handle large amounts or tightly tangled hair carefully to avoid brush damage; use the tool carefully and keep it away from children.
After clearing hair and dirt, reinstall the brush and press its cover to lock it.
Wipe the brush with a wet cloth and let it dry away from direct sunlight.
Do not use corrosive fluids or disinfectants.
Clean the side brush4 steps
Switch the product off and unplug it before cleaning or maintenance.
Clean monthly and replace every 3–6 months.
Unscrew the retaining screw.
Remove and clean the side brush, reinstall it and tighten the screw.
Clean the omni-directional wheel5 steps
Switch the product off and unplug it before cleaning or maintenance.
Clean when required.
Use a tool such as a small screwdriver to pry out the axle and remove the wheel; its bracket cannot be removed.
Rinse the wheel and axle with water to remove hair and dirt.
Dry them, refit the wheel and press firmly into place.
Clean the main wheelsView
Switch the product off and unplug it before cleaning or maintenance. Clean monthly with a soft, dry cloth.
Clean the dustbin and washable filter9 steps
Switch the product off and unplug it before cleaning or maintenance.
Clean weekly and replace the filter every 6–12 months.
Take out the dustbin.
Remove the washable filter and empty the dustbin.
Rinse the dustbin with clean water only; do not add cleaning liquid.
Rinse the filter repeatedly and tap it to remove dirt.
Do not touch its surface with hands, a brush or hard objects.
Let both the dustbin and filter dry thoroughly for 24 hours before reinstalling them.
An additional filter may be purchased for alternation.
Replace the dock dust bag6 steps
Switch the product off and unplug it before cleaning or maintenance.
Replace when required.
Lift the dustbin cover vertically.
Lift the dust bag out and discard it; its handle seals it during removal to prevent dust leakage.
Clean the dock filter with a dry cloth.
Slide a new dust bag into its slot and put the dustbin cover back.
Clean the dock air duct5 steps
Switch the product off and unplug it before cleaning or maintenance.
Clean when required.
Remove the ten screws and air-duct cover.
Wipe the air duct and cover with a dry cloth.
Reinstall the cover and screws.
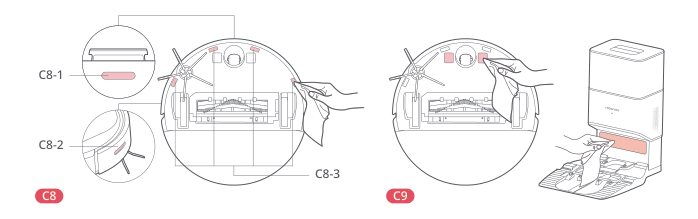
Clean the robot sensorsView
Switch the product off and unplug it before cleaning or maintenance. Clean monthly. Use a soft, dry cloth on the dock locator, wall sensor and cliff sensors.
Clean charging contacts and dock locator5 steps
Switch the product off and unplug it before cleaning or maintenance.
Clean when required.
Wipe the robot charging contacts with a soft, dry cloth.
Clean the dock location beacon, charging contacts and electrode brushes.
Never use a wet cloth, liquid or wet hands on charging contacts.
Battery and charging
Instructions from the manual
Connect the polarized power plug4 steps
The plug has one wider blade and fits a polarized outlet in only one orientation.
If it does not fit fully, reverse it.
If it still does not fit, ask a qualified electrician to install a suitable outlet.
Never alter the plug.
Store and transport the robot4 steps
For storage, charge fully and switch off before putting the robot in a cool, dry place.
Recharge at least every three months to prevent over-discharge.
For transport, switch the robot off and use its original packaging.
Do not use it above 40°C (104°F), below 4°C (39°F), or on liquid/sticky floor contamination.
Apply the battery temperature limits3 steps
Charge and use the battery pack at 4–40°C (39–104°F).
For storage of three months, the specified range is −20–45°C (−4–113°F); for six months it is −20–20°C (−4–68°F).
The operation guide additionally directs charging fully and switching off before cool, dry storage, with recharging at least every three months.
Environmental protection description
Instructions from the manual
Remove the battery for disposal8 steps
This procedure applies only to disposal or a battery that no longer functions normally: the robot remains unable to clean because of low battery even after charging.
Do not remove the battery if the robot will continue to be used.
Drain the battery fully, disconnect from the dock and switch the robot off.
Unscrew and remove the battery cover.
Press the clip and pull out the battery connector.
Remove the whole battery pack without damaging its casing, to prevent shorts or hazardous leakage.
Recycle through local authorities or a battery-recycling facility.
If battery fluid contacts you, rinse thoroughly with water and seek immediate medical attention.
Important safety instructions
Instructions from the manual
Apply the safety guide before use21 steps
Use indoors on dry surfaces only and follow the manual and manufacturer’s recommended attachments.
Do not use the appliance as a toy; supervise use around children, pets and plants.
Do not put objects into openings or use the product with blocked openings.
Keep openings clear of dust, lint and hair and keep hair, loose clothing, fingers and body parts away from moving parts and openings.
Do not pick up flammable liquids, burning/smoking material or use the product where flammable liquids may be present.
Do not use without a dust bag.
Disconnect the main brush before cleaning or servicing because it may start unexpectedly.
Switch off before adjustments, accessory changes, storage, connecting a battery, lifting or carrying.
If the cord or plug is damaged, or the appliance malfunctions, was dropped/damaged, left outdoors or dropped in water, return it to a service center.
Never pull/carry by the cord, trap it in a door or around sharp edges, run over it or expose it to heat.
Unplug by grasping the plug.
Never touch the charger, its plug or terminals with wet hands.
Use only specified chargers and battery packs.
Keep an unused battery away from metal items that can short its terminals.
Avoid ejected battery liquid; rinse accidental skin contact with water and obtain medical help for eye contact.
Do not use damaged or modified batteries or appliances.
Do not expose batteries or appliances to fire or temperatures above 130°C (266°F).
Follow the charging temperature limits; do not modify or attempt repairs beyond the use/care instructions.
Have qualified repair personnel use identical replacement parts.
Use and charge at 4–40°C (39–104°F); do not use on liquid or sticky floor contamination.
This product is for household use only.
Holiday energy saving function
Instructions from the manual
Use holiday energy-saving mode3 steps
With the robot docked, hold Dock/Spot Clean for ten seconds or until the alert sounds.
Holiday mode minimizes power use: the LED dims and non-charging functions stop, including cleaning and remote WiFi control.
To leave Holiday mode, hold Dock/Spot Clean for ten seconds until the LED brightens.
Fcc/ic statement
Instructions from the manual
Address radio or television interference4 steps
If switching the equipment off and on shows that it is causing radio/TV interference, reorient or move the receiving antenna, increase distance between equipment and receiver, or use an outlet on a circuit different from the receiver’s.
Ask the dealer or an experienced radio/TV technician for assistance if needed.
Maintain at least 20 cm between the device antenna and people during operation.
Unauthorized modifications may void operating authority.
A
Instructions from the manual
Read the paired Q5+ diagram reference2 steps
Use the A-group product overview, B-group installation and C-group maintenance callouts with their matching explanations in the Q5+ operation manual.
The complete selected keys are presented with each crop.
B
Instructions from the manual
Use the dock installation diagramsView
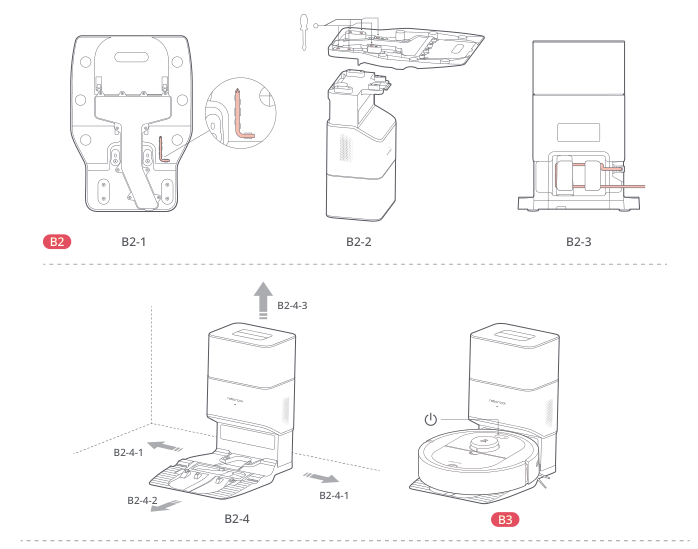
Follow the B2-1, B2-2, B2-3, B2-4 and B3 figures with the matching Installation instructions and the complete explanatory key below.
Dock assembly, cable storage, all clearance arrows and first charge. US/FCC Q5+ (Q5 Plus) with Auto-Empty Dock; other versions are outside this review.
Diagram key
B2: Position the charging dock; keep its cover secure when upside down. Keep dock away from fire, heat, water, direct sunlight and beacon obstructions. Use hard, flat flooring, store the standard robot dock and avoid suspension or narrow locations.
B2-1: Remove the screwdriver from storage under the base.
B2-2: Place the dock upside down on a soft, flat surface and attach the base with the six provided screws.
B2-3: Connect the cable and put excess cable in its storage slot.
B2-4: Place the dock on hard, flat flooring, check good WiFi coverage and turn on.
B2-4-1: More than 0.5 m (1.6 ft) clearance on each side; both repeated arrows are included.
B2-4-2: More than 1.5 m (4.9 ft) clearance in front.
B2-4-3: More than 1 m (3.3 ft) clearance above.
B3: Hold Power/Clean to switch on, then place the robot on the dock when the light turns on. A low battery may require placing it directly on the dock. Keep the robot charged.
Power/Clean symbol: The power symbol by the robot identifies the Power/Clean button used for B3.
C
Instructions from the manual
Use the dustbin and filter cleaning diagramsView
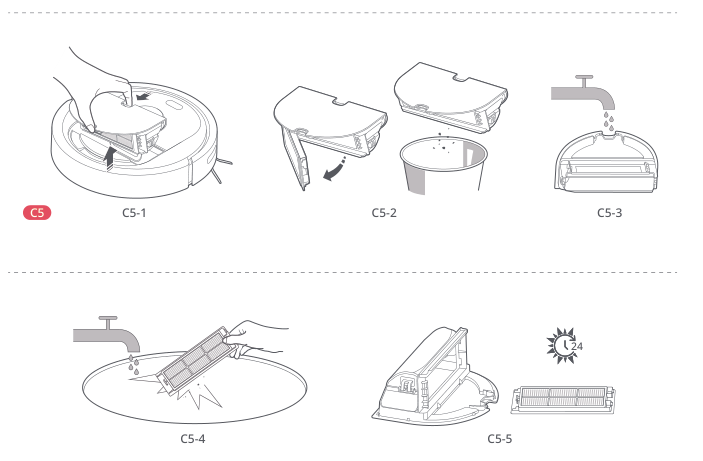
Follow the C5-1 through C5-5 figures with the matching Dustbin and Washable Filter instructions and the complete explanatory key below, including the printed 24-hour drying symbol.
Dustbin and washable-filter cleaning with complete ordered steps and drying condition. US/FCC Q5+ (Q5 Plus) with Auto-Empty Dock; other versions are outside this review.
Diagram key
C5: Dustbin and washable filter: switch off and unplug before maintenance. Clean weekly; replace the filter every 6–12 months.
C5-1: Take out the robot dustbin; complete lifting arrow retained.
C5-2: Remove the washable filter and empty the dustbin; removal and emptying arrows retained.
C5-3: Rinse the dustbin with clean water only, without cleaning liquid.
C5-4: Rinse the filter repeatedly and tap to remove dirt; do not touch its surface with hands, brushes or hard objects.
C5-5: Dry the dustbin and filter thoroughly for 24 hours before reinstalling. An additional filter may be used for alternation.
24-hour symbol: Both dustbin and filter must dry thoroughly for 24 hours, not just one depicted item.
Controls and parts
See the manual diagrams 2 diagrams
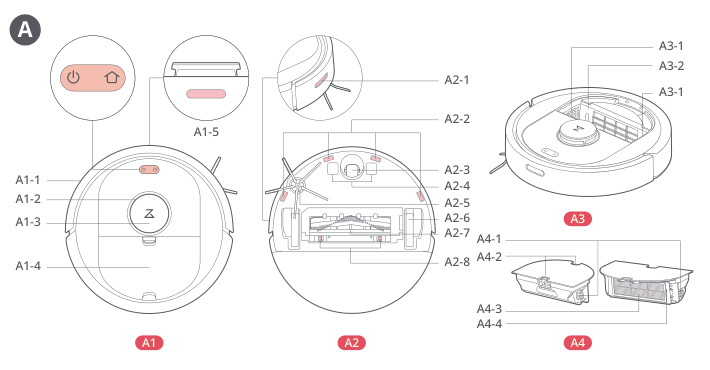
Robot controls, parts, sensors and dustbin: complete A1–A4 callouts. US/FCC Q5+ (Q5 Plus) with Auto-Empty Dock; other versions are outside this review.
Diagram key
A: Product Overview.
A1: Robot (top view).
Power/Clean symbol: Hold to switch on/off; press to start cleaning. Power indicator: white at battery ≥20%, red below 20%, pulsing when charging/starting, flashing red on error.
Dock/Spot Clean symbol: Press to return to dock; hold for spot cleaning. WiFi light flashes blue slowly while waiting, quickly while connecting, and is steady blue for five seconds when connected. Any button stops cleaning/docking.
A1-1: Bumper.
A1-2: LiDAR sensor.
A1-3: Vertical bumper.
A1-4: Robot dustbin.
A1-5: Dock locator, including its enlarged highlighted inset.
A2: Robot (bottom view).
A2-1: Wall sensor.
A2-2: Cliff sensors; all repeated leader lines identify the depicted sensor locations.
A2-3: Omni-directional wheel.
A2-4: Charging contacts.
A2-5: Side brush.
A2-6: Main wheel.
A2-7: Main brush.
A2-8: Main-brush cover latches.
A3: Robot with dustbin removed.
A3-1: Air inlets; both repeated callouts are included.
A3-2: Reset button.
A4: Robot dustbin.
A4-1: Air inlets.
A4-2: Dustbin latches.
A4-3: Washable filter.
A4-4: Filter latch.
Sensor and charging-contact locations, including every repeated leader. US/FCC Q5+ (Q5 Plus) with Auto-Empty Dock; other versions are outside this review.
Diagram key
C8: Robot sensors: switch off and unplug before maintenance. Clean monthly using a soft, dry cloth.
C8-1: Dock locator.
C8-2: Wall sensor.
C8-3: Cliff sensors; repeated leader lines and all depicted sensor locations retained.
C9: Charging contact areas: clean as required with a soft, dry cloth. Clean robot charging contacts and the dock location beacon, charging contacts and electrode brushes. Never use a wet cloth, liquids or wet hands on charging contacts.
Model details
Model and compatibility
Model and region
Q5+ (Q5 Plus), US/FCC Q340RR robot with AED03LRR or AED04LRR Auto-Empty Dock. Base Q5 and other hardware/regions are outside this reference. [1]
Battery
14.4 V, 5200 mAh lithium-ion battery; charge time is less than six hours. [1]
Auto-Empty Dock power
The US/FCC dock is rated for 120 V AC, 50–60 Hz; rated charge output is 20 V DC, 1.2 A. [1]