MODEL REFERENCE
Russell Hobbs 26230
4 errors · 6 troubleshooting topics · 20 guides

The checks and guides below come from the official manuals for this model.
No matches for this wording. Try a light name, error code or a shorter phrase.
Errors and messages
Shown on the machine displayFind the indicator lights

Diagram key
- Cleaning symbol: After approximately 60 cycles this icon pulses on and off. It does not prevent brewing. Tap Cancel to dismiss it temporarily; run the cleaning function to reset the count.

Diagram key
- Crossed-drop symbol: Moving the lever left closes the valve and displays the icon. Moving it right opens the valve and clears the icon. Attempting to brew with it closed sounds an alert and flashes this symbol until opened.
Err 01unit has overheated
Unit has overheated: Wait for the coffee maker to cool down, or run a cold-brew cycle. Descaling may also be needed.
Err 02machine malfunction
Machine malfunction: Contact customer service.
—Anti drip icon flashes with an alert tone
Brewing attempted with the anti drip lever closed.: Move the anti drip lever to the right to open the valve.
—Cleaning icon pulses after approximately 60 cycles
Descale using the reviewed cleaning function. This warning does not affect coffee making. Tap Cancel for temporary dismissal; run the cleaning function to reset the cycle count.
Troubleshooting
Find the problem you are experiencingNo coffee is made2 checks
- Water tank empty
- Fill the water tank.
- Anti drip lever is in the closed position
- Move the anti drip lever to the right.
Excessive steam is produced1 check
- Scale build-up
- Run the cleaning function with a descaling product to remove scale.
Coffee is weak or the quantity seems incorrect1 check
- Scale build-up
- Run the cleaning function with a descaling product to remove scale.
Control panel doesn’t respond to touch1 check
- Control panel dirty
- Wipe the control panel with a damp cloth, then dry thoroughly.
Coffee dripping onto warming plate when the carafe is removed1 check
- Anti drip valve open
- Move the lever to the left to close the valve.
Coffee maker is not working1 check
- The product is not working; the service passage does not establish a specific cause.
- Read the instructions and check the plug fuse and main fuse/circuit breaker.
- If still not working, consult the retailer.
- If unresolved, call Customer Service for possible technical advice.
- The product is not user-serviceable.
Guides
Important safeguards
Instructions from the manualSafe use and when to stop17 steps
- Read and retain the instructions, passing them on with the appliance.
- Remove all packaging before use.
- Misuse can cause injury, electric shock or other hazards; use only as instructed.
- Children aged eight and above and people with reduced physical, sensory or mental abilities or limited experience or knowledge may use the appliance only with supervision or instruction and understanding of the hazards.
- Children must not play with it.
- Children may clean or maintain it only if older than eight and supervised.
- Keep the appliance and cable out of reach of children under eight.
- Do not operate the coffee maker inside a cabinet.
- Its surfaces and heating element remain hot after use.
- A damaged cable must be replaced by the manufacturer, its service agent or a similarly qualified person to avoid hazards.
- Clean the product and all accessories after each use.
- Do not immerse the appliance in liquid.
- The separate milk-frother instructions specifically describe immersing its working end for frothing and cleaning; this does not authorize immersion of the appliance.
- Use in households or similar settings: staff kitchens in shops, offices or other workplaces; hotel or motel guests and other residential settings; bed-and-breakfast establishments; farmhouses.
- Place on a stable, level, heat-resistant surface.
- Use only for the purposes described in the instructions.
- Do not use if damaged or malfunctioning.
Parts
Instructions from the manualIdentify the parts2 steps
- The numbered parts are: 1 filter; 2 filter holder; 3 filter compartment lid; 4 water tank lid; 5 water level gauge; 6 anti drip lever; 7 milk frother release; 8 small cup stand; 9 scoop, approximately 7 g; 10 warming plate; 11 select/confirm knob; 12 touch controls and display; 13 carafe lid; 14 carafe; 15 cold brew filter.
- Refer to the reviewed parts figures and complete keys for their locations.
Before using for the first time
Instructions from the manualWash and prime before first use or after a long time unused8 steps
- Wash the carafe, filter holder and filter in warm soapy water.
- Rinse and dry.
- Before first use, or after a long time unused, fill the reservoir with water to the 10–15 marking.
- Place the carafe on the warming plate.
- Tap the cold-brew icon.
- Use the select/confirm knob to select full carafe.
- Press the select/confirm knob, marked with a check, to start the brewing cycle.
- This cleans and primes the coffee maker.
Controls and display
Instructions from the manualUse the touch controls and read the display16 steps
- Touch an icon to activate its function.
- The selected icon lights brightly; remaining available icons are dimly lit.
- The coffee maker enters standby after five minutes without touching controls or changing settings.
- Hold Power/Standby for one second to switch on or enter standby.
- It remembers the last settings selected.
- An audible alert sounds at the start and end of each brewing cycle.
- Tap Settings to access clock setting, timer or cleaning.
- After Settings, tap the corresponding Clock set, Timer or Clean icon.
- Hold Cancel for one second to cancel brewing.
- The warming-plate active light means the plate is hot.
- The numerical display shows the current time or programmed brewing time; after brewing it counts up for 40 minutes to show time on the warming plate.
- Coffee-strength icons are cold brew, regular, strong and concentrate (shot).
- Coffee-volume lights are full carafe, half carafe, travel mug and single cup.
- Press the select/confirm knob, marked with a check, to start brewing.
- The drip-stop lever has its own status light.
- Use the reviewed controls key for the actual source symbols.
Setting the clock
Instructions from the manualSet the clock8 steps
- Clock setting is unnecessary for immediate brewing but required for the timer.
- If in standby, hold Power/Standby for one second.
- Tap Settings, then Clock set.
- The display flashes slowly.
- Turn the select/confirm knob to the correct time in 24-hour format.
- Slow turning increases or decreases time in one-minute steps; quick turning changes it in 15-minute steps.
- Press the select/confirm knob to accept.
- Flashing stops and the set time appears.
Preparation
Instructions from the manualPrepare water, coffee and the receiving cup9 steps
- Open the water tank lid (Figure A).
- Fill with the desired amount of cold, fresh water without exceeding the max markings (Figure B).
- Close the water tank lid.
- Open the filter compartment lid.
- Add the desired coffee quantity with the supplied scoop (Figure C).
- Keep the coffee level in the scoop, not heaped (Figure D).
- Place the carafe on the warming plate (Figure E).
- For a single cup or travel mug, place that vessel on the warming plate.
- For small cups, pull the small cup stand down into position (Figure F).
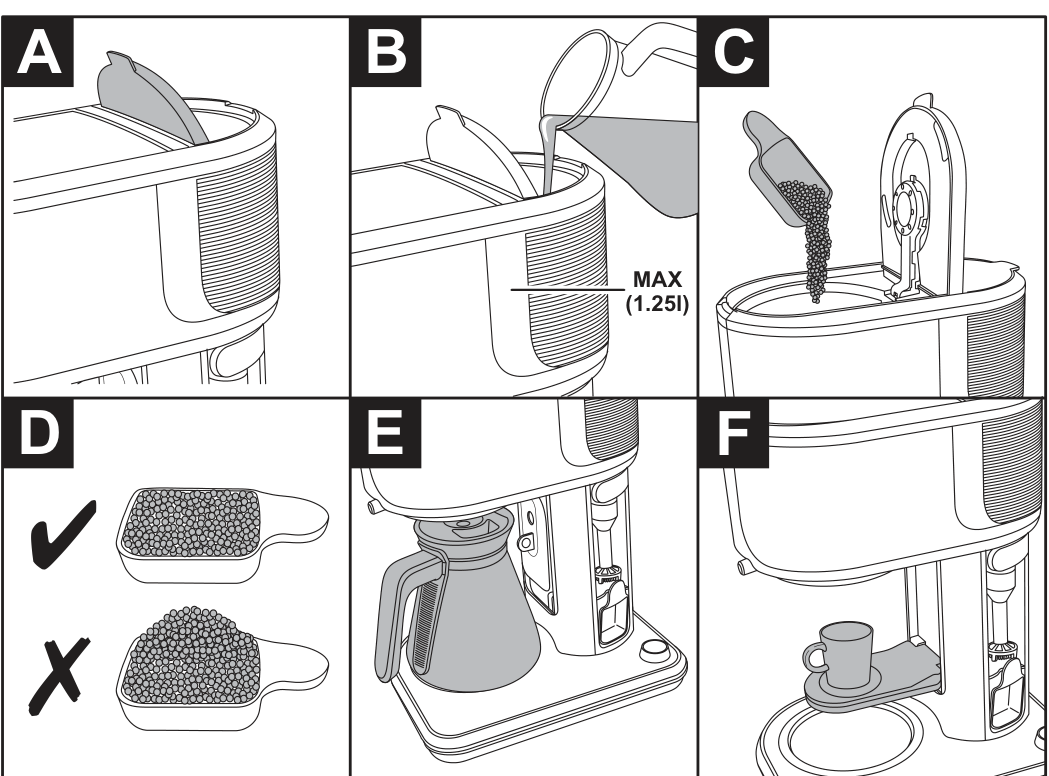
Diagram key
- A: Open the water tank lid.
- B and MAX (1.25 l): Fill with the desired cold, fresh water without exceeding the maximum mark.
- C: Open the filter compartment and add the desired coffee with the supplied scoop.
- D and check mark: Use level scoops.
- D and cross: Do not use heaped scoops.
- E: Place the carafe on the warming plate.
- F: Pull the small cup stand down into position for a small cup; use the appropriate receiving cup or travel mug.
Coffee quantity
Instructions from the manualMeasure coffee for the selected volume3 steps
- Use the supplied scoop for ground coffee.
- The guide quantities are level scoops: full carafe, 10 large or 15 small cups, 8–9 scoops; half carafe, 5 large or 8 small cups, 4–5 scoops; travel mug, 2 scoops; single cup, 1–2 scoops.
- These are the basic-coffee quantities; concentrate and cold brew have their own reviewed quantities.
Making coffee
Instructions from the manualMake basic regular or strong coffee8 steps
- Prepare the coffee maker using the reviewed preparation instructions.
- If in standby, hold Power/Standby for one second.
- Tap the desired coffee strength: regular or strong.
- Use the select/confirm knob to select full carafe, half carafe, travel mug or single cup.
- When ready, press the select/confirm knob to start brewing.
- To cancel brewing at any time, hold Cancel for one second.
- The warming plate keeps brewed coffee warm for approximately 40 minutes.
- The display counts upward from zero to show time on the warming plate.
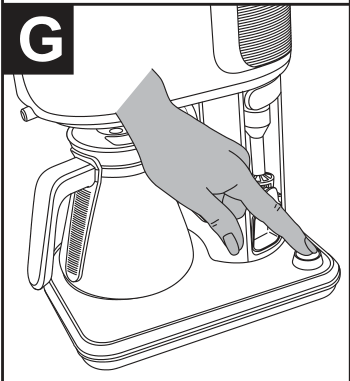
Diagram key
- G: Press the select/confirm knob to start brewing after preparing the coffee maker and selecting strength and quantity.
Concentrate (shot)
Instructions from the manualMake a concentrate shot9 steps
- Concentrate makes an extra-strength shot to drink alone or use for latte, cappuccino and similar drinks.
- The guide gives approximately 118 ml for the small size and 148 ml for the large size.
- Prepare the coffee maker.
- Add two level scoops for the small cup, or two to three level scoops for a travel mug.
- Tap the concentrate-strength icon.
- Use the select/confirm knob to select single cup or travel mug.
- Place a small cup on the cup platform as shown in the guide.
- When ready, press the select/confirm knob to start brewing.
- To cancel at any time, hold Cancel for one second.
Making ecbc coffee
Instructions from the manualMake coffee using the ECBC method7 steps
- Fill the reservoir to the 1.25 l marking.
- Add 75 g of coffee to the filter.
- For 1.0 l of water, use 60 g.
- Place the carafe on the warming plate.
- Tap regular strength.
- Use the select/confirm knob to select full carafe.
- Press the select/confirm knob to start brewing.
Cold brewing
Instructions from the manualMake cold brew and allow extraction20 steps
- Cold brewing slowly extracts coffee with cold water for a smoother, sweeter flavour.
- The manual describes that flavour lasting in the fridge for up to a week without becoming bitter; it does not establish a food-safety storage limit.
- Cold brew may be drunk cold, used as concentrate with hot water, combined with milk, frothed milk, sugar or soda water, or used in cooking and cocktails.
- Use the cold brew filter.
- Open its lid and add 13 level scoops for a full carafe or 6–7 level scoops for a half carafe (Figure H).
- Close the lid.
- Remove the carafe lid and fit the cold brew filter into the carafe (Figure J).
- Place the carafe on the warming plate.
- Tap the cold-brew icon.
- Use the select/confirm knob to choose full or half carafe.
- When ready, press the select/confirm knob to start.
- To cancel at any time, hold Cancel for one second.
- During cold brewing, water pumps intermittently with pauses of up to 30 seconds.
- This slowly wets the grounds for flavour and aroma extraction.
- Once brewed, leave the carafe on the switched-off warming plate or put it in the fridge.
- Refrigeration can slow extraction.
- The guide recommends approximately 8–12 hours to develop full flavour and permits longer periods.
- For a brew to keep and use over time, put the carafe in the fridge.
- Transfer to another container if the carafe is needed for normal brewing.
- Coffee quantities are guidance; experiment to suit your taste.
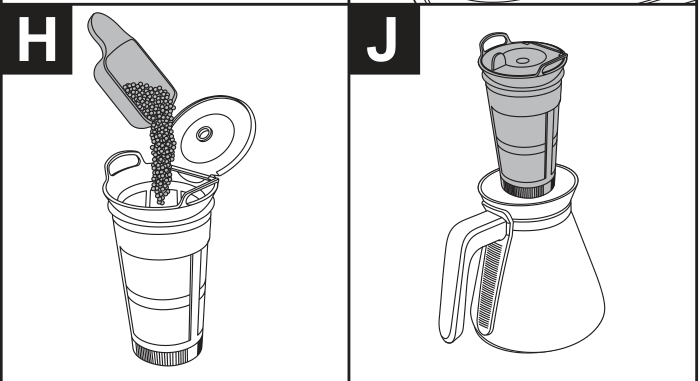
Diagram key
- H: Open the cold brew filter lid and add coffee: 13 level scoops for a full carafe or 6–7 for a half carafe. Close the lid.
- J: Remove the carafe lid and fit the cold brew filter into the carafe.
Milk frother
Instructions from the manualFroth milk5 steps
- The frother aerates milk to produce thick foam, making its texture lighter and increasing volume for drinks such as latte and cappuccino.
- Press the top of the milk frother to release it, then swing it out (Figure K).
- Put milk in a small jug or similar vessel and hold it under the frother until the frother is immersed in the milk.
- Press and hold the button on top of the frother (Figure L).
- Use long presses and circular jug motions until the desired result is achieved.
Cleaning the milk frother after use
Instructions from the manualClean and stow the milk frother after use8 steps
- Clean the milk frother after every use.
- Immerse the frother in a cup of clean water.
- Press its button several times to activate it.
- Repeat several times if necessary.
- Swivel the frother into its compartment and press until it clicks into place.
- The lower section can also be removed for cleaning.
- Twist the shaft left and pull it away from the button section (Figure M).
- To replace, fit the shaft over the button section and twist right to lock.
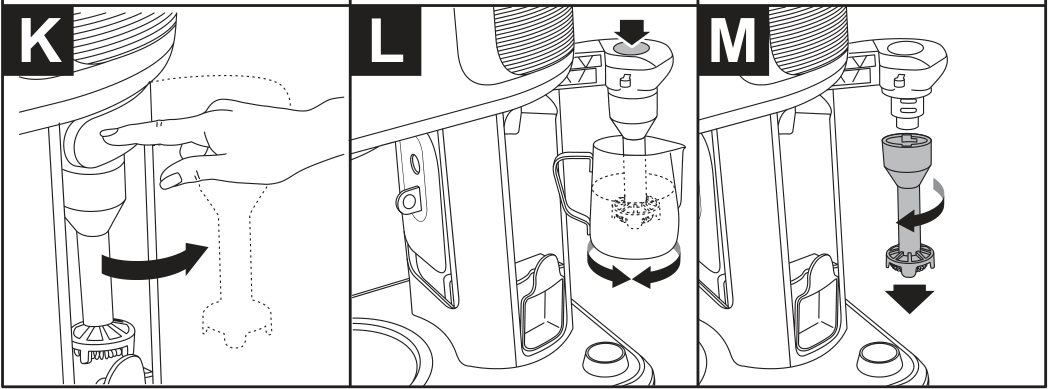
Diagram key
- K and curved arrow: Press the frother top to release it, then swing it out.
- L and downward arrow: With the frother immersed in milk, press and hold the top button; use long presses.
- L and circular arrows: Move the milk jug in circles until the desired foam is achieved.
- M and twisting arrow: For cleaning, twist the lower shaft left to release it. To replace, fit it over the button section and twist right to lock.
- M and downward arrow: Pull the released shaft away from the button section. Clean the frother after every use; the separate reviewed instructions describe activating it in clean water and stowing it until it clicks.
Using the timer
Instructions from the manualProgram or cancel timed brewing10 steps
- Set the clock correctly before using the timer, then prepare the coffee maker as required.
- Tap Settings.
- Tap Timer.
- The display flashes slowly.
- Turn the select/confirm knob to the desired brewing start time.
- Slow turning increases or decreases time in one-minute steps; quick turning changes it in 15-minute steps.
- Press the select/confirm knob to accept.
- The display stops flashing and returns to the current time.
- The Timer icon stays lit to show a timer is set.
- To cancel the timer at any time, tap Cancel.
Anti drip
Instructions from the manualOpen or close the anti drip valve4 steps
- The anti drip lever closes a valve to prevent drips splashing on the warming plate when the carafe is removed.
- Move the lever left to close the valve; the anti drip icon appears.
- Move it right to open the valve; the icon goes out.
- Attempting to brew with the lever closed sounds an alert and flashes the icon until the valve is opened.
Care and maintenance
Instructions from the manualClean the appliance, filters and cold brew cap6 steps
- Unplug the appliance and let it cool completely.
- Clean exterior surfaces with a slightly damp cloth, then dry thoroughly.
- Remove the filter and filter holder and empty the coffee grounds.
- Wash under running water and dry thoroughly.
- Wipe the filter holder compartment with kitchen paper.
- Remove the cold brew filter bottom cap if needed for cleaning: twist clockwise to unlock and remove it; twist counterclockwise to lock.
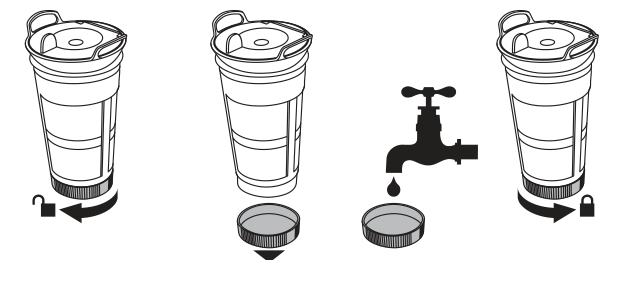
Diagram key
- Open padlock and clockwise arrow: Twist the bottom cap clockwise to unlock it for removal.
- Downward arrow: Remove the unlocked bottom cap to assist cleaning.
- Tap and drop: Wash the removable filter parts under running water and dry thoroughly.
- Counterclockwise arrow and closed padlock: Twist the bottom cap counterclockwise to lock it again.
Descaling
Instructions from the manualDescale and reset the cleaning cycle count18 steps
- After approximately 60 cycles the cleaning icon pulses on and off, indicating cleaning/descaling is due.
- It is a warning and does not prevent coffee making.
- Tap Cancel to dismiss it temporarily; running the cleaning function is required to reset the cycle count.
- Descale regularly for performance, according to water lime content and frequency of use.
- Do not use descalers based on the acids named in the guide: sulphuric, hydrochloric, sulphamic or acetic acid, including vinegar.
- They may damage the machine.
- Use a proprietary descaler recommended for appliances with plastic parts and follow its manufacturer instructions.
- Scale-related faults returned under guarantee incur a repair charge.
- Prepare the solution as its manufacturer directs.
- Add it to the water tank, without exceeding the 10–15 markings, and place the carafe on the warming plate.
- Tap Settings.
- Tap Clean; its icon lights.
- Press the select/confirm knob to start the cleaning cycle.
- Stopping and starting during cleaning is normal.
- The cycle stops when the water tank is empty.
- Discard the water in the carafe.
- After descaling, rinse several times by brewing water without coffee to remove descaler residue.
- To cancel a cleaning cycle before it finishes normally, hold Cancel for one second.
Recycling
Instructions from the manualDispose through an official collection point3 steps
- Electrical and electronic products, and rechargeable or non-rechargeable batteries where applicable, carrying the printed recycling symbols must not go into unsorted municipal waste.
- Use an appropriate official recycling or collection point to avoid environmental and health problems.
- No battery in this coffee maker is asserted.
Service
Instructions from the manualContact service and return the product5 steps
- Have the model number ready when calling Customer Service; it is on the rating plate, usually underneath the product.
- If Customer Service advises a return, pack carefully and include your name, address, daytime phone number and a description of the problem.
- For a guarantee claim, state where and when purchased and include proof of purchase, such as the till receipt.
- The supplied UK guide lists Customer Service, Spectrum Brands (UK) Ltd, Fir Street, Failsworth, Manchester M35 0HS; support@russellhobbs.com; 0345 658 9700, a local-rate number.
- For products bought within the last six months, contact the retailer first about warranty matters.
Guarantee
Instructions from the manualUK guarantee terms in the supplied manual9 steps
- The guarantee lasts two years from first retail purchase.
- Register online within 28 days of purchase for an extra year using uk.russellhobbs.com/product-registration, as named in the manual.
- Functional defects within the guarantee period are corrected by repair or replacement at the manufacturer’s option, provided use and maintenance follow the instructions.
- Statutory rights are unaffected.
- The warranty is invalid where contrary to US or other applicable laws or prohibited by applicable economic sanctions, export controls, embargoes or restrictive trade measures.
- The manual names Cuba, Iran, North Korea, Syria and the Crimea region as examples.
- Consumables are covered only for their recommended lifecycle.
- Replacement and spare parts, including examples such as filters, removable grill plates and drip or crumb trays, are covered only by a one-year warranty.
- Scale-related faults incur the repair charge stated in the descaling instructions.
Controls and parts
See the manual diagrams 4 diagrams
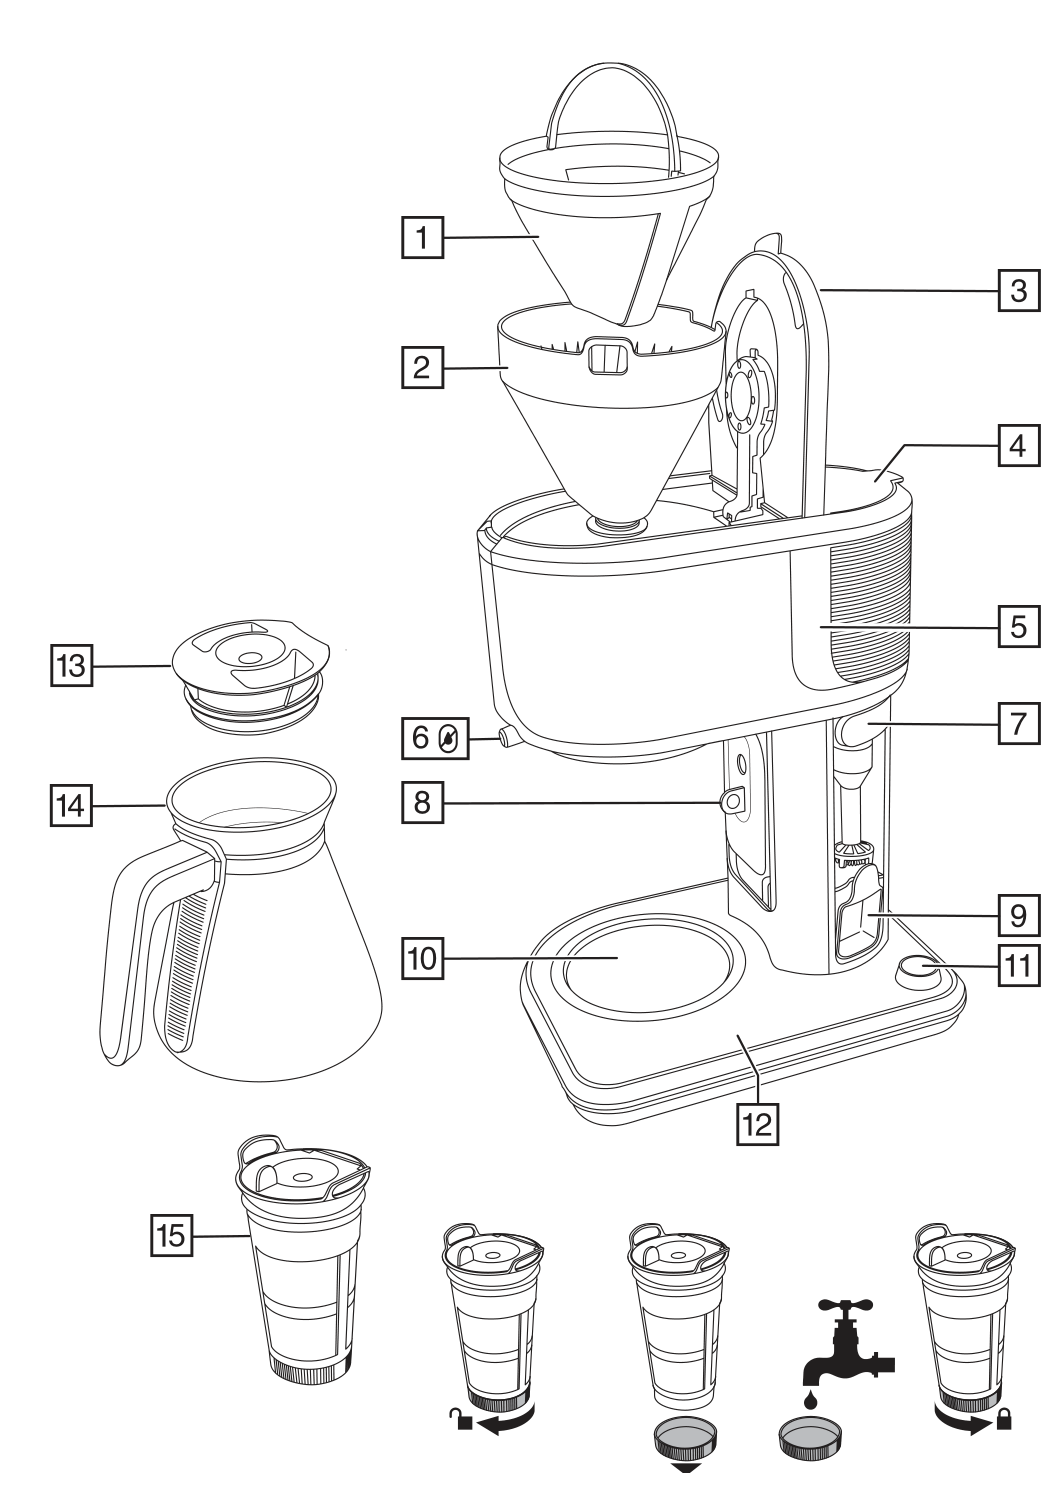
Diagram key
- 1: Filter.
- 2: Filter holder.
- 3: Filter compartment lid.
- 4: Water tank lid.
- 5: Water level gauge.
- 6 and its crossed-drop symbol: Anti drip lever; left closes the valve and displays its icon, right opens the valve and clears the icon.
- 7: Milk frother release.
- 8: Small cup stand; pull it down into position for small cups.
- 9: Supplied scoop, approximately 7 g; use level, not heaped, scoops.
- 10: Warming plate; its active light means the plate is hot.
- 11: Select/confirm knob; turn to select and press to confirm or start brewing as instructed.
- 12: Touch controls and display.
- 13: Carafe lid.
- 14: Carafe.
- 15: Cold brew filter, shown complete at the left and repeated in the cap-removal sequence.
- Open padlock and clockwise arrow: Twist the bottom cap clockwise to unlock it for removal.
- Downward arrow: Remove the unlocked bottom cap to assist cleaning.
- Tap and drop: Wash the removable filter parts under running water and dry thoroughly.
- Counterclockwise arrow and closed padlock: Twist the bottom cap counterclockwise to lock it again.
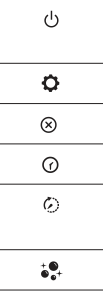
Diagram key
- Power symbol: Hold for one second to switch on or enter standby.
- Gear symbol: Tap Settings to access clock setting, timer or cleaning.
- Circled cross: Hold Cancel for one second to cancel brewing.
- Clock face: After Settings, tap Clock set to enter clock-setting mode.
- Timer clock: After Settings, tap Timer to program a brewing time.
- Cleaning symbol: After Settings, tap Clean to enter cleaning mode.
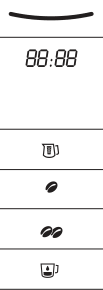
Diagram key
- Curved warming-plate light: When lit, the warming plate is hot.
- 88:88: Numerical display shows current or programmed time, then counts up for 40 minutes after brewing to show time on the warming plate; 88:88 is an illustration of the display, not a fault code.
- Cold-brew carafe: Cold-brew strength selection.
- Single coffee bean: Regular strength.
- Two coffee beans: Strong strength.
- Concentrate cup: Concentrate or shot strength.
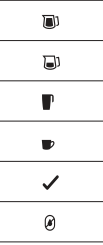
Diagram key
- Full carafe: Full-carafe volume light.
- Half carafe: Half-carafe volume light.
- Tall mug: Travel-mug volume light.
- Small cup: Single-cup volume light.
- Check mark: Press the select/confirm knob to start brewing.
- Crossed-drop symbol: Drip-stop lever status light; left closes the valve and displays this icon, right opens it and clears the icon.
Model details
Model and compatibility
- Water and coffee
- Use cold, fresh water within the max markings and level scoops of ground coffee; distinct quantities apply to basic coffee, concentrate and cold brew. [1]
- Cleaning reminder
- The cleaning icon pulses after approximately60cycles. Only running the cleaning function resets the cycle count. [1]