The checks and guides below come from the official manuals for this model.
No matches for this wording. Try a light name, error code or a shorter phrase.
Error messages
Shown on the machine display
CodeWhat it meansCheck or action
—Caution icon appears
5 checks
The steam/hot water control is in the open position during brewing.
Close the steam/hot-water control.
Manual brewing longer than 60 seconds.
Do not hold the manual button for longer than sixty seconds.
Steaming longer than 180 seconds.
Do not use the steam/hot-water control for longer than one hundred eighty seconds.
Hot water dispensed for longer than 90 seconds.
Do not try to dispense hot water for longer than ninety seconds.
The steam/hot water control is in the open position when the unit is switched on.
The unit will not brew; close the steam/hot-water control.
—Preheat and countdown with flashing caution
3 checks
Attempting to brew coffee before the unit has reached the correct temperature.
Allow the unit to preheat fully. The preheat icon and countdown indicate heating; the automatic-mode instructions identify all segments off and the ready check mark as completion.
Attempting to create steam before the unit has reached the correct temperature.
Allow the unit to reach the correct temperature. The preheat icon indicates heating; the steaming instructions identify all segments off and the ready check mark as completion.
Attempting to dispense hot water before the unit has reached the correct temperature.
Allow the unit to reach the correct temperature indicated by the preheat display before dispensing hot water.
—Cleaning icon remains lit
Descale using the reviewed procedure, then hold the two-cup and manual buttons together for five seconds to reset the clean icon.
The warning appears after approximately five hundred cycles and does not prevent brewing.
Remove and refit the portafilter; turn it fully right until it cannot turn farther.
Portafilter can’t be fitted2 checks
Too much coffee in the sieve
Use the supplied measure/tamper as directed.
Debris around the portafilter fitting
Clean the area where the portafilter fits.
Coffee tastes weak3 checks
Not enough coffee in the sieve
Use the supplied measure/tamper as directed.
Grind is too fine or coarse
Grind coffee to the correct consistency.
Coffee too loose in sieve
Tamp the coffee with more pressure.
Espresso maker is not working1 check
The product is not working; the service passage does not identify a specific cause.
Read the instructions and check the plug fuse and main fuse/circuit breaker.
If still not working, consult the retailer; if unresolved, call Customer Service for possible technical advice.
The product is not user-serviceable.
Guides
Important safeguards
Instructions from the manual
Safe use and when to stop17 steps
Read and retain the instructions and pass them on with the appliance.
Remove all packaging before use.
Misuse can cause injury, electric shock or other hazards; use only as instructed.
Children aged eight or above and people with reduced physical, sensory or mental capabilities or limited experience or knowledge may use the appliance only with supervision or instruction and understanding of the hazards.
Children must not play with it.
Children may clean or maintain it only if older than eight and supervised.
Keep the appliance and cable out of reach of children under eight.
Do not operate inside a cabinet.
Surfaces and the heating element remain hot after use.
A damaged cable must be replaced by the manufacturer, its service agent or a similarly qualified person to avoid hazards.
Clean the product and accessories after each use.
Do not immerse the appliance in any liquid.
The separate nozzle-cleaning and removable-part washing instructions apply only to the named components.
Use in households or similar settings: staff kitchens in shops, offices or other workplaces; hotel or motel guests and other residential settings; bed-and-breakfast establishments; farmhouses.
Place on a stable, level, heat-resistant surface.
Use only for purposes described in the instructions.
Do not use if damaged or malfunctioning.
Parts
Instructions from the manual
Identify all fifteen parts2 steps
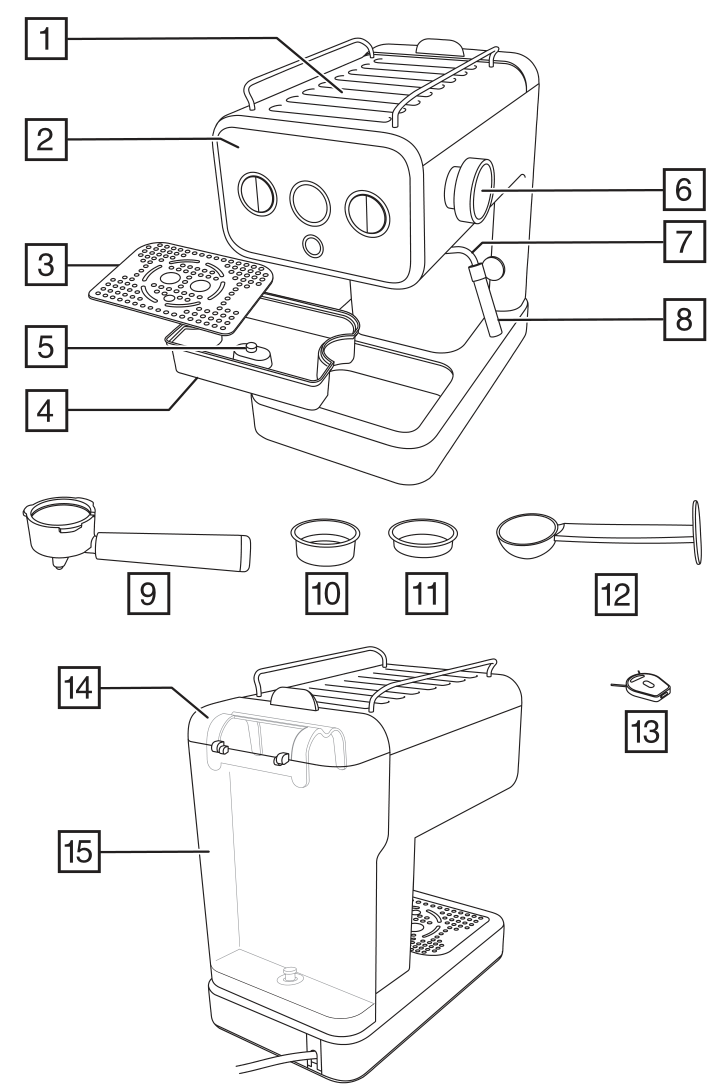
The parts are: 1 cup warming plate; 2 control panel; 3 drip tray cover; 4 removable drip tray; 5 drip tray full indicator; 6 steam/hot water control; 7 swivel arm; 8 removable steam nozzle; 9 portafilter; 10 two-shot sieve; 11 one-shot sieve; 12 measure/tamper; 13 cleaning tool; 14 water tank lid; 15 water tank.
Refer to the reviewed complete parts figure and key.
Before using for the first time
Instructions from the manual
Wash and prime before first use or after a long time unused4 steps
Wash the portafilter, sieves and measure/tamper in warm soapy water.
Rinse and dry.
Before first use or after a long time unused, fill and run the appliance without coffee, following the reviewed Filling and Making espresso instructions but adding no coffee.
Clean the steam system following Care and maintenance.
Auto shutoff
Instructions from the manual
Automatic shutdown and restartView
After twenty-five minutes of inactivity the appliance shuts off. Press Power to turn it back on.
Filling
Instructions from the manual
Fill and refit the water tankView
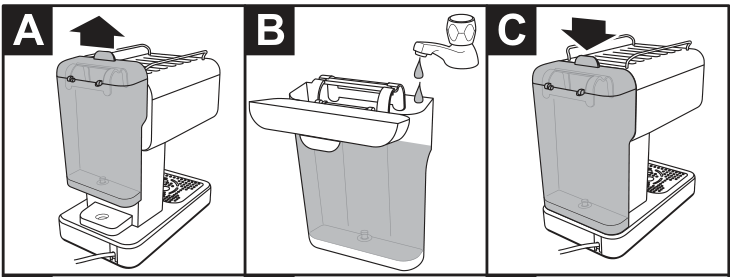
Lift the water tank upwards to remove it (A). Fill with cold, fresh water up to the max marking (B). Refit the tank, correctly fitted and fully seated (C).
Panels A–C: remove, fill and fully seat the water tank.
Diagram key
A and upward arrow: Lift the water tank upwards to remove it.
B: Fill the tank with cold, fresh water to the max marking.
C and downward arrow: Refit the tank, correctly fitted and fully seated.
Filling the portafilter
Instructions from the manual
Choose and fill the portafilter sieve7 steps
Choose a single shot, approximately 30 ml, or a double shot, approximately 60 ml.
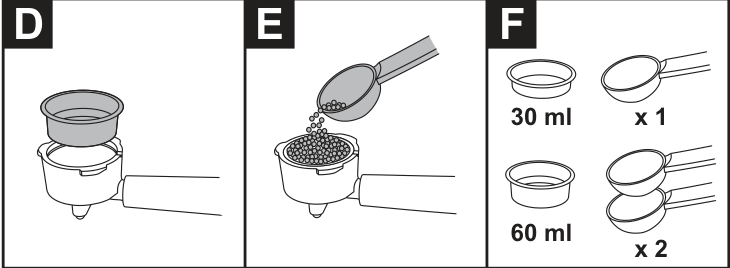
For one shot fit the smaller, one-shot sieve into the portafilter; for two shots fit the larger, two-shot sieve (D).
For ESE (easy serving espresso) pods use the one-shot sieve.
Use the supplied measure to fill the sieve (E): one measure for one shot or two measures for two shots (F).
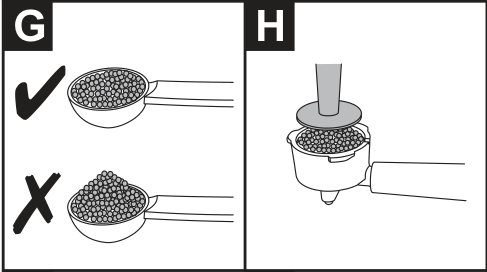
Use level, not heaped, measures (G).
Lightly tamp the coffee level with the flat end of the measure (H).
Compact just enough to resist water flow: too loose fails to extract full flavour; too tight obstructs flow and produces harsh, bitter flavour.
Panels D–F: choose the sieve and measure the coffee.
Diagram key
D: Fit the smaller one-shot sieve for one shot, or the larger two-shot sieve for two shots. ESE pods use the one-shot sieve.
E: Fill the sieve using the supplied measure.
F,30ml,x1 and one repeated measure: One shot is approximately30ml and uses one level measure.
F,60ml,x2 and two repeated measures: Two shots are approximately60ml and use two level measures.
Panels G–H: level measures and light tamping.
Diagram key
G and check mark: Use a level measure of coffee.
G and cross: Do not use a heaped measure.
H: Lightly tamp level using the flat end of the measure. Compact enough to resist water flow; too loose fails to extract full flavour and too tight obstructs flow and makes flavour harsh and bitter.
Fitting the portafilter
Instructions from the manual
Fit or remove the portafilter4 steps
Clear coffee debris from the rim.
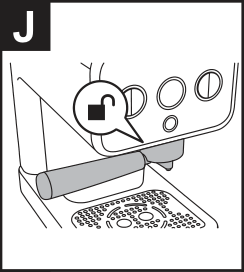
Fit the portafilter with its handle facing left, aligned with the open-padlock mark (J).
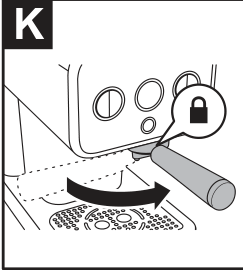
Push upwards and turn right until it stops (K).
To remove, turn left until the handle aligns with the open-padlock mark.
Panel J: align the portafilter with the open-padlock mark.
Diagram key
J and open padlock: With its rim free of coffee debris, fit the portafilter with the handle facing left, aligned with the open-padlock mark. To remove, turn left until aligned with this mark.
Panel K: push upwards and turn right until the portafilter stops.
Diagram key
K,closed padlock and curved right arrow: Push the portafilter upwards and turn it right until it stops.
Automatic one and two cup mode
Instructions from the manual
Make one or two cups automatically10 steps
Fill the water tank, add the required coffee to the portafilter and fit it.
Press Power.
During preheating, all six display segments and the preheat icon light.
The first segment flashes, then goes off as the next anticlockwise segment flashes.
Wait until every segment is off and the ready check mark appears.
Place one or two cups on the drip tray.
For one cup press the one-cup button; for two cups press the two-cup button.
The six segments cycle and go off in a similar sequence, without the preheat icon.
When coffee is ready all six segments are off and the ready check mark appears.
If reheating is needed after brewing, the preheat icon appears instead of the ready mark.
Manual mode
Instructions from the manual
Control the dispensed amount manually7 steps
Fill the water tank, add the required coffee to the portafilter and fit it.
Place one or two cups on the drip tray.
Press and hold the manual button, shown with cup/hand symbols.
Its light comes on.
Hold until the required amount of coffee is dispensed.
The maximum manual run time is sixty seconds.
A single display segment moves anticlockwise while the button is held.
Steaming milk
Instructions from the manual
Heat milk with steam10 steps
The steam/hot-water functions heat milk, froth milk and reheat cooled drinks.
After steaming or frothing, a short cooling period is required before brewing is possible.
Press the steam button.
The six display segments and preheat icon light.
Segments flash and go off successively anticlockwise; wait for all to go off and the ready check mark to appear.
Fill a small jug with milk.
Hold the jug under the nozzle with its tip beneath the milk surface.
Turn the steam/hot-water control anticlockwise; turning farther increases steam output.
When heated as desired, turn the control clockwise to the off position.
Clean the steam nozzle.
Frothing milk
Instructions from the manual
Froth milk with large bubbles or microfoam7 steps
Follow steps one and two of Heat milk with steam: select steam and wait for preheating to finish.
Cold refrigerated milk gives the best results.
Hold the jug under the nozzle as in the steaming instructions and open the steam/hot-water control as desired.
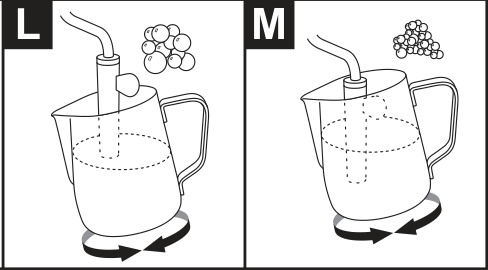
For large bubbles, hold the nozzle just below the milk surface and move the jug in circles while steam is released (L).
For small bubbles or microfoam, fully submerge the nozzle tip and move the jug in circles while steam is released (M).
Turn the control clockwise to off when finished.
Clean the steam nozzle.
Panels L–M: nozzle depth for large bubbles and microfoam.
Diagram key
L,large bubbles and circular arrows: Keep the nozzle just under the milk surface and move the jug in circles while steam is released for large bubbles.
M,small bubbles and circular arrows: Keep the nozzle fully under the milk surface and move the jug in circles while steam is released for small bubbles or microfoam.
Hot water
Instructions from the manual
Dispense hot water5 steps
Follow steps one and two of Heat milk with steam: select steam and wait for preheating to finish.
Hold a suitable container under the steam nozzle.
Turn the steam/hot-water control fully anticlockwise to its steam/hot-water position.
Hot water comes from the nozzle for up to ninety seconds.
Turn the control clockwise to off when finished.
Heating drinks
Instructions from the manual
Reheat a cooled drinkView
Follow the reviewed Heat milk with steam instructions, holding the cooled drink under the steam nozzle instead of milk.
Cleaning the steam nozzle after each use
Instructions from the manual
Clean the steam nozzle immediately after each use5 steps
Clean the steam nozzle and swivel arm immediately after every use.
Immerse the nozzle in a cup of clean water.
Turn the control anticlockwise and allow steam to escape into the clean water for several seconds.
Repeat several times if necessary.
Carefully remove the nozzle, wipe it and the swivel arm with a clean damp cloth, then replace it.
Tips
Instructions from the manual
Warm cups and the portafilter; cool after steaming6 steps
Place espresso cups on top of the unit to warm gently.
For hotter espresso, fit a sieve in the portafilter, fit the portafilter and run brewing for five to ten seconds.
Remove the portafilter and use normally.
Handle carefully: the portafilter and sieve will be hot.
After repeated steaming, the unit may be too hot to brew until it cools.
The hot-water function can cool it more quickly.
Cleaning
Instructions from the manual
Clean the machine, sieve and drip tray9 steps
Unplug and allow the appliance to cool completely.
Wipe the exterior and nozzle with a slightly damp cloth, then dry thoroughly.
Prevent water entering the interior, including through the control opening.
Pull the nozzle tip down to remove it for separate washing.
Remove the portafilter and sieve, empty the grounds, wash under running water and dry thoroughly.
Wipe the area where the portafilter fits.
Empty the drip tray after use or when its full indicator pops up.
Use the cleaning tool to unblock portafilter openings.
The steam nozzle, sieves, drip tray and drip-tray cover can be cleaned in a dishwasher.
Descaling
Instructions from the manual
Descale and reset the cleaning reminder14 steps
After approximately five hundred cycles, the clean icon appears.
It is a warning and does not prevent brewing, but stays lit until reset after descaling.
Never use descalers based on the acids named in the guide: sulphuric, hydrochloric, sulphamic or acetic acid, including vinegar.
These may damage the machine.
Use a proprietary product recommended for appliances with plastic parts and follow its manufacturer instructions.
Scale-related faults returned under guarantee incur a repair charge.
Descale regularly according to water lime content and frequency of use.
Add fresh water and the descaler amount specified by its manufacturer to the tank.
Repeatedly run brewing and the hot-water process to clean the nozzle and internal components.
Continue until the tank is empty.
Repeat if necessary.
Rinse several times by brewing water without coffee to remove descaler residue.
After descaling, hold the two-cup and manual buttons together for five seconds to reset the light.
The clean icon goes off.
Service
Instructions from the manual
Contact service and return the product5 steps
Have the model number ready when calling; it is on the rating plate, usually underneath the product.
If Customer Service advises a return, pack carefully and include your name, address, daytime phone number and a description of the problem.
For a guarantee claim, state where and when purchased and include proof of purchase such as the till receipt.
The supplied UK manual lists Customer Service, Spectrum Brands (UK) Ltd, Fir Street, Failsworth, Manchester M35 0HS; support@russellhobbs.com; telephone 0345 658 9700, local rate.
If purchased within the last six months, contact the retailer first about warranty matters.
Guarantee
Instructions from the manual
UK guarantee terms in the supplied manual10 steps
The guarantee lasts two years from first retail purchase.
Register online within twenty-eight days for an extra year at uk.russellhobbs.com/product-registration, as named in the manual.
Functional defects appearing within the guarantee period are corrected by replacement or repair at the manufacturer’s option, provided use and maintenance follow the instructions.
Statutory rights are unaffected.
The warranty is invalid where contrary to US or other applicable laws, or prohibited by applicable sanctions, export controls, embargoes or restrictive trade measures.
The manual names Cuba, Iran, North Korea, Syria and the Crimea region as examples.
Consumables are covered only for their recommended lifecycle.
Replacement and spare parts are excluded from that guarantee and covered only by a one-year warranty; examples in the guide include filters, removable grill plates and drip or crumb trays.
These general examples do not establish that this model has grill plates or crumb trays.
Scale-related faults incur the repair charge stated in the descaling instructions.
Electrical and electronic products, and rechargeable or non-rechargeable batteries where applicable, marked with the printed recycling symbols must not go into unsorted municipal waste.
Use an appropriate official recycling or collection point to avoid environmental and health problems.
No battery inside this espresso maker is asserted.
Controls and parts
See the manual diagrams 1 diagram
UK26452: all fifteen parts, including both views and all accessories.
Diagram key
1: Cup warming plate.
2: Control panel.
3: Drip tray cover.
4: Removable drip tray.
5: Drip tray full indicator; empty the tray after use or when the indicator pops up.
6: Steam/hot water control.
7: Swivel arm.
8: Removable steam nozzle.
9: Portafilter.
10: Two-shot sieve.
11: One-shot sieve.
12: Measure/tamper.
13: Cleaning tool.
14: Water tank lid.
15: Water tank.
Model details
Model and compatibility
Coffee measures
Single shot approximately30ml: one level measure and one-shot sieve; double shot approximately60ml: two level measures and two-shot sieve. ESE pods use the one-shot sieve. [1]
Automatic shutdown
Shuts off after25minutes of inactivity; press Power to restart. [1]