MODEL REFERENCE
Singer Stitch Sew Quick
12 guides

The checks and guides below come from the official manuals for this model.
No matches for this wording. Try a light name, error code or a shorter phrase.
Guides
Parts diagram:
Instructions from the manualIdentify the parts3 steps
- The source diagram labels the set screw, tension control, needle arm, on/off switch, two thread guides, adapter input, fastening plate, bobbin, rotary wheel, battery, threader and extension spindle.
- Always move the needle with the rotary wheel.
- Never push or pull directly on the needle arm: this can damage the internal mechanism.
Important notes to be read prior to first use:
Instructions from the manualPrepare for first use4 steps
- On first operation, run the device for 10 seconds, then pause for 5 seconds.
- It can then be used regularly.
- Lift the fastening plate and remove the test material.
- Cut the thread close to that material.
Directions for use:
Instructions from the manualSew and finish a seam18 steps
- Make sure the device is off: slide the on/off switch backward, toward its rear.
- Turn the rotary wheel in either direction to raise the needle arm fully.
- Lift the fastening plate without pressing down on the needle arm; the arm can still move manually in the locked position.
- Put the fabric underneath and release the plate.
- Before sewing, pull at least 2 inches of thread through the needle from back to front.
- If threading is needed, follow the reviewed threading instructions.
- Hold the device in your right hand, with your thumb by the on/off switch and your other fingers supporting its bottom.
- Slide the on/off switch forward with your thumb.
- Use your left hand to hold and guide the fabric and control how quickly it passes through.
- Do not pull too quickly.
- For wider stitches, pull the fabric left a little faster while sewing.
- Follow the fastening plate’s centerline for straight stitching.
- To finish the seam, turn the rotary wheel to raise the needle arm fully.
- Use the back of a seam ripper or scissors to pull out about 3 inches of thread, then cut it.
- Turn the rotary wheel to lower the needle into the fabric and continue turning until the needle arm is fully raised again.
- Lift the fastening plate and take the fabric off to the left.
- Do not pull the thread: the seam will unravel.
- Secure it with the reviewed knotting instructions.
Tieing a knot in thread
Instructions from the manualSecure the thread with a knot5 steps
- Turn the fabric over and use the reserved 3 inches of thread.
- Slide the threader under the last stitch.
- Pass about 1 inch of thread through the threader from top to bottom.
- Pass the thread through the resulting loop and pull it tight to form a knot.
- Slowly pull the threader from under the stitch, then cut off excess thread.
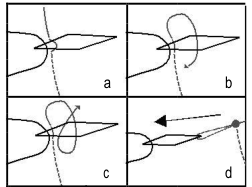
Diagram key
- a: Slide the threader under the last stitch.
- b: Pass about 1 inch of thread through the threader, from top to bottom.
- c: Pass the thread through the loop and pull it tight to form a knot.
- d: Slowly pull the threader out from under the stitch; the arrow shows its withdrawal direction.
How to thread stitch note:
Instructions from the manualThread the device8 steps
- Let thread run from the top right of the bobbin or spool.
- The spring must be in place before the bobbin is installed.
- Follow diagrams 7, 8 and 9.
- Pass the thread upward through the eyelet.
- Pass the thread over the top of the tension control, between its two silver discs.
- Pass the needle threader through the needle eye from front to back, then put the thread through the threader’s eye.
- Pull the threader and thread through the needle eye from back to front.
- Remove the threader.
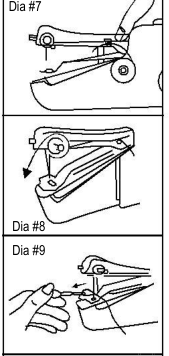
Diagram key
- 7: Pass the thread upward through the eyelet.
- 8: Guide the thread over the top of the tension control between its two silver discs, following the illustrated curved route.
- 9: Put the needle threader through the needle eye from front to back, insert the thread, then pull both back to front and remove the threader.
Adjusting thread tension
Instructions from the manualAdjust thread tensionView
If stitching is too tight, turn the tension control slightly to the left. If stitching is too loose, turn the tension control slightly to the right.
To install a normal thread spool
Instructions from the manualInstall a normal thread spoolView
Loosen the bobbin nut and remove the bobbin. Slide the thread spool onto the extension spindle. Connect the extension spindle to the bobbin shaft.
To replace needle
Instructions from the manualReplace the needle2 steps
- Loosen the set screw with a screwdriver and remove the old needle.
- Use a standard sewing-machine needle, installed with the flat side of its shank facing the front of the Stitch Sew Quick.
Bobbin replacement
Instructions from the manualChoose a replacement bobbinView
Use a Class 15 metal bobbin when buying replacements for this device.
To replace batteries (4aa not included)
Instructions from the manualPrepare to replace the batteriesView
Make sure the device is off before replacing its batteries. It uses four AA batteries, which are not included.
Ac/dc adapter (not included)
Instructions from the manualSelect and set an optional adapter4 steps
- The optional adapter must be rated 6 V, 800 mA and use a nominal 1/8-inch / 3.5 mm diameter plug.
- Different ratings may damage the device and adapter.
- Set the adapter tip polarity to match the diagram below the device’s DC input jack.
- The adapter is not included.
Caution:
Instructions from the manualHandle and store the device safely4 steps
- The needle is sharp: handle it carefully to avoid injury and keep it away from children.
- Keep the device off whenever it is not in use.
- People, including children, with reduced physical, sensory or mental capabilities or insufficient experience and knowledge must have supervision or instruction from a person responsible for their safety.
- Supervise children so that they do not play with the device.
Model details
Model and compatibility
- Replacement bobbin
- Class 15 metal bobbin.
- Batteries
- Four AA batteries; not included.
- Optional adapter
- 6 V, 800 mA; match tip polarity to the diagram on the device.