MODEL REFERENCE
Sunbeam PC7900
12 guides
The checks and guides below come from the official manuals for this model.
No matches for this wording. Try a light name, error code or a shorter phrase.
Guides
Sunbeam’s safety precautions
Instructions from the manualUse the brewer safely and prevent hot-liquid overflow10 steps
- Read and retain all instructions.
- Do not overfill the water tank; fill it with cold water only, never warm or hot water.
- Do not operate the appliance empty.
- Use a flat, level surface.
- Start each brew with an empty carafe, correctly positioned on the hot plate with its lid on throughout brewing, or hot water or coffee may overflow.
- Secure the lid correctly before serving.
- Do not open the appliance during brewing because of the scalding risk.
- Do not touch the keep warm plate while the appliance is on; accessible surfaces become hot and the heating element may retain heat after use.
- Do not leave an empty carafe on the keep warm plate because it may crack.
- Let the brewer cool before cleaning.
Electrical safety, supervision and when to stop20 steps
- Switch off the power outlet before inserting or removing the plug.
- Grasp the plug rather than pulling the cord.
- Turn off and unplug the appliance when not in use and before cleaning.
- Use only an AC outlet at the voltage marked on the appliance.
- Use an extension cord only if a qualified technician or service person has checked and tested it.
- People, including children, with reduced physical, sensory or mental capabilities or insufficient experience or knowledge need supervision or instruction by a person responsible for their safety.
- Supervise children so they do not play with the appliance.
- Never leave it unattended while in use.
- Use it only for its intended purpose.
- Misuse may cause injury.
- Do not place it on or near a hot gas flame, electric element or heated oven, or on top of another appliance.
- Do not let the cord hang over a table or bench edge or touch hot surfaces.
- Do not operate it with a damaged cord or after damage of any kind.
- If damage is suspected, return it to the nearest Sunbeam Appointed Service Centre for examination, repair or adjustment.
- Sunbeam recommends additional RCD protection with a tripping current not exceeding 30 mA in the appliance supply circuit.
- Do not immerse the appliance in water or other liquid unless specifically recommended; the cleaning instructions prohibit immersing this unit, its plug or cord.
- Do not operate it with an external timer or separate remote control.
- Its intended household and similar uses include staff kitchens, farm houses, hotel and motel client use, other residential settings and bed-and-breakfast settings.
- If concerned about performance or use, contact Sunbeam Consumer Service or visit its website.
- Ensure the safety precautions are understood.
Features of your stainless drip filter
Instructions from the manualIdentify the filter, controls, carafe and accessories10 steps
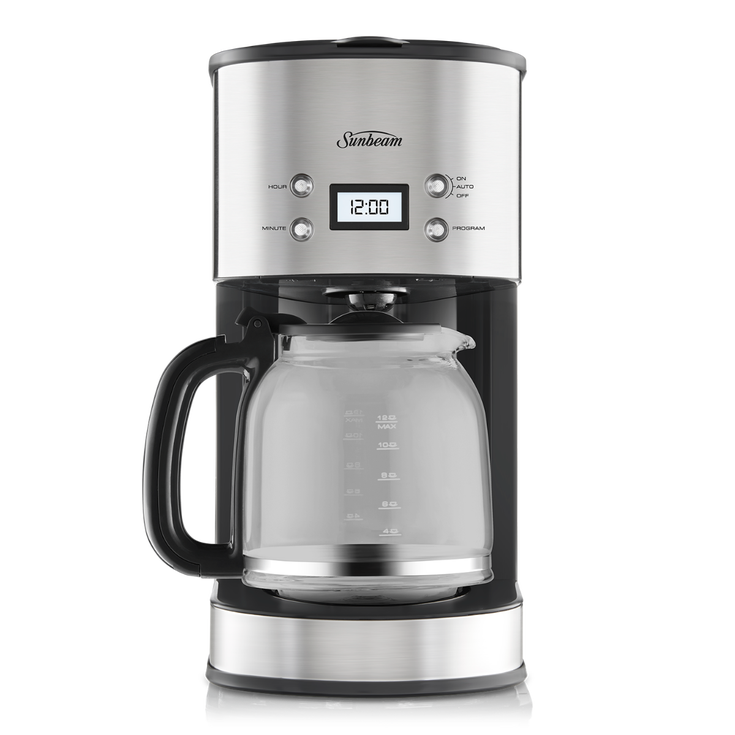
- The removable mesh filter basket allows brewing without paper filters and is removable for cleaning.
- The filter basket holder lets the mesh basket be removed with minimal mess.
- The LCD control panel has a 24-hour clock.
- ON/AUTO/OFF starts an immediate brew or activates brewing at a preset time; PROGRAM sets the automatic start time.
- The anti-drip valve allows temporary carafe removal during brewing.
- The water gauge shows the amount of water needed for the desired number of cups.
- The capacity is 12 cups.
- The glass carafe shows the filtered-coffee volume and has a hinged lid for one-handed use.
- The keep warm plate holds coffee warm for up to two hours.
- A measuring spoon is supplied.
Before using your stainless drip filter for the first time
Instructions from the manualClean and flush before first use11 steps
- Put the brewer on a flat, level surface.
- Open the water-tank lid and fill to the maximum 12-cup mark.
- Use cold water as required by the safety precautions.
- Fit the filter basket holder and removable mesh basket firmly, then close the lid.
- Put the empty carafe on the keep warm plate and connect to a 230/240 V AC outlet.
- The LCD illuminates and shows 12.00.
- Press ON/AUTO/OFF once; water starts dripping into the carafe.
- When all water has dripped through and the tank is empty, press ON/AUTO/OFF twice to switch the appliance off.
- Wash the carafe, filter basket holder, removable mesh filter and supplied spoon in warm soapy water.
- Rinse, dry thoroughly and refit.
- The safety precautions require cooling before cleaning.
Setting the current time of day on the lcd
Instructions from the manualSet the 24-hour clock8 steps
- Set the clock only if using AUTO mode; manual brewing does not require it.
- Place the brewer on a flat, level surface and connect to a 230/240 V AC outlet.
- The LCD illuminates and shows 12.00.
- Press PROGRAM once so the screen shows SET CLOCK.
- Press HOUR until the correct hour appears; hold it to scroll quickly.
- Press MIN until the correct minutes appear; hold it to scroll quickly.
- The display uses 24-hour time.
- Press PROGRAM twice to set the time, or wait ten seconds until MIN stops illuminating.
Brewing coffee using manual operation
Instructions from the manualBrew coffee manually and use pause-and-serve19 steps
- Do not use disposable paper filters with this appliance.
- Put the brewer on a flat, level surface.
- Open the water-tank lid and fill to the desired water-gauge level with cold water.
- Do not exceed 12 cups; Sunbeam recommends making at least four cups at once.
- Fit the basket holder and removable mesh filter firmly.
- Using the supplied spoon, add the desired coffee; the recommendation is two spoonfuls of ground coffee per cup.
- Close the water-tank lid.
- Put the empty carafe on the keep warm plate and connect to a 230/240 V AC outlet.
- The LCD illuminates and shows 12.00.
- Press ON/AUTO/OFF once to start brewing.
- The anti-drip valve lets you remove the carafe temporarily, but return it immediately after pouring to prevent basket overflow: brewing continues while it is removed.
- For optimum flavour, wait until brewing finishes before serving.
- Brewing finishes when all coffee has dripped through and the water tank is empty.
- Wait a few minutes before removing the basket and holder because hot liquid remains in the grounds and needs to drip through.
- Wait until the coffee in the mesh basket is cool before removing it.
- Grasp the basket-holder handle to lift out both the holder and mesh basket for cleaning.
- The keep warm plate stays on for up to two hours.
- Press ON/AUTO/OFF twice to turn it off earlier.
- Switch off once the glass carafe is empty, or it may crack.
Brewing coffee using auto operation
Instructions from the manualProgram automatic coffee brewing13 steps
- Put the brewer on a flat, level surface.
- Open the tank lid and add the desired amount of cold water according to the gauge, without exceeding 12 cups.
- Sunbeam recommends at least four cups at once.
- Fit the filter holder and removable mesh basket firmly.
- Add coffee with the supplied spoon, using the recommended two spoonfuls per cup, and close the lid.
- Put the empty carafe on the keep warm plate and connect to a 230/240 V AC outlet.
- The LCD illuminates and shows 12.00.
- Set the current clock time by pressing PROGRAM once for SET CLOCK, then using HOUR and MIN, as described in steps 3–5 of Setting the current time of day on the LCD.
- After setting the current time, press PROGRAM once; SET TIMER appears.
- Use HOUR and MIN to select the desired automatic brewing time.
- Press ON/AUTO/OFF twice.
- The LCD shows the current time and ON/AUTO/OFF keeps flashing, indicating AUTO mode is waiting for the preset time.
- At the preset time, ON/AUTO/OFF stops flashing and stays illuminated as automatic brewing begins.
Brewing tea
Instructions from the manualBrew tea instead of coffee2 steps
- Follow the coffee preparation steps, replacing coffee with four to six tea bags or teaspoons of tea in the removable mesh basket.
- Remove every trace of coffee grounds from the mesh basket before using tea bags so the tea flavour is not affected.
Tips for coffee making
Instructions from the manualChoose and store coffee and adjust flavour4 steps
- Use only finely ground coffee for optimum flavour and aroma.
- When grinding beans, select Drip Filter or the finest adjustment; fresh beans give the best result.
- Store leftover coffee in an airtight container in a dry, cool, dark place.
- Find your preferred flavour by trying more or less ground coffee and different blends or brands.
After each use
Instructions from the manualClean after each use9 steps
- Disconnect from the power outlet before cleaning any part and let the appliance cool.
- Do not immerse the cord, plug or unit in water or any other liquid.
- Wash all detachable parts, including the filter holder, mesh basket, glass carafe and plastic spoon, in warm soapy water.
- Wipe the exterior with a soft damp cloth to remove stains.
- Never use abrasive agents on the appliance.
- Droplets may collect above the funnel and drip onto the base during brewing.
- After each use, wipe that area with a clean dry cloth to control dripping.
- Gently wipe the keep warm plate with a damp cloth; never use abrasive agents there.
- Refit all parts ready for the next use.
Removal of mineral deposits
Instructions from the manualRemove mineral deposits15 steps
- Tap-water mineral deposits may accumulate in the tank and internal tubes.
- Remove them periodically to maintain optimum performance.
- Sunbeam Liquid Descaler is available from Sunbeam Appointed Service Agents.
- Alternatively, place the brewer on a flat, level surface.
- Fill the tank to maximum capacity with a solution of two-thirds water and one-third white vinegar, and close the lid.
- Press ON/AUTO/OFF once to start the solution dripping into the carafe.
- After one cup has dripped through, press ON/AUTO/OFF twice to switch off.
- Leave switched off for 15 minutes so the solution can act in the tank and internal tubes.
- After 15 minutes, press ON/AUTO/OFF once and let the rest of the solution drip through until the tank is empty.
- Remove the carafe, filter holder and mesh filter.
- Wash in warm soapy water, rinse, dry thoroughly and refit.
- The general safety precautions require cooling before cleaning.
- Fill to the maximum 12-cup mark with water, press ON/AUTO/OFF once and let it drip through until the tank is empty.
- Empty the carafe and repeat twice more.
- The mineral-removal process is then complete.
12 month replacement guarantee
Instructions from the manualUse the replacement guarantee and obtain service10 steps
- The manual states that a malfunction caused by faulty materials or manufacture within 12 months of purchase, or three months for commercial use, will be replaced free of charge.
- For difficulties, call Sunbeam on 1300 881 861 in Australia or 0800 786 232 in New Zealand, or send a written claim to the address in the manual.
- Sunbeam will seek to resolve the problem or advise how to obtain replacement or refund for a defective appliance.
- The replacement guarantee excludes misuse, negligent handling, normal wear and tear, freight and other claim costs.
- Retain the receipt as proof of purchase.
- These benefits are additional to statutory rights.
- The manual identifies non-excludable Australian and New Zealand consumer guarantees; in Australia it describes replacement or refund for major failure, compensation for reasonably foreseeable loss or damage, and repair or replacement for unacceptable quality not amounting to major failure.
- For repair or service after the guarantee period, contact a Sunbeam service centre.
- The manual lists Australia: Units 5 & 6, 13 Lord Street, Botany NSW 2019; New Zealand: 26 Vestey Drive, Mt Wellington, Auckland.
- The current manufacturer website also provides service-agent assistance.
Controls and parts
See the manual diagrams 1 diagram
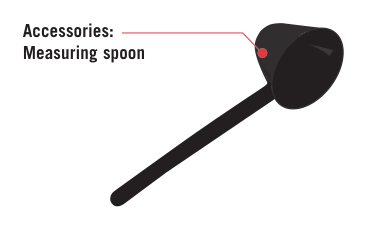
Diagram key
- Measuring spoon: Supplied coffee measure; the manual recommends two spoonfuls of ground coffee per cup for manual and AUTO brewing.
Model details
Model and compatibility
- Brewing capacity
- Maximum 12 cups; at least four cups at once are recommended. [1]
- Power connection
- 230/240 V AC outlet, as instructed for this Australian model. [1]
- Keep warm
- Up to two hours; switch off when the carafe is empty to avoid cracking. [1]
- Filters
- Use the removable mesh filter; do not use disposable filter papers. [1]