MODEL REFERENCE
Sunbeam SDP1000BK
17 guides

The checks and guides below come from the official manuals for this model.
No matches for this wording. Try a light name, error code or a shorter phrase.
Guides
Sunbeam’s safety precautions
Instructions from the manualUse the machine safely and avoid scalding11 steps
- Place the machine on a flat, level surface; do not place it in a cabinet during use.
- Do not operate without water in the reservoir.
- Use filtered water and observe the maximum filling volume.
- Keep the power cord away from hot machine parts.
- Do not place hands directly under the brew spout: scalding or injury may result.
- Accessible surfaces become hot during operation and the heating element retains heat after use.
- Always switch off and unplug at the power outlet before cleaning, and if any problem occurs during coffee making.
- Children must not clean or maintain the machine without supervision.
- Use the appliance only for its intended purpose; misuse can cause injury.
- If concerned about performance or use, visit Sunbeam’s website or contact its Consumer Service Line.
- Ensure these precautions are understood.
Electrical safety, supervision and when to stop17 steps
- Read and retain all instructions.
- Turn off the power outlet before inserting or removing the plug.
- Remove it by grasping the plug, never by pulling the cord.
- Turn off and unplug when not in use and before cleaning.
- Use only an AC outlet of the voltage marked on the appliance.
- Use an extension cord only after a qualified technician or service person has checked and tested it.
- People, including children, with reduced physical, sensory or mental capabilities or insufficient experience or knowledge need supervision or instruction by a person responsible for their safety.
- Supervise children so they do not play with the appliance.
- Never leave an appliance unattended while in use.
- Do not place the appliance on or near a hot gas flame, electric element or heated oven, or on top of another appliance.
- Do not let its cord hang over a table or bench edge or touch a hot surface.
- Do not operate with a damaged cord or after damage of any kind.
- If damage is suspected, return the appliance to the nearest Sunbeam Appointed Service Centre for examination, repair or adjustment.
- Sunbeam recommends additional RCD protection with a tripping current not exceeding 30 mA in the supply circuit.
- Do not immerse the appliance in liquid unless recommended; the cleaning instructions specifically prohibit immersing its electrical base, cord and plug.
- Do not operate through an external timer or separate remote control.
- Intended uses are household and similar settings: staff kitchens, farm houses, hotel and motel client use, other residential settings and bed-and-breakfast settings.
Features of iced coffee machine
Instructions from the manualIdentify the machine, controls and supplied accessoriesView
The numbered parts are: 1, ON/OFF button; 2, BREW button; 3, base and water reservoir; 4, brew spout; 5, lid; 6, reusable coffee filter; 7, brew basket; 8, no drip lever; 9, scoop; 10, reusable 650 mL tumbler; 11, tumbler straw; and 12, tumbler lid.
Unpack your iced coffee machine
Instructions from the manualUnpack the iced coffee machineView
Unpack the machine and remove plastic bags, cartons and any tape on the unit. Keep plastic bags away from children.
Clean iced coffee machine before first use
Instructions from the manualClean and flush before first use12 steps
- Do not plug in the machine without water in it; this can damage the unit.
- Wash the tumbler, lid, straw, coffee filter and brew basket in mild detergent and water.
- Rinse each thoroughly.
- Start with the unit unplugged.
- Fill the tumbler to its water line with filtered water and pour into the reservoir.
- Fit the brew basket and reusable filter.
- Slide the no drip lever to open.
- Place the tumbler under the drip spout before plugging in.
- Switch on at the rear and press BREW.
- Ensure the LED is illuminated.
- When the cycle finishes and the machine is fully flushed, discard the water and rinse the tumbler thoroughly with clean water.
- The machine is ready for use.
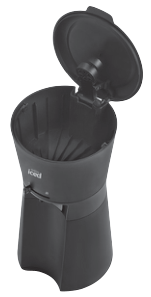
Let’s make iced coffee!
Instructions from the manualMake iced coffee18 steps
- Start with the unit unplugged.
- To prevent hot-steam injury or damage, do not plug it in until water is in the reservoir and the tumbler is under the drip spout as described in step 9.
- Fill the tumbler to the WATER marking with filtered water.
- Lift the machine lid and remove the brew basket to expose the reservoir.
- Pour the water into the reservoir.
- Never fill above the MAX fill line.
- Refit the brew basket on the reservoir and place the reusable coffee filter in the basket.
- Slide the no drip lever to open.
- Using the supplied scoop, put one level scoop of grounds into the reusable filter and close the lid.
- For a bolder cup, use 1½–2 scoops.
- Fill the tumbler with large ice cubes to the ICE marking.
- Place the tumbler under the drip spout, then plug in.
- Switch on at the rear and press BREW.
- Ensure the LED is illuminated.
- Wait 3–4 minutes for brewing to finish.
- Once dripping slows and stops, slide the no drip lever to closed to stop coffee flow.
- Add your preferred coffee mix-ins.
- Insert the straw in the tumbler lid and place the lid on the tumbler.
How to clean your iced coffee machine
Instructions from the manualDecalcify monthly and rinse twice12 steps
- Decalcify once per month to remove mineral deposits such as calcium and limestone that can affect performance.
- The safety instructions require switching off and unplugging before cleaning.
- Prepare one cup (235 mL) of undiluted white household vinegar and pour it into the water reservoir.
- Put the reusable coffee filter in the brew basket and close the lid.
- Place the tumbler under the spout and press BREW to run a cycle.
- Once the machine shuts off, discard the tumbler contents and remove the reusable filter from the basket.
- Rinse the tumbler, reusable filter and brew basket with clean water.
- Fill the tumbler to WATER with clean water and pour into the reservoir.
- Place the tumbler under the spout and press BREW to run a cycle.
- Discard the water and rinse the tumbler thoroughly with clean water.
- Repeat the preceding water-fill, brew and discard/rinse sequence once more for thorough rinsing.
- The machine is ready to brew again.
Dishwasher safe parts of your iced coffee machine
Instructions from the manualClean removable parts without immersing the electrical base5 steps
- The reusable coffee filter may be cleaned on the dishwasher’s top rack.
- The electrical base, power cord and plug are not dishwasher safe and must never be immersed in water or other liquids.
- Hand-wash the tumbler, lid and straw.
- The first-use instructions specify mild detergent and water for the tumbler, lid, straw, coffee filter and brew basket, followed by thorough rinsing.
- Switch off and unplug before cleaning.
Faq
Instructions from the manualHow does the iced coffee machine work?1 check
- How does the iced coffee machine work?
- The machine brews hot concentrated coffee directly over ice. The specified coffee, water and ice ratio keeps the drink tasting good as the ice melts.
Iced coffee is not strong enough1 check
- Iced coffee is not strong enough
- Next time, add another half scoop of grounds to the reusable filter. If still too weak, try a full extra scoop; adjust until the ratio suits your taste.
Is the tumbler dishwasher safe?1 check
- Is the tumbler dishwasher safe?
- No. Hand-wash the tumbler, lid and straw only.
No ice remains after brewing1 check
- No ice remains after brewing
- Use bigger ice cubes so they melt more slowly and leave ice in the drink for longer. Ensure the tumbler was filled to its ICE marking.
The tumbler is not filled to the top1 check
- The tumbler is not filled to the top
- Space is deliberately left for milk, cream, sugar or syrups. For a fuller tumbler, fill the reservoir to MAX FILL; do not exceed it.
Use a different cup or tumbler1 check
- Use a different cup or tumbler
- Most cups should fit under the spout. Keep the same ratio of water, grounds and ice for the best taste.
Coffee is not dispensing into the tumbler1 check
- Coffee is not dispensing into the tumbler
- The no drip lever may be closed. Slide it to open so coffee can flow.
Grounds in the iced coffee1 check
- Grounds in the iced coffee
- The reusable filter may have been overfilled so grounds spilled over its top. Try using fewer grounds next time.
Turn off, pause or stop brewing1 check
- Turn off, pause or stop brewing
- The machine turns itself off after brewing. To pause or stop a cycle, switch it off at the rear with the ON/OFF button.
Controls and parts
See the manual diagrams 1 diagram
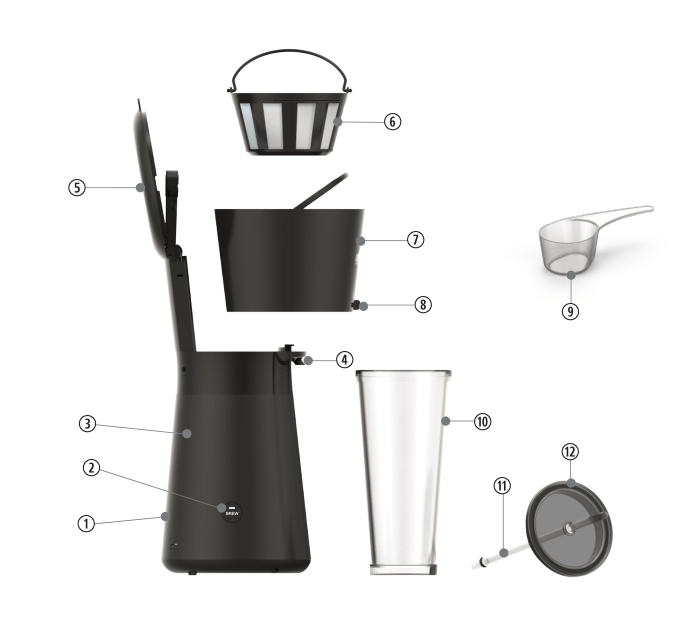
Diagram key
- 1: ON / OFF Button.
- 2: BREW Button.
- 3: Base & Water Reservoir.
- 4: Brew Spout.
- 5: Lid.
- 6: Reusable Coffee Filter.
- 7: Brew Basket.
- 8: No drip lever.
- 9: Scoop.
- 10: Reusable 650mL Tumbler.
- 11: Tumbler Straw.
- 12: Tumbler Lid.