MODEL REFERENCE
Brother GL-H105
13 errors · 10 troubleshooting topics · 25 guides

The checks and guides below come from the official manuals for this model.
No matches for this wording. Try a light name, error code or a shorter phrase.
Errors and messages
Messages and indicator states from the manual Low Battery!batteries are weak2 checks
Battery Deadinstalled batteries have expired
- The row identifies expired batteries without a separate remedy.
- The power-supply instructions specify replacing all six alkaline cells together with new ones, or all six Ni-MH cells together with fully charged ones.
Invalid!label length number is invalid
An invalid label-length number was entered. This message is not displayed in Auto Designs. The separate label-length instructions allow Auto or 30–300 mm.
No Text!no stored or entered text
- This appears when printing a file without stored data, pressing Print without text, choosing Text Preview or Cable Label without text, or pressing Enter without text in DECO MODE or Auto Designs.
- The table gives no separate remedy; use the reviewed text-entry and file instructions for those operations.
Line Limit!too many lines or tape is too narrow2 checks
No Cassette!printing attempted without a cassette
The table identifies an absent cassette without a separate remedy. The reviewed setup instructions describe inserting a Brother TZe cassette until it snaps into place.
Cutter Errorcutter lever used during printing
The tape cutter lever was used during printing. The separate printing instructions say not to touch the lever while Printing... or Feeding... is displayed.
Text Full!character capacity reached
- The maximum character count has been entered: 80 for regular text, or 50 for Auto Designs and DECO MODE.
- The row gives no separate remedy; the reviewed clear function explains removing text.
Text Limit!text exceeds selected label length2 checks
No Frame OK?frame is invalid on 3.5 mm tape
Press Enter to print without a frame, or Backspace to cancel.
OK to Feed?chain Print feed confirmation
- This prompt appears for feeding after Chain Print.
- Follow the separate Setting Margin instructions: Backspace continues with more text; after the final label, press Enter to feed before cutting.
Insert 12mmdECO MODE requires 12 mm tape
Only 12 mm tape is available for DECO MODE; its separate instructions limit DECO MODE to 12 mm cassettes.
Wrong Tape!cassette lacks the TZe mark
Use a tape cassette with the Brother TZe mark; the mark was visually verified in the printed row.
Troubleshooting
Find the problem you are experiencingDisplay stays blank after power on2 checks
- Battery insertion
- Check that the batteries are correctly inserted.
- Weak batteries
- Replace weak batteries.
Printed margins are too large1 check
- Margin setting
- Select Half or Narrow under Setting Margin for smaller margins.
No printing or poorly formed characters3 checks
- Cassette seating
- Check that the cassette is inserted correctly.
- Empty cassette
- Replace an empty cassette.
- Cover
- Check that the cassette cover is properly closed.
Settings clear on their own2 checks
- Weak batteries
- Replace weak batteries.
- Power disconnected
- More than three minutes without power clears displayed text and formats, language and unit settings.
- The general precautions also state that saved files are cleared; no recovery is supplied.
Blank horizontal line through printed label2 checks
- Dust on the print head
- Remove the cassette and gently wipe the print head up and down with a dry cotton swab.
- Optional cleaning cassette
- The optional TZe-CL3 print head cleaning cassette can make cleaning easier.
P-touch is locked up1 check
- No response to keys
- Use the reviewed Resetting the P-touch procedure. Resetting clears all text, settings and stored files.
Power turns off when printing starts3 checks
- Weak batteries
- Replace weak batteries.
- Battery insertion
- Check that the batteries are correctly inserted.
- Repeated weak-battery check
- The source repeats: if the batteries are weak, replace them.
Tape feeds poorly or gets stuck2 checks
- Tape guide
- Check that the tape end feeds under the tape guides.
- Cutter during printing
- Do not touch the cutter lever during printing.
Clear all text and formatting for a new label1 check
- Clear function
- Press Clear and select Text&Format, then confirm with Enter.
LCD language is incorrect1 check
- Initial settings
- Use Menu, Language, select the required language with Left or Right, and press Enter.
Guides
Power supply and tape cassette
Instructions from the manualInstall batteries and tape cassette9 steps
- Switch power off before changing batteries or cassettes.
- Press the indicated area at the top end to open the cassette cover.
- Pull any installed cassette straight up and remove installed batteries.
- Insert six new AAA alkaline LR03 batteries or six fully charged AAA Ni-MH HR03 batteries with the illustrated polarity.
- Replace all six together with new alkaline cells or fully charged Ni-MH cells.
- Consult the battery and charger instructions and charge Ni-MH cells in a specialized external charger; the machine cannot charge them.
- Insert a Brother TZe cassette so it snaps in place, with the tape end under the guides.
- Close the cover securely until it snaps in place.
- For GL-H105, the optional AD-24ES adapter procedure is also applicable; see Use the optional AC adapter.
Use the optional AC adapter8 steps
- GL-H105 supports the optional AD-24ES AC adapter.
- Connect the adapter to the AC adapter socket on the bottom of the P-touch.
- Insert the plug into the nearest standard electrical outlet.
- For memory backup, Brother recommends using AAA alkaline LR03 or Ni-MH HR03 batteries together with the adapter.
- The P-touch cannot charge rechargeable batteries; charge Ni-MH batteries in a specialized external charger.
- Use the specified voltage and recommended adapter.
- Follow the reviewed power safety precautions.
- Disconnect the adapter and remove batteries when the machine will not be used, and immediately stop use and disconnect both power sources if abnormal odour, heat, discolouration, deformation or anything unusual occurs.
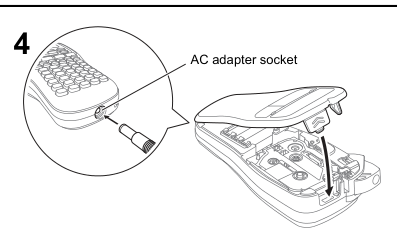
Diagram key
- 4: Close the cassette cover securely until it snaps into place.
- AC adapter socket and leader line: The socket is on the bottom of the P-touch; connect the optional AD-24ES adapter here, then plug into the nearest standard outlet.
- Magnified plug and socket: Adapter connection detail. Batteries alongside the adapter are recommended for memory backup; the P-touch does not charge rechargeable cells.
Lcd display & keyboard
Instructions from the manualRead the LCD and keyboard5 steps
- The LCD shows one row of 12 characters; entered text can contain up to 80 characters.
- The complete source figure identifies Size, Cursor, Caps, Underline/Frame, Width, Style, Label Length and left/right guidance indicators, plus all 17 numbered keyboard controls.
- A fixed label length also displays the length indicator.
- Space restores the default item while selecting settings.
- Preview and displayed label lengths may differ slightly from printed results.
Initial settings
Instructions from the manualStart and set language and units8 steps
- Supply six AAA batteries and press Power.
- Press Menu, select Language with Left or Right and press Enter.
- Select the required language and press Enter.
- Available languages are English, Español, Français, Hrvatski, Italiano, Magyar, Nederlands, Norsk, Polski, Português, Portug. (BR), Română, Slovenski, Slovenský, Suomi, Svenska, Türkçe, Čeština, Dansk and Deutsch.
- For units, press Menu, select Unit and press Enter, choose inch or mm and press Enter.
- Default units are mm.
- Power turns off automatically after five minutes without a key press.
- Backspace cancels an operation.
Switching upper case/lower case
Instructions from the manualSwitch uppercase and lowercaseView
Press Caps to switch between uppercase and lowercase. The Caps indicator is on for uppercase.
Making two lines of text
Instructions from the manualMake two lines of text3 steps
- Enter the first line and press Enter for the second line, or move the cursor to where the second line should start and press Enter.
- Use 9 mm or 12 mm tape for two-line text.
- Do not press Enter after the second line, or Line Limit! appears.
To clear
Instructions from the manualClear text or text and formats3 steps
- Backspace deletes letters one by one.
- To delete all text and settings, press Clear, select Text&Format using Left or Right, and press Enter.
- To delete only text, press Clear, select Text Only and press Enter.
Entering accented characters
Instructions from the manualEnter accented characters4 steps
- Type a letter, press Accent repeatedly as needed, select its accented form using Left or Right and press Enter.
- Backspace cancels the operation.
- The order depends on the selected LCD language.
- The printed table contains uppercase and lowercase A, C, D, E, G, I, K, L, N, R, O, S, T, U, Y and Z forms.
Changing label length
Instructions from the manualChange label length4 steps
- Press Menu, choose Label Length and press Enter.
- Choose Auto or 30–300 mm using Left or Right and press Enter.
- A fixed length displays the length indicator.
- After printing, cut at the printed dots (:) with scissors so the label matches the selected length.
Preview
Instructions from the manualPreview textView
Press Menu, select Preview using Left or Right, and press Enter. Only text is previewed; size, font and additional features are not shown.
Feeding (tape feed)
Instructions from the manualFeed tapeView
Press Menu, select Feed with Left or Right and press Enter. Do not touch the cutter lever while Feeding... is displayed.
Printing
Instructions from the manualPrint and cut labels6 steps
- Press Print.
- Select 1–9 copies using Left or Right or a number key and press Enter.
- For a single copy, press Enter at Copies: 1 without changing the count.
- Do not touch the cutter lever while Printing... or Feeding... is displayed.
- After printing, push the cutter lever at the upper-right corner to cut.
- Peel the backing and apply the label.
Setting margin
Instructions from the manualSet margins and use Chain Print13 steps
- Press Menu, select Margin and press Enter.
- Select Full, Half, Narrow or Chain Print and press Enter.
- Full, Half and Narrow leave equal margins on each side of 25, 12 and 4 mm respectively.
- With Half or Narrow, displayed length runs from the printed dots to the label end.
- For multiple copies with minimum margins, use Narrow.
- For Chain Print, enter text and press Print, choose the count using Left or Right or number keys, and press Enter.
- When OK to Feed? appears, press Backspace to enter more text.
- Clear the text, enter the next label and press Print.
- After the final label, press Enter at OK to Feed? to feed the tape.
- Only then press the cutter lever to cut the chain.
- Cut at printed dots with scissors to centre the text.
- Always feed before cutting a Chain Print label or text may be cut off.
- Never pull the tape.
Saving label files
Instructions from the manualSave open and print label files6 steps
- Save up to nine labels with up to 80 characters per file; saved labels can be edited and overwritten.
- Press Menu, choose File and press Enter.
- To save, select Save and press Enter, select a file using Left or Right and press Enter.
- If Overwrite? appears, Enter saves the new label and Backspace cancels.
- To open, select Open, press Enter, choose a file and press Enter.
- To print, select Print, press Enter, choose a file and press Enter, then choose the copy count and press Enter.
Replacing the cutter unit
Instructions from the manualReplace the cutter unit4 steps
- When repeated use makes the blade blunt and it no longer cuts cleanly, obtain replacement TC-4 from an authorised Brother reseller.
- Pull the two green sections of the cutter unit in the arrow directions shown in the figure.
- Install the new unit and push it until it snaps into place.
- Do not touch the blade directly with fingers.
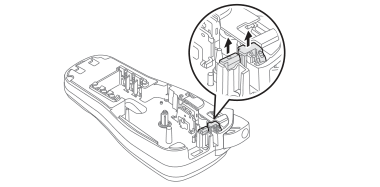
Diagram key
- Two removal arrows and magnified green sections: Pull both green sections of the cutter unit in the illustrated arrow directions.
- Cutter assembly and insertion position: Install a new TC-4 cutter unit obtained from an authorised Brother reseller and push it in until it snaps into place.
- Cutter blade: Do not touch the blade directly with fingers.
Resetting the p-touch
Instructions from the manualReset the P-touch5 steps
- Use reset to initialise settings or when the machine does not work properly.
- Turn power off.
- Hold Menu and R, then press Power to turn it on.
- Release Menu and R.
- The internal memory resets and all text, settings and stored files are cleared.
Auto designs
Instructions from the manualUse Auto Designs9 steps
- Press Auto Designs, select a category with Left or Right and press Enter.
- Enter the text, press Enter, select Print and confirm with Enter.
- Categories are Congrats, Sports, People, Fashion, Pets, Flower, Kitchen, Space, Business and Surprise!.
- Surprise! chooses a frame, style and graphics randomly, and does not display label length in the text input screen.
- Templates cannot be edited.
- The most recently printed Auto Designs text and label length are recalled on re-entry.
- Backspace returns to the previous step.
- To clear text, press Clear, then Enter at Clear?, or Backspace to cancel.
- To exit to ordinary text entry, select Cancel with Left or Right when Print is displayed, then press Enter.
Deco mode
Instructions from the manualUse DECO MODE13 steps
- Press Menu, select Deco mode and press Enter.
- Choose Design 1–12 and press Enter.
- Enter text, press Enter, select Auto or 30–200 mm label length, and press Enter.
- Choose Print and press Enter.
- Use only 12 mm cassettes; maximum label length is 200 mm.
- Only the highlighted Basic symbols in the source chart are available in this mode.
- Fixed length may prevent all text from printing and display Text Limit!; reduce the text.
- Template designs cannot be edited.
- The most recently printed DECO MODE text and length are recalled.
- Clear followed by Enter at Clear? removes text; Backspace cancels.
- Backspace returns to the previous step.
- To exit, select Cancel with Left or Right when Print is displayed and press Enter.
- Auto adjusts length to text; Space restores Auto in the label-length setting.
Frame key
Instructions from the manualSelect a frameView
Press Frame, select a frame using Left or Right, and press Enter. The printed source shows nine frame designs. Frames cannot be printed on 3.5 mm tape.
Cable label
Instructions from the manualCreate a cable label6 steps
- Enter the first line, press Enter and enter the second line.
- Press Menu, choose Cable and press Enter.
- Confirm Print OK? with Enter, select 1–9 copies with Left or Right or number keys and press Enter.
- Use Brother Flexible ID tape for wrapping these labels around cables, and follow the supplied tape insertion sheet for recommended usage conditions.
- Cable Label automatically sets label length to Auto and margins to Full.
- No unsupported cable diameter or material compatibility is inferred.
Text keys
Instructions from the manualSet text size style and width4 steps
- Press Size or Style, or Menu plus 1 for Width, then use Left or Right to choose the setting.
- Size choices are Large, Medium and Small.
- Style choices are Normal, Bold, Outline, Shadow, Italic, I+Bold, I+Outline, I+Shadow and Vertical.
- Width choices are Normal, ×2 and ×1/2.
Short cut keys
Instructions from the manualSymbol key
Instructions from the manualEnter symbols and print the pictograph list7 steps
- Press Symbol, choose Basic and press Enter, then select a symbol with Left or Right and press Enter.
- Only highlighted Basic symbols can be used in DECO MODE.
- For pictographs, press Symbol, choose Pictograph and press Enter, select a category with Left or Right and press Enter, then select a symbol with Left or Right and press Enter.
- The input screen shows the selected pictograph as its letter and number, such as A1.
- Basic symbols occupy 14 rows; pictographs occupy categories A–L.
- To print every pictograph, press Symbol, choose Print List and press Enter, then confirm Print OK? with Enter.
- Backspace returns to the previous step.
General precautions
Instructions from the manualClean and store the label maker8 steps
- Use only a soft, dry cloth; never alcohol or other organic solvents.
- Use a soft wipe for the print head and never touch it directly.
- Do not put foreign objects into the machine, print an empty cassette, pull tape while printing or feeding, or press the cutter lever excessively.
- Avoid direct sunlight, rain, heaters, extreme temperatures, humidity and dust, including hot car interiors.
- Remove the LCD shipping sticker before use.
- Failure, repair or expired batteries can lose memory; more than three minutes without power clears text, formats and saved files.
- Remove batteries and disconnect the AC adapter when you do not intend to use the P-touch.
- Labels can peel, become irremovable or transfer colour depending on surface and conditions; check these before applying.
Safety precautions
Instructions from the manualFollow power battery and handling precautions13 steps
- Stop using the GL-H105 and disconnect the AC adapter and remove batteries immediately if abnormal odour, heat, discolouration, deformation or anything unusual occurs.
- Do not disassemble or modify the machine, AC adapter or batteries, expose batteries to heat or fire, short their terminals with metal, use sharp tools to change batteries, or use damaged, leaking or deformed cells.
- Keep children from swallowing parts or labels; seek medical attention if swallowed.
- If leaked fluid enters the eyes, rinse immediately with plenty of clean water and seek medical attention; rinse skin or clothes immediately with clean water if contaminated.
- Do not touch the machine during lightning, allow the machine, AC adapter, power plug or batteries to get wet, including by handling with wet hands or spilling beverages, drop or hit the machine or adapter, press on the LCD, or touch the cutter blade or metal near the print head just after printing.
- Keep fingers clear when closing the cover.
- Use only the specified batteries without mixing ages, types, charge levels, manufacturers or models, and never reverse their polarity.
- Read Ni-MH battery and charger instructions and use a specialized charger.
- Always use the specified voltage and recommended AD-24ES AC adapter to prevent damage or failure.
- Do not use the machine or adapter in high humidity, such as bathrooms.
- Do not overload the power cord, place heavy objects on it, damage the cord or plug, or forcibly bend or pull the cord.
- Hold the AC adapter carefully when disconnecting it from the outlet.
- Fully insert the plug and do not use a loose outlet.
Controls and parts
See the manual diagrams 1 diagram
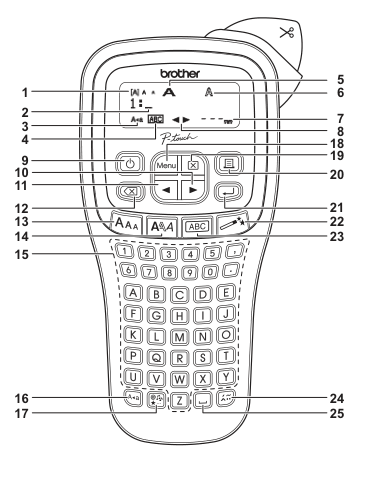
Diagram key
- 1: Size — selected character size.
- 2: Cursor — text-entry position.
- 3: Caps — uppercase mode.
- 4: Underline/Frame — underline or frame selection.
- 5: Width — selected character width.
- 6: Style — selected character style.
- 7: Label Length — fixed label length; the length indicator also appears when a fixed length is selected.
- 8: Guidance — left and right directions.
- 9: Power key.
- 10: Right cursor key.
- 11: Left cursor key.
- 12: Backspace key — deletes one character or cancels an operation.
- 13: Size key.
- 14: Style key.
- 15: Character keys.
- 16: Caps key — switches uppercase/lowercase.
- 17: Symbol key.
- 18: Menu key.
- 19: Clear key — choose Text&Format or Text Only.
- 20: Print key.
- 21: Enter key — confirms selections; starts the second line, but do not press after the second line.
- 22: Auto Designs key.
- 23: Frame key.
- 24: Accent key.
- 25: Space key — restores the default item when selecting settings.
Model details
Model and compatibility
- Tape
- Brother TZe tape in 3.5, 6, 9 or 12 mm widths. Two-line text needs 9 or 12 mm tape.
- Power
- Six AAA LR03 alkaline or HR03 Ni-MH cells, or optional AD-24ES AC adapter. Charge Ni-MH cells externally; batteries with the adapter are recommended for memory backup.
- Display and text
- One row of 12 displayed characters and up to 80 entered characters.
- Dimensions and weight
- Approximately 110×208×59 mm (W×D×H); 390 g without batteries or tape cassette.