MODEL REFERENCE
Brother HL-2135W
41 errors · 35 troubleshooting topics · 150 guides
The checks and guides below come from the official manuals for this model.
No matches for this wording. Try a light name, error code or a shorter phrase.
Messages and printer lights
Computer Status Monitor and printer lightsFind the indicator lights
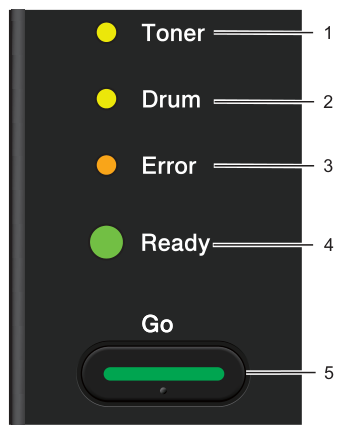
Diagram key
- 1: Toner LED; indicates low toner.
- 2: Drum LED; indicates that the drum will need replacement soon.
- 3: Error LED; indicates no paper, a paper jam or an open cover.
- 4: Ready LED; flashes according to machine status.
- 5: Go button; wake-up, error recovery, form feed, job cancel, reprint and enabling/disabling wireless on HL-2135W.

Diagram key
- Off circle: The LED is off.
- Yellow on circle: The Toner or Drum LED is on.
- Orange on circle: The Error LED is on.
- Green on circle: The Ready LED is on.
- Dim green circle: The LED is dimmed.
- Yellow flashing symbol: The Toner or Drum LED is flashing.
- Orange flashing symbol: The Error LED is flashing.
- Green flashing symbol: The Ready LED is flashing.
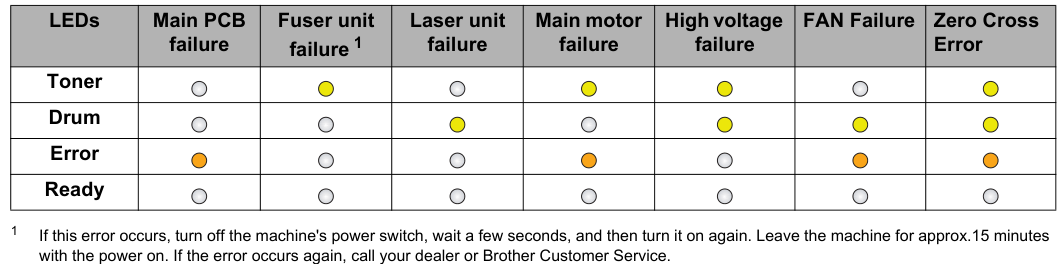
Diagram key
- Main PCB failure / Toner: Toner is off.
- Main PCB failure / Drum: Drum is off.
- Main PCB failure / Error: Error is on.
- Main PCB failure / Ready: Ready is off.
- Fuser unit failure / Toner: Toner is on.
- Fuser unit failure / Drum: Drum is off.
- Fuser unit failure / Error: Error is off.
- Fuser unit failure / Ready: Ready is off.
- Laser unit failure / Toner: Toner is off.
- Laser unit failure / Drum: Drum is on.
- Laser unit failure / Error: Error is off.
- Laser unit failure / Ready: Ready is off.
- Main motor failure / Toner: Toner is on.
- Main motor failure / Drum: Drum is off.
- Main motor failure / Error: Error is on.
- Main motor failure / Ready: Ready is off.
- High voltage failure / Toner: Toner is on.
- High voltage failure / Drum: Drum is on.
- High voltage failure / Error: Error is off.
- High voltage failure / Ready: Ready is off.
- FAN Failure / Toner: Toner is off.
- FAN Failure / Drum: Drum is on.
- FAN Failure / Error: Error is on.
- FAN Failure / Ready: Ready is off.
- Zero Cross Error / Toner: Toner is on.
- Zero Cross Error / Drum: Drum is on.
- Zero Cross Error / Error: Error is on.
- Zero Cross Error / Ready: Ready is off.
- 1 (Fuser unit failure): Turn the power switch off, wait a few seconds, then turn it on. Leave the printer powered on for approximately 15 minutes. If the error returns, contact your dealer or Brother Customer Service.
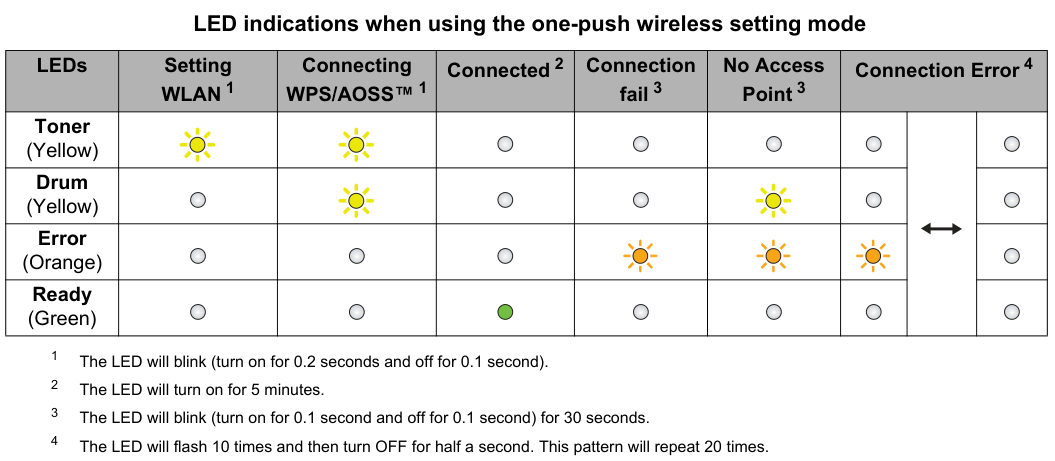
Diagram key
- Toner / Setting WLAN: Flashes on 0.2 seconds, off 0.1 second.
- Toner / Connecting WPS/AOSS: Flashes on 0.2 seconds, off 0.1 second.
- Toner / Connected: Off.
- Toner / Connection fail: Off.
- Toner / No Access Point: Off.
- Toner / Connection error burst: Off.
- Toner / Connection error pause: Off.
- Drum / Setting WLAN: Off.
- Drum / Connecting WPS/AOSS: Flashes on 0.2 seconds, off 0.1 second.
- Drum / Connected: Off.
- Drum / Connection fail: Off.
- Drum / No Access Point: Flashes on/off 0.1 second for 30 seconds.
- Drum / Connection error burst: Off.
- Drum / Connection error pause: Off.
- Error / Setting WLAN: Off.
- Error / Connecting WPS/AOSS: Off.
- Error / Connected: Off.
- Error / Connection fail: Flashes on/off 0.1 second for 30 seconds.
- Error / No Access Point: Flashes on/off 0.1 second for 30 seconds.
- Error / Connection error burst: Flashes ten times.
- Error / Connection error pause: Off for half a second.
- Ready / Setting WLAN: Off.
- Ready / Connecting WPS/AOSS: Off.
- Ready / Connected: On for five minutes.
- Ready / Connection fail: Off.
- Ready / No Access Point: Off.
- Ready / Connection error burst: Off.
- Ready / Connection error pause: Off.
- Connection error arrow: Alternate the ten-flash burst with a half-second off period; repeat the pattern twenty times.
- Footnote 1: Setting WLAN and Connecting WPS/AOSS use 0.2 seconds on and 0.1 second off.
- Footnote 2: Connected keeps Ready on for five minutes.
- Footnote 3: Connection fail and No Access Point flash at 0.1-second on/off intervals for thirty seconds.
- Footnote 4: Connection error flashes ten times, turns off for half a second and repeats twenty times.
NO PAPER T1No Paper T15 checks
MANUAL FEEDManual Feed3 checks
MEMORY FULLMemory Full2 checks
PRINT OVERRUNPrint Overrun2 checks
DRUM ERRORDrum Error2 checks
- If the FUSER ERROR pop-up message appears on your computer, turn the machine's power switch off, wait a few seconds, and then turn it on again.
- Leave the machine for 15 minutes with the power on.
- Turn the power switch off and on, and try printing again.
- If the error remains, press Go to identify the LED indication.
- Record the indication and report it to your dealer or Brother Customer Service.
- Make sure that the front cover is completely closed before reporting a service call.
- Error on; Toner, Drum and Ready off.
- Turn the power switch off and on, and try printing again.
- If the error remains, press Go to identify the LED indication.
- Record the indication and report it to your dealer or Brother Customer Service.
- Make sure that the front cover is completely closed before reporting a service call.
- Toner on; Drum, Error and Ready off.
- Turn the power switch off, wait a few seconds, then turn it on.
- Leave it powered on for approximately 15 minutes.
- If the error occurs again, contact your dealer or Brother Customer Service.
- Make sure that the front cover is completely closed before reporting a service call.
- Drum on; Toner, Error and Ready off.
- Turn the power switch off and on, and try printing again.
- If the error remains, press Go to identify the LED indication.
- Record the indication and report it to your dealer or Brother Customer Service.
- Make sure that the front cover is completely closed before reporting a service call.
- Toner and Error on; Drum and Ready off.
- Turn the power switch off and on, and try printing again.
- If the error remains, press Go to identify the LED indication.
- Record the indication and report it to your dealer or Brother Customer Service.
- Make sure that the front cover is completely closed before reporting a service call.
- Toner and Drum on; Error and Ready off.
- Turn the power switch off and on, and try printing again.
- If the error remains, press Go to identify the LED indication.
- Record the indication and report it to your dealer or Brother Customer Service.
- Make sure that the front cover is completely closed before reporting a service call.
- Drum and Error on; Toner and Ready off.
- Turn the power switch off and on, and try printing again.
- If the error remains, press Go to identify the LED indication.
- Record the indication and report it to your dealer or Brother Customer Service.
- Make sure that the front cover is completely closed before reporting a service call.
- Toner, Drum and Error on; Ready off.
- Turn the power switch off and on, and try printing again.
- If the error remains, press Go to identify the LED indication.
- Record the indication and report it to your dealer or Brother Customer Service.
- Make sure that the front cover is completely closed before reporting a service call.
- Error flashes on and off at 0.1-second intervals for 30 seconds; Toner, Drum and Ready are off.
- Check the printed WLAN report and follow its TS instructions.
- For PIN registration check the PIN and retry; if repeated, reset the print server and retry.
- Drum and Error flash on and off at 0.1-second intervals for 30 seconds; Toner and Ready are off.
- Move closer to the access point with minimal obstructions and retry the wireless-button procedure.
- If repeated reset the print server and retry.
- Error flashes ten times and then turns off for half a second, repeating this pattern twenty times; Toner, Drum and Ready are off.
- Ensure only one access point within range has WPS/AOSS active and retry.
- The WLAN report’s TS-08 row also recommends waiting a few minutes to avoid interference.
- The code is printed on the WLAN report.
- Hold Go for ten seconds and release when the printer prints a Network Configuration page to turn wireless on.
- The cable-disconnection branch concerns other models with a LAN port.
TS-02WLAN report: WLAN access point or router cannot be detected5 checks
- The code is printed on the WLAN report.
- For infrastructure mode, configure a supported combination on the router: WPA-Personal with TKIP or AES, WPA2-Personal with AES, OPEN with WEP or no encryption, or Shared key with WEP.
- These are legacy compatibility instructions from the manual.
- For ad-hoc mode configure the computer for OPEN authentication, optionally WEP.
- If still unresolved, reconfirm the SSID and wireless settings using router documentation or its manufacturer, administrator or ISP.
- The code is printed on the WLAN report.
- Reconfirm SSID and Network Key.
- If using WEP, enter the first WEP key; this printer supports only that first key.
- Consult router documentation or its manufacturer, administrator or ISP if needed.
- The code is printed on the WLAN report.
- Reconfirm authentication method, encryption method and Network Key against the TS-04 supported-combination table.
- For WEP use the router’s first WEP key only.
- Consult router documentation or its manufacturer, administrator or ISP for the settings.
- The code is printed on the WLAN report.
- Operate WPS/AOSS on both printer and access point/router.
- Confirm that the router supports WPS/AOSS and restart setup.
- For router operation consult its documentation, manufacturer or network administrator.
TS-08WLAN report: Two or more WPS or AOSS enabled access points detected2 checks
Troubleshooting
Find the problem you are experiencingThe machine does not feed paper.4 checks
- If there is paper in the paper tray, make sure it is straight
- If there is paper in the paper tray, make sure it is straight.
- If the paper is curled, straighten it before printing.
- Sometimes it is helpful to remove the paper, turn the stack over, and then put it back in the paper tray.
- If the paper continues to curl, replace the paper.
- Reduce the amount of paper in the paper tray, and then try again
- Reduce the amount of paper in the paper tray, and then try again.
- Make sure that manual feed mode is not chosen in the printer driver
- Make sure that manual feed mode is not chosen in the printer driver.
- Clean the paper pick-up roller
- Clean the paper pick-up roller. See Cleaning the paper pick-up roller on page 94.
The machine does not feed paper from the manual feed slot.2 checks
- Put only one sheet of paper in the manual feed slot
- Put only one sheet of paper in the manual feed slot.
- Make sure that you have chosen Manual in Paper Source of the printer driver
- Make sure that you have chosen Manual in Paper Source of the printer driver.
The machine does not feed envelopes.1 check
- The machine feeds envelopes from the manual feed slot
- The machine feeds envelopes from the manual feed slot.
- You must set up your application to print on the size of envelopes you are using.
- This is usually done in the page setup or document setup menu of your software. (See your application manual.)
A paper jam has occurred.1 check
- Clear the jammed paper
- Clear the jammed paper. (See Paper jams and how to clear them on page 105.)
The machine does not print.3 checks
- Make sure that the cable is connected to the machine
- Make sure that the cable is connected to the machine.
- Make sure the machine is powered on and that no error LEDs are lit on the machine control panel
- Make sure the machine is powered on and that no error LEDs are lit on the machine control panel.
- Make sure that you have chosen the correct printer driver
- Make sure that you have chosen the correct printer driver.
When printing on normal paper, it creases.1 check
- Change the printer driver setting in Media Type to a thin setting
- Change the printer driver setting in Media Type to a thin setting.
The paper slides off the top output tray.2 checks
- Lift up the output tray support flap 1
- Lift up the output tray support flap 1.
- If the paper curls and slides off, lift up the output tray support flap 2
- If the paper curls and slides off, lift up the output tray support flap 2.
Faint6 checks
- Take out the drum unit and toner cartridge assembly
- Take out the drum unit and toner cartridge assembly.
- Hold the assembly level with both hands and gently shake it from side to side several times to spread the toner evenly inside the cartridge.
- If the LEDs indicate REPLACE TONER (Continue mode), put in a new toner cartridge
- If the LEDs indicate REPLACE TONER (Continue mode), put in a new toner cartridge. See Replacing the toner cartridge on page 71.
- Check the machine’s environment
- Check the machine’s environment. Conditions such as humidity, high temperatures, and so on, may cause this print fault. See Safety and Legal booklet.
- If the whole page is too light, Toner Save Mode may be on
- If the whole page is too light, Toner Save Mode may be on. Turn off Toner Save Mode in Advanced tab (For Windows®) or Basic tab of Print Settings (For Macintosh) of the driver.
- Put in a new toner cartridge
- Put in a new toner cartridge. See Replacing the toner cartridge on page 71.
- Put in a new drum unit
- Put in a new drum unit. See Replacing the drum unit on page 79.
Gray background4 checks
- Make sure that you use paper that meets our specifications
- Make sure that you use paper that meets our specifications. See Acceptable paper and other print media on page 3.
- Check the machine’s environment
- Check the machine’s environment. Conditions such as high temperatures and high humidity can increase the amount of background shading. See Safety and Legal booklet.
- Put in a new toner cartridge
- Put in a new toner cartridge. See Replacing the toner cartridge on page 71.
- Put in a new drum unit
- Put in a new drum unit. See Replacing the drum unit on page 79. ABCDEFGH abcdefghijk A B C D abcde 0 1 2 3 4 CDEF defg B C bcd 2 3 ABCDEFGH abcdefghijk A B C D abcde 0 1 2 3 4
Ghost6 checks
- Make sure that you use paper that meets our specifications
- Make sure that you use paper that meets our specifications. Rough-surfaced paper or thick print media may cause this problem. See Acceptable paper and other print media on page 3.
- Make sure that the media type setting in the driver matches the type of paper you are using
- Make sure that the media type setting in the driver matches the type of paper you are using. See Acceptable paper and other print media on page 3.
- Choose Reduce Ghosting mode in the printer driver
- Choose Reduce Ghosting mode in the printer driver.
- See Improve Print Output in Other Print Options... on page 32 (For Windows®) or Print Settings on page 43 (For Macintosh).
- Do not use Reduce Ghosting if humidity is below 30%, because ghosting may increase.
- The feature may not help every paper type; test a small quantity before buying a lot.
- Put in a new toner cartridge
- Put in a new toner cartridge. See Replacing the toner cartridge on page 71
- Put in a new drum unit
- Put in a new drum unit. See Replacing the drum unit on page 79.
- The fuser unit may be contaminated
- The fuser unit may be contaminated. Call your Brother dealer or Brother Customer Service.
Toner specks3 checks
- Make sure that you use paper that meets our specifications
- Make sure that you use paper that meets our specifications. Rough-surfaced paper may cause the problem. See Acceptable paper and other print media on page 3.
- The drum unit may be damaged
- The drum unit may be damaged. Put in a new drum unit. See Replacing the drum unit on page 79.
- The fuser unit may be contaminated
- The fuser unit may be contaminated. Call Brother Customer Service.
Hollow print4 checks
- Make sure that you use paper that meets our specifications
- Make sure that you use paper that meets our specifications. See Acceptable paper and other print media on page 3.
- Choose Thick Paper mode in the printer driver, or use thinner paper than what you are now using
- Choose Thick Paper mode in the printer driver, or use thinner paper than what you are now using.
- Check the machine’s environment
- Check the machine’s environment. Conditions such as high humidity can cause hollow print. See Safety and Legal booklet.
- The drum unit may be damaged
- The drum unit may be damaged. Put in a new drum unit. See Replacing the drum unit on page 79.
All black2 checks
- Clean the primary corona wire inside the drum unit by sliding the green tab
- Clean the primary corona wire inside the drum unit by sliding the green tab. Be sure to return the green tab to the home position (a). See Cleaning the corona wire on page 85.
- The drum unit may be damaged
- The drum unit may be damaged. Put in a new drum unit. See Replacing the drum unit on page 79.
White lines across the page5 checks
- Make sure that you use paper that meets our specifications
- Make sure that you use paper that meets our specifications. A rough surfaced paper or thick print media can cause problems.
- Make sure that you choose the correct media type in the printer driver
- Make sure that you choose the correct media type in the printer driver.
- Make sure that a torn piece of paper is not stuck inside the machine blocking the scanner
- Make sure that a torn piece of paper is not stuck inside the machine blocking the scanner.
- The problem may disappear by itself
- The problem may disappear by itself. Print multiple pages to clear this problem, especially if the machine has not been used for a long time.
- The drum unit may be damaged
- The drum unit may be damaged. Put in a new drum unit. See Replacing the drum unit on page 79.
Lines across the page2 checks
- Clean the primary corona wire in the drum unit
- Clean the primary corona wire in the drum unit. See Cleaning the corona wire on page 85.
- The drum unit may be damaged
- The drum unit may be damaged. Put in a new drum unit. See Replacing the drum unit on page 79.
White lines, bands or ribbing across the page2 checks
- Check the machine's environment
- Check the machine's environment. Conditions such as high humidity and high temperatures may cause this print quality problem.
- If the problem is not solved after printing a few pages, put in a new drum unit
- If the problem is not solved after printing a few pages, put in a new drum unit. (See Replacing the drum unit on page 79.)
White spots on black text or graphics and black spots at 94 mm (3.71 in.) intervals2 checks
- If the problem is not solved after printing a few pages, the drum unit may have foreign material, such as glue from a label, stuck on the drum
- If the problem is not solved after printing a few pages, the drum unit may have foreign material, such as glue from a label, stuck on the drum.
- Clean the drum unit. (See Cleaning the drum unit on page 87)
- The drum unit may be damaged
- The drum unit may be damaged. Put in a new drum unit. See Replacing the drum unit on page 79.
Black toner marks across the page6 checks
- The drum unit may be damaged
- The drum unit may be damaged. Put in a new drum unit. See Replacing the drum unit on page 79.
- The toner cartridge may be damaged
- The toner cartridge may be damaged. Put in a new toner cartridge. See Replacing the toner cartridge on page 71.
- Make sure that you use paper that meets our specifications
- Make sure that you use paper that meets our specifications. See Acceptable paper and other print media on page 3.
- If you use label sheets for laser printers, the glue from the sheets may sometimes stick to the OPC drum surface
- If you use label sheets for laser printers, the glue from the sheets may sometimes stick to the OPC drum surface. Clean the drum unit. See Cleaning the drum unit on page 87.
- Do not use paper that has clips or staples because they will scratch the surface of the drum
- Do not use paper that has clips or staples because they will scratch the surface of the drum.
- If the unpacked drum unit is in direct sunlight or room light, the unit may be damaged
- If the unpacked drum unit is in direct sunlight or room light, the unit may be damaged.
Black lines down the page5 checks
- Clean the primary corona wire inside the drum unit by sliding the green tab
- Clean the primary corona wire inside the drum unit by sliding the green tab. See Cleaning the corona wire on page 85.
- Make sure the green tab of the primary corona wire is at the home position (a)
- Make sure the green tab of the primary corona wire is at the home position (a).
- The drum unit may be damaged
- The drum unit may be damaged. Put in a new drum unit. See Replacing the drum unit on page 79.
- The toner cartridge may be damaged
- The toner cartridge may be damaged. Put in a new toner cartridge. See Replacing the toner cartridge on page 71.
- The fuser unit may be contaminated
- The fuser unit may be contaminated. Call your dealer or Brother Customer Service.
White lines down the page3 checks
- The toner cartridge may be damaged
- The toner cartridge may be damaged. Put in a new toner cartridge. See Replacing the toner cartridge on page 71.
- The drum unit may be damaged
- The drum unit may be damaged. Put in a new drum unit. See Replacing the drum unit on page 79.
- If the LEDs indicate REPLACE TONER (Continue mode), put in a new toner cartridge
- If the LEDs indicate REPLACE TONER (Continue mode), put in a new toner cartridge. See Replacing the toner cartridge on page 71.
Page skewed5 checks
- Make sure that the paper or other print media is loaded properly in the paper tray and that the guides are not too tight or too loose against the paper stack
- Make sure that the paper or other print media is loaded properly in the paper tray and that the guides are not too tight or too loose against the paper stack.
- Set the paper guides correctly
- Set the paper guides correctly. See Printing from the paper tray (plain paper, recycled paper and thin paper only) on page 10.
- If you are using the manual feed slot, see Printing from the Manual feed slot on page 13
- If you are using the manual feed slot, see Printing from the Manual feed slot on page 13.
- The paper tray may be too full
- The paper tray may be too full. See Printing from the paper tray (plain paper, recycled paper and thin paper only) on page 10.
- Check the paper type and quality
- Check the paper type and quality. See Acceptable paper and other print media on page 3.
Curled or wavy4 checks
- Check the paper type and quality
- Check the paper type and quality. High temperatures and high humidity will cause paper to curl. See Acceptable paper and other print media on page 3.
- If you do not use the machine often, the paper may have been in the paper tray too long
- If you do not use the machine often, the paper may have been in the paper tray too long.
- Turn over the stack of paper in the paper tray.
- Also, fan the paper stack and then rotate the paper 180° in the paper tray.
- Open the back cover (face-up output tray) to let the printed paper out on the face- up output tray
- Open the back cover (face-up output tray) to let the printed paper out on the face- up output tray.
- Choose Reduce Paper Curl mode in the printer driver when you do not use our recommended paper
- Choose Reduce Paper Curl mode in the printer driver when you do not use our recommended paper.
- See Improve Print Output in Other Print Options... on page 32 (For Windows®) or Print Settings on page 43 (For Macintosh).
Wrinkles or creases3 checks
- Make sure that the paper is loaded properly
- Make sure that the paper is loaded properly. See Printing from the paper tray (plain paper, recycled paper and thin paper only) on page 10.
- Check the paper type and quality
- Check the paper type and quality. See Acceptable paper and other print media on page 3.
- Turn over the stack of paper in the tray or try rotating the paper 180° in the input tray
- Turn over the stack of paper in the tray or try rotating the paper 180° in the input tray.
Envelope creases1 check
- Envelope creases
- Make sure that the two green envelope levers inside the back cover are pulled down when you print the envelope.
- Note When you have finished printing, open the back cover and reset the two green levers back to their original position.
Poor fixing2 checks
- Open the back cover and make sure that the two green envelope levers on the left and right hand sides are in the up position
- Open the back cover and make sure that the two green envelope levers on the left and right hand sides are in the up position.
- Choose Improve Toner Fixing mode in the printer driver
- Choose Improve Toner Fixing mode in the printer driver.
- See Improve Print Output in Other Print Options... on page 32 (For Windows®) or Print Settings on page 43 (For Macintosh).
- If this selection does not provide enough improvement, select Thicker Paper in Media Type settings.
Curled2 checks
- Choose Reduce Paper Curl mode in the printer driver when you do not use our recommended paper
- Choose Reduce Paper Curl mode in the printer driver when you do not use our recommended paper.
- See Improve Print Output in Other Print Options... on page 32 (For Windows®) or Print Settings on page 43 (For Macintosh).
- Turn the paper over in the paper tray, and print again
- Turn the paper over in the paper tray, and print again. (Excluding letterhead paper) If the problems remains, switch the Anti-Curl Levers as follows: Open the back cover.
- Lift the lever (1) and slide the two gray levers (2) in the direction of the arrow.
The machine prints unexpectedly or it prints garbage data.5 checks
- Make sure that the printer cable is not too long
- Make sure that the printer cable is not too long. We recommend that you use a USB cable that is no longer than 2 meters (6.5 feet).
- Make sure that the printer cable is not damaged or broken
- Make sure that the printer cable is not damaged or broken.
- If you are using an interface-switching device, remove it
- If you are using an interface-switching device, remove it. Connect your computer directly to your machine, and then try again.
- Make sure that you have chosen the correct printer driver with ‘Set as Default Printer’
- Make sure that you have chosen the correct printer driver with ‘Set as Default Printer’.
- Make sure that the machine is not connected to the same port that is also connected to a storage device or scanner
- Make sure that the machine is not connected to the same port that is also connected to a storage device or scanner.
- Remove all other devices and connect the machine to the port only.
The machine does not appear in Print Setup Utility3 checks
- Make sure that the machine is turned on
- Make sure that the machine is turned on.
- Make sure that the USB interface cable is connected directly to the Macintosh and that it is connected to the USB port of the machine
- Make sure that the USB interface cable is connected directly to the Macintosh and that it is connected to the USB port of the machine.
- Make sure the printer driver is installed correctly
- Make sure the printer driver is installed correctly.
Unable to print from the application.1 check
- Make sure that the supplied Macintosh printer driver is installed in the Hard Disk and that it is chosen with Print Setup Utility (Mac OS X 10
- Make sure that the supplied Macintosh printer driver is installed in the Hard Disk and that it is chosen with Print Setup Utility (Mac OS X 10.4.11) or Print & Fax in System Preferences (Mac OS X 10.5.x and 10.6.x).
I cannot complete the wireless network setup configuration.4 checks
Troubleshooting table in the applicable network guide; retained as troubleshooting.
- SSID or Network Key is incorrect
- Reconfirm the security settings.
- Default settings may use the router manufacturer/model.
- Consult its instructions, manufacturer, ISP or network administrator to find them; the Network Glossary explains SSID and Network Key.
- MAC address filtering blocks the printer
- Allow the printer MAC address in the router filter; find it on the Printer Settings Page.
- The access point hides its SSID
- Enter the correct SSID and Network Key manually, using the router instructions, and reconfigure wireless setup.
- All listed checks were tried without completing setup
- Use the Network Connection Repair Tool instructions under the network-printing troubleshooting topic.
The Brother machine is not found on the network during the printer driver installation.4 checks
Troubleshooting table in the applicable network guide; retained as troubleshooting.
- Security software blocks detection
- Search again in the installer and allow printer access when the security alert appears. Follow the security-software troubleshooting checks.
- Printer is too far from the access point
- During wireless setup place the printer within about one metre (3.3 feet) of the access point/router.
- Walls or furniture obstruct wireless communication
- Move the printer to an obstruction-free position or closer to the access point/router.
- Nearby devices interfere with wireless communication
- Move wireless computers, Bluetooth devices, microwave ovens and cordless phones away from the printer or router.
The Brother machine cannot print over the network or is not found after successful installation.5 checks
Troubleshooting table in the applicable network guide; retained as troubleshooting.
- Security software may block communication
- Follow the security-software troubleshooting checks.
- Printer and computer IP address or subnet mask is incorrect
- Confirm that the printer and computer have correct IP addresses and subnet masks on the same network; ask the administrator for verification details.
- In historical Windows, ask the administrator about using the Network Connection Repair Tool, log on as administrator, and ensure the printer is on and connected to the computer’s network.
- Windows 2000/XP or Server 2003/2008: Start > All Programs (Programs in Windows 2000) > Accessories > Windows Explorer > My computer.
- Vista/Windows 7: Start > Computer.
- Open Local Disk (C:) > Program Files or Program Files (x86) > Browny02 > Brother, then launch the named Network Connection Repair Tool.
- For Vista UAC choose Continue; for Windows 7 choose Yes.
- Follow the screens and check the diagnosis by printing the Printer Settings Page.
- Enable Network Connection Repair Tool on the Status Monitor Options tab starts automatic repair, but the guide advises against this if an administrator assigned a static IP because it changes the address automatically.
- If correct IP address and subnet mask are still unavailable, ask the administrator or Brother support.
- An earlier failed job remains in the queue
- Delete the failed job.
- Open the printer in Windows 2000 Settings > Printers, XP Printers and Faxes, Vista Control Panel > Hardware and Sound > Printers, or Windows 7 Devices and Printers > Printers and Faxes, then Printer > Cancel All Documents.
- Wireless connection status is uncertain
- Print the WLAN report and follow its TS error topic, then follow the checks for printer detection during driver installation.
- All preceding checks were tried but printing still fails
- Uninstall and reinstall the printer driver.
I'm using security software.2 checks
Troubleshooting table in the applicable network guide; retained as troubleshooting.
- The security alert was not accepted
- The firewall may block access with or without an alert.
- Follow the security-software instructions or consult its manufacturer.
- Permit the installer’s alerts for BrYNsvc.exe, Brother Status Monitor (Network), Generic Host Process, Setup.exe and Spooler SubSystem App as shown in the guide.
- The security software needs the network port numbers
- The guide lists UDP 137 for network printing and UDP 161 for BRAdmin Light. Consult the security-software instructions/manufacturer for opening ports.
I want to check my network devices are working properly.6 checks
Troubleshooting table in the applicable network guide; retained as troubleshooting.
- Power or basic printer setup may be wrong
- Check the printer cord and power, access point/router power, removed packing, correctly installed toner/drum, closed covers and loaded tray paper.
- Wired-printer cable instructions apply to other models.
- The printer IP address or network settings are needed
- Print the Printer Settings Page.
- The wireless link status needs checking
- Print the Printer Settings Page and check Wireless Link Status for Link OK. For Link Down or Failed to Associate, restart the first-check list.
- The printer cannot be reached with ping
- Ping the printer IP address or node name.
- Success confirms communication on the same network.
- On failure, Windows users should ask the administrator and use the Network Connection Repair Tool; Macintosh users should confirm the IP address and subnet mask.
- Wireless association or a TS error needs checking
- Print the WLAN report and follow the matching TS error troubleshooting topic.
- Problems remain after all preceding checks
- Use the router instructions to verify SSID and Network Key, then set them correctly as described in wireless-setup troubleshooting.
Guides
Leds (light emitting diodes)
Instructions from the manualUnderstand sleepView
Understand deep sleep6 steps
- The machine is in Deep Sleep mode (reducing more power consumption than Sleep mode).
- The machine acts as though it were turned off.
- If the machine does not receive data for a certain length of time while it is in Sleep mode, it enters Deep Sleep mode automatically.
- Receiving data or pressing Go wakes up the machine from Deep Sleep mode to Ready mode.
- On HL-2135W, enabling wireless prevents Deep Sleep.
- To disable wireless, use the reviewed wireless enable/disable procedure from the Network User’s Guide.
Understand readyView
Understand printingView
Understand warming upView
Understand cooling downView
Understand receiving dataView
Understand data remainingView
Locate the control panel4 steps
- The control panel has Toner, Drum, Error and Ready LEDs and the Go button.
- Toner indicates low toner; Drum indicates a drum nearing replacement; Error indicates no paper, a paper jam or an open cover; Ready flashes according to machine status.
- Go supports wake-up, error recovery, form feed, job cancellation and reprinting.
- Wireless switching applies only to HL-2135W and HL-2270DW.
Identifying your problem
Instructions from the manualCheck the printer before troubleshooting9 steps
- First, check the following: The AC power cord is connected properly and the machine is turned on.
- All of the protective parts have been removed.
- The toner cartridge and drum unit is installed properly.
- The front cover, back cover, and fuser cover are completely closed.
- Paper is inserted properly in the paper tray.
- The interface cable is securely connected to the machine and the computer.
- The correct driver for the machine has been chosen and is installed.
- The computer is set up to connect to the correct machine port.
- Machine does not print:
Improving the print quality
Instructions from the manualCheck print quality with a test page4 steps
- If you have a print quality problem, print a test page first (see Print a test page on page 61).
- If the printout looks good, the problem is probably not the machine.
- Check the interface cable or try the machine on another computer.
- Brother does not recommend the use of cartridges other than genuine Brother Original cartridges or the refilling of used cartridges with toner from other sources.
Acceptable paper and other print media
Instructions from the manualSelect acceptable paper and print media11 steps
- Before buying large quantities, test a small amount.
- Use paper made for plain-paper copying.
- Tray 1 accepts plain, recycled and thin paper; the manual feed slot also accepts bond, thick paper, labels and envelopes.
- Do not mix paper types or sizes in the tray.
- Match the application paper size to the loaded paper.
- Avoid touching the printed surface immediately.
- The manual recommends neutral long-grain copy paper of 75–90 g/m² with approximately 5% moisture.
- Tray 1 holds up to 250 sheets of 80 g/m² paper; manual feed holds one sheet.
- Tray sizes: A4, Letter, B5 (ISO/JIS), A5, A5 long edge, B6 (ISO), A6 and Executive.
- Manual-feed width is 76.2–216 mm and length is 116–406.4 mm.
- Plain paper is 75–105 g/m², thin paper 60–75 g/m²; bond and thick paper up to 163 g/m² must use the manual feed slot.
Handling and using special paper
Instructions from the manualAvoid unsuitable paper3 steps
- Types of paper to avoid IMPORTANT Some types of paper may not perform well or may cause damage to your machine.
- DO NOT use paper: that is highly textured that is extremely smooth or shiny that is curled or warped 1 A curl of 2 mm (0.08 in.) or greater may cause jams to occur. that is coated or has a chemical finish that is damaged, creased or folded that exceeds the recommended weight specification in this guide with tabs and staples with letterheads using low temperature dyes or thermography that is multipart or carbonless that is designed for inkjet printing If you use any of the types of paper listed above, they may damage your machine.
- This damage is not covered under any Brother warranty or service agreement.
Envelopes
Instructions from the manualSelect suitable envelopes8 steps
- Envelopes Most envelopes designed for laser printers will be suitable for your machine.
- However, some envelopes may have feed and print-quality problems because of the way they have been made.
- A suitable envelope should have edges with straight, well-creased folds and the leading edge should not be thicker than two sheets of paper.
- The envelope should lie flat and not be of baggy or flimsy construction.
- You should buy quality envelopes from a supplier who understands that you will be using the envelopes in a laser machine.
- We recommend that you print a test envelope to make sure the print results are what you want.
- Types of envelopes to avoid IMPORTANT DO NOT use envelopes: that are damaged, curled, wrinkled, irregularly shaped, extremely shiny or textured envelopes. with clasps, staples, snaps, tie strings, self-adhesive components, windows, holes, cutouts or perforations. that are of a baggy construction, not sharply creased, embossed (have raised writing on them) or preprinted on the inside. that were previously printed by a laser / LED printer. that cannot be arranged when put in a pile. that are made of paper that weighs more than the paper weight specifications for the machine. with edges that are not straight or consistently square. with glue on surface as shown in figure below with double flaps as shown in figure below with sealing flaps that are not folded down when purchased with sealing flaps as shown in figure below with each side folded as shown in figure below If you use any of the types of envelopes listed above, they may damage your machine.
- This damage may not be covered under any Brother warranty or service agreement.
Labels
Instructions from the manualSelect full-sheet laser labels12 steps
- Labels The machine will print on most types of labels designed for use with a laser printer.
- Labels should have an adhesive that is acrylic-based since this material is more stable at the high temperatures in the fuser unit.
- Adhesives should not come in contact with any part of the machine, because the label stock may stick to the drum unit or rollers and cause jams and print quality problems.
- No adhesive should be exposed between the labels.
- Labels should be arranged so that they cover the entire length and width of the sheet.
- Using labels with spaces may result in labels peeling off and causing serious jams or print problems.
- All labels used in this machine must be able to withstand a temperature of 200 degrees centigrade (392 degrees Fahrenheit) for a period of 0.1 seconds.
- Do not feed a label sheet through the machine more than one time.
- Types of labels to avoid Do not use labels that are damaged, curled, wrinkled or an unusual shape.
- IMPORTANT Avoid feeding labels with the carrier sheet exposed because your machine will be damaged.
- Label sheets should not exceed the paper weight specifications described in this User’s Guide.
- Labels exceeding this specification may not feed or print properly and may cause damage to your machine.
Printing from the paper tray (plain paper, recycled paper and thin paper only)
Instructions from the manualPrint from the paper tray14 steps
- Printing methods Printing on plain paper, recycled paper, bond paper, thin paper or thick paper Printing from the paper tray (plain paper, recycled paper and thin paper only) (For the recommended paper to use, see Type and size of paper on page 4.) Pull the paper tray completely out of the machine.
- While pressing the green paper-guide release lever, slide the paper guides to fit the paper size.
- Make sure that the guides are firmly in the slots.
- Put paper in the tray and make sure: The paper is below the maximum paper mark (b b b).
- Over filling the paper tray will cause paper jams.
- The side to be printed on must be face down.
- The paper guides touch the sides of the paper so it will feed properly.
- Put the paper tray firmly back in the machine.
- Make sure that it is completely inserted into the machine.
- Lift up the support flap 1 to prevent paper from sliding off the face-down output tray, or remove each page as soon as it comes out of the machine.
- Choose the following from each drop-down list of the printer driver.
- Paper Size Media Type Paper Source For any other settings, see Driver and Software in Chapter 2.
- Send the print data to the machine.
- A4 Letter Executive A5 B5 B6 A6 JIS B5 A5 Long Edge Plain Paper Thin Paper Recycled Paper Tray 1
Printing from the manual feed slot
Instructions from the manualPrint from the manual feed slot9 steps
HL-2135W has no manual feed slot cover. The shared illustrations show HL-2270DW.
- Lift support flap 1 or remove each output page immediately.
- Set the manual-feed paper guides to the paper width.
- With both hands insert one sheet face up until its front edge touches the feed roller; release it when the machine pulls it in.
- Keep the sheet straight and correctly positioned.
- Feed only one sheet at a time; inserting paper before Ready mode may eject it unprinted.
- Choose the matching paper size and media type and Manual as Paper Source in the driver.
- Send the print job.
- Insert each subsequent sheet only after the printed page exits.
- Do not open a manual-feed cover: HL-2135W does not have one.
Printing on labels or envelopes
Instructions from the manualPrint labels and envelopes17 steps
HL-2135W has no manual feed slot cover. The shared illustrations show HL-2270DW.
- Open the back cover for a straight path to the face-up output tray.
- For envelopes only, lower both green levers.
- Set the manual-feed guides to the media width.
- Insert one complete label sheet or one envelope face up with both hands until the front edge touches the roller; release it when grabbed.
- Keep it straight; only one item at a time, and only when Ready.
- Choose Label or Envelopes/Env.
- Thin/Env.
- Thick as appropriate, the exact paper size, and Manual as Paper Source.
- For labels choose A4 or Letter.
- Envelope choices include Com-10, DL, C5 and Monarch; define other sizes in the driver.
- Send the print job, then insert each next item after the prior one exits.
- Remove printed sheets/envelopes immediately to prevent a jam or curl.
- If an envelope is smudged, select Env.
- Thick.
- If a double-flap DL envelope is creased, select DL Long Edge in Windows and insert long edge first.
- After printing envelopes, restore both green levers to their original position.
- HL-2135W has no manual-feed slot cover.
Guidelines for printing on both sides of the paper
Instructions from the manualPrepare for manual duplex printing12 steps
- Duplex printing The supplied printer drivers for Windows® 2000 or greater and Mac OS X 10.4.11 or greater all enable duplex printing.
- For more information about how to choose the settings, see the Help text in the printer driver.
- Guidelines for printing on both sides of the paper If the paper is thin, it may wrinkle.
- If paper is curled, straighten it and then put it back in the paper tray or the manual feed slot.
- If the paper continues to curl, replace the paper.
- If the paper is not feeding properly, it may be curled.
- Remove the paper and straighten it.
- If the paper continues to curl, replace the paper.
- When you use the manual duplex function, it is possible that there may be paper jams or poor print quality. (If there is a paper jam, see Paper jams and how to clear them on page 105.
- If you have a print quality problem, see Improving the print quality on page 112.) Note Make sure that the paper tray is completely inserted to the machine.
- You should use plain paper, recycled paper or thin paper.
- Do not use bond paper.
Manual duplex printing
Instructions from the manualPrint manual duplex in Windows7 steps
- Choose the matching paper size and a supported media type except media with a specified print side, such as envelopes or labels.
- Select Tray 1 or Manual as Paper Source, Duplex (Manual), one of four binding types per orientation, and any required binding offset in inches or millimetres.
- Send the job.
- The supplied Windows driver prints the even-numbered pages first, then prompts you to reload the paper for the odd-numbered pages; follow the prompt and click OK.
- Straighten the paper before reloading to prevent jams.
- Very thin or thick paper is not recommended.
- Do not select automatic Duplex: it is not supplied on HL-2135W.
Print manual duplex on Macintosh6 steps
- Manual Duplex Printing For Mac OS X 10.4.11 Select Paper Handling.
- Choose Odd numbered pages and click Print.
- Turn the paper over and reload it in the tray, and then choose Even numbered pages and click Print.
- For Mac OS X 10.5.x and 10.6.x Select Paper Handling.
- Choose Odd only in Pages To Print and click Print.
- Turn the paper over and reload it in the tray, and then choose Even only in Pages To Print and click Print.
Basic tab
Instructions from the manualSet Windows basic printing options6 steps
- Basic tab You can also change settings by clicking the illustration on the left side of the Basic tab.
- Choose Paper Size, Orientation, Copies, Media Type, Resolution and Print Settings (1).
- Choose Multiple Page and Duplex / Booklet setting (2).
- Choose Paper Source (3).
- Click OK to apply your chosen settings.
- To return to the default settings, click Default, then OK.
Paper size
Instructions from the manualChoose paper size in WindowsView
Orientation
Instructions from the manualChoose orientation in WindowsView
Copies
Instructions from the manualSet copies and collate in Windows4 steps
- Copies The copies selection sets the number of copies that will be printed.
- Collate With the Collate check box selected, one complete copy of your document will be printed and then will be repeated for the number of copies you selected.
- If the Collate check box is not selected, then each page will be printed for all the copies selected before the next page of the document is printed.
- Portrait Landscape Collate checked Collate non-checked
Media type
Instructions from the manualChoose Windows media type10 steps
- Media Type You can use the following types of media in your machine.
- For the best print quality, select the type of media that you wish to use.
- Note When using ordinary plain paper (75 to 105 g/m2 (20 to 28 lb)) choose Plain Paper.
- When using heavier weight paper or rough paper choose Thick Paper or Thicker Paper.
- For bond paper, choose Bond Paper.
- When you use envelopes, choose Envelopes.
- If the toner is not fixed to the envelope correctly when Envelopes has been selected, choose Env.
- Thick.
- If the envelope is crumpled when Envelopes has been selected, choose Env.
- Thin.
Resolution
Instructions from the manualChoose Windows resolutionView
Print settings
Instructions from the manualChoose Windows print settings5 steps
- Print Settings You can manually change the print setting.
- Graphics This is the best mode for printing documents that contain graphics.
- Text This is the best mode for printing text documents.
- Manual You can change the settings manually by choosing Manual and clicking the Manual Settings... button.
- You can set brightness, contrast and other settings.
Choose Macintosh media and resolution3 steps
- Print Settings You can change settings by choosing a setting in the Print Settings list: Basic tab Media Type You can change the media type to one of the following: Plain Paper Thin Paper Thick Paper Thicker Paper Bond Paper Envelopes Env.
- Thick Env.
- Thin Recycled Paper Label Resolution You can change the resolution as follows: 300 dpi 600 dpi HQ 1200
Choose Macintosh toner, source and advanced options12 steps
- Toner Save Mode You can conserve toner using this feature.
- When you set Toner Save Mode to On, print appears lighter.
- The default setting is Off.
- Note We do not recommend Toner Save Mode for printing Photo or Gray Scale images.
- Toner Save Mode is not available for HQ 1200 resolution.
- Paper Source You can choose Auto Select, Tray 1 or Manual.
- Reverse Print (For Mac OS X 10.4.11 only) Check Reverse Print to rotate the data by 180 degrees.
- Advanced tab Graphics Quality You can change the print quality as follows: Graphics This is a graphics mode (contrast priority).
- Choose this setting for printing text and figures, such as business and presentation documents.
- You can represent sharp contrasts between shaded areas.
- Text This is the best mode for printing text documents.
- Skip Blank Page If Skip Blank Page is checked, the printer driver automatically detects blank pages and excludes them from printing.
Improve Macintosh print output10 steps
- Improve Print Output This feature allows you to improve a print quality problem.
- Reduce Paper Curl If you choose this setting, the paper curl may be reduced.
- If you are printing only a few pages, you do not need to choose this setting.
- We recommend that you change the printer driver setting in Media Type to a thin setting.
- Improve Toner Fixing If you choose this setting, the toner fixing on paper may be improved.
- If this selection does not provide enough improvement, change the printer driver setting in Media Type to a thick setting.
- Reduce Ghosting If you are using the machine in a high humidity environment this setting may reduce ghosting on the paper.
- Do not use this setting if the humidity is below 30% or ghosting may increase.
- Note This feature may not reduce ghosting for all types of paper.
- Before you buy a lot of paper, test a small quantity to make sure that the paper is suitable.
Open Macintosh support resources3 steps
- Support Brother Solution Center The Brother Solutions Center (http://solutions.brother.com/) is a website offering information about your Brother product including FAQs (Frequently Asked Questions), User’s Guides, driver updates and tips for using your machine.
- Visit the Genuine Supplies website You can visit our website for original Brother supplies by clicking this button.
- Brother CreativeCenter You can visit our website for a free and easy online solution for business and home uses by clicking this button.
Multiple page
Instructions from the manualPrint multiple pages in Windows6 steps
- Multiple Page The Multiple Page selection can reduce the image size of a page allowing multiple pages to be printed on one sheet of paper or can enlarge the image size for printing one page on multiple sheets of paper.
- Page Order When N in 1 option is selected, the page order can be selected from the drop-down list.
- Border Line When printing multiple pages onto one sheet, with the Multiple Page feature, you can choose to have a solid border, dash border or no border around each page on the sheet.
- Plain Paper Thin Paper Thick Paper Thicker Paper Bond Paper Envelopes Env.
- Thick Env.
- Thin Recycled Paper Label
Set Windows multiple-page cut-out lines2 steps
- Print cut-out line When 1 in NxN pages option is selected, the Print cut-out line option can be selected.
- This option allows you to print a faint cut-out line around the printable area.
Paper source
Instructions from the manualChoose Windows paper source2 steps
- Paper Source You can choose Auto Select, Tray1, Manual and specify separate trays for printing the first page and for printing from the second page onwards.
- Portrait Landscape Left Binding Right Binding Top Binding Bottom Binding
Scaling
Instructions from the manualScale the Windows print imageView
Reverse print
Instructions from the manualReverse Windows print orientationView
Use watermark
Instructions from the manualAdd a Windows watermark4 steps
- Use Watermark You can put a logo or text into your documents as a watermark.
- You can choose one of the preset watermarks, or you can use a bitmap file or text that you have created.
- When you use a bitmap file as a watermark, you can change the size of the watermark and put it anywhere you like on the page.
- When you use text as a watermark, you can change the Text, Font, Style, Size and Darkness settings.
Toner save mode
Instructions from the manualUse Windows toner save mode5 steps
- Toner Save Mode You can conserve toner use with this feature.
- When you set Toner Save Mode to On, print appears lighter.
- The default setting is Off.
- Note We do not recommend Toner Save Mode for printing Photo or Gray Scale images.
- Toner Save Mode is not available for HQ 1200 resolution.
Use reprint
Instructions from the manualProtect Windows reprint data4 steps
- Use Reprint The machine keeps the last print job sent to it in memory.
- You can reprint the last job without sending the data again from your computer.
- For more information about the Reprint function, see Go button on page 60.
- Note If you want to prevent other people from printing your data using the reprint function, uncheck the Use Reprint check box.
Sleep time
Instructions from the manualSet Windows sleep time6 steps
- Sleep Time When the machine does not receive data for a certain period of time, it enters sleep mode.
- In sleep mode, the machine acts as though it were turned off.
- When you choose Printer Default, the timeout setting will be reset to the specific time set at the factory; this can be altered in the driver.
- Intelligent Sleep Mode automatically adjusts to the most suitable timeout setting depending on the frequency of your machine use.
- While the machine is in sleep mode, the Ready LED is dimmed, but the machine can still receive data.
- Receiving a print file or document or pressing Go will automatically wake up the machine to start printing.
Set Macintosh sleep time6 steps
- Sleep Time When the machine does not receive data for a certain period of time, it enters sleep mode.
- In sleep mode, the machine acts as though it were turned off.
- When you choose Printer Default, the timeout setting will be reset to the default time; this can be altered in the driver.
- If you want to change the sleep time, choose Manual and then enter the time in the text box on the driver.
- While the machine is in sleep mode, the Ready LED is dimmed, but the machine can still receive data.
- Receiving a print file or document or pressing Go will automatically wake up the machine to start printing.
Density adjustment
Instructions from the manualAdjust Windows print densityView
Error message printout
Instructions from the manualPrint Windows error messagesView
Improve print output
Instructions from the manualImprove Windows print output10 steps
- Improve Print Output This feature allows you to improve a print quality problem.
- Improvement Settings Reduce Paper Curl If you choose this setting, the paper curl may be reduced.
- If you are printing only a few pages, you do not need to choose this setting.
- We recommend that you change the printer driver setting in Media Type to a thin setting.
- Improve Toner Fixing If you choose this setting, the toner fixing on paper may be improved.
- If this selection does not provide enough improvement, change the printer driver setting in Media Type to a thick setting.
- Reduce Ghosting If you are using the machine in a high humidity environment this setting may reduce ghosting on the paper.
- Do not use this setting if the humidity is below 30% or ghosting may increase.
- Note This feature may not reduce ghosting for all types of paper.
- Before you buy a lot of paper, test a small quantity to make sure that the paper is suitable.
Skip blank page
Instructions from the manualSkip blank pages in Windows2 steps
- Skip Blank Page If Skip Blank Page is checked, the printer driver automatically detects blank pages and excludes them from printing.
- Note This feature does not work when you choose the following features: Use Watermark Header-Footer Print N in 1 and 1 in NxN pages in Multiple Page Duplex (Manual), Booklet, Booklet (Manual) and Duplex with Binding Offset in Duplex / Booklet (HL-2240D only) Duplex with HQ 1200 in Resolution
Print profiles tab
Instructions from the manualChoose Windows print profiles5 steps
- Print Profiles tab Print Profiles (1) The printer driver of the machine has the preset print profiles.
- Select the desired profile and click OK to configure the desirable print settings easily.
- Edit a profile (2) You can edit and save a new print profile.
- Restore default profiles (3) Click to restore all the default print profiles.
- Always show Print Profile tab first (4) When you always want to show the Print Profiles tab first, select this check box.
Editing a print profile
Instructions from the manualEdit a Windows print profile7 steps
- Editing a print profile Configure the print settings in the print driver.
- See Basic tab on page 25 and Advanced tab on page 30.
- Click the Print Profiles tab.
- Click the Edit a profile button.
- Choose the icon from the drop-down list (1) and enter a profile name (2).
- Choose the print profile you want to overwrite and click OK.
- Note You can overwrite the preset print profiles.
Tray settings
Instructions from the manualDefine Windows tray settings11 steps
- Tray Settings Note From the Start menu, select Printers and Faxes 1.
- Right-click the Brother printer-series icon supplied for your model and select Properties to access the Tray Settings tab.
- Select Settings and then Printers for Windows® 2000 users.
- You can define the paper size for each paper tray and auto detect the serial number in the Tray Settings tab as follows.
- Paper Source Setting (1) This feature identifies the paper size defined for each paper tray.
- Paper Size This setting allows you to define which paper size is used for the tray and manual feed slot.
- Highlight the paper source you want to define and then choose the paper size from the drop-down list.
- Click Update to apply the setting to the tray.
- Default Source This setting allows you to choose the default paper source that your document will be printed from.
- Choose the Default Source from the drop-down list and click Update to save your setting.
- The Auto Select setting will automatically pull paper from any paper source (tray or manual feed slot) that has a defined paper size that matches your document.
Detect the printer serial number in Windows6 steps
- Serial No. (2) By clicking Auto Detect, the printer driver will query the machine and display its serial number.
- If it fails to receive the information, the screen will display "---------------".
- Note The Auto Detect function is not available under the following machine conditions: The machine's power switch is off.
- The machine is in an error mode.
- The machine is in a network shared environment.
- The cable is not connected to the machine correctly.
Status monitor
Instructions from the manualOpen Windows Status Monitor4 steps
- Status Monitor This reports the machine status (any errors that may happen with the machine) when printing.
- If you would like to turn the status monitor on, follow these steps: Click the Start button, All Programs 1 , Brother, your machine (e.g.
- Brother HL-2270DW), and then Status Monitor.
- Programs for Windows® 2000 users
Open Macintosh Status Monitor10 steps
- Status Monitor This reports the machine status (any errors that may happen with the machine) when printing.
- If you would like to turn the status monitor on, follow these steps: For Mac OS X 10.4.11 Run the Printer Setup Utility (from the Go menu, choose Applications, Utilities), then choose the machine.
- Click the Utility, then the status monitor will start up.
- For Mac OS X 10.5.x Run the System Preferences, select Print & Fax, then choose the machine.
- Click the Open Print Queue..., then click Utility.
- The status monitor will start up.
- For Mac OS X 10.6.x Run the System Preferences, select Print & Fax, then choose the machine.
- Click the Open Print Queue..., then click Printer Setup.
- Select the Utility tab then click Open Printer Utility.
- The status monitor will start up.
Choosing page setup options
Instructions from the manualChoose Macintosh page setup5 steps
- Choosing page setup options From an application such as Apple TextEdit, click File, then Page Setup.
- Make sure HL-XXXX (where XXXX is your model name.) is chosen in the Format for pop-up menu.
- You can change the settings for Paper Size, Orientation and Scale, then click OK.
- From an application such as Apple TextEdit, click File, then Print to start printing.
- For Mac OS X 10.4.11
Choosing printing options
Instructions from the manualChoose Macintosh printing options2 steps
- Choosing printing options To control special printing features, choose the options in the Print dialog box.
- For the details of available options, see the following descriptions of each option.
Cover page
Instructions from the manualAdd a Macintosh cover page3 steps
- Cover Page You can make the following cover page settings: Print Cover Page If you want to add a cover page to your document, use this function.
- Cover Page Type Choose a template for the cover page.
- Billing Info If you want to add the billing information to the cover page, enter text in the Billing Info box.
How to use and install the remote printer console software
Instructions from the manualInstall Remote Printer Console in Windows6 steps
- How to use and install the Remote Printer Console software To use the Remote Printer Console software, follow the steps below.
- Put the supplied installation CD-ROM into your CD-ROM drive and close the opening screen when it appears.
- Open Windows® Explorer and choose the CD-ROM drive.
- Double-click the tools folder.
- Double-click the RPC folder.
- Refer to the RPC_User’s_Guide.pdf for how to install and use the Remote Printer Console.
Booklet / booklet (manual)
Instructions from the manualPrint a manual Windows booklet4 steps
- Select Booklet (Manual) to arrange pages for folding.
- Even-numbered sides print first; follow the driver prompt to reload the paper, then click OK to print the odd-numbered sides.
- Duplex Settings offers two binding directions per orientation, a binding offset in inches or millimetres, and Divide into Sets with 1–15 sheets per set.
- Automatic Booklet is limited to the other listed duplex models and does not apply to HL-2135W.
Administrator
Instructions from the manualConfigure Windows administrator locks10 steps
- Administrator Administrators have the authority to limit access to functions such as scaling and watermark.
- Password Enter the password into this box.
- Set Password...
- Click here to change the password.
- Set Click here current password.
- Then you can change the settings.
- Copies Lock Lock the copy pages selection to prevent multiple copy printing.
- Multiple Page & Scaling Lock Lock the current settings of the Multiple Page and Scaling options to prevent changes being made.
- Watermark Lock Lock the current settings of the Watermark option to prevent changes being made.
- Header-Footer Print Lock Lock the current settings of the Header-Footer Print option to prevent changes being made.
Support
Instructions from the manualUse Windows driver support tools7 steps
- Support Note You can access the Support dialog box by clicking Support... in the Printing Preferences dialog box.
- Brother Solutions Center (1) The Brother Solutions Center (http://solutions.brother.com/) is a website offering information about your Brother product including FAQs (Frequently Asked Questions), User’s Guides, driver updates and tips for using your machine.
- Original Supplies Website (2) You can visit our website for original Brother supplies by clicking this button.
- Brother CreativeCenter (3) You can visit our website for a free and easy online solution for business and home uses by clicking this button.
- Print Settings (4) This will print the pages that show how the internal settings of the machine have been configured.
- Check Setting... (5) You can check the current driver settings.
- About... (6) This will show the list of the printer driver files and version information.
Layout
Instructions from the manualChoose Macintosh layout5 steps
- Layout Pages per Sheet Choose how many pages will appear on each side of the paper.
- Layout Direction When you specify the pages per sheet, you can also specify the direction of the layout.
- Border If you want to add a border, use this function.
- Reverse Page Orientation (Mac OS X 10.5.x and 10.6.x only) Check Reverse Page Orientation to reverse the data from up to down.
- Flip Horizontally (Mac OS X 10.6.x only) Check Flip Horizontally to print as a reflection flipped left-to-right.
Uninstalling the printer driver
Instructions from the manualUninstall printer drivers13 steps
- Uninstalling the printer driver You can uninstall the printer driver that you have installed with the following steps.
- Note This is not available if you installed the printer driver from the Windows® Add a printer function.
- After uninstalling, we recommend that you restart your computer to remove files that were in use during the uninstall.
- Printer driver for Windows® Click the Start button, point to All Programs 1, Brother, and then to your machine name.
- Click UnInstall.
- Follow the instructions on the screen.
- Programs for Windows® 2000 users Printer driver for Macintosh For Mac OS X 10.4.11 Disconnect the USB cable between the Macintosh and your machine.
- Log on as an ‘Administrator’.
- Run the Printer Setup Utility (from Go menu, choose Applications, Utilities), then choose the machine you want to remove and remove it by clicking the Delete button.
- For Mac OS X 10.5.x and 10.6.x Disconnect the USB cable between the Macintosh and your machine.
- Log on as an ‘Administrator’.
- From the Apple menu, choose System Preferences.
- Click Print & Fax, then choose the machine you want to remove and remove it by clicking the - button.
Print a test page
Instructions from the manualPrint a test page10 steps
- Print a test page You can use Go or the printer driver to print a test page.
- Using the Go button Turn off the machine.
- Make sure that the front cover is closed and the power cord is plugged in.
- Hold down Go as you turn on the power switch.
- Keep Go pressed down until the Toner, Drum and Error LEDs light up.
- Release Go.
- Make sure that the Toner, Drum and Error LEDs are off.
- Press Go again.
- The machine will print a test page.
- Using the printer driver If you are using the Windows® printer driver, click the Print Test Page button in the General tab of the printer driver.
Print the initial standalone test page5 steps
- Do not connect the interface cable yet.
- Connect the AC cord to printer and outlet, and turn on the power switch.
- Wait until warm-up ends and Ready stops flashing and stays green.
- Press Go and check the printed test page.
- This initial test function is unavailable after the first job sent from a computer.
Print a printer settings page
Instructions from the manualPrint a Printer Settings page6 steps
- Print a Printer Settings page You can print the current settings using the control panel button or printer driver.
- Using the Go button Make sure that the front cover is closed and the power cord is plugged in.
- Turn on the machine and wait until the machine is in Ready mode.
- Press Go three times within 2 seconds.
- The machine will print the current printer settings page.
- Using the printer driver If you are using the Windows® printer driver, you can print the current printer settings page by clicking the Print Settings button in the Support dialog.
Factory reset
Instructions from the manualPartially reset printer settings11 steps
- Factory Reset You can partially reset the machine back to its default printer settings.
- The network settings will not be reset: Turn off the machine.
- Make sure that the front cover is closed and the power cord is plugged in.
- Hold down Go as you turn on the power switch.
- Keep Go pressed down until all the LEDs light up and the Ready LED turns off.
- Release Go.
- Make sure that all the LEDs turn off.
- Press Go eight times.
- Make sure that all the LEDs light up to indicate the machine has been reset to its factory default settings (except the network settings).
- The machine will restart.
- The page counter cannot be changed.
Settings reset
Instructions from the manualReset all printer settings9 steps
- Settings Reset This operation will reset all the machine settings back to the settings that were set at the factory: Turn off the machine.
- Make sure that the front cover is closed and the power cord is plugged in.
- Hold down Go as you turn on the power switch.
- Keep Go pressed down until all the LEDs light up and the Ready LED turns off.
- Release Go.
- Make sure that all the LEDs turn off.
- Press Go ten times.
- The machine will automatically restart.
- The page counter cannot be changed.
Before replacing the consumable items
Instructions from the manualPrepare to replace consumables32 steps
- Before replacing the consumable items Please read the following instructions before replacing the consumable items.
- WARNING DO NOT put a toner cartridge into a fire.
- It could explode, resulting in injuries.
- DO NOT use flammable substances, any type of spray or any organic solvent/liquids containing alcohol or ammonia to clean the inside or outside of the machine.
- Doing this may cause a fire or electrical shock.
- See Cleaning on page 83 for how to clean the machine.
- Be careful not to inhale toner.
- HOT SURFACE After you have just used the printer, some internal parts will be extremely hot.
- Wait at least 10 minutes for the printer to cool down before continuing to the next step.
- To prevent any degradation to the print quality, DO NOT touch the shaded parts shown in the illustrations.
- IMPORTANT Brother machines are designed to work with toner of a particular specification and will work to a level of optimum performance when used with genuine Brother branded toner cartridges.
- Brother cannot guarantee this optimum performance if toner or toner cartridges of other specifications are used.
- Brother does not therefore recommend the use of cartridges other than genuine Brother branded cartridges with this machine.
- If damage is caused to the drum unit or other part of this machine as a result of using other manufacturer’s products with this machine, any repairs required as a result may not be covered by the warranty.
- We recommend that you place the drum unit and toner cartridge assembly on a clean, flat surface with a piece of disposable paper underneath it in case you accidentally spill or scatter toner.
- Handle the toner cartridge carefully.
- If toner scatters on your hands or clothes, immediately wipe or wash it off with cold water.
- To prevent damage to the machine from static electricity, DO NOT touch the electrodes shown in the illustration.
- To avoid print quality problems, DO NOT touch the shaded parts shown in the illustrations.
- We recommend that you clean the machine when you replace the consumables.
- See Cleaning on page 83.
- DO NOT unpack a spare toner cartridge until immediately before you put it into the machine.
- If toner cartridges are left unpacked for a long time the toner life may be shortened.
- DO NOT unpack a spare drum unit until immediately before you put it into the machine.
- If drum unit is exposed to sunlight or room light the unit may be damaged.
- While removing the drum unit, handle it carefully because it may contain toner.
- Note Be sure to seal up the used toner cartridge tightly in a suitable bag so that toner powder does not spill out of the cartridge.
- Go to http://www.brother.eu/recycle/ for instructions on how to return the used toner cartridge to the Brother collection program.
- If you choose not to return your used toner cartridge, please discard the used toner cartridge according to local regulations, keeping it separate from domestic waste.
- If you have questions, call your local waste disposal office.
- To ensure high quality printing, we recommend that you use only genuine Brother toner cartridges.
- When you want to buy toner cartridges, call your dealer.
Replacing the toner cartridge
Instructions from the manualReplace the toner cartridge53 steps
- Before replacing the consumable items Please read the following instructions before replacing the consumable items.
- WARNING DO NOT put a toner cartridge into a fire.
- It could explode, resulting in injuries.
- DO NOT use flammable substances, any type of spray or any organic solvent/liquids containing alcohol or ammonia to clean the inside or outside of the machine.
- Doing this may cause a fire or electrical shock.
- See Cleaning on page 83 for how to clean the machine.
- Be careful not to inhale toner.
- HOT SURFACE After you have just used the printer, some internal parts will be extremely hot.
- Wait at least 10 minutes for the printer to cool down before continuing to the next step.
- To prevent any degradation to the print quality, DO NOT touch the shaded parts shown in the illustrations.
- IMPORTANT Brother machines are designed to work with toner of a particular specification and will work to a level of optimum performance when used with genuine Brother branded toner cartridges.
- Brother cannot guarantee this optimum performance if toner or toner cartridges of other specifications are used.
- Brother does not therefore recommend the use of cartridges other than genuine Brother branded cartridges with this machine.
- If damage is caused to the drum unit or other part of this machine as a result of using other manufacturer’s products with this machine, any repairs required as a result may not be covered by the warranty.
- We recommend that you place the drum unit and toner cartridge assembly on a clean, flat surface with a piece of disposable paper underneath it in case you accidentally spill or scatter toner.
- Handle the toner cartridge carefully.
- If toner scatters on your hands or clothes, immediately wipe or wash it off with cold water.
- To prevent damage to the machine from static electricity, DO NOT touch the electrodes shown in the illustration.
- To avoid print quality problems, DO NOT touch the shaded parts shown in the illustrations.
- We recommend that you clean the machine when you replace the consumables.
- See Cleaning on page 83.
- DO NOT unpack a spare toner cartridge until immediately before you put it into the machine.
- If toner cartridges are left unpacked for a long time the toner life may be shortened.
- DO NOT unpack a spare drum unit until immediately before you put it into the machine.
- If drum unit is exposed to sunlight or room light the unit may be damaged.
- While removing the drum unit, handle it carefully because it may contain toner.
- Note Be sure to seal up the used toner cartridge tightly in a suitable bag so that toner powder does not spill out of the cartridge.
- Go to http://www.brother.eu/recycle/ for instructions on how to return the used toner cartridge to the Brother collection program.
- If you choose not to return your used toner cartridge, please discard the used toner cartridge according to local regulations, keeping it separate from domestic waste.
- If you have questions, call your local waste disposal office.
- To ensure high quality printing, we recommend that you use only genuine Brother toner cartridges.
- When you want to buy toner cartridges, call your dealer.
- REPLACE TONER The machine will stop printing until you replace the toner cartridge.
- A new and unused original Brother toner cartridge will reset the REPLACE TONER mode.
- Replacing the toner cartridge Before you replace the toner cartridges, see Before replacing the consumable items on page 67.
- Make sure that the machine is turned on.
- Leave the machine for at least 10 minutes to cool down.
- Open the front cover.
- Take out the drum unit and toner cartridge assembly.
- IMPORTANT We recommend that you put the drum unit and toner cartridge assembly on a piece of disposable paper or cloth in case you accidentally spill or scatter toner.
- To prevent damage to the machine from static electricity, DO NOT touch the electrodes shown in the illustration.
- Push down the green lock lever and take the toner cartridge out of the drum unit.
- Unpack the new toner cartridge.
- Hold the cartridge level with both hands and gently shake it from side to side several times to spread the toner evenly inside the cartridge.
- Pull off the protective cover.
- Put the new toner cartridge firmly into the drum unit until you hear it lock into place.
- If you put it in properly, the green lock lever will lift automatically.
- Clean the primary corona wire inside the drum unit by gently sliding the green tab from right to left and left to right several times.
- Note Be sure to return the tab to the home position (a) (1).
- If you do not, printed pages may have a vertical stripe.
- Put the drum unit and toner cartridge assembly back into the machine.
- Close the front cover.
- Note DO NOT turn off the machine's power switch or open the front cover until the Ready LED lights up.
Replace toner
Instructions from the manualSelect toner Continue or Stop mode11 steps
- The printing operation varies depending on the machine setting: Default setting (Stop mode) The machine will stop printing until you replace the toner cartridge with a new one when the LEDs indicate REPLACE TONER.
- Continue mode To force the machine to continue printing after the LEDs indicate REPLACE TONER, press Go seven times to enter Continue mode (all the LEDs flash twice, and then the Ready LED turns on).
- The machine will continue printing until the LEDs indicate TONER ENDED.
- To return to the default setting (Stop mode), press Go seven times (all the LEDs flash once).
- Note Make sure that the front cover is closed before you change the mode.
- When the LEDs indicate an error mode, you cannot change the mode.
- If you continue printing in the Continue mode, we cannot guarantee the print quality.
- While using Continue mode the print may appear faint.
- Ready mode When you replace the toner cartridge with a new one, the machine returns to Ready mode.
- TONER ENDED The machine stops printing until you replace the toner cartridge with a new one.
- See Replacing the toner cartridge on page 71.
Drum unit
Instructions from the manualUnderstand drum life and drum replacement warnings15 steps
- Drum unit A new drum unit can print approximately 12,000 A4 or Letter size single-sided pages at 1 page / job.
- Note There are many factors that determine the actual drum life, such as the temperature, humidity, type of paper, type of toner used, number of pages per print job and so on.
- Under ideal conditions, the average drum life is estimated at approximately 12,000 pages.
- The actual number of pages that your drum will print may be significantly less than this estimate.
- Because we have no control over the many factors that determine the actual drum life, we cannot guarantee a minimum number of pages that will be printed by your drum.
- For best performance, use only genuine Brother toner.
- The machine should be used only in a clean, dust- free environment with adequate ventilation.
- Printing with a non-Brother drum unit may reduce not only the print quality but also the quality and life of the machine itself.
- Warranty coverage does not apply to problems caused by the use of a non-Brother drum unit.
- DRUM END SOON If the Drum LED flashes, it means the drum unit will need to be replaced soon.
- We recommend that you replace the drum unit with a new one before there is a noticeable deterioration in the print quality.
- REPLACE DRUM If the Drum LED is on, it means the drum unit should be replaced.
- Please replace it with a new Brother drum unit.
- DRUM STOP If the Drum and Error LEDs are on, it means the drum unit must be replaced.
- Replace it with a new Brother drum unit.
Replacing the drum unit
Instructions from the manualReplace an early-warning drum and reset its counter50 steps
This manual sequence starts with the Drum LED flashing. Current exact-model support also provides a sequence for the steady REPLACE DRUM indication. Reset the drum counter only when fitting a new drum, never for toner alone.
- Before replacing the consumable items Please read the following instructions before replacing the consumable items.
- WARNING DO NOT put a toner cartridge into a fire.
- It could explode, resulting in injuries.
- DO NOT use flammable substances, any type of spray or any organic solvent/liquids containing alcohol or ammonia to clean the inside or outside of the machine.
- Doing this may cause a fire or electrical shock.
- See Cleaning on page 83 for how to clean the machine.
- Be careful not to inhale toner.
- HOT SURFACE After you have just used the printer, some internal parts will be extremely hot.
- Wait at least 10 minutes for the printer to cool down before continuing to the next step.
- To prevent any degradation to the print quality, DO NOT touch the shaded parts shown in the illustrations.
- IMPORTANT Brother machines are designed to work with toner of a particular specification and will work to a level of optimum performance when used with genuine Brother branded toner cartridges.
- Brother cannot guarantee this optimum performance if toner or toner cartridges of other specifications are used.
- Brother does not therefore recommend the use of cartridges other than genuine Brother branded cartridges with this machine.
- If damage is caused to the drum unit or other part of this machine as a result of using other manufacturer’s products with this machine, any repairs required as a result may not be covered by the warranty.
- We recommend that you place the drum unit and toner cartridge assembly on a clean, flat surface with a piece of disposable paper underneath it in case you accidentally spill or scatter toner.
- Handle the toner cartridge carefully.
- If toner scatters on your hands or clothes, immediately wipe or wash it off with cold water.
- To prevent damage to the machine from static electricity, DO NOT touch the electrodes shown in the illustration.
- To avoid print quality problems, DO NOT touch the shaded parts shown in the illustrations.
- We recommend that you clean the machine when you replace the consumables.
- See Cleaning on page 83.
- DO NOT unpack a spare toner cartridge until immediately before you put it into the machine.
- If toner cartridges are left unpacked for a long time the toner life may be shortened.
- DO NOT unpack a spare drum unit until immediately before you put it into the machine.
- If drum unit is exposed to sunlight or room light the unit may be damaged.
- While removing the drum unit, handle it carefully because it may contain toner.
- Note Be sure to seal up the used toner cartridge tightly in a suitable bag so that toner powder does not spill out of the cartridge.
- Go to http://www.brother.eu/recycle/ for instructions on how to return the used toner cartridge to the Brother collection program.
- If you choose not to return your used toner cartridge, please discard the used toner cartridge according to local regulations, keeping it separate from domestic waste.
- If you have questions, call your local waste disposal office.
- To ensure high quality printing, we recommend that you use only genuine Brother toner cartridges.
- When you want to buy toner cartridges, call your dealer.
- Replacing the drum unit Before you replace the drum unit, see Before replacing the consumable items on page 67.
- When you replace the drum unit with a new one, you need to reset the drum counter by completing the following steps: Make sure that the machine is turned on and the Drum LED is flashing.
- Leave the machine for at least 10 minutes to cool down.
- Open the front cover.
- Take out the drum unit and toner cartridge assembly.
- IMPORTANT We recommend that you put the drum unit and toner cartridge assembly on a piece of disposable paper or cloth in case you accidentally spill or scatter toner.
- To prevent damage to the machine from static electricity, DO NOT touch the electrodes shown in the illustration.
- Push down the green lock lever and take the toner cartridge out of the drum unit.
- Unpack the new drum unit.
- Put the toner cartridge firmly into the new drum unit until you hear it lock into place.
- If you put the cartridge in properly, the green lock lever will lift automatically.
- Put the drum unit and toner cartridge assembly back into the machine.
- Do not close the front cover yet.
- Press and hold down Go for about 4 seconds until all the LEDs light up.
- Once all four LEDs are lit, release Go.
- IMPORTANT Do not reset the drum counter when you only replace the toner cartridge.
- Close the front cover.
- Make sure that the Drum LED is now off.
Cleaning
Instructions from the manualClean the printer safely8 steps
- Cleaning Clean the outside and inside of the machine regularly with a dry, lint-free cloth.
- When you replace the toner cartridge or the drum unit, make sure that you clean the inside of the machine.
- If printed pages are stained with toner, clean the inside of the machine with a dry, lint-free cloth.
- WARNING DO NOT use flammable substances, any type of spray or any organic solvent/liquid that contains alcohol or ammonia to clean the inside or outside of the machine.
- Doing this may cause a fire or electrical shock.
- Be careful not to inhale toner.
- IMPORTANT Use neutral detergents.
- Cleaning with volatile liquids such as thinner or benzine will damage the surface of the machine.
Cleaning the outside of the machine
Instructions from the manualClean the outside of the machine10 steps
- Cleaning the outside of the machine Turn off the machine's power switch.
- Disconnect all cables, and then unplug the power cord from the AC power outlet.
- Pull the paper tray completely out of the machine.
- Wipe the outside of the machine with a dry, lint-free cloth to remove dust.
- Remove all the paper, and anything that is stuck inside, from the paper tray.
- Wipe the inside of the paper tray with a dry, lint-free cloth to remove dust.
- Put the paper back in the paper tray.
- Put the paper tray back in the machine.
- Plug the machine's power cord back into the AC power outlet first, and then reconnect all cables.
- Turn on the machine's power switch.
Cleaning the corona wire
Instructions from the manualClean the corona wire9 steps
- Cleaning the corona wire If you have print quality problems, clean the corona wire as follows: Open the front cover and leave the machine for at least 10 minutes to cool down.
- Take out the drum unit and toner cartridge assembly.
- IMPORTANT We recommend that you put the drum unit and toner cartridge assembly on a piece of disposable paper or cloth in case you accidentally spill or scatter toner.
- To prevent damage to the machine from static electricity, DO NOT touch the electrodes shown in the illustration.
- Clean the primary corona wire inside the drum unit by gently sliding the green tab from right to left and left to right several times.
- Note Be sure to return the tab to the home position (a) (1).
- If you do not, printed pages may have a vertical stripe.
- Put the drum unit and toner cartridge assembly back into the machine.
- Close the front cover.
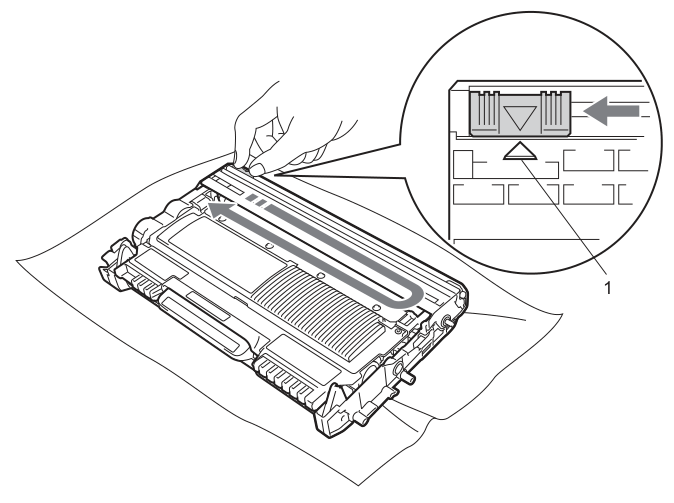
Diagram key
- Curved movement arrow: Gently slide the green tab right to left and left to right several times.
- Left arrow in enlarged view: Slide the same green tab during cleaning.
- 1: Home position for the green tab.
- Triangle on the tab: Align the tab with the home-position triangle after cleaning.
- Triangle on the housing: Home-position marker.
Cleaning the drum unit
Instructions from the manualRun the automatic drum cleaning procedure15 steps
HL-2135W has no manual feed slot cover. The shared illustrations show HL-2270DW.
- For white or black spots at 94 mm (3.71 in.) intervals, prepare blank A4 or Letter paper and wait for Ready.
- Open the front and back covers.
- Confirm that both green envelope levers are up.
- Press Go five times and close the front cover; wait until Ready turns on for drum cleaning.
- HL-2135W has no manual-feed slot cover to open.
- Use both hands to set the guides to paper width, then feed one blank sheet until the roller grabs it and let go.
- Ready flashes during cleaning.
- Reverse OPC rotation makes a mechanical noise; this is normal.
- Feed only one sheet, straight and correctly positioned, to avoid a skewed print or jam.
- Any size other than A4 or Letter stops cleaning and is ejected.
- Do not close the back cover during cleaning: it stops cleaning, ejects the sheet and may cause a jam.
- A print job received before feeding the sheet stops cleaning and prints that job.
- Wait until the machine returns to Ready.
- Repeat from opening both covers through completed cleaning two more times, each with a new blank sheet.
- Discard the used paper.
Manually clean persistent drum marks21 steps
- If the problem is not solved yet, follow the steps below: Turn off the machine's power switch.
- Disconnect all the cables, and then unplug the power cord from the AC power outlet.
- Leave the machine turned off for at least 10 minutes to cool down.
- Open the front cover.
- Take out the drum unit and toner cartridge assembly.
- IMPORTANT We recommend that you put the drum unit and toner cartridge assembly on a piece of disposable paper or cloth in case you accidentally spill or scatter toner.
- To prevent damage to the machine from static electricity, DO NOT touch the electrodes shown in the illustration.
- Push down the green lock lever and take the toner cartridge out of the drum unit.
- IMPORTANT To avoid print quality problems, DO NOT touch the shaded parts shown in the illustrations.
- Put the print sample in front of the drum unit, and find the exact position of the poor print.
- Turn the drum unit gear by hand while looking at the surface of the OPC drum (1).
- When you have found the mark on the drum that matches the print sample, wipe the surface of the OPC drum with a dry cotton swab until the dust or glue on the surface comes off.
- IMPORTANT DO NOT clean the surface of the photosensitive drum with a sharp object.
- Put the toner cartridge back into the drum unit until you hear it lock into place.
- If you put the cartridge in properly, the green lock lever will lift automatically.
- Open the front cover.
- Put the drum unit and toner cartridge assembly back into the machine.
- Put the paper tray firmly back in the machine.
- Close the front cover.
- Plug the machine's power cord back into the AC power outlet first, and then reconnect all cables.
- Turn on the machine's power switch.
Cleaning the paper pick-up roller
Instructions from the manualClean the paper pick-up roller11 steps
- Cleaning the paper pick-up roller If the paper pick-up roller is dirty, the machine may not feed paper.
- In that case, clean the paper pick-up roller as follows: Turn off the machine's power switch.
- Disconnect all cables, and then unplug the power cord from the AC power outlet.
- Pull the paper tray out of the machine.
- Remove all the paper, and anything that is stuck inside, from the paper tray.
- Tightly wring out a lint-free cloth soaked in lukewarm water, and then in the paper tray wipe the separator pad (1) to remove any dust.
- Wipe the two paper pick-up rollers (1) inside the machine.
- Put the paper back in the paper tray.
- Put the paper tray back in the machine.
- Plug the machine's power cord back into the AC power outlet first, and then reconnect all cables.
- Turn on the machine's power switch.
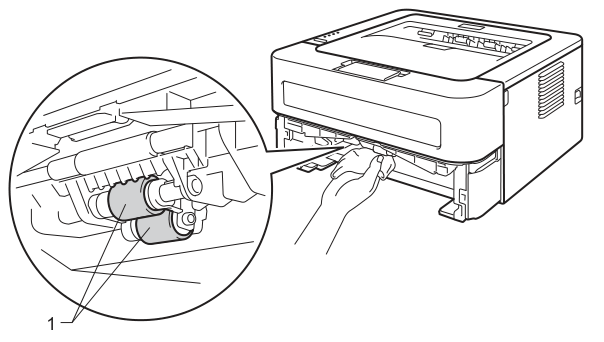
Diagram key
- 1: The two paper pick-up rollers inside the machine.
Packing and shipping the machine
Instructions from the manualPack and ship the machine19 steps
- Packing and shipping the machine Note If for any reason you must ship your machine, carefully repack the machine in the original packaging to avoid any damage during transit.
- The machine should be adequately insured with the carrier.
- Turn off the machine's power switch.
- Disconnect all the cables, and then unplug the power cord from the AC power outlet.
- Leave the machine turned off for at least 10 minutes to cool down.
- Open the front cover.
- Take out the drum unit and toner cartridge assembly.
- IMPORTANT We recommend that you put the drum unit and toner cartridge assembly on a piece of disposable paper or cloth in case you accidentally spill or scatter toner.
- To prevent damage to the machine from static electricity, DO NOT touch the electrodes shown in the illustration.
- Put the protective material in the machine with the "REMOVE" text to the left, as shown in the illustration.
- Put the drum unit and toner cartridge assembly back into the machine.
- Put the elastic band over the handle of the drum unit, as shown in the illustration.
- Close the front cover.
- Put the machine into the bag it originally came in.
- Put the styrofoam piece marked "RIGHT" on the right side of the machine.
- Put the styrofoam piece marked "LEFT" on the left side of the machine.
- Put the machine into the original carton.
- RIGHT LEFT Put the AC power cord and printed materials in the original carton as shown in the illustration.
- Close the carton and tape it shut.
Paper jams and how to clear them
Instructions from the manualClear paper jams25 steps
HL-2135W has no automatic duplex tray. The shared jam procedure steps j–m are for duplex models and are excluded; all applicable steps a–i and n–t, cautions and checks are retained.
- Keep both the toner cartridge and drum installed correctly.
- When adding paper, first remove all paper from the tray and straighten the stack to prevent multiple feeding.
- If a jam occurs, the Error LED flashes.
- Internal parts can be extremely hot: do not touch the shaded sensitive parts shown in the source illustrations.
- Open the front cover and leave the printer switched on for at least 10 minutes to cool.
- Slowly remove the drum and toner assembly; the jammed paper may come out with it or become accessible.
- If the assembly cannot be removed easily, do not force it; proceed directly to pulling out the paper tray.
- If it was removed, place it on disposable paper or cloth to contain toner, do not touch the electrodes because of static electricity, and close the front cover without reinstalling it yet.
- Pull the paper tray completely out and use both hands to slowly remove jammed paper.
- Open the back cover.
- Pull down the left and right tabs to open the fuser cover.
- Use both hands to gently remove paper from the fuser unit.
- Close the fuser cover and back cover.
- Insert the paper tray firmly.
- If the drum and toner assembly could not be removed earlier, remove it now before continuing.
- Push down the green lock lever and remove the toner cartridge from the drum.
- Clear any paper inside the drum unit.
- Handle toner carefully; immediately wipe or wash toner from hands or clothing with cold water, and do not touch the shaded sensitive parts.
- Refit the toner cartridge until it clicks; the green lock lever rises automatically when correctly seated.
- Open the front cover and reinstall the drum and toner assembly, then close the front cover.
- Confirm that Error is off and Ready is on.
- Once all jammed paper is removed, inserting the paper tray and then closing the front cover resumes printing automatically.
- If printing does not resume, press Go.
- If it still does not print, check that every remaining piece of jammed paper has been removed, then try again.
- The duplex-tray steps apply to other models and are absent from this HL-2135W procedure.
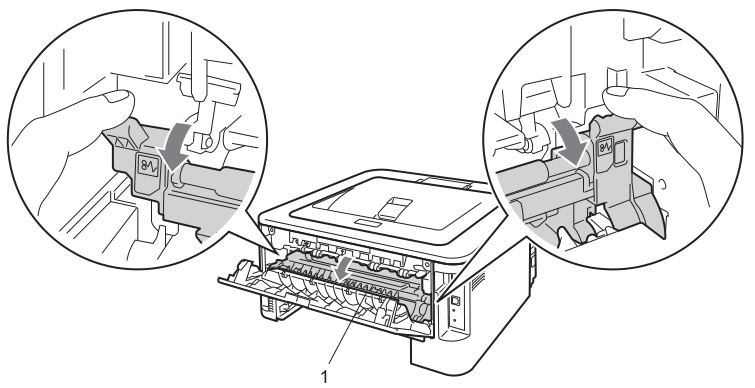
Diagram key
- Left downward arrow: Pull down the tab on the left-hand side.
- Right downward arrow: Pull down the tab on the right-hand side.
- Central downward arrow: Open the fuser cover after pulling down both side tabs.
- 1: Fuser cover.
Important information for choosing your paper
Instructions from the manualChoose and store laser-printer paper7 steps
- Before buying a large quantity, check that the paper is suitable for laser printers and test a small quantity.
- Brother recommends 75–90 g/m² paper, long-grain fibres and neutralized rather than acid paper.
- An acid-paper check pen distinguishes acid from neutral paper.
- Check the packaging for the print side and follow its instructions; the opening side of the ream package is usually the print side.
- Paper typically contains about 5% water by weight and may absorb about 10% in high humidity, impairing toner fixing.
- Brother recommends 50–60% surrounding humidity for storing and using paper.
- Unrecommended paper may cause jams or misfeeds.
Brother numbers
Instructions from the manualFind official product support and service4 steps
- For technical or operational help, contact the country where you bought the printer, from within that country.
- Use Brother’s official support site for driver updates, manuals, FAQs and troubleshooting tips.
- Register the product through Brother’s registration service.
- For European service centres, contact the local Brother office using the country selection on the official Brother site.
Installing bradmin light
Instructions from the manualInstall BRAdmin Light for historical Windows5 steps
- Turn on the printer and computer, then close running applications.
- Insert the supplied CD-ROM.
- Select the model and language if prompted.
- In the CD-ROM menu choose Install Other Drivers or Utilities, then BRAdmin Light and follow the on-screen instructions.
- Macintosh installation of the printer driver installs BRAdmin Light automatically.
Setting the ip address, subnet mask and gateway using bradmin light
Instructions from the manualConfigure the wireless IP address with BRAdmin Light10 steps
- Use the current Brother BRAdmin Light download when available.
- Advanced BRAdmin Professional 3 management is Windows-only.
- If firewall or antivirus protection is temporarily disabled during setup, configure or restore it after printing works.
- The default wireless node name is BRW followed by the printer MAC address, and the print-server default password is access.
- Start BRAdmin Light from Start > All Programs (Programs in Windows 2000) > Brother > BRAdmin Light, or on the historical Macintosh system from Library/Printers/Brother/Utilities/BRAdmin Light.jar.
- Let it search and double-click the unconfigured device.
- Factory-default devices without DHCP/BOOTP/RARP appear as Unconfigured.
- Find the node name and MAC address on the Printer Settings Page.
- Choose STATIC for Boot Method, enter IP Address, Subnet Mask and Gateway if needed, and click OK.
- The correctly addressed print server appears in the device list.
Other management utilities
Instructions from the manualUse supported network management utilities7 steps
- HTTP Web Based Management changes network settings in a standard browser.
- BRAdmin Professional 3 is a Windows-only utility for network configuration, firmware updates and activity logging in HTML, CSV, TXT or SQL.
- Use the latest version.
- Restore any temporarily disabled firewall or antivirus application after printing works.
- For locally connected printers, the Print Auditor Client gathers page counts, toner/drum status and firmware version over USB and passes them to BRAdmin Professional 3.
- BRPrint Auditor can send CSV/XML usage and status email reports or warning/error notifications when SMTP mail is available.
- Web BRAdmin is explicitly unavailable for HL-2135W; parallel and wired-printer instructions in the shared guide do not add those interfaces to this model.
Confirm your network environment
Instructions from the manualChoose infrastructure or ad-hoc wireless operation9 steps
- Infrastructure mode connects the printer and computers through a WLAN access point/router.
- A computer may itself use a cable to the router; the HL-2135W printer connection is wireless.
- Ad-hoc mode sends print jobs directly from a wireless computer to the printer without a central router.
- Brother does not guarantee ad-hoc wireless connection with Windows Server products.
- Before installation, consult the network administrator and record the SSID/ESSID and Network Key; the shared guide also discusses enterprise credentials, but HL-2135W support is limited to the personal authentication combinations in its supported-protocol table.
- Keep printer and access point close with minimal obstructions.
- Large files and interference may make USB preferable.
- This model has no Ethernet printer port.
- Reset previously configured printer network settings before configuring a different wireless network.
Before configuring the wireless settings
Instructions from the manualConfigure wireless with the supplied installer16 steps
- Contact the network administrator and record the network name, authentication, encryption and Network Key before starting.
- Reset existing network settings first.
- If security software is temporarily disabled, restore it after printing works.
- Use a temporary USB cable for HL-2135W; the shared guide’s temporary Ethernet method is only for HL-2270DW/HL-2275DW.
- Insert the CD-ROM.
- Windows: choose model/language, Install Printer Driver, accept the licence if you agree, choose Wireless Network Connection and Brother Peer-to-Peer Network Printer or Network Shared Printer.
- For a shared printer select its queue and OK; ask the administrator if its location/name is unknown.
- Select the firewall option and Next.
- For historical Vista/Windows 7 UAC choose Allow/Yes.
- If the menu does not open, run Start.exe at the CD-ROM root.
- Macintosh: choose Start Here OSX, model, Next, then Wireless Network Connection and Next.
- Choose the WPS/AOSS option if supported, otherwise choose No and follow the temporary-USB or ad-hoc instructions.
- Infrastructure supports Open with no encryption or WEP, Shared Key with WEP, WPA-PSK with TKIP/AES and WPA2-PSK with AES.
- Ad-hoc uses Open with no encryption or WEP.
- TKIP is supported for WPA-PSK only.
- Follow the installer screens through wireless setup, then Next and the printer-driver installation.
Configure the wireless settings
Instructions from the manualConnect ad-hoc using the historical SETUP network9 steps
- When ad-hoc setup requires a computer restart, restart and resume the installer from its CD-ROM opening step.
- You may temporarily change computer wireless settings as follows.
- Windows 7: Start > Control Panel > Network and Internet > Network and Sharing Center > Connect to a network; select SETUP and Connect.
- Once Identifying becomes Unidentified network, choose Wireless Network Connection (SETUP), then Details and check Network Connection Details.
- Windows Vista: Control Panel > Network and Internet > Network and Sharing Center > Connect to a network; choose SETUP, Connect Anyway and Close, then View status of Wireless Network Connection (SETUP), Details, and check the connection.
- Windows XP SP2: Start > Control Panel > Network and Internet Connections > Network Connections; right-click Wireless Network Connection, View Available Wireless Networks, select SETUP and Connect, then check connection status.
- It may take a few minutes for the address to change from 0.0.0.0 to 169.254.x.x, with x values 1–254.
- Macintosh: choose the AirPort status icon and select SETUP.
- Follow the installer’s wireless setup screens, then Next and printer-driver installation.
Using the one-push wireless setting mode to configure your machine for a wireless network
Instructions from the manualUsing the pin method of wi-fi protected setup
Instructions from the manualConnect using WPS PIN registration16 steps
- Consult the administrator.
- With the cord plugged in, turn on the printer and wait for Ready.
- Use a pointed object such as a ballpoint pen to hold the rear wireless setup button for at least three seconds.
- The printer prints an eight-digit PIN and searches for an access point for five minutes.
- On a computer already on the network, open the registrar/access-point IP address in a browser, enter its WPS setup page and register the printed PIN according to the router’s instructions.
- The registrar is normally the WLAN access point/router.
- If using a historical Windows Vista or Windows 7 computer as registrar, first register it to the network.
- Vista: Start > Network > Add a wireless device.
- Windows 7: Start > Devices and Printers > Add a device.
- Select the printer, Next, enter the printed PIN, Next, select the required network, Next and Close.
- Windows 7 can then install its driver through the prompts; for the full software package follow the setup guide.
- Ready stays on for five minutes after connection.
- On Connection Fail check the PIN and retry the button step; if repeated reset the print server and retry.
- On No Access Point move closer with minimal obstructions and retry, then reset if repeated.
- Read any TS error code on the automatically printed WLAN report.
- Choose Install Printer Driver on the CD-ROM after setup.
Reset the network settings to the factory default
Instructions from the manualReset all wireless print-server settings8 steps
- This resets stored network information, including the password and IP address.
- The guide also allows reset through BRAdmin or Web Based Management.
- Turn the printer off.
- Close the front cover and leave the power cord plugged in.
- Hold Go while turning on the power switch; keep holding until all LEDs light and Ready goes off.
- Release Go and confirm all LEDs are off.
- Press Go six times.
- All LEDs light to confirm reset, then the printer restarts.
Printing the printer settings page
Instructions from the manualPrint a network Printer Settings Page6 steps
- Close the front cover and plug in the power cord.
- Turn on the printer and wait for Ready.
- Press Go three times within two seconds.
- The page lists printer and print-server settings.
- The wireless node name is BRW followed by the printer MAC address.
- If the IP address is 0.0.0.0, wait one minute and print again.
Enabling or disabling the wireless network (for hl-2135w, hl-2270dw and hl-2275dw)
Instructions from the manualEnable or disable the wireless network6 steps
- Wireless is disabled by default.
- Plug in the cord, turn on the printer and wait for Ready.
- Hold Go for ten seconds, then release when a Network Configuration page prints.
- Releasing before ten seconds prints any stored reprint data instead.
- In the Node Type section beside IEEE 802.11b/g, Active means enabled and Inactive means disabled.
- BRAdmin and Web Based Management can also switch the wireless setting.
Printing the wlan report
Instructions from the manualPrint the WLAN status report3 steps
- Close the front cover, plug in the cord, turn on the printer and wait for Ready.
- Press Go five times within four seconds.
- Check the wireless status and follow the matching TS error topic if connection failed.
Overview
Instructions from the manualConfigure network settings in a browser8 steps
- Use TCP/IP with valid printer and computer IP addresses.
- The historical guide recommends Internet Explorer 6+, Firefox 3+ or Safari 3+ with JavaScript and cookies enabled; other browsers must support HTTP 1.0/1.1.
- Open the printer IP address with HTTP, then Network Configuration.
- DNS, NetBIOS or the printed node name can replace the address when enabled.
- Macintosh Status Monitor can open the management system from its printer icon.
- Enter admin and the factory password access, then OK.
- Change the print-server settings.
- After changing protocol settings, click Submit and restart the printer to activate them.
Security features
Instructions from the manualConfigure authenticated email notifications and reports13 steps
- The manual recommends disabling FTP and TFTP because their access is not secure.
- Set protocols through browser-based Network Configuration.
- These are historical source instructions, not a claim that this legacy printer meets current network-security standards.
- Open the printer HTTP address, Network Configuration, sign in with admin/access unless changed, then Configure Protocol.
- Open Advanced Setting for POP3/SMTP and ensure POP3/SMTP is enabled.
- Configure the mail settings, using the help text where needed.
- Click Submit and optionally follow the Test E-mail Send Configuration prompts.
- Match POP-before-SMTP or SMTP-AUTH to the mail server; ask the administrator or ISP.
- Enable SMTP-AUTH under SMTP Server Authentication Method when using it.
- If both methods are available the guide prefers SMTP-AUTH.
- POP-before-SMTP also requires POP3 settings and optionally APOP.
- The SMTP port can be changed to the ISP’s specified port, such as its port 587 example, when outbound port 25 is blocked.
- Web BRAdmin is unavailable for HL-2135W.
Secure management using bradmin professional 3
Instructions from the manualRestrict older BRAdmin management access6 steps
- Use the latest BRAdmin Professional 3.
- To block older management clients, open browser-based Configure Protocol > Advanced Setting for SNMP and disable older BRAdmin access.
- The guide defines older versions as BRAdmin Professional before 2.80, Web BRAdmin before 1.40 and Macintosh BRAdmin Light before 1.10.
- When managing old print servers together with newer ones, use a different password for each group.
- Web BRAdmin itself does not support HL-2135W.
- The old-server list in this security passage is a compatibility limitation, not a claim that this printer has those older server modules.
Unpack the machine and check the components
Instructions from the manualPosition the printer for initial setup11 steps
- Read Safety and Legal before setup.
- Check the Quick Setup Guide, Safety and Legal booklet, documentation/installation CD-ROM, AC power cord and pre-installed drum/toner assembly.
- Contents vary by country.
- Keep plastic packing bags away from babies and children and dispose of them properly to prevent suffocation.
- Keep at least 100 mm (4 in.) above and on each side of the printer, and 120 mm (4.72 in.) behind it.
- Save the original packaging.
- If shipping, repack in that packaging as described in the User’s Guide and insure adequately with the carrier.
- The shared drawings show HL-2270DW/HL-2275DW.
- An interface cable is not supplied.
- For this model use USB or wireless; use a USB 2.0 Type A/B cable no longer than 2 metres (6 feet).
- The shared Ethernet cable instruction belongs to the other models.
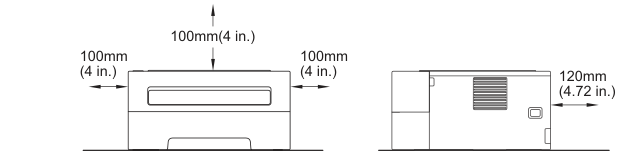
Diagram key
- Top clearance arrow: Keep at least 100 mm (4 in.) above the printer.
- Left clearance arrow: Keep at least 100 mm (4 in.) on the left.
- Right clearance arrow: Keep at least 100 mm (4 in.) on the right.
- Rear clearance arrow: Keep at least 120 mm (4.72 in.) behind the printer.
Remove the packing material from the machine
Instructions from the manualUnpack and install the drum and toner assembly8 steps
- Do not connect the AC power cord yet.
- Remove outside packing tape and the silica gel pack from the face-down output tray.
- Discard the silica pack; never eat it, and seek medical attention immediately if swallowed.
- Open the front cover.
- Lift the elastic band off the drum, then pull the paper strip to remove the protective material.
- Remove the drum and toner assembly.
- Gently shake it side to side several times to distribute toner evenly.
- Reinsert the assembly and close the front cover.
Load paper in the paper tray
Instructions from the manualLoad paper during initial setup8 steps
- Pull the paper tray completely out.
- Press the green guide-release lever and slide the guides to the loaded paper size, firmly engaging their slots.
- Fan the stack to prevent jams and misfeeds.
- Load paper below the maximum mark, print side down, with guides touching its sides.
- Overfilling causes jams.
- Reinsert the tray firmly and completely.
- Use the paper types and sizes approved in the User’s Guide.
- The shared Legal/Folio extension instruction is region-limited; these are not tray sizes for the reviewed UK model.
Install the printer driver
Instructions from the manualInstall the historical Windows USB driver11 steps
- Turn on the computer, log on with administrator rights and close running programs.
- Turn the printer off and disconnect any USB cable from it before starting driver installation.
- Insert the installation CD-ROM and select model/language if prompted.
- If its screen does not open, use My Computer (Computer), double-click the CD-ROM and start.exe.
- Click Install Printer Driver and Yes if you accept the licence.
- For Vista/Windows 7 UAC choose Allow or Yes.
- Follow the screens until prompted to connect.
- Connect the USB cable to the printer USB connector and computer, turn on the printer and follow the screens to complete setup.
- Allow any required Windows Security/antivirus prompt.
- The guide recommends the XML Paper Specification driver for applications using those documents, available from Brother.
- Screens vary by operating system.
Install the historical Macintosh USB driver8 steps
- Log on to the switched-on Macintosh with administrator rights and plug in the printer.
- The guide covers Mac OS X 10.4.11–10.6.x; upgrade older 10.4.0–10.4.10 and check Brother for applicable drivers.
- Connect the USB cable directly between printer and Macintosh, not a keyboard port or unpowered USB hub.
- Turn on the printer.
- Insert the CD-ROM, double-click Start Here OSX and follow its instructions.
- Installation may take a few minutes.
- Choose the printer from the list and OK, then Next when prompted.
- Make the Brother Support selection and follow the screens to finish.
Before you begin
Instructions from the manualPrepare infrastructure wireless installation11 steps
- Consult the administrator before connecting.
- Configure wireless settings before installing the driver.
- For existing printer network settings, first perform the reviewed network-factory-reset procedure.
- Place the printer near its access point with minimal obstructions; large files, walls and interference can slow transfers and USB may be preferable.
- Record the SSID and Network Key from router documentation, router manufacturer, system administrator or ISP.
- The initial SSID can be its manufacturer/model name.
- Brother cannot locate these security settings for you; obtain them before seeking setup assistance.
- The key may be called Password, Security Key or Encryption Key.
- Choose automatic WPS/AOSS if the router supports it, otherwise manual temporary-USB setup.
- WPS PIN is documented separately in the Network User’s Guide.
- Infrastructure uses a WLAN access point/router; printer Ethernet and the shared one-network-at-a-time note are for HL-2270DW/HL-2275DW.
Configure the wireless settings and install the printer driver
Instructions from the manualInstall Windows wireless with automatic WPS or AOSS19 steps
- Confirm router support for WPS/AOSS and place the printer within its range.
- Turn on the printer.
- Insert the CD-ROM.
- Select model/language if prompted.
- If needed open the CD-ROM from My Computer (Computer) and run start.exe.
- Choose Install Printer Driver, accept the licence if you agree, then Wireless Network Connection and Next.
- Choose Brother Peer-to-Peer Network Printer and Next, the firewall option and Next, and Yes, my Access Point supports WPS or AOSS and I want to use them, then Next.
- For Vista/Windows 7 UAC choose Allow/Yes.
- With a pointed object such as a ballpoint pen, press the rear wireless setup button for less than two seconds.
- Holding three seconds or more selects PIN mode instead.
- The printer searches for WPS/AOSS for two minutes.
- Activate WPS/AOSS on the router as its instructions describe.
- Read the resulting LEDs and automatically printed WLAN report.
- If connection fails, use the matching TS error instructions.
- Click Next, confirm completion with the checkbox and Next.
- Do not cancel any driver-installation screen; follow the screens to finish.
- If assigning a particular IP address, use BRAdmin Light to set Boot Method to Static.
- Allow any required security/antivirus prompt.
- Use Brother’s latest XML Paper Specification driver for applications using those documents.
Install Macintosh wireless with automatic WPS or AOSS17 steps
- Confirm router support for WPS/AOSS and place the printer within its range.
- Turn on the printer.
- Insert the CD-ROM.
- Double-click Start Here OSX and follow the screens.
- Choose Wireless Network Connection, Next, then Yes, my Access Point supports WPS or AOSS and I want to use them, and Next.
- With a pointed object such as a ballpoint pen, press the rear wireless setup button for less than two seconds.
- Holding three seconds or more selects PIN mode instead.
- The printer searches for WPS/AOSS for two minutes.
- Activate WPS/AOSS on the router as its instructions describe.
- Read the resulting LEDs and automatically printed WLAN report.
- If connection fails, use the matching TS error instructions.
- Click Next, confirm completion with the checkbox and Next.
- Do not cancel any driver-installation screen; follow the screens to finish.
- If assigning a particular IP address, use BRAdmin Light to set Boot Method to Static.
- If several same-model printers appear, distinguish their MAC addresses; scroll right to see the IP address.
- Both addresses can be found on the Printer Settings Page.
- Make the Brother Support selection and complete the screens.
Install Windows wireless using a temporary USB cable25 steps
- Have the recorded SSID and Network Key ready and obtain a temporary USB cable, which is not supplied.
- The Ethernet branch applies only to HL-2270DW/HL-2275DW.
- Insert the CD-ROM, choose model/language, run start.exe from the CD if necessary, Install Printer Driver and accept the licence if you agree.
- Choose Wireless Network Connection, Next, Brother Peer-to-Peer Network Printer, Next, then the firewall option and Next.
- Choose No and Next.
- For Vista/Windows 7 UAC choose Allow/Yes.
- Read Important Notice, confirm the SSID/Network Key checkbox and Next.
- Choose Temporarily use a USB cable (Recommended), Next, and connect the USB cable directly between computer and printer.
- If the confirmation screen already lists the required SSID, check it, select Yes if connecting to it, and Next.
- Otherwise select the required SSID from the available networks and Next.
- If none appear, check that the router is on, broadcasting its SSID and within range, then Refresh.
- For a hidden SSID use Advanced and enter its name as the screens instruct.
- If no authentication/encryption is configured, click OK and continue.
- Otherwise enter Network Key and Confirm Network Key, then Next.
- Click Next to send settings to the printer; Cancel leaves them unchanged.
- To change the IP address manually, choose Change IP Address and enter the required network values.
- If USB wireless setup fails, Retry and restart from network selection.
- Check the automatically printed WLAN report.
- Select the matching Connection:OK or Connection:Failed status, Next, then Finish.
- For failure, check its TS code and retry setup.
- Disconnect the temporary USB cable when prompted, then Next.
- Do not cancel driver-installation screens; follow them to completion.
- Set Boot Method to Static in BRAdmin Light if specifying a fixed IP address.
- Allow required security/antivirus prompts.
- The guide recommends Brother’s latest XML Paper Specification driver for applications using those documents.
Install Macintosh wireless using a temporary USB cable24 steps
- Have the recorded SSID and Network Key ready and obtain a temporary USB cable, which is not supplied.
- The Ethernet branch applies only to HL-2270DW/HL-2275DW.
- Turn on the Macintosh, insert the CD-ROM and double-click Start Here OSX.
- Choose Wireless Network Connection and Next, then No and Next.
- Read Important Notice, confirm the SSID/Network Key checkbox and Next.
- Choose Temporarily use a USB cable (Recommended), Next, and connect the USB cable directly between computer and printer.
- If the confirmation screen already lists the required SSID, check it, select Yes if connecting to it, and Next.
- Otherwise select the required SSID from the available networks and Next.
- If none appear, check that the router is on, broadcasting its SSID and within range, then Refresh.
- For a hidden SSID use Advanced and enter its name as the screens instruct.
- If no authentication/encryption is configured, click OK and continue.
- Otherwise enter Network Key and Confirm Network Key, then Next.
- Click Next to send settings to the printer; Cancel leaves them unchanged.
- To change the IP address manually, choose Change IP Address and enter the required network values.
- If USB wireless setup fails, Retry and restart from network selection.
- Check the automatically printed WLAN report.
- Select the matching Connection:OK or Connection:Failed status, Next, then Finish.
- For failure, check its TS code and retry setup.
- Disconnect the temporary USB cable when prompted, then Next.
- Do not cancel driver-installation screens; follow them to completion.
- Set Boot Method to Static in BRAdmin Light if specifying a fixed IP address.
- If same-model printers are listed, identify by MAC address; scroll right for IP.
- Find both on the Printer Settings Page.
- Make the Brother Support selection and follow the remaining screens.
Printer led indications
Instructions from the manualRead setup LED indications and blink timings16 steps
- The setup table depicts all four LEDs off when the printer is off.
- In Sleep or Deep Sleep, only Ready is dimmed; in Ready, only Ready is on.
- Warming up or cooling down flashes Ready on and off at 1-second intervals.
- Receiving data or remaining data flashes Ready on and off at 0.5-second intervals.
- Toner Low flashes Toner on for 2 seconds and off for 3 seconds, with Ready on.
- Replace Toner in the table’s Stop mode has Toner on and all other LEDs off; Toner Ended has Toner and Error on, Drum and Ready off.
- Drum End Soon flashes Drum on for 2 seconds and off for 3 seconds, with Ready on.
- Replace Drum has Drum and Ready on, Toner and Error off.
- Cover Open or Paper Jam flashes Error at 0.5-second intervals, with the other LEDs off.
- No Paper has Error on and the other LEDs off.
- Drum Error flashes Drum and Error at 0.5-second intervals, with Toner and Ready off.
- Drum Stop has Drum and Error on, Toner and Ready off.
- Service call error flashes all LEDs at 0.5-second intervals.
- The table refers to the complete User’s Guide remedies.
- Pressing Go seven times selects toner Continue mode, makes all LEDs flash twice and then turns Ready on; printing continues until Toner Ended.
- Preserve the operation guide’s precautions for changing this mode.
Choosing a location
Instructions from the manualChoose a safe location7 steps
- Place the printer on a flat, level, stable surface without vibration or shocks, near a grounded electrical socket.
- Keep the temperature between 10°C and 32.5°C and humidity between 20% and 80%, without condensation.
- Avoid direct sunlight, excessive heat, flames, corrosive gases, moisture, dust, heaters, air conditioners, desk fans, refrigerators, water, chemicals and high-traffic areas.
- Leave roughly 100 mm between ventilation holes and a wall.
- Avoid switched/timed sockets and circuits with large appliances.
- Keep cables from causing a trip hazard, and avoid interference sources.
- Discard the silica pack; do not eat it, and seek medical attention immediately if swallowed.
To use the product safely
Instructions from the manualUse the printer safely9 steps
- Unplug the power cord before cleaning inside the printer.
- Do not handle the plug with wet hands; insert it fully.
- Keep an easily accessible electrical socket nearby so that power can be disconnected completely in an emergency.
- Keep plastic packing bags away from babies and children and dispose of them properly.
- Do not use flammable substances near the printer or sprays to clean it.
- Do not vacuum scattered toner: use a dry, lint-free soft cloth and dispose of the toner according to local regulations.
- Avoid inhaling toner.
- After use, internal parts can be extremely hot; do not touch the shaded parts shown in the safety illustrations when opening front or rear covers.
- Do not remove or damage internal warning labels.
Important safety instructions
Instructions from the manualFollow important safety instructions17 steps
- Read and save all safety instructions, and follow every warning and instruction marked on the printer.
- Unplug it before cleaning inside; do not use liquid or aerosol cleaners, and use a dry, lint-free soft cloth.
- Do not place it on an unstable cart, stand or table.
- Keep all casing ventilation openings clear: do not set it on a bed, sofa, rug or similar surface, near or over a radiator or heater, or in a built-in installation without adequate ventilation.
- Use an AC source within the rating-label range; never use DC or an inverter, and consult a qualified electrician if unsure.
- The three-wire grounded plug must connect to a grounded outlet; if it will not fit, have an electrician replace the obsolete outlet, and never defeat the grounding.
- Use only the supplied power cord.
- Do not rest objects on it or place it where people can walk on it.
- Use a well-ventilated area.
- Brother strongly recommends not using any extension cord.
- The power cord, including extensions, must be no longer than 5 metres (16.5 feet); do not share its circuit with high-powered appliances such as an air conditioner, copier or shredder.
- Keep the printed-page path clear, and wait until pages have exited before picking them up.
- Unplug the printer and refer service to Brother Authorized Service Personnel if the cord is damaged or frayed, liquid enters it, it is exposed to rain or water, it does not work normally when the operating instructions are followed, it is dropped or its casing is damaged, or its performance changes distinctly.
- Adjust only controls covered by the operating instructions; other adjustments may damage it and require extensive qualified repair.
- Brother recommends a surge protector.
- Do not use it near water-using appliances, a swimming pool, in a wet basement, during an electrical storm, or near a gas leak.
- The telephone gas-leak-reporting condition in the shared source is MFC-only and does not apply to this printer.
Disconnect device
Instructions from the manualDisconnect the printer in an emergency2 steps
- Disconnect device This product must be installed near an electrical socket that is easily accessible.
- In case of emergencies, you must disconnect the power cord from the electrical socket to shut off power completely.
Iec60825-1:2007 specification (for 220-240v models only)
Instructions from the manualProtect against laser exposure3 steps
- For 220–240 V models, the product is a Class 1 laser product.
- The internal Class 3B diode emits invisible laser radiation in the scanner unit; never open that unit.
- Do not use controls, adjustments or procedures other than those specified in the manual: hazardous radiation exposure may result.
Wiring information (u.k. only)
Instructions from the manualCheck UK plug fuse and earthing requirements6 steps
- Wiring information (U.K. only) If you need to replace the plug fuse, fit a fuse that is approved by ASTA to BS1362 with the same rating as the original fuse.
- Always replace the fuse cover.
- Never use a plug that does not have a cover.
- If in any doubt, call a qualified electrician.
- Warning -This product must be earthed.
- The wires in the mains lead are coloured in line with the following code: Green and Yellow: Earth Blue: Neutral Brown: Live
Eu directive 2002/96/ec and en50419
Instructions from the manualDispose of the equipment separately3 steps
- EU Directive 2002/96/EC and EN50419 This equipment is marked with the above recycling symbol.
- It means that at the end of the life of the equipment you must dispose of it separately at an appropriate collection point and not place it in the normal domestic unsorted waste stream.
- This will benefit the environment for all. (European Union only)
Open source licensing remarks
Instructions from the manualFind software licensing information4 steps
- Open Source Licensing Remarks This product includes open-source software.
- Please see Open Source Licensing Remarks and Copyright information on the supplied CD-ROM. (For Windows®) “X:\License.txt” (where X is your drive letter). (For Macintosh) Double-click the CD-ROM icon on your desktop.
- Then double-click the Utilities icon.
- License.rtf will appear.
Ip addresses, subnet masks and gateways
Instructions from the manualChoose supported network address settings4 steps
- Use a printer IP address and subnet mask on the same logical network as the host computers, or correctly configure the subnet mask and gateway for routed communication.
- Ask the administrator for an unknown gateway.
- A DHCP/BOOTP/RARP server can assign the address; otherwise APIPA uses 169.254.1.0–169.254.254.255.
- The glossary’s generic LCD menus and unsupported model features do not apply to this printer.
Ssid (service set identifier) and channels
Instructions from the manualConfigure personal wireless network keys7 steps
- Match the access point SSID/ESSID, up to 32 bytes, and use a channel allowed in the country of purchase.
- Configure the authentication and encryption actually supported in the HL-2135W Network User’s Guide; generic enterprise methods in the glossary do not establish model support.
- For WEP, a 64/40-bit ASCII key has five case-sensitive text characters or a hexadecimal key ten hex digits.
- A 128/104-bit ASCII key has thirteen case-sensitive characters or a hexadecimal key twenty-six hex digits.
- WPA-PSK/WPA2-PSK uses a key of 8–63 characters.
- The model’s setup guide limits WEP to the first configured key.
- These are historical compatibility specifications.
Network printing installation when using web services (windows vista® and windows® 7)
Instructions from the manualInstall a historical Windows Web Services printer8 steps
- First configure the printer IP address and ensure the host and printer share a subnet or a router correctly passes data.
- Windows Server 2008 requires Print Services.
- Web Services installs printer support only.
- Insert the installation CD-ROM and browse to install/driver/gdi/32 or 64, choose the language and double-click DPInst.exe.
- For UAC choose Allow in Vista or Yes in Windows 7.
- Vista: Start > Network.
- Windows 7: Start > Control Panel > Network and Internet > View network computers and devices.
- Right-click the printer identified by model name and MAC address, then Install.
Network printing installation for infrastructure mode when using vertical pairing (windows® 7)
Instructions from the manualInstall through historical Windows 7 Vertical Pairing8 steps
- Enable Web Services if it was switched off, using browser management or BRAdmin Professional 3; its default is on.
- Confirm Windows 7 compatibility logos for the router, computer and any external wireless NIC, consulting their manufacturers if uncertain.
- Register a computer used as registrar to the network first.
- Turn on the printer and initiate its reviewed WPS PIN method.
- On Windows 7 choose Start > Devices and Printers > Add a device.
- Choose the printer and enter its printed PIN.
- Choose the infrastructure network and Next.
- Appearance in Devices and Printers confirms wireless configuration and driver installation.
Using dhcp to configure the ip address
Instructions from the manualUse DHCP or a static network boot method3 steps
- A DHCP server automatically provides the print server IP address and registers its name with compliant RFC1001/1002 dynamic name services.
- To prevent DHCP/BOOTP/RARP assignment, set Boot Method to Static using BRAdmin or browser management.
- This printer has no LCD Network menu.
Using rarp to configure the ip address
Instructions from the manualConfigure a wireless IP address through RARP5 steps
- For advanced administrators: add an /etc/ethers entry binding the actual printer MAC address to its BRW node name; use the same name in /etc/hosts.
- The printed example is 00:80:77:31:01:07 BRW008077310107; substitute the actual device values.
- Start the host RARP daemon if necessary; its command may be rarpd, rarpd -a, in.rarpd -a or another system-specific form, so consult man rarpd or the host documentation.
- To check it on Berkeley UNIX use ps -ax | grep -v grep | grep rarpd; on AT&T UNIX use ps -ef | grep -v grep | grep rarpd.
- Powering on the printer obtains its address from the daemon.
Using bootp to configure the ip address
Instructions from the manualConfigure a wireless IP address through BOOTP8 steps
- For administrators: install and run BOOTP on the host; check its /etc/services entry and consult man bootpd or system documentation.
- It is commonly started from /etc/inetd.conf; remove the leading # from its bootp entry to enable it.
- The service may instead be named bootps.
- Edit the host’s BOOTP configuration, usually /etc/bootptab, with the actual BRW printer node name, network type, MAC address, IP address, subnet mask and gateway.
- Formats vary, so use the host documentation and template examples.
- The manual’s BRN examples become BRW for wireless.
- If the implementation requires a download filename, create an empty host file and specify its full path.
- Power on the printer to obtain the BOOTP address.
Using apipa to configure the ip address
Instructions from the manualCheck APIPA fallback addressing2 steps
- When DHCP is unavailable, enabled-by-default APIPA chooses an address from 169.254.1.0–169.254.254.255, sets subnet mask 255.255.0.0 and gateway 0.0.0.0.
- Use BRAdmin Light or browser management to disable APIPA if required; the generic LCD-menu method is inapplicable.
Using arp to configure the ip address
Instructions from the manualSet an initial IP address using ARP8 steps
- For administrators unable to use BRAdmin and without DHCP: the host and printer must be on the same network segment with no router between them.
- If an administrator already supplies BOOTP/DHCP/RARP, this command is unnecessary.
- At the host command prompt use arp -s ipaddress ethernetaddress followed by ping ipaddress, substituting the required address and actual printer MAC address.
- Windows uses hyphens between MAC bytes, for example arp -s 192.168.1.2 00-80-77-31-01-07 and ping 192.168.1.2.
- UNIX/Linux normally uses colons, for example arp -s 192.168.1.2 00:80:77:31:01:07 and ping 192.168.1.2.
- ARP address setup works only once.
- After successful assignment later ARP changes are ignored; use the model’s supported browser management, or factory-reset the print server before using ARP again.
- The generic TELNET alternative is not established by the HL-2135W supported-protocol list.
Set a device
Instructions from the manualSelect the printer in historical Apple iPrint&Scan6 steps
- Install the current applicable Brother iPrint&Scan from the App Store on Apple devices or Google Play on Android; use the supported Wi-Fi setup from the printer Quick Setup Guide.
- Shared mobile connection methods vary by model.
- This printer is print-only and its supported interface list does not provide scanning, fax, NFC, Bluetooth, Wi-Fi Direct or Google Cloud Print.
- If another machine or No Device Selected appears, tap the model name/No Device Selected and select the printer.
- If absent, use Set Manually and enter its IP address.
- Swipe the list to refresh on Apple devices.
Select the printer in historical Android iPrint&Scan5 steps
- Install the current applicable Brother iPrint&Scan from the App Store on Apple devices or Google Play on Android; use the supported Wi-Fi setup from the printer Quick Setup Guide.
- Shared mobile connection methods vary by model.
- This printer is print-only and its supported interface list does not provide scanning, fax, NFC, Bluetooth, Wi-Fi Direct or Google Cloud Print.
- If another machine or No Device Selected appears, tap the model name/No Device Selected and select the printer.
- If absent, use Set Manually and enter its IP address.
Edit an image
Instructions from the manualEdit an image in historical Apple iPrint&Scan4 steps
- Tap the pencil Edit icon.
- For scaling, select Scale and move the size control or pinch open/closed to resize, then drag the image to reposition it.
- Select rotation/angle, tap Rotate for a 90-degree clockwise turn and drag the angle control left or right to adjust.
- Select Crop, move its boundary control to set the area and drag the area to reposition it.
Edit an image in historical Android iPrint&Scan4 steps
- Tap the pencil Edit icon.
- For scaling, select Scale and move the size control to resize, then drag the image to reposition it.
- Select rotation/angle, tap Rotate for a 90-degree clockwise turn and drag the angle control left or right to adjust.
- Select Crop, move its boundary control to set the area and drag the area to reposition it.
Print photos stored on your mobile device
Instructions from the manualPrint stored photos with historical Apple iPrint&ScanView
Print stored photos with historical Android iPrint&ScanView
Print documents
Instructions from the manualPrint documents with historical Apple iPrint&ScanView
Print documents with historical Android iPrint&Scan4 steps
- Tap the blue Print icon, Documents, then the required file on the device memory card.
- Tap Print.
- Use the gear Settings icon to change Print Settings.
- The guide excludes files with Password Security, a 256-bit AES PDF encryption level, or Printing Allowed set to None or Low Resolution (150dpi).
Print using cloud services
Instructions from the manualPrint cloud files with historical Apple iPrint&Scan4 steps
- In the historical app, tap the blue Print icon, Cloud Services, choose the service and sign in.
- Select the required file or note and Print.
- Use gear Settings for Print Settings or pencil Edit to edit.
- This is the app’s service workflow, not a claim that the printer supports Google Cloud Print or that a historical service is still available.
Print cloud files with historical Android iPrint&Scan4 steps
- In the historical app, tap the blue Print icon, Cloud Services, choose the service and sign in.
- Select the required file or note and Print.
- Use gear Settings for Print Settings or pencil Edit to edit.
- This is the app’s service workflow, not a claim that the printer supports Google Cloud Print or that a historical service is still available.
Print web pages
Instructions from the manualPrint web pages with historical Apple iPrint&ScanView
Print web pages with historical Android iPrint&ScanView
Add a bookmark to a web page
Instructions from the manualManage bookmarks in historical Apple iPrint&Scan6 steps
- Navigate to the page, tap the bookmark/add icon shown in the guide, then Save.
- To edit bookmarks, tap the open-book Bookmarks icon and Edit.
- To delete, tap the red minus icon and Delete.
- To rename, tap its title, edit and Save.
- Tap Done.
- The page-located original icon figures were visually checked.
Clear your entire browsing history
Instructions from the manualClear history in historical Apple iPrint&ScanView
Print data from the clipboard
Instructions from the manualPrint clipboard data with historical Apple iPrint&ScanView
Print photos taken with brother iprint&scan
Instructions from the manualPrint a camera photo with historical Apple iPrint&ScanView
Print photos or documents from other applications
Instructions from the manualPrint from other apps with historical Apple iPrint&Scan4 steps
- Open the required file in Brother iPrint&Scan.
- For example in Safari viewing a PDF, tap Open in… and choose Brother iPrint&Scan.
- Tap Print.
- Use gear Settings to change Print Settings.
Clear your browsing history
Instructions from the manualClear history in historical Android iPrint&ScanView
Print email messages
Instructions from the manualPrint Gmail with historical Android iPrint&Scan5 steps
- In the historical Gmail account workflow tap the blue Print icon, Email, then the message.
- Tap Print Preview and Print.
- Tap the tag-shaped message icon to display other messages.
- Use gear Settings on the home screen for Account Settings or in the print screen for Print Settings.
- This documents the supplied edition, not ongoing Gmail/app service compatibility.
Print from other applications
Instructions from the manualControls and parts
See the manual diagrams 1 diagram
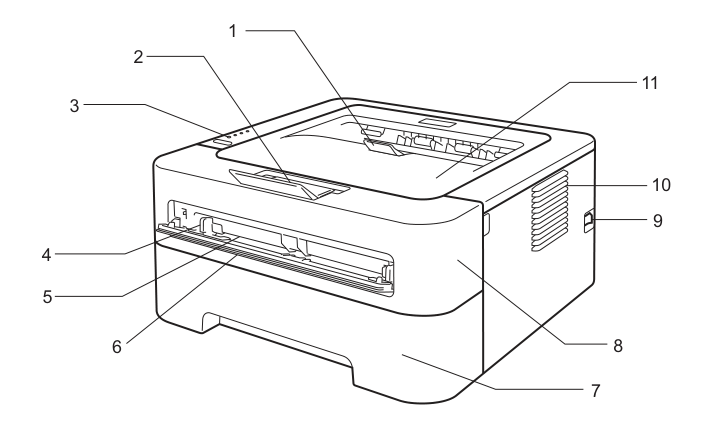
Diagram key
- 1: Face-down output tray support flap 2.
- 2: Face-down output tray support flap 1.
- 3: Control panel.
- 4: Manual feed paper guide.
- 5: Manual feed slot.
- 6: Manual feed slot cover, not available on HL-2130, HL-2132, HL-2135W or HL-2220.
- 7: Paper tray.
- 8: Front cover.
- 9: Power switch.
- 10: Ventilation hole.
- 11: Face-down output tray.
Model details
Model and compatibility
- Connection
- Hi-speed USB 2.0 and IEEE802.11b/g wireless (infrastructure or ad-hoc); no wired Ethernet printer interface. 16 MB memory.
- Paper capacity
- Tray 1: up to 250 sheets of 80 g/m² paper. Manual feed: one sheet.
- Duplex
- Manual duplex only; no automatic duplex tray.
- UK consumables
- TN-2010 toner cartridge and DR-2200 drum unit. Standard toner yield is approximately 1,000 A4/Letter pages under ISO/IEC 19752. Drum yield is approximately 12,000 A4/Letter pages at one page per job, varying by use.
- Controls
- Four LEDs: Toner, Drum, Error and Ready, with Go button. Go also enables/disables wireless on HL-2135W. No LCD display.
Related reviewed instructions
Manuals and sources
- Brother HL-2135W printer guide
- Brother model support and details
- Brother manual download listing
- Brother HL-2135W network guide
- Brother HL-2135W setup guide
- Brother HL-2135W safety guide
- Brother glossary guide
- Brother ios guide
- Brother android guide
- Brother printer EC declaration of conformity
- Brother supplies EC declaration of conformity
- Brother supplies UK declaration of conformity
- Brother HL-2135W Network Connection Repair Tool instructions