MODEL REFERENCE
Brother MW-140BT
14 errors · 8 troubleshooting topics · 51 guides
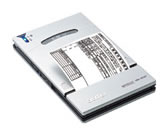
The checks and guides below come from the official manuals for this model.
No matches for this wording. Try a light name, error code or a shorter phrase.
Errors and indicators
Light patterns and messages documented in the manualFind the indicator lights
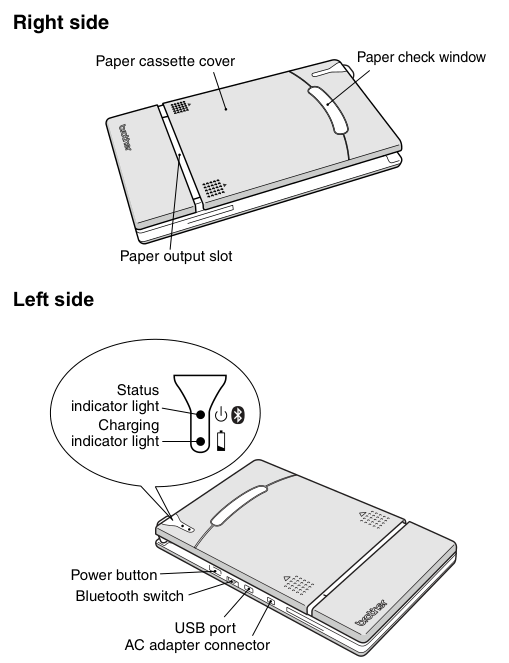
Diagram key
- Right side: The source’s right-side view.
- Paper cassette cover: Cover over the paper cassette.
- Paper check window: Window through which the installed cassette’s paper-type indication is visible.
- Paper output slot: Opening from which printed paper emerges.
- Left side: The source’s left-side view.
- Status indicator light: Upper light in the magnified panel: blue/green/red status indication.
- Power-outline marking: Marking shown beside the status indicator in the enlarged panel.
- Bluetooth marking: Bluetooth symbol beside the upper status indicator in the enlarged panel; blue status states refer to Bluetooth reception or standby.
- Charging indicator light: Lower light in the magnified panel: orange charging/battery-level indication.
- Battery-outline marking: Marking shown beside the charging indicator in the enlarged panel.
- Power button: Button used to turn on the printer, as described in the reviewed power instructions.
- Bluetooth switch: Switch selects Bluetooth communication ON/OFF.
- USB port: Port for the enclosed USB cable.
- AC adapter connector: Connection for the dedicated charging adapter.
—Status indicator: blue, constantly lit
- Waiting to receive data using Bluetooth or USB.
- When the status light is blue, both Bluetooth and USB can receive data.
- Once either connection is established, the other cannot receive data until printing finishes.
—Status indicator: blue, flashing
- Receiving data using Bluetooth.
- When the status light is blue, both Bluetooth and USB can receive data.
- Once either connection is established, the other cannot receive data until printing finishes.
—Status indicator: blue, flashing in long intervals
- Sleep mode: power-saving standby, possible only when receiving data using Bluetooth.
- When the status light is blue, both Bluetooth and USB can receive data.
- Once either connection is established, the other cannot receive data until printing finishes.
—Status indicator: green, constantly lit
- Waiting to receive data using USB.
- When the status light is blue, both Bluetooth and USB can receive data.
- Once either connection is established, the other cannot receive data until printing finishes.
—Status indicator: green, flashing
- Receiving data using USB.
- When the status light is blue, both Bluetooth and USB can receive data.
- Once either connection is established, the other cannot receive data until printing finishes.
—Status indicator: red, flashing6 checks
—Status indicator: red, constantly lit
A system error has occurred and the printer may be damaged. Contact the seller where it was purchased.
—Charging indicator: orange, constantly lit with adapter connected
The battery is charging.
—Charging indicator: off with adapter connected
Charging has finished.
—Charging indicator: orange, flashing with adapter connected
The built-in battery is malfunctioning.
—Battery-level indicator: off while running on battery
The battery is more than 60% charged. If the charging indicator flashes during printing, immediately connect the AC adapter and charge the battery; printing may stop.
—Battery-level indicator: flashes once
The battery is less than 60% charged. Recharge it. If the charging indicator flashes during printing, immediately connect the AC adapter and charge the battery; printing may stop.
—Battery-level indicator: flashes twice
The battery is less than 30% charged. Recharge it. If the charging indicator flashes during printing, immediately connect the AC adapter and charge the battery; printing may stop.
—Battery-level indicator: repeatedly flashes three times
The battery is almost empty. Recharge it. If the charging indicator flashes during printing, immediately connect the AC adapter and charge the battery; printing may stop.
Troubleshooting
Find the problem you are experiencingThe printer cannot be turned on.2 checks
- Power button
- Press and hold the power button for a short while.
- Built-in battery needs recharging
- Recharge the built-in lithium-ion battery.
There is a paper misfeed.1 check
- Paper misfeed
- Remove the misfed paper using Feeding paper.
The error remains after misfed paper is removed.1 check
- Torn paper may remain
- Contact the seller where the printer was purchased.
An indicator light is lit or flashing.1 check
- Indicator state
- Use the Indicator lights explanations to identify the state.
The paper does not feed.4 checks
- Cassette lid fold
- Check that the lid is firmly folded along fold 2.
- Cassette cover
- Check that the cover is securely closed.
- Paper may be dirty
- Pull the first sheet out from the back of the cassette, then reinstall the cassette.
- Pick-up roller
- Clean the pick-up roller.
The print is faint (light).1 check
- Cassette cover
- Check that the cover is securely closed.
The paper cassette cover cannot be closed.1 check
- Parts marked A have locked
- Use the tip of a ball-point pen to slide the indicated part in the arrow’s direction and free it. Free the opposite-side part in the same way.
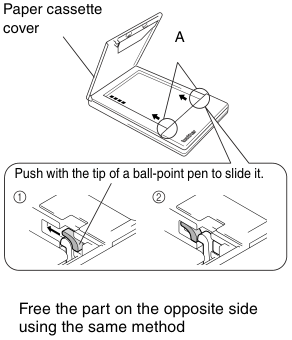
Diagram key
- Paper cassette cover: The open cover shown in the drawing.
- A: first indicated part: First locked part identified by the branched A callout; slide with a ball-point pen tip in the shown arrow direction.
- A: repeated indicated part: Second location identified by the same A callout; free the opposite-side part by the same method.
- Main arrow: first part: Arrow points in the sliding direction for the first locked A part.
- Main arrow: repeated part: Arrow points in the sliding direction for the opposite locked A part.
- 1: First inset shows the ball-point pen tip applied to the indicated part.
- 2: Second inset shows the part sliding in the printed arrow direction.
- Inset arrows: Movement arrows used with the printed instruction to push with a ball-point pen tip and slide the part.
- Opposite-side instruction: Free the part on the opposite side using the same method.
The printer does not print after a print command.4 checks
- Bluetooth connection settings
- Enable Bluetooth communication using the computer or Pocket PC settings.
- Bluetooth connection in use by another device
- Make sure no other computer or Pocket PC is sending data through USB or Bluetooth.
- USB cable
- Check that the printer is securely connected to the computer with the USB cable.
- USB connection in use by another device
- Make sure no other computer or Pocket PC is sending data using Bluetooth.
Guides
Concerning this printer (including the built-in lith- ium ion battery)
Instructions from the manualPrinter and built-in battery precautions19 steps
- Do not use the printer where prohibited, including on an airplane.
- Before use near medical equipment or in another special environment, check that its electromagnetic waves will not cause harmful effects.
- Do not insert foreign objects into the printer, connectors or ports.
- If an object enters the printer, turn it off immediately, unplug the AC adapter from the outlet and contact the seller; continuing to use it risks fire, electric shock or damage.
- Do not operate, recharge or store it near water, a water heater, in an extremely humid location, in rain or moisture, in extreme dust or heat, near flames or heaters, in direct sunlight, in a closed car under hot sun, or where condensation may form.
- Leaking liquid may indicate battery damage.
- Move the printer away from flames immediately and do not touch the liquid.
- If it reaches your eyes, rinse immediately with water and consult a medical professional; rinse exposed skin or clothing immediately with water.
- Do not disassemble or alter the printer.
- Ask the seller for servicing, adjustments or repairs; damage caused by user disassembly or alteration is outside the warranty.
- If the printer is dropped or damaged, turn it off, unplug the adapter and contact the seller.
- If it produces smoke, an unusual smell or noise, turn it off immediately, unplug the adapter and contact the seller for repair.
- Stop using it if it leaks, changes color, deforms or develops another defect.
- Use only the specified charger.
- If it has not fully charged after the specified time, stop charging.
- Keep the printer away from children, especially infants.
- Fully charge the slightly charged built-in battery before first use.
- For long-term non-use, charge it at least once every six months to protect battery efficiency and life.
- If a full charge lasts only a short time, ask the seller to replace the built-in battery; do not replace it yourself.
Concerning the ac adapter
Instructions from the manualAC adapter precautions13 steps
- Use only the AC adapter made for this printer and a household 220–240 V AC outlet.
- Do not handle the adapter or power plug with wet hands.
- Do not disassemble, alter or repair the adapter; contact the seller for servicing, adjustments or repairs.
- Do not spill water or drinks on the adapter or use it where it may become wet.
- If the plug is dusty or dirty, unplug it and wipe it with a dry cloth.
- Unplug by holding the plug rather than pulling the cord.
- Do not insert objects into the adapter terminals.
- Do not damage, modify, twist, severely bend, pull, heat, bind or pinch the cord, or put objects on it.
- Ask the seller for a replacement if the adapter is damaged.
- Keep it away from children, especially infants, microwave ovens, flames and heaters.
- Before maintenance or cleaning, unplug the adapter from the outlet.
- For long periods of non-use, unplug it from both the printer and outlet.
- Do not wind its cable around the adapter or bend it.
Operating precautions
Instructions from the manualOperating precautions and paper storage18 steps
- Operate at 0–40 °C and 20–80% humidity, with maximum wet-bulb temperature 27 °C.
- Avoid extreme temperature, humidity, dust, vibration and temperature changes.
- If condensation forms, let it dry naturally before use.
- The adapter case and printer can become hot during charging or printing without indicating a fault.
- Unplug when not in use, do not obstruct the paper output slot, and periodically clean dirty adapter connectors and the USB port with a dry cotton swab.
- Use a soft, dry cloth for routine cleaning; do not use benzene or paint thinner.
- Follow the supplied instructions for optional accessories.
- Do not touch the printer with wet hands or leave its paper cassette cover open during storage.
- Use thermal paper.
- Writing or stamping over printed text can erase or discolor it, and the added ink may take time to dry.
- Store cassettes closed, away from extreme heat, humidity, dust, direct sun and closed cars under hot sun.
- Close an opened cassette package promptly.
- Do not use paper exposed to condensation, transfer paper between cassettes or reuse paper already passed through the printer.
- Do not open the cassette cover or pull or push paper during printing.
- Do not use folded, curled, cut, wet or damp paper.
- Do not handle paper or cassettes with wet hands or prepare or replace a cassette in extreme humidity.
- Before using adhesive-backed paper, test a small piece on an inconspicuous area: it can discolor, peel, be difficult to remove, leave adhesive or damage the surface depending on conditions and material.
- Do not apply it to people, animals or plants, or to public or other people’s property without permission.
Charging
Instructions from the manualCharging9 steps
- Use the AC adapter specified for this printer.
- Fully charge the built-in lithium-ion battery before first use.
- Connect the adapter cable to the printer’s adapter connector, then plug the adapter into a household 220–240 V AC outlet.
- Charging starts automatically and the charging indicator turns orange.
- When charging finishes, the charging light goes out.
- Disconnect the adapter after charging.
- Charging from empty to full takes approximately three hours with the printer off.
- The protective circuitry prevents charging at extremely high or low temperatures.
- Do not wind the cable around the adapter or bend it.
Preparing the paper
Instructions from the manualPreparing the paper9 steps
- Use only the cassette designed for this printer.
- Prepare it before installation, taking care not to drop its paper.
- Open the cassette lid and tear off the two side pieces marked 1.
- Fold the lid firmly back along fold 2, then insert its tab into slit 3 at the back.
- The printer identifies paper type from the cassette and chooses settings accordingly; do not transfer paper between cassettes or reuse printed paper.
- Dispose of an empty cardboard cassette under local rules.
- Do not use a torn or deformed cassette, prepare it in extreme humidity, or touch it or its paper with wet hands.
- Store it closed, away from extreme heat, humidity, dust, direct sun and hot closed cars.
- Use the paper promptly to avoid discoloration.
Installing the paper cassette
Instructions from the manualInstalling the paper cassette8 steps
- Slide the cover in direction 1; it opens in direction 2.
- Insert the cassette with the paper-type indication facing up and the end of the paper toward you.
- Align it correctly and avoid folding the paper end.
- Close the cover in direction 3, then slide it in direction 4.
- Correct loading leaves the paper-type indication visible through the check window and locks the cover.
- Do not remove paper from its cassette and load it directly.
- Change paper type by installing a different cassette.
- During printing, do not press the output slot or place anything on the printer.
Sending data through a usb connection
Instructions from the manualSending data through a USB connectionView
After the software installation described in the Software Guide, use the enclosed USB cable to connect the printer to a computer or a Pocket PC that supports a USB host interface.
Feeding paper
Instructions from the manualFeeding paper3 steps
- If misfed paper has emerged from the output slot, pull it out without tearing it.
- If it has not emerged, open the cassette cover, remove the cassette and pull out the misfed paper without tearing it.
- Pulling out the paper does not affect printer operation.
Cleaning the printer
Instructions from the manualCleaning the printer4 steps
- Turn the printer off before cleaning and unplug the AC adapter from the outlet as required by the adapter precautions.
- Wipe dust and dirt from the front with a soft, dry cloth.
- If it is extremely dirty, use a slightly damp cloth.
- Do not use benzene or paint thinner, which can discolor or deform it.
Cleaning the paper cassette sensor
Instructions from the manualCleaning the paper cassette sensor3 steps
- Turn the printer off before cleaning and unplug the adapter from the outlet.
- Clean the paper cassette sensor with a dry cotton swab; dirt can prevent correct cassette detection.
- Do not use benzene or paint thinner.
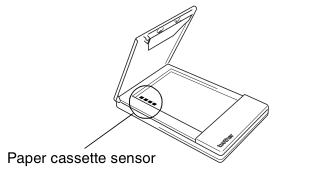
Diagram key
- Paper cassette sensor: Sensor identified by the leader line. Turn off the printer and unplug the adapter before maintenance; clean it with a dry cotton swab.
Cleaning the pick-up roller
Instructions from the manualCleaning the pick-up roller3 steps
- Turn the printer off and unplug the adapter before maintenance.
- If the pick-up roller is dirty, attach a piece of cellophane tape to it, then remove the tape to lift away dirt.
- Rotate the roller and repeat the tape procedure over its entire surface.
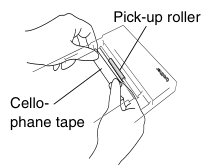
Diagram key
- Pick-up roller: Roller identified by the upper leader line; attach and remove tape to lift dirt, then rotate and repeat over the entire surface.
- Cellophane tape: Tape identified by the lower leader line; attach it to the roller, then remove it to lift dirt.
Disposing of this printer
Instructions from the manualDisposing of this printer8 steps
- Only when disposing of the printer, remove its built-in lithium-ion battery.
- Removing the back cover voids the warranty; do not open it for normal service.
- Turn the printer off and disconnect the AC adapter.
- With a screwdriver, loosen the four rear screws and remove the back cover.
- Disconnect the connector without pulling its cable, then grasp and pull the battery from the adhesive tape holding it.
- Do not pull the battery cable.
- An incorrect replacement battery type can explode.
- Dispose of used batteries according to local special-waste regulations.
Selecting bluetooth communication on/off
Instructions from the manualSelecting Bluetooth communication ON/OFFView
Use the Bluetooth switch to choose whether to use Bluetooth. Set it to ON for Bluetooth communication. USB printing is still possible with Bluetooth ON, except during sleep mode.
Turning on/off the printer
Instructions from the manualTurning on/off the printer5 steps
- Press and hold the power button briefly until the status light comes on.
- With Bluetooth ON it is blue; with Bluetooth OFF it is green.
- A light press does not start the printer; hold the button a little longer.
- With Bluetooth ON, inactivity or no incoming data makes the printer enter sleep after the time specified in the Utility software.
- With Bluetooth OFF, it powers off after five minutes without operation or incoming data; the Utility can change that time.
Communication using bluetooth technology
Instructions from the manualSending data through Bluetooth5 steps
- First install the software on the computer or Pocket PC as described in the Software Guide.
- Enable Bluetooth on the computer or Pocket PC and have it recognize the printer, then start printing.
- The status indicator flashes blue during transmission.
- Bluetooth communication is unavailable while the printer is communicating with another computer through USB.
- Consult the computer or Pocket PC instructions for device-specific details.
1 general description
Instructions from the manualGeneral Description2 steps
- Right side: paper cassette cover, paper check window and paper output slot.
- Left side: status indicator, charging indicator, power button, Bluetooth switch, USB port and AC adapter connector.
Mw-140bt accessories
Instructions from the manualMW-140BT Accessories4 steps
- C-11 A7 thermal paper and C-21 A7 labels are 105 × 74 mm.
- C-41 four-per-sheet labels are 26.25 × 74 mm; C-42 two-per-sheet labels are 52.5 × 74 mm.
- Thermal paper has 50 sheets per cassette; all other listed paper types have 30.
- Use only the cassette designed for this printer.
Enclosed accessories
Instructions from the manualCheck the enclosed accessoriesView
Check for the MW-140BT, a cassette with 50 C-11 thermal sheets, charger/AC adapter, USB cable, Quick Guide and CD-ROM containing software, User’s Guide and Software Guide.
Printer operation
Instructions from the manualPrinter operation: initial setup7 steps
- Read the Quick Guide and check all accessories.
- Insert the CD-ROM in the Windows computer; if the installer does not start, open My Computer and double-click its CD-ROM icon.
- Read the User’s Guide before preparing or operating the printer.
- Open it with View User Guide in the installer’s first dialog; saving it on the computer is recommended.
- Install the software following the prompts.
- Use View Software Guide to open its guide, then follow it to print.
- Adobe Acrobat Reader is needed to view both PDF guides.
2) precautions for using bluetooth
Instructions from the manualPrecautions for using BluetoothView
Turn Bluetooth off in hospitals, aircraft, gasoline/petrol stations and near fire alarms to prevent malfunctions.
3) for better transmission
Instructions from the manualFor better transmission3 steps
- Bluetooth connectivity depends strongly on the operating environment.
- If a good connection cannot be achieved, try again.
- Connections are difficult near electronic equipment, broadcasting stations or wireless base stations, and wireless LAN IEEE802.11.
4) other features of bluetooth technology
Instructions from the manualOther features of Bluetooth technologyView
Bluetooth equipment may take several seconds to become available after switching on. The time varies by device; MW-140BT requires a maximum of eight seconds.
1 operating environment
Instructions from the manualCheck the original software operating environment6 steps
- The original software guide lists Windows 98, 98SE, Me, 2000 Professional or XP; USB 1.1 and Bluetooth 1.1 class 2 serial-port profile; recommended Pentium 266 MHz or faster and 64 MB RAM or more; and at least 20 MB free disk space.
- Pocket PC or Pocket PC 2002 requires ARM or MIPS, excluding SH; Pocket PC 2002 supports ARM only.
- USB 1.1 and Bluetooth 1.1 class 2 with Serial Port profile are listed.
- A Windows computer able to connect to the Pocket PC is needed for installation.
- Consult Brother for verified computers, adapters and Pocket PCs.
- These are the original guide’s requirements, not a current OS-support claim.
2 printing data from a computer running windows
Instructions from the manualPrepare Windows printing connections4 steps
- For Bluetooth, first install the computer’s Bluetooth connection software, then Brother software and driver, then connect to the printer and print.
- Consult the Bluetooth device/software instructions.
- For USB, install Brother software and driver before printing.
- Do not connect the printer until instructed during installation.
Communication using bluetooth technology
Instructions from the manualPair using Bluetooth9 steps
- Set the printer’s Bluetooth switch ON; the status light is blue.
- Run the computer or Pocket PC Bluetooth connection software.
- Search for devices and select MW-140BTxxxx, where xxxx is the last four serial-number digits.
- A PIN/passkey prompt appears only on the first connection.
- Enter the PIN/passkey and click or tap Enter.
- At shipment it is the last four serial-number digits.
- Connected device Yes appears.
- In Operations, click or tap Connect Serial Port.
- Connected to serial port appears; note the COM port number when shown because printing may require it.
Installing the software
Instructions from the manualInstall Windows software and Bluetooth driver11 steps
- Do not connect the printer until instructed.
- Insert the CD-ROM in the Windows computer.
- If it does not start, open My Computer, choose the CD drive and double-click setup.exe.
- Select the language and OK.
- Click the top Windows button, then Spotsnap software.
- Installed packages include Spotsnap Operator, Snapper, templates, help and the driver with MW-140BT Utility.
- Follow prompts; the driver installs next.
- Choose USB or Bluetooth, then OK.
- For Bluetooth, select Install and Next.
- Select the COM number used for Bluetooth and Next.
- Follow remaining prompts.
Install USB driver: Windows 98,98SE,2000 orMe10 steps
- Do not connect the printer until instructed.
- Insert the CD-ROM in the Windows computer.
- If it does not start, open My Computer, choose the CD drive and double-click setup.exe.
- Select the language and OK.
- Click the top Windows button, then Spotsnap software.
- Installed packages include Spotsnap Operator, Snapper, templates, help and the driver with MW-140BT Utility.
- Follow prompts; the driver installs next.
- Choose USB or Bluetooth, then OK.
- For Windows 98, 98SE, 2000 Professional or Me, wait for Connect Brother MW-140BT, and then turn it on.
- Connect the supplied USB cable and turn on the printer; the driver installs.
Install USB driver: Windows XP14 steps
- Do not connect the printer until instructed.
- Insert the CD-ROM in the Windows computer.
- If it does not start, open My Computer, choose the CD drive and double-click setup.exe.
- Select the language and OK.
- Click the top Windows button, then Spotsnap software.
- Installed packages include Spotsnap Operator, Snapper, templates, help and the driver with MW-140BT Utility.
- Follow prompts; the driver installs next.
- Choose USB or Bluetooth, then OK.
- For XP, wait for Connect Brother MW-140BT, and then turn it on.
- Connect the supplied cable and turn on the printer.
- If a model-selection dialog appears, select MW-140BT and Next.
- In Found New Hardware Wizard select Install the software automatically (Recommended), then Next.
- When Windows Logo testing warning appears, select Continue Anyway, then follow remaining prompts.
- The guide states Brother tested this driver thoroughly.
Printing
Instructions from the manualPrint from SpotSnap Operator3 steps
- Use Snapper to take a snapshot or import or copy text or an image.
- Check and edit it in SpotSnap Operator, then print.
- The guide refers detailed SpotSnap operation to the PDF manual on the supplied CD-ROM; no additional steps are inferred.
Check the Pocket PC printing functions2 steps
- On the Program screen tap Brother MPrint.
- Check for Note Print, Schedule Print, Task Print, Contact Print, Clipboard Print, Screen Capture Print, Image File Print, E-mail Print and MPrint Utility.
Printing from other applications
Instructions from the manualPrinting from other applications3 steps
- As in the guide’s Excel 2000 example, create the data, choose File > Print, select Brother MW-140BT in the printer list and click OK.
- Adjust the data to the paper size, including when changing from A4 to A7.
- Some applications are incompatible; consult Brother for compatible applications and the latest driver.
Uninstalling the software
Instructions from the manualUninstall SpotSnap softwareView
- In the guide’s Windows 98 example, choose Start > Settings > Control Panel and open Add/Remove Programs.
- Select Spotsnap Software, click Add/Remove and follow the removal prompts.
Uninstall the Pocket PC softwareView
Remove the software with the Pocket PC’s functions, following that device’s uninstall instructions. The source gives no additional removal sequence.
Uninstalling (removing) the printer driver
Instructions from the manualUninstall the printer driverView
Choose Start > Settings > Printers. Right-click the Brother MW-140BT icon and choose Delete. Reinstall the software before using the printer from that computer again.
3 printing data from a pocket pc
Instructions from the manualInstall the Pocket PC software12 steps
- Use a Windows computer to install the software onto the Pocket PC.
- Consult its instructions for ActiveSync and the computer connection.
- Install Bluetooth connection software on the Pocket PC before Bluetooth communication.
- If the CD-ROM does not start automatically, choose its CD drive and double-click setup.exe.
- Select the language, then OK.
- Common modules also install MPrintUtility.
- Insert the supplied CD-ROM; if it does not start automatically, open My Computer and double-click the CD-ROM icon.
- Click the second, Pocket PC button, then the Brother mobile printing software installation button.
- Select Pocket PC or Pocket PC 2002 for the device’s operating system.
- Answer Yes or No in the installer and follow the remaining prompts.
- Standard installation includes Common modules, Note Print, Schedule Print, Task Print, Contact Print, Clipboard Print, Screen Capture Print, Image File Print, E-mail Print and Help files.
- Compact installation includes only Common modules, Contact Print, Screen Capture Print and Help files.
Graphics-processing settings
Instructions from the manualGraphics-processing settingsView
In Print Preview, tap Graphics. Choose Dithering, Error Diffusion or None for Half-tone, and Full-size printing or Fit to paper for Image processing. Tap OK to apply.
Text format settings
Instructions from the manualText format settings3 steps
- In Note Print, choose Settings > Font.
- Choose Tahoma, Courier New, Frutiger Linotype or Bookdings; Largest, Larger, Standard, Smaller or Smallest; and Bold, Underline, Italic or Strikethrough.
- Tap OK to apply.
Template setting
Instructions from the manualTemplate settingView
In Schedule Print, choose Settings > Template. Select the desired template and tap OK. The source illustrates Two down, Four down and A7 portrait.
Printing a specified date
Instructions from the manualPrinting a specified dateView
In Schedule Print, choose Settings > Date. Change Start date, End date, Inprogress and Date as required, then tap OK. Schedules within the chosen period appear.
Screen capture settings
Instructions from the manualScreen capture settings4 steps
- Tap the settings icon on the Screen Capture Print toolbar.
- Choose a capture delay of 0–10 seconds and Selection range, Client or Desktop.
- Selection range uses the stylus to choose the area; Client is the hatched area illustrated in the guide, and Desktop is the entire screen.
- Tap OK to apply.
5 printpocketce for brother
Instructions from the manualInstall PrintPocketCE for Brother6 steps
- This bonus software prints Pocket Excel spreadsheets, Pocket Word documents, e-mail, Pocket RTF and plain TXT files from Pocket PC or Pocket PC 2002.
- Insert the supplied CD-ROM in the Windows computer.
- Click Pocket PC, then Bonus software.
- Choose Print Pocket CE for Pocket PC or Pocket PC 2002 for the device.
- Installation runs and the computer connects to the PDA via ActiveSync.
- Use the software’s Help for operating details; no extra printing instructions are inferred.
Note print
Instructions from the manualNote Print8 steps
- On Brother MPrint tap Note Print.
- Select one saved memo; use the folder list for previously categorized folders.
- Choose Printer > Preview, then tap Print.
- After the Pocket PC detects the printer, printing begins.
- Tapping Print directly skips preview.
- The layout depends on the Printer setting paper size.
- Preview displays the output but text may be difficult to read.
- For first Bluetooth use, set its COM x port in Printer setting.
Advanced settings
Instructions from the manualPocket PC printer settings4 steps
- In Print Preview tap Printer setting.
- Choose MW-140BT, COM1/COM2/COM3…/FILE/USB, A7/four-label/two-label paper matching the cassette, Portrait/Landscape, Normal/Global and 1–50 copies/Collate.
- For Bluetooth choose the applicable COM x port.
- Tap OK to apply.
Schedule print
Instructions from the manualSchedule Print9 steps
- On Brother MPrint tap Schedule Print.
- Tick one or more schedules; use the category list for a previously specified category.
- The date period and template can be specified.
- Choose Printer > Preview, then tap Print.
- After the Pocket PC detects the printer, printing begins.
- Tapping Print directly skips preview.
- The layout depends on the Printer setting paper size.
- Preview displays the output but text may be difficult to read.
- For first Bluetooth use, set its COM x port in Printer setting.
Task print
Instructions from the manualTask Print9 steps
- On Brother MPrint tap Task Print.
- Tick one or more tasks or appointments.
- The date period and template can be specified.
- Choose Printer > Preview, then tap Print.
- After the Pocket PC detects the printer, printing begins.
- Tapping Print directly skips preview.
- The layout depends on the Printer setting paper size.
- Preview displays the output but text may be difficult to read.
- For first Bluetooth use, set its COM x port in Printer setting.
Contact print
Instructions from the manualContact Print9 steps
- On Brother MPrint tap Contact Print.
- Tick one or more contacts to print names, addresses and telephone numbers.
- The template can be specified.
- Choose Printer > Preview, then tap Print.
- After the Pocket PC detects the printer, printing begins.
- Tapping Print directly skips preview.
- The layout depends on the Printer setting paper size.
- Preview displays the output but text may be difficult to read.
- For first Bluetooth use, set its COM x port in Printer setting.
Clipboard print
Instructions from the manualClipboard Print8 steps
- On Brother MPrint tap Clipboard Print.
- The copied or cut images/text on the clipboard appear.
- Choose Printer > Preview, then tap Print.
- After the Pocket PC detects the printer, printing begins.
- Tapping Print directly skips preview.
- The layout depends on the Printer setting paper size.
- Preview displays the output but text may be difficult to read.
- For first Bluetooth use, set its COM x port in Printer setting.
Screen capture print
Instructions from the manualScreen Capture Print9 steps
- On Brother MPrint tap Screen Capture Print.
- Display the screen to print, then tap the toolbar’s capture icon.
- The captured screen appears in Print Preview.
- Choose Printer > Preview, then tap Print.
- After the Pocket PC detects the printer, printing begins.
- Tapping Print directly skips preview.
- The layout depends on the Printer setting paper size.
- Preview displays the output but text may be difficult to read.
- For first Bluetooth use, set its COM x port in Printer setting.
Image file print
Instructions from the manualImage File Print9 steps
- On Brother MPrint tap Image File Print.
- Search Image file (BMP/JPG/PNG), Bitmap file, Jpeg file (JPG/JPEG), Png file or All files.
- Select one image, then OK.
- Choose Printer > Preview, then tap Print.
- After the Pocket PC detects the printer, printing begins.
- Tapping Print directly skips preview.
- The layout depends on the Printer setting paper size.
- Preview displays the output but text may be difficult to read.
- For first Bluetooth use, set its COM x port in Printer setting.
E-mail print
Instructions from the manualE-mail Print9 steps
- On Brother MPrint tap E-mail Print.
- Select one saved e-mail.
- The template can be specified.
- Choose Printer > Preview, then tap Print.
- After the Pocket PC detects the printer, printing begins.
- Tapping Print directly skips preview.
- The layout depends on the Printer setting paper size.
- Preview displays the output but text may be difficult to read.
- For first Bluetooth use, set its COM x port in Printer setting.
Changing the settings
Instructions from the manualOpen and change printer settings11 steps
- On Windows choose Start > Settings > Printers.
- Right-click Brother MW-140BT, choose Properties, then MW-140BT Utility.
- On Pocket PC tap MPrint Utility on Brother MPrint.
- The Utility provides auto power-off, auto sleep, auto sleep/power-off, power-saving, device name, PIN/passkey and Initialize settings, which resets all parameters to defaults.
- General sets automatic power-off time; zero disables automatic power-off.
- With Bluetooth ON, Bluetooth (1) sets auto sleep time and power-off after sleep, plus power-saving.
- Zero auto sleep time disables sleep.
- Bluetooth (2) changes device name and PIN/passkey.
- Device name must be 1–12 alphanumeric characters.
- Specify a four-digit PIN only when Activate PIN code is selected.
- Tap OK to close the Utility.
Model details
Model and compatibility
- Printing and paper
- 300×300dpi direct thermal printing on Brother A7 cut paper, 74×105mm.
- Connections
- USB1.1 and Bluetooth1.1 class2 Serial Port profile.
- Battery
- Built-in780mAh 7.4V lithium-ion battery.
- Dimensions and mass
- 100mm wide×160mm deep excluding projection×17.5mm high;300g including battery and cassette of50plain thermal sheets.