MODEL REFERENCE
Brother MW-270
15 errors · 21 troubleshooting topics · 52 guides

The checks and guides below come from the official manuals for this model.
No matches for this wording. Try a light name, error code or a shorter phrase.
Errors and indicators
Light patterns and messages documented in the manualFind the indicator lights
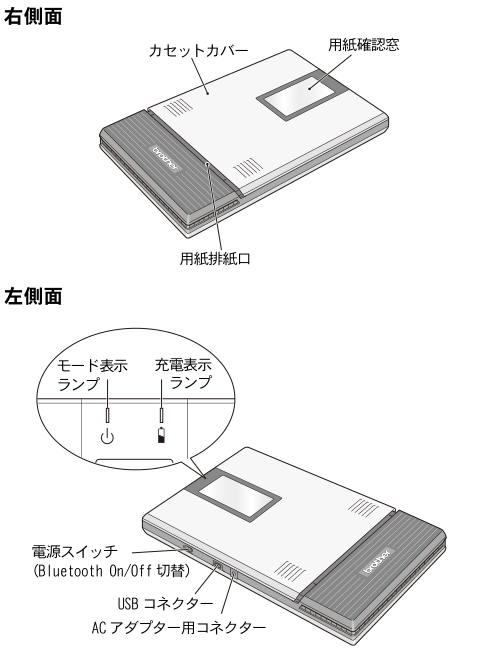
Diagram key
- Right-side view: 右側面 identifies the upper view.
- Cassette cover: カセットカバー: cover over the paper cassette.
- Paper check window: 用紙確認窓: window displaying the installed paper type.
- Paper output slot: 用紙排紙口: printed-paper exit.
- Left-side view: 左側面 identifies the lower view.
- Mode light: モード表示ランプ: left light in the enlarged panel.
- Power marking: Circle-and-line symbol beside the mode light; the power switch is identified in the same drawing.
- Charging light: 充電表示ランプ: right light in the enlarged panel.
- Battery marking: Battery-outline symbol beside the charging light.
- Power/Bluetooth switch: 電源スイッチ(Bluetooth On/Off切替): operates power and Bluetooth switching.
- USB connector: USBコネクター: USB connection.
- AC-adapter connector: ACアダプター用コネクター: dedicated adapter connection.
- Sleep mode, a power-saving standby state with only Bluetooth communication available.
- Once communication begins through one interface, the other cannot communicate until printing finishes.
—Red mode light: flashing6 checks
Troubleshooting
Find the problem you are experiencingCharging light flashes before charging completes2 checks
From the manual’s 充電表示ランプが点滅した場合 section; this entry remains troubleshooting.
- Supply rating may be unsuitable
- Turn the printer on and then off to clear the flashing state. Retry charging: use the dedicated AC adapter, or connect the USB cable directly to the computer without a USB hub.
- Flashing after eight hours
- If the light flashes more than eight hours after charging began despite those measures, the battery may be faulty.
- Replace it using the reviewed battery installation/removal instructions.
Printer will not turn on2 checks
From the manual’s こんなときは section; this entry remains troubleshooting.
- Switch press
- Hold the power switch slightly longer.
- Battery low
- Charge the lithium-ion battery.
Print command produces no print4 checks
From the manual’s こんなときは section; this entry remains troubleshooting.
- Bluetooth disabled
- Check that Bluetooth is enabled on the computer or mobile device; consult its instructions.
- Bluetooth busy
- Check no other computer or mobile device is communicating with this printer by USB or Bluetooth.
- USB connection
- Check that the printer and computer USB cable are connected securely.
- USB busy
- Check no other computer or mobile device is communicating with this printer by USB or Bluetooth.
Paper is jammed1 check
From the manual’s こんなときは section; this entry remains troubleshooting.
- Jammed paper
- Pull the sheet out slowly using the reviewed jam-removal instructions.
Error remains after jam removal1 check
From the manual’s こんなときは section; this entry remains troubleshooting.
- Torn paper may remain inside
- Contact the selling dealer or Brother call centre in the safety guide.
A light is on or flashing1 check
From the manual’s こんなときは section; this entry remains troubleshooting.
- Indicator state
- Refer to the reviewed mode and charging-light entries.
Cassette cover came off1 check
From the manual’s こんなときは section; this entry remains troubleshooting.
- Cover mounting
- Fit the cover into the white holders at the two B locations until it clicks. Angling the two parts into a V makes fitting easier.
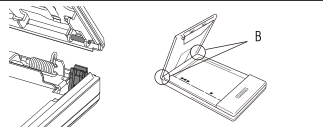
Diagram key
- First close-up: Upper close-up shows the cover attachment at a mounting point.
- Repeated close-up: Lower close-up shows the fitting relationship at the cover mount.
- B: first holder: First B leader identifies a white cassette-cover receiver.
- B: repeated holder: Second B leader identifies the opposite receiver; angle the two parts into a V for easier fitting.
Cassette cover is difficult to open1 check
From the manual’s こんなときは section; this entry remains troubleshooting.
- Dirt inside cover
- Remove dirt and dust using a dry cotton swab or cloth following the reviewed cover-cleaning instructions.
Paper does not feed5 checks
From the manual’s こんなときは section; this entry remains troubleshooting.
- Cassette fold
- Firmly fold along rear fold 1.
- Cassette cover
- Check the cover is fully closed.
- Dirty paper
- Remove the first sheet from the cassette back and reload it.
- Feed roller
- Clean the paper-feed roller.
- Long period without use
- Slide both movable parts from position 1 to position 2 as illustrated, then close the cover. Closing returns the parts to position 1. This symptom may occur after long non-use.
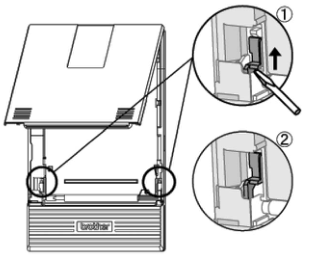
Diagram key
- First circled mechanism: First of the two movable parts that must be shifted.
- Repeated circled mechanism: Opposite movable part; perform the same shift.
- 1: ① is the initial position.
- Sliding arrow: Arrow shows shifting the part upward from 1 to 2.
- Tool in inset: The illustration depicts the contact point used to shift the movable part; text prescribes sliding both parts.
- 2: ② is the shifted position. Close the cover while shifted; closing returns both to 1.
Adapter cable breaks during transport1 check
From the manual’s よくあるご質問 section; this entry remains troubleshooting.
- Cable stress
- For transport, gather the cable with a cable tie or similar so no load is applied. Do not wind it around the adapter or fold it.
USB connector damaged during transport1 check
From the manual’s よくあるご質問 section; this entry remains troubleshooting.
- Cable left connected
- Disconnect the USB cable before carrying the printer, including in a bag: impacts stress the connector.
Printer or paper damaged in a hot car2 checks
From the manual’s よくあるご質問 section; this entry remains troubleshooting.
- High temperature
- Do not leave the printer in a vehicle. Use it at 0–40°C, 20–80% humidity, with maximum wet-bulb temperature 27°C.
- Unsuitable locations and optional car adapter
- Avoid locations outside0–40°C or20–80% humidity, dust, vibration, hot closed vehicles, water/humidity, rain/mist, flames/heaters/sunlight and condensation.
- The optional car adapter is charging-only.
- At40°C or above paper discolours and the battery deteriorates.
Stamped printed text fades or ink dries slowly1 check
From the manual’s よくあるご質問 section; this entry remains troubleshooting.
- Thermal surface
- Stamping the thermal surface is not recommended; check before use. Ink, cellophane-tape adhesive and pens can erase printed text.
When to choose low print speed1 check
From the manual’s よくあるご質問 section; this entry remains troubleshooting.
- Legacy speed or cold use
- Choose Low for speed equivalent to MW-260-series models or when using the printer at 10°C or below. Set speed in the driver utility; Standard is the default.
Paper remains but does not feed1 check
From the manual’s よくあるご質問 section; this entry remains troubleshooting.
- Dirty feed roller
- Dirt may prevent pickup; remove roller dirt with cellophane tape using the reviewed cleaning instructions.
Preserve lithium-ion battery life3 checks
From the manual’s よくあるご質問 section; this entry remains troubleshooting.
- Recharge timing
- Avoid frequent top-up charging; use the charge first. One repeated flash indicates below 30%.
- Heat
- Avoid 40°C or above and direct sunlight.
- Long storage
- Remove the battery, store in a cool dark place at 20°C or below, and recharge once every three months to preserve performance.
Paper feed failures with other-brand paper1 check
From the manual’s よくあるご質問 section; this entry remains troubleshooting.
- Paper source
- Use genuine Brother paper.
- Other paper may cause repeated feeding failures that cleaning cannot solve; damage caused by it can incur charges during warranty.
- Not all other paper necessarily causes failures.
Paper transferred or reused1 check
From the manual’s よくあるご質問 section; this entry remains troubleshooting.
- Cassette recognition
- The printer identifies paper and settings from its cassette.
- Do not move paper into another cassette or return used/removed paper: double feeding, empty feeding or head failure may result.
Printer moved into a cold environment1 check
From the manual’s よくあるご質問 section; this entry remains troubleshooting.
- Temperature
- It may not work below 0°C, and print count decreases at 10°C or below. Print at 0°C or higher. Allow gradual temperature changes to avoid condensation.
Store thermal paper safely5 checks
From the manual’s よくあるご質問 section; this entry remains troubleshooting.
- Before and after printing
- Before printing, keep packaged against light and gas at 25°C and at most 65% RH; use within one year of purchase.
- After printing, keep in a dark cool place at 25°C or below, including filed storage.
- Contact materials
- Keep both sides away from back-carbon/carbonless/diazo paper; plasticized soft PVC, rubber mats and erasers; adhesive tapes, correction fluid and oil-based markers; organic compounds containing alcohol, ketone, ester or ether groups; leather, hand creams, hair products and cosmetics.
- Water and adhesives
- Do not immerse in rainwater, water or sweat or touch with wet/sweaty hands. Do not glue the thermal surface; use water-based starch, polyvinyl-alcohol or CMC glue on the back.
- Record protection
- Stamping either side can discolour blank areas or fade printed text through chemical reaction. Avoid scratching and friction heat. Keep a separate copy of important documents.
- Performance qualification
- Storage figures and life are information, not a guarantee.
- Actual storage, surface oil/dust and printing environment affect results; check in the actual environment.
- Brother assumes no responsibility for resulting damage or lost profit.
Guides
各部の名前
Instructions from the manualIdentify controls and parts3 steps
- Right-side view: cassette cover, paper check window and paper output slot.
- Left-side view: mode/status indicator, charging indicator, AC-adapter connector, USB connector and power switch with Bluetooth on/off switching.
- The rear view identifies the back cover and rechargeable-battery connector.
保護フィルムを取る
Instructions from the manualRemove the protective filmView
充電池を入れる/ 取り外す
Instructions from the manualInstall or remove the BT-200 battery5 steps
- Follow the safety guide when handling or disposing of the rechargeable battery.
- Slide the rear battery cover in direction 1, then lift it at point 2.
- To install, align the battery with connector 3 and seat the lithium-ion battery.
- To remove, take the battery out.
- Close the cover by reversing the cover-removal operations, 2 then 1.
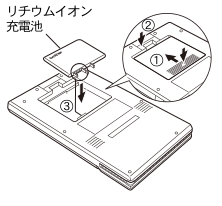
Diagram key
- Lithium-ion battery: リチウムイオン充電池 identifies the battery.
- 1: ① and its arrow identify the cover-slide direction.
- 2: ② identifies the finger-lift point for removing the cover.
- 3: ③ identifies the aligned battery connector.
- Insertion arrow: Downward arrow shows seating the battery on connector 3; reverse cover-removal operations 2 then 1 to close.
充電する
Instructions from the manualCharge the battery12 steps
- Before first use, charge until the orange charging light goes out.
- Connect the dedicated AC-adapter connector to the printer, then plug the adapter into a household AC100V outlet.
- Charging starts automatically; the orange indicator lights and goes out when complete.
- If it does not light, the battery may be incorrectly installed.
- Charge at 5–35°C.
- Outside this range charging may not occur; if temperature leaves the range during charging, it may stop while the light remains on.
- Turning the printer off for charging is recommended.
- Disconnect the AC adapter after charging.
- The battery must be installed: the printer cannot operate solely on adapter power.
- Alternatively use the supplied USB cable connected to a computer or mobile-device USB-AC adapter rated at least 5V/0.5A.
- Charging time varies with method and environment.
- Do not wrap the adapter cable around the adapter or bend it.
使わない時のリチウムイオン充電池の保管について
Instructions from the manualStore the battery when not in use6 steps
- Remove the battery and keep it cool, at low humidity and as steady a temperature as possible; 15–25°C and 40–60% humidity are recommended.
- Avoid heat, sunlight, vehicles, heaters and heated carpets.
- For long non-use, remove it and store in a cool dark place.
- Avoid storage fully charged; use the printer until the charging light flashes once before storage.
- Disconnect the AC adapter and keep metal away from battery terminals to prevent short circuit.
- About once every three months, charge the battery, use it again until the charging light flashes once, and return it to storage to prevent over-discharge deterioration.
充電表示ランプ
Instructions from the manualPreserve battery life during use6 steps
- Use as much of the charge as possible before recharging; wait until the three-flash indication continues.
- Even fully charged, the battery provides far fewer prints at 10°C or below.
- After charging disconnect the AC adapter.
- After USB charging, disconnect USB too unless printing using USB.
- Avoid 40°C or above and direct sunlight because heat accelerates deterioration.
- Short operating time despite sufficient charge indicates end of battery life; replace it with a new lithium-ion battery.
電源を入れる/ 切る
Instructions from the manualTurn the printer on or off5 steps
- Press the power switch until the mode light comes on: blue when Bluetooth is on, green when it is off.
- A light touch does not start it; hold it a little longer if needed.
- Press with the pad of a finger, never a pointed object or pen tip.
- To conserve battery, Bluetooth-on inactivity or lack of data triggers configured auto sleep; with Bluetooth off, it triggers configured automatic power off.
- Configure these intervals in Printer Properties > Device Settings > Utility using the reviewed software guide.
Bluetooth を使う
Instructions from the manualSwitch Bluetooth on or off11 steps
- To turn Bluetooth on, start with steady green.
- Hold the power switch until the mode light goes out and begins flashing blue; release it.
- The light becomes steady blue.
- To turn Bluetooth off, start with steady blue.
- Hold the switch until the light goes out and flashes blue; release it.
- It becomes steady green.
- Turning Bluetooth off is recommended for USB printing to save power.
- Turn Bluetooth off in hospitals, aircraft, near petrol/gasoline or other flammables, and near fire alarms.
- Connections may be difficult near electronics, broadcast/radio equipment or wireless LAN IEEE802.11.
- Availability after power-on can take a few seconds depending on the device.
- Before installing the computer driver, confirm that the computer or mobile device supports Bluetooth.
Bluetooth 通信を確立する
Instructions from the manualPair using Bluetooth16 steps
- Start with a steady green mode light.
- Hold the power switch until the light goes out and begins flashing blue; release it and check that it becomes steady blue, required for Bluetooth.
- Open the computer/mobile-device Bluetooth connection screen and search.
- Select MW-270_****, whose suffix is the last four serial-number digits.
- Establish the connection.
- For the first connection, enter the requested PIN/password/passcode; its factory value is the last four serial-number digits.
- Some devices request it again later.
- For a computer, select Serial Port as the connection method.
- Record a displayed COM port number: printing may require it.
- Consult the device instructions for details.
- If a device cannot find the printer, another device may already be connected.
- For iOS, disconnect that device or clear the last-device information.
- Otherwise disconnect the existing device or restart the printer.
- Bluetooth stays connected during sleep; disconnection can temporarily wake the printer.
- Closing a device smart cover during communication can interrupt it.
- If an iPad/iPhone/iPod moves out of range and disconnects, bring it near and select the printer again in Bluetooth settings.
自動再接続機能について
Instructions from the manualClear the last Bluetooth device information9 steps
- Automatic reconnection uses the last iPad/iPhone/iPod information after a power cycle or return into range.
- It is enabled by default and configurable in the driver utility.
- While connected to such a device, the printer is not discoverable by others.
- To clear last-device information, the printer must be powered on with Bluetooth disconnected.
- Check that the mode light is steady blue.
- Hold the switch until the light goes out then flashes blue; release it and check steady green.
- Press to turn the printer off, press to turn it on, press to turn it off, then press to turn it on.
- Hold the switch until the light goes out then flashes blue; release it.
- It becomes steady blue without automatically connecting to the former device.
用紙の準備
Instructions from the manualPrepare and handle the paper cassette11 steps
- Use only the dedicated cassette; other paper can cause misfeeds or damage.
- Avoid dropping sheets while preparing it.
- Firmly fold the rear lid along fold 1, then insert its tip into rear slit 2.
- Insufficient folding prevents correct feeding.
- Do not transfer paper between cassettes: paper type and settings are identified from the cassette.
- Do not return used or removed sheets.
- Do not use torn or deformed cassettes.
- The cassette is paper: dispose according to local rules.
- Avoid wet hands and preparation in extreme humidity.
- Store away from heat, humidity, sunlight and dust with the lid closed.
- Never leave in a hot parked car; use promptly to prevent discoloration.
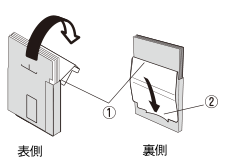
Diagram key
- Front: 表側 identifies the front view.
- Back: 裏側 identifies the back view.
- 1: ① identifies the rear fold line to bend firmly.
- Folding arrow: Curved arrow shows bending the lid back along fold 1.
- 2: ② identifies the back slit for the lid tip.
- Insertion arrow: Downward arrow shows inserting the tip into slit 2.
用紙をセットする
Instructions from the manualLoad the paper cassette7 steps
- Disconnect the AC adapter and USB cable before changing paper.
- Slide the top cover in direction 1 so it opens in direction 2.
- Place the cassette with its paper-type title up and sheet ends toward you, aligned without bent or uneven leading edges.
- Close the cover in direction 3, then slide it in direction 4 to lock.
- Correct loading shows the paper model through the check window.
- Do not load loose sheets directly; change the whole cassette to change paper type.
- Do not press near the output slot or put objects on the printer during printing.
パソコンで本機を使用する
Instructions from the manualInstall the computer software5 steps
- Download the installer from install.brother.
- Open the downloaded .exe and follow the screens.
- Select needed software/manuals in the pre-installation dialog; recommended items are preselected.
- Complete installation as directed.
- Available items are P-touch Editor 5.2 for layouts with fonts/templates/clip art, P-touch Update Software for Editor updates, Printer Setting Tool for P-touch Template settings, the driver required for printing and manuals.
排紙する
Instructions from the manualRemove jammed paper5 steps
- If paper protrudes from the output slot, pull it out slowly without tearing it.
- Then clean the feed roller to remove paper dust.
- If it does not protrude, open the cover, remove the cassette, then slowly pull out the jammed paper without tearing it.
- Clean paper dust from the roller afterward.
- Pulling the sheet out does not affect operation.
ペーパーガイドを使う
Instructions from the manualInstall or remove the optional PG-200 paper guide6 steps
- The PG-200 is sold separately.
- Place it with the paper check window visible.
- Align both side tabs with their grooves and press until they click into place.
- To remove, open the cassette cover.
- At callout 1 use a flat screwdriver or similar tool near the tabs, within about 1 cm above or below, to unhook one side at a time.
- The guide is not intended for repeated fitting/removal; repetition can damage the printer or distort the cover or guide.
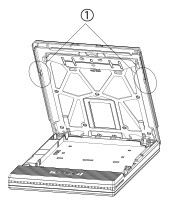
Diagram key
- 1: first tab area: ① points to one hooked-tab area; place a flat screwdriver or similar within about 1 cm above or below the tab to release it.
- 1: repeated tab area: The same branched① leader identifies the opposite tab; release one side at a time.
本機を清掃する
Instructions from the manualClean the printer surface4 steps
- Turn the printer off before maintenance.
- Wipe dirt/dust with a soft dry cloth.
- For heavy dirt use a water-moistened cloth wrung out firmly.
- Benzine and thinner can change its colour or shape.
センサーを清掃する
Instructions from the manualClean the cassette sensors4 steps
- Turn the printer off before maintenance.
- Remove sensor dirt with a dry cotton swab or similar implement.
- Dirty sensors can prevent correct cassette recognition and cause malfunction.
- Do not use benzine or thinner.
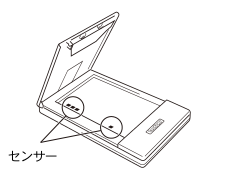
Diagram key
- Sensor: first location: First circled point reached by the センサー leader; remove dirt with a dry cotton swab.
- Sensor: repeated location: Second circled point reached by the same leader; clean by the same method.
カセットカバー内部を清掃する
Instructions from the manualClean inside the cassette cover8 steps
- Turn the printer off before maintenance.
- Dirt at A and B can make the cover difficult to open.
- Slowly open it outward to detach it.
- A loud removal sound is normal.
- Wipe A with a dry cotton swab or cloth; fine wear particles may accumulate there.
- Clean the opposite side as well.
- Cleaning B at the same time is effective.
- Refit the cover until it clicks into the white holders, using the reviewed cover-refitting troubleshooting instructions.
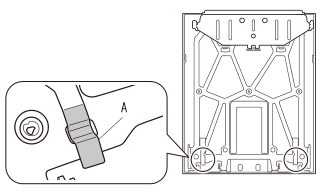
Diagram key
- A: Enlarged A friction surface is where fine wear particles and dirt may accumulate.
- First cleaning point: Circled point on the detached cover identifies one A mechanism location.
- Repeated cleaning point: Opposite circled point is cleaned by the same method.
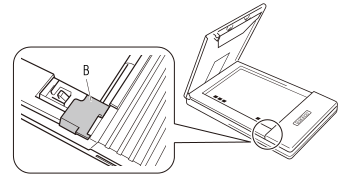
Diagram key
- B: Magnified B surface may be cleaned at the same time as A for improved effect.
- Circled B location: Printer-side receiver area reached by the B inset leader; clean with a dry cotton swab or cloth.
用紙送りローラーを清掃する
Instructions from the manualClean the paper-feed roller6 steps
- Turn the printer off before maintenance.
- Open the cassette cover and rotate the roller in the feed direction until it stops.
- Apply cellophane tape across the whole rubber surface.
- Slowly peel it off, then rotate the roller 3–4 mm opposite to the feed direction.
- The tape removes dirt.
- Repeat tape application, slow removal and rotation until the roller reaches its stop, cleaning the entire roller surface.
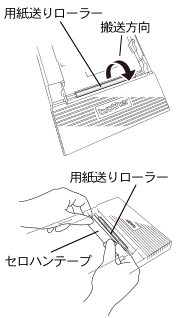
Diagram key
- Feed roller: upper view: 用紙送りローラー identifies the roller; rotate in the feed direction until it stops.
- Feed direction: 搬送方向 and curved arrow identify the feed direction.
- Feed roller: lower view: Repeated用紙送りローラー label identifies the same roller during tape cleaning.
- Cellophane tape: セロハンテープ: apply across the whole rubber surface,peel slowly,rotate 3–4 mm opposite the feed direction and repeat until its stop.
設定を変更する
Instructions from the manualOpen the printer driver utility8 steps
- The software guide documents Windows 7, 8.1 and 10 workflows; these are historical guide instructions, not a new OS-support claim.
- For Windows 7 choose Start > Devices and Printers; for 8.1 open Control Panel > View devices and printers; for 10 open Start > Windows System Tools > Control Panel > Hardware and Sound > View devices and printers.
- Right-click this printer and choose Printer Properties.
- Under Device Settings select Utility and click its Properties button.
- Change the required setting.
- If Current Setting/Time is Unknown, click Current Value to read it.
- After changes click Set, then Exit.
- Restore Initial Settings resets all settings.
一般タブ
Instructions from the manualConfigure general utility settings6 steps
- Auto power-off accepts 0–255 minutes; 0 disables automatic power-off.
- The printed default is 5 minutes.
- Command modes are Raster, ESC/P and P-touch Template.
- Bluetooth can be On or Off.
- Print speed can be Standard or Low; Low corresponds to the earlier MW-145/MW-260 series.
- Use the reviewed utility workflow to apply changes.
Bluetooth (1) タブ
Instructions from the manualConfigure Bluetooth sleep and reconnection5 steps
- With Bluetooth on, set auto-sleep from 0–255 minutes, printed default 3 minutes.
- Set power-off after sleep to immediately, 10 minutes, 30 minutes, 1 hour, 3 hours, 6 hours, 9 hours, 12 hours or Never.
- Power-saving choices are prioritize saving, Standard or prioritize connection time.
- Automatic reconnection for iPhone/iPad/iPod touch can be enabled or disabled.
- Apply using the reviewed utility workflow.
Bluetooth (2) タブ
Instructions from the manualConfigure Bluetooth security and discovery7 steps
- Choose PIN enabled/disabled, a 4–16 character half-width alphanumeric PIN when enabled, SSP enabled/disabled, and encryption on/off.
- Some settings cannot be changed depending on PIN state and Bluetooth version.
- SSP allows compatible Bluetooth 2.1 devices to pair without entering a PIN.
- Disable SSP if printing by others is not permitted.
- Devices that do not support SSP or have it disabled require pairing with a PIN and encryption.
- Allow or disallow discovery from other devices.
- If this printer cannot be found, change this setting from the computer.
Bluetooth (3) タブ
Instructions from the manualConfigure the Bluetooth device name3 steps
- Set a 1–24 character half-width alphanumeric/symbol device name.
- The default is MW-xxx_****, where xxx is the model and **** is the last four serial digits.
- The Bluetooth address field reads and displays the target printer address.
プリンター設定ツールを使用する
Instructions from the manualUse Printer Setting Tool for templates10 steps
- Use USB; P-touch Template Tool settings are available only over USB and only while the printer is in standby.
- Trying to configure it during a job may cause malfunction.
- Connect the printer.
- For Windows 7 choose Start > All Programs > Brother > Label & Mobile Printer > Printer Setting Tool; for 8.1 choose Printer Setting Tool on Apps; for 10 choose Start > Brother > Printer Setting Tool.
- Check the Printer field; choose the correct printer if more than one is connected.
- Click P-touch Template Settings.
- Set options in its dialog, then Set > Exit to apply them.
- Click Exit on the main screen.
- P-touch Template inserts device input into stored text/barcode objects; stored layouts can be recalled by scanning their template barcodes.
- Detailed command programming is covered by the separate command reference.
P-touch template 設定ダイアログボックス
Instructions from the manualConfigure P-touch Template options11 steps
- Choose command mode P-touch Template, ESC/P or Raster.
- Select the default template number only if that template has been transferred to the printer.
- Specify a 1–20 character delimiter marking the next object.
- Choose the print trigger: command string, all object data received at the final delimiter, or a specified character count; delimiters do not count toward that count.
- International character choices are United States, France, Germany, Britain, Denmark, Sweden, Italy, Spain, Japan, Norway, Denmark II, Spain II, Latin America, Korea or Legal.
- These switch codes 23h, 24h, 40h, 5Bh, 5Ch, 5Dh, 5Eh, 60h, 7Bh, 7Ch, 7Dh, 7Eh; consult the command reference for resulting characters.
- Specify a prefix command-identification string; 1–20 characters to ignore during reception; and a line-break code, choosing ^CR, ¥0D¥0A, ¥0A, ¥0D or a 1–20 character string.
- Set 1–99 copies.
- Set applies the dialog; its adjacent arrow saves settings as a command file.
- Cancel closes without changes.
- Restore Defaults resets the dialog content to factory settings.
P-touch editor を起動する
Instructions from the manualStart P-touch Editor 5.25 steps
- For Windows 7 use Start > All Programs > Brother P-touch > P-touch Editor 5.2; for 8.1 use the Apps screen; for 10 use Start > Brother P-touch > P-touch Editor 5.2.
- A desktop shortcut also works if present.
- Choose New Layout to create a layout; check Connect Database if needed.
- Choose Open for an existing layout.
- To change startup behaviour, use Tools > Options > General > Startup Settings > Operation; the default displays the new view.
P-touch editor を使用して印刷する
Instructions from the manualPrint in Express or Professional mode3 steps
- Express creates simple text/image layouts: choose File > Print or the Print icon, and configure the print screen before printing.
- Professional offers advanced tools: File > Print or print-settings icon A opens settings.
- Print icon B prints immediately without changing settings.
Snap モード
Instructions from the manualUse Snap modeView
テンプレートをp-touch transfer manager に転送する
Instructions from the manualTransfer a layout into Transfer Manager3 steps
- Create the layout in P-touch Editor 5.2 and save it with File > Save As as an .lbx template.
- Choose File > Transfer Template > Transfer to open Transfer Manager.
- Alternatively open Transfer Manager 2.3: Windows 7 Start > All Programs > Brother P-touch > P-touch Tools; Windows 8.1 Apps; Windows 10 Start > Brother P-touch.
Prepare the Transfer Express template4 steps
- Create a layout in P-touch Editor 5.2 and use File > Save As to save an .lbx template.
- Choose File > Transfer Template > Transfer.
- Transfer Manager opens automatically.
- Alternatively start Transfer Manager 2.3 using the Windows 7, 8.1 or 10 paths in the reviewed Transfer Manager instructions and drag the .lbx file into it.
メイン画面
Instructions from the manualUse the Transfer Manager interface7 steps
- Menu bar groups File, Edit, View, Tools and Help commands.
- Toolbar provides common commands.
- Printer Selector chooses the transfer destination and limits the list to data that printer can receive.
- Folder List shows folders/printers and their templates/data.
- Template List shows selected-folder templates; Preview shows the selected item.
- Toolbar commands are Transfer, Backup, Open, Print, Search and View Style.
- Transfer is Transfer Manager only; Print is Library only.
Usb 経由でコンピューターからプリンターへテンプレートやその他データを転送 する
Instructions from the manualTransfer templates and data to the printer14 steps
- Connect the powered-on printer to the computer by USB.
- Select it in the folder view and check it is the intended destination.
- Confirm the USB connection and power before transfer.
- Right-click Transfer Data Set > New to create a folder.
- Drag the templates/data into it.
- Select All Contents or filter categories to view data; multiple files can be dragged together.
- Each receives a key number representing its memory location.
- At most 99 templates can be transferred, with at most 50 objects per template.
- To change a key, right-click the item > Key Assignment and choose the number.
- Reusing a key overwrites the existing template; back up data to inspect existing assignments.
- If memory is full, delete one or more templates.
- To rename data select it and type a name; model-dependent length limits may apply.
- Select the folder and click Transfer, then OK.
- Individual items can be transferred without a folder, and multiple items/folders can be selected for one transfer.
プリンターに保存されたテンプレートやその他データをバックアップする
Instructions from the manualBack up stored printer data5 steps
- Connect the printer and turn it on.
- Select it in the folder view, click Backup, then OK.
- All stored templates/data are saved in a new date/time-named folder beneath that printer.
- Backed-up data cannot be edited on the computer.
- Data backed up from one model may not be transferable to a different model.
すべてのプリンターデータを削除する
Instructions from the manualDelete all stored templates and data4 steps
- This function requires USB.
- Connect the printer and turn it on.
- Right-click the printer in the folder view and choose Delete All.
- Confirm with OK to delete all stored templates and other data.
P-touch library を起動する
Instructions from the manualStart P-touch Library 2.33 steps
- For Windows 7 choose Start > All Programs > Brother P-touch > P-touch Tools > P-touch Library 2.3; for 8.1 choose it on Apps; for 10 choose Start > Brother P-touch > P-touch Library 2.3.
- The menu bar and toolbar give commands; Folder List selects folders; Template List shows selected-folder contents; Preview shows the selected item.
- Open opens the selected template, Print prints it, Search finds registered data, and View Style changes the list presentation.
テンプレートを開いて編集する
Instructions from the manualOpen and edit a library templateView
テンプレートを印刷する
Instructions from the manualPrint a library templateView
テンプレートやその他のデータを検索する
Instructions from the manualSearch and register library templates7 steps
- Click Search.
- Set conditions for name, type, size and update date.
- With multiple conditions choose AND to require all or OR to accept any.
- Click Start Search, then close the dialog.
- Results are under Search Results in the folder view.
- Register data by dragging it into All Contents or the folder list.
- For automatic registration from Editor choose Tools > Options > General > Registration Conditions, select when templates should be registered, then OK.
P-touch transfer express を準備する
Instructions from the manualPrepare Transfer Express4 steps
- Download the latest Transfer Express from Brother support under product selection/software downloads, and save it anywhere on the computer.
- This workflow requires USB.
- When sending a new template, choose an unused Transfer Manager key; an existing key will overwrite the stored template.
- An administrator can prepare templates and distribute them to users with Transfer Express.
テンプレートをtransfer package ファイル(.pdz)として保存 する
Instructions from the manualSave a Transfer Package file3 steps
- Select Transfer Data Set in the folder view and select the templates to distribute; multiple templates may be selected.
- Choose File > Save Transfer File, enter a name and Save as .pdz.
- Selecting Transfer Data Set or a folder and using Save Transfer File saves all its templates; multiple templates may share one package.
Transfer package ファイル(.pdz)とp-touch transfer express をユーザーに配布する
Instructions from the manualDistribute Transfer Express files3 steps
- Move the .pdz package into the downloaded Transfer Express folder.
- Distribute all files in that folder to the user.
- If the user already has Transfer Express, only the package is needed: place it in the existing downloaded folder and open PtTrExp.exe.
Transfer package ファイル(.pdz)をプリンターに転送する
Instructions from the manualTransfer a package using Transfer Express5 steps
- Do not turn off power during template transfer.
- Turn on the printer, connect it to the computer by USB, and open the supplied PtTrExp.exe in the Transfer Express folder.
- If exactly one .pdz is beside PtTrExp.exe, click Start to begin.
- If there are multiple packages or none, click Browse, select the package and Open, then Start and Yes.
- Click OK when transfer is complete.
Mfi 対応機器一覧
Instructions from the manualCheck the manual MFi compatibility listView
リチウムイオン充電池
Instructions from the manualHandle the lithium-ion battery safely16 steps
- Use only the specified battery/printer combination.
- Charge with the battery installed using the dedicated AC adapter or supplied USB cable with a 5 V/0.5 A-or-higher supply.
- Do not use the battery in other equipment or connect it directly to an outlet or cigarette-lighter socket.
- Do not disassemble, modify or repair it.
- Do not burn, heat, expose to 60°C-or-higher locations, immerse in water/seawater, use in corrosive surroundings, pierce, step on, hit or throw it.
- Do not use a damaged or leaking battery.
- Do not place it or the battery-equipped printer in a microwave or high-pressure container.
- Do not force installation.
- If liquid leaks, unplug AC and USB, stop use and do not touch the liquid.
- If it enters the eyes, do not rub: rinse with clean water and immediately obtain medical treatment.
- Rinse exposed skin/clothing with clean water.
- Isolate the leaking printer in a bag.
- For approximately three months or longer without use, remove the battery.
- Do not burn it or discard it with household waste.
- If full charging provides only brief use, replace it.
- Insulate removed battery contacts with tape to prevent short circuit.
Store the battery for long periods3 steps
- The supplied battery is only partly charged for testing; fully charge with the dedicated AC adapter or supplied USB cable and at least 5 V/0.5 A.
- For long non-use, remove it and store indoors preferably at 15–25°C and 40–60% humidity without static electricity.
- Recharge once every three months to preserve performance and life.
プリンター
Instructions from the manualStop use after foreign objects or abnormal operation10 steps
- Follow restrictions in aircraft and other prohibited places.
- Check electromagnetic compatibility before use near medical equipment; stop use around equipment affected by it.
- Do not put foreign objects into the printer or terminals.
- If any enter, immediately turn off the power switch, unplug AC and USB, and contact the dealer or Brother call centre.
- Do not disassemble or modify the printer.
- Contact the dealer or Brother call centre for internal inspection, adjustment or repair.
- If smoke, unusual smell or unusual noise occurs, immediately turn off power, unplug AC and USB, and request repair.
- Use only the specified charging method and keep charging contacts and their surroundings clean.
- Do not use the printer or battery if leaking, discoloured, deformed or otherwise abnormal.
- Do not hold only the cassette cover; it may detach and let the printer fall.
Protect the printer during handling10 steps
- Do not remove product/operation labels.
- Do not press the power switch with pointed objects.
- Do not carry the printer with power or USB cables connected.
- Store away from heat, humidity, sun and dust.
- Do not put objects in or block the paper outlet, power connector or USB port.
- Use no thinner, benzine, alcohol or other organic solvents for cleaning.
- Use a soft dry cloth; follow the operation guide’s explicit water-wrung-cloth exception for heavy exterior dirt.
- Read optional-accessory instructions before use.
- Do not touch the printer with wet hands.
- Writing or stamping thermal paper may erase or discolour print and ink may dry slowly.
Ac アダプター
Instructions from the manualUse and maintain the AC adapter safely14 steps
- Use only this printer’s dedicated adapter, and do not use it for other equipment.
- Insert plugs fully and use only a household AC 100 V outlet.
- Do not touch the printer or adapter during thunder.
- Do not handle the adapter or plug with wet hands, disassemble/modify/repair it, spill liquids or metal onto it, or use it where it may get wet.
- Have the dealer or Brother call centre inspect, adjust or repair it.
- Unplug a dusty plug and wipe it with a dry cloth.
- Remove it by its non-metal body, not by pulling the cable.
- Do not insert objects into adapter terminals.
- Do not damage, modify, twist, forcibly bend, pull, load, heat, bundle or pinch the cable.
- Stop using a damaged adapter and contact the dealer.
- Keep it away from children/infants, microwave ovens, flames and heaters.
- Unplug the adapter before maintenance.
- For long storage disconnect it from both printer and outlet.
- Do not wind its cable around the adapter or fold it.
ペーパーカセット/用紙
Instructions from the manualHandle paper and the supplied USB cable8 steps
- Store paper/cassettes away from heat, humidity, sun and dust; close cassette lids.
- Do not leave them in a closed hot vehicle.
- Use opened paper promptly.
- Do not transfer sheets between cassettes or return used/removed sheets.
- Do not open the cover or pull/push paper during printing.
- Do not use folded, curled, cut, wet or condensation-covered sheets; do not handle paper/cassettes with wet hands or prepare/replace them in very humid conditions.
- Use Brother genuine C-Paper.
- Use the supplied USB cable for charging and a USB port rated at least 5 V/0.5 A.
Bluetooth® の電波に関するご注意
Instructions from the manualObserve the Japan radio-use limitation4 steps
- The built-in radio module is certified under Japanese radio law; this printer is for use in Japan only, and overseas use may be penalized.
- Before use, check that nearby premises and specified low-power stations used for mobile-object identification are not operating.
- If interference affects a premises station, promptly switch the printer off and stop Bluetooth use.
- For interference affecting specified low-power or amateur stations, or other problems, contact the Brother call centre.
充電池の廃棄
Instructions from the manualRecycle an unwanted battery in Japan5 steps
- Do not disassemble the battery.
- Cover contacts with insulating tape.
- Never dispose of it with general household waste because of environmental, rupture and fire risks.
- Individual users can locate a rechargeable-battery collection box through the JBRC participating-shop/municipality search.
- Corporate users should contact the Brother call centre.
Model details
Model and compatibility
- Paper and printing
- Direct thermal 300×300 dpi on genuine Brother A6 cut sheets,105×148 mm. Print area97.5×140.6 mm; C-251 uses93×137 mm.
- Battery and charging
- BT-200 lithium-ion7.4V. Approximate empty-to-full with power off and supplied equipment:2hours by AC adapter,4hours by USB Type-C.
- Interfaces
- USB2.0 Full Speed and Bluetooth2.1+EDR Class2 SPP/iAP2.
- Dimensions and mass
- 130×210×18.5 mm (W×D×H),approximately520g including battery and cassette with50thermal sheets.
- Region
- Japan-market model. Use in Japan only; the supplied AC-adapter instructions specify household AC 100 V.