MODEL REFERENCE
Brother PT-1260
4 errors · 9 troubleshooting topics · 30 guides
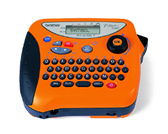
The checks and guides below come from the official manuals for this model.
No matches for this wording. Try a light name, error code or a shorter phrase.
Errors and messages
Messages and indicator states from the manual ERRORan error occurred3 checks
BATTERYweak batteries
Replace weak batteries with new ones. The Power Supply instructions require six AAA alkaline LR03 batteries, replacing all six at the same time.
B A T T E R Ybatteries about to run out
The installed batteries are about to run out. This row supplies no separate remedy; see the reviewed battery replacement instructions.
FULLtext or memory full
- The maximum 55 entered characters have already been entered, or memory is full.
- For 300 stored characters, press the Function dial or Return, then delete one stored text file before storing the current text.
- The table supplies no separate remedy for the 55-character text limit.
Troubleshooting
Find the problem you are experiencingDisplay stays blank after power on3 checks
- Battery insertion
- Check that the batteries are correctly inserted.
- Weak batteries
- Replace weak batteries.
- Adapter connection
- Check that the AC adapter is correctly connected.
Margins on both sides are too large1 check
- Tape margin setting
- Under TAPE MARGIN, select # (4 mm) for smaller margins.
Printing fails or characters are malformed3 checks
- Cassette insertion
- Check that the tape cassette is correctly inserted.
- Empty cassette
- Replace an empty cassette.
- Compartment cover
- Check that the tape compartment cover is properly closed.
Settings and memory cleared themselves2 checks
- Weak batteries
- Replace weak batteries.
- Power disconnected for more than three minutes
- All displayed text and formats and stored text files are lost. This condition supplies no separate recovery procedure.
Blank horizontal line through printed label2 checks
- Dust on the print head
- Remove the cassette and gently wipe the print head up and down with a dry cotton swab.
- Optional cleaning cassette
- The optional TZ-CL3 print head cleaning cassette can clean the head more easily.
Machine locks up1 check
- No response while powered on
- Turn off. Hold Code and Delete, press Power to turn on, then release Code and Delete. Displayed text and formats and stored texts are erased.
Power turns off when printing2 checks
- Weak batteries
- Replace weak batteries.
- Battery insertion
- Check that batteries are correctly inserted.
Tape does not feed or gets stuck2 checks
- Tape path
- Check that the tape end feeds under the tape guides.
- Cutter used while printing
- Do not touch the cutter lever during printing.
Striped tape appears1 check
- Empty cassette
- Replace the empty tape cassette.
Guides
Power supply
Instructions from the manualInstall or replace batteries6 steps
- Press the rough area at the top and fold open the back cover.
- Pull an installed cassette straight out, then remove the batteries.
- Insert six AAA alkaline LR03 batteries: the positive ends of the bottom three point toward the top of the machine, and the top three point in the opposite direction.
- Replace all six together; do not mix old and new batteries or alkaline with other types, reverse polarity, or use metallic tools.
- Insert new batteries within three minutes of removing old ones or displayed text and stored files are lost, unless the AC adapter remains connected.
- Close the back cover securely until it snaps into place.
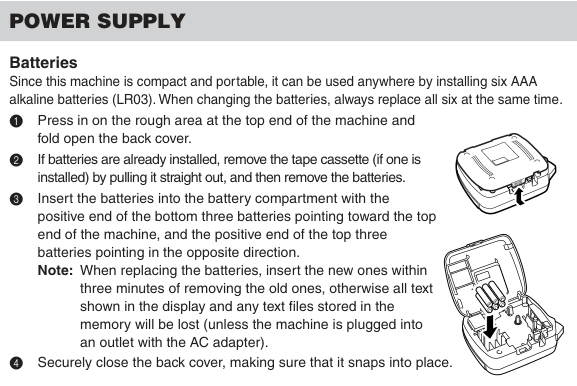
Diagram key
- 1 — Cover opening and arrow: Press the rough top area and fold the cover open.
- 2 — Remove cassette and old batteries: Pull an installed cassette straight out, then remove the batteries.
- 3 — Battery positions, insertion arrow and repeated polarity signs: Use six AAA alkaline LR03 cells: bottom three positive ends point toward the machine top; upper three point oppositely. Replace all six together, without mixed types or ages.
- 4 — Close cover: Close securely until it snaps into place. The step 3 note requires replacing batteries within three minutes unless adapter power remains connected; otherwise displayed text and stored files are lost.
Connect the optional AC adapter5 steps
- Use the specified voltage and suggested MODEL-G1 adapter.
- The adapter is included with PT-1260VP; do not imply it is included with the standard PT-1260.
- Insert the adapter cord plug into the socket on the bottom of the machine, then insert the plug fully into the nearest standard outlet.
- Do not use a loose outlet.
- Keep the adapter and plug dry.
Tape cassettes
Instructions from the manualInstall a tape cassette8 steps
- Use Brother TZ tape in 6,9 or 12 mm widths.
- Press the rough top area and open the back cover.
- Pull an installed cassette straight up.
- If the replacement cassette ribbon is loose, wind its toothed wheel with a finger in the cassette arrow direction until no slack remains; ensure the tape end feeds under the guides.
- Remove the stopper from a new cassette if fitted.
- Insert the cassette firmly so its entire back contacts the compartment bottom; the inner ribbon must not catch the metal guide corner.
- Close the back cover until it clicks.
- Hold Code and press Print once to feed, then push the cutter lever to cut.
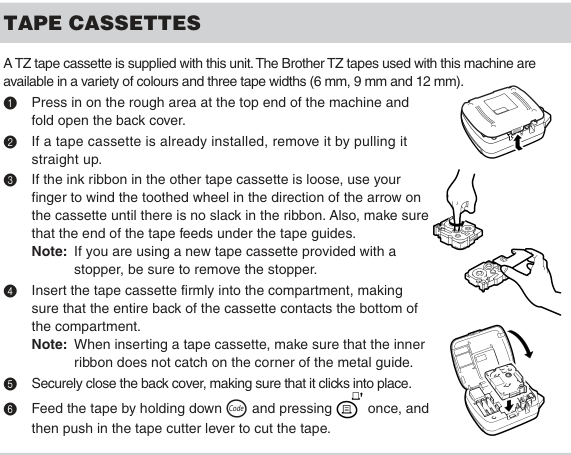
Diagram key
- 1 — Cover opening: Press the rough top area and fold open the back cover.
- 2 — Remove cassette: Pull an installed cassette straight up.
- 3 — Tension ribbon and winding arrow: If ink ribbon is loose, wind the toothed wheel in the arrow direction until there is no slack; feed the tape end under its guides. Remove a new cassette stopper if fitted.
- 4 — Cassette insertion: Insert firmly with the entire back contacting the bottom; avoid catching inner ribbon on the metal guide corner.
- 5 — Close cover and closing arrow: Close securely until it clicks.
- 6 — Feed and cut with Code and Print symbols: The Code and Print key symbols mean hold Code and press Print once to feed, then push the cutter lever to cut.
Starting
Instructions from the manualStart and resume work3 steps
- Press Power.
- With batteries or the optional adapter supplying power, the previous session reappears when the machine is turned on.
- After five minutes without a key press, power turns off automatically, retaining the session in internal memory for the next power-on.
Code key
Instructions from the manualUse Code shortcutsView
Hold Code and press a key whose function, character or accent is written in blue above it to use that function or enter that character.
Caps key
Instructions from the manualUse uppercase lettersView
Press Caps to enable uppercase entry; the Caps indicator at the top-left lights. Press Caps until that indicator goes off to leave Caps mode.
Num key
Instructions from the manualEnter numbersView
Press Num to enter numbers using the corresponding keys; the bottom-left Num indicator lights. Press Num until the indicator goes off to leave Num mode.
Display
Instructions from the manualRead the displayView
The LCD shows one row of eight characters, viewing entered text of up to 55 characters through a moving window.
Cursor movement
Instructions from the manualMove through textView
Press Left or Right to move one character. Hold Code and press Left to go to the beginning, or Code and Right to go to the end.
Delete key
Instructions from the manualDelete text or cancel a function3 steps
- Press Delete to remove the character left of the cursor or cancel a function instead of confirming it with Return.
- Hold Code and press Delete to clear all currently entered text.
- The Memory section states stored files remain after this clearing.
Space key
Instructions from the manualInsert spacesView
Press Space to insert a blank space.
Return key
Instructions from the manualAdd a second line or confirm a settingView
Press Return to select a setting, or once to end the first line and begin the second. The return mark identifies this boundary. Two-line text requires 9 or 12 mm tape.
Composite characters
Instructions from the manualEnter composite characters3 steps
- Hold Code and press the diacritical-mark key.
- Press Caps first if the resulting character should be uppercase, then press the letter to combine with the mark.
- Supported combinations are grave A E I O U and lowercase; acute A E I O U and lowercase; diaeresis A E I O U and lowercase plus y; circumflex A E I O U and lowercase; tilde A N O and lowercase.
Accented characters
Instructions from the manualEnter accented characters5 steps
- Press Caps if an uppercase accented character is needed.
- Press Accent; A-Y? appears.
- Turn the Function dial until the cursor is under the desired character, or press its base-letter key and use Left/Right.
- Press the Function dial or Return to insert it.
- Delete cancels without changes.
Symbols
Instructions from the manualInsert symbols5 steps
- Turn Function to SYMBOL and press the dial or Return; A-J? appears.
- Select one of 75 symbols in 10 groups by turning the dial, or press the group letter and use Left/Right to choose the symbol.
- Press the dial or Return to insert.
- Delete cancels without changes.
- Check any applicable local, national or European rules governing the symbol before use.
Size
Instructions from the manualChoose character size5 steps
- Turn Function to SIZE and press the dial or Return.
- Turn the dial or use Left/Right to choose AUTO or SIZE1 standard, SIZE2 double width, SIZE3 double height, SIZE4 double width and height, or SIZE5 four-times width and double height.
- Press the dial or Return to apply; Delete cancels without changes.
- AUTO selects the largest size for the installed tape and lights all size indicators.
- Two-line text always uses SIZE1 regardless of selection.
Style
Instructions from the manualChoose a print style5 steps
- Turn Function to STYLE and press the dial or Return.
- Turn the dial or use Left/Right to select NORMAL, OUTLINE, BOLD, SHADOW, ITALIC, I+OUTL, I+BOLD, I+SHADOW or VERTICAL.
- Press the dial or Return to apply; Delete cancels without changes.
- The Style indicator lights for a non-NORMAL style.
- Two-line text always prints NORMAL regardless of selection.
Underline/frame
Instructions from the manualUnderline or frame text5 steps
- Turn Function to UNDL/FRM and press the dial or Return.
- Turn the dial or use Left/Right to choose OFF, ROUND, BANNER, WOODEN, VINE or UNDL, then confirm with the dial or Return.
- Delete cancels without changes.
- The underline/frame indicator lights for a setting other than OFF.
- Neither underline nor frame prints with VERTICAL style.
Mirror printing
Instructions from the manualMirror-print transparent labels3 steps
- Use transparent tape so the adhesive-side text reads correctly through glass or another transparent surface.
- Turn Function to MIRROR and press the dial or Return, choose the desired setting with the dial or Left/Right, then confirm with the dial or Return.
- Delete cancels without changes.
Tape margin
Instructions from the manualSet tape margins6 steps
- Turn Function to TAPE and press the dial or Return.
- Choose the margin setting with the dial or Left/Right and confirm with the dial or Return.
- The #,##and### settings leave 4,12 and 24 mm equal margins respectively.
- Delete cancels without changes.
- The - setting allows different formats on one label without intermediate feeding; afterward hold Code and press Print once to feed before cutting, or characters may be cut off.
- For # or ##, cut with the lever and use scissors along the printed dots to centre the text.
Printing & cutting
Instructions from the manualPrint feed and cut labels6 steps
- After entering and formatting text, press Print; PRINT appears and tape exits at the top.
- To feed 25 mm, hold Code and press Print once; FEED appears.
- Push the cutter lever at the top-right to cut.
- Never cut during PRINT or FEED or pull fed tape.
- For # or ## margins, cut with the lever then use scissors at the printed dots to centre text.
- Do not print with an empty cassette.
Repeat printing
Instructions from the manualPrint repeated copies6 steps
- Turn Function to REPEAT and press the dial or Return;1-9? appears.
- Turn the dial or use Left/Right for the copy count, or press its 1-9 number key.
- Press the dial, Return or Print to print up to nine identical labels.
- Delete cancels without changes.
- After printing with the tape margin setting, hold Code and press Print once to feed before cutting.
- For #,##or### margins, cut with the lever then separate labels with scissors at printed dots.
Numbering
Instructions from the manualPrint incrementing numbers7 steps
- Position the cursor under the number to increase.
- Turn Function to NUMBER and press the dial or Return;1-9? appears.
- Turn the dial or use Left/Right to choose the last number, or press its 1-9 key.
- This last number must exceed the selected starting number or ERROR appears.
- Press the dial, Return or Print to print, increasing the selected number by one each label, as in 0123,0124,0125.
- Delete cancels without changes.
- Feed with Code plus Print before cutting after using the tape margin setting; for #,##or###, separate labels with scissors at printed dots.
Flagging
Instructions from the manualMake a cable or wire flag7 steps
- Turn Function to REPEAT and press the dial or Return.
- Select 2 using the dial, Left/Right or the 2 key, then press the dial, Return or Print.
- Wrap the labels around the cable or wire and stick the ends together as a flag.
- For a shorter diameter choose # or ## tape margins; for a longer diameter choose ### or add equal spaces before and after the text.
- Greater spacing makes a longer flag diameter.
- Delete cancels without changes.
- Follow the reviewed Repeat Printing feed-and-cut precautions.
Memory
Instructions from the manualUnderstand file memory3 steps
- Memory stores up to 300 characters in up to nine files, with up to 55 characters in one file.
- Stored files remain when displayed text is cleared with Code plus Delete.
- Recall stored text for reuse.
Storing text
Instructions from the manualStore a text file8 steps
- Turn Function to MEMORY and confirm with the dial or Return.
- Select STORE and confirm;1-9? appears.
- Choose the destination file with the dial, Left/Right or its 1-9 key, then confirm with the dial or Return.
- The previous display returns.
- Delete cancels without changes.
- If ERROR means the file already contains text, confirm and choose another file.
- If all nine files are occupied, confirm ERROR and delete one before storing.
- If 300 characters are stored, confirm FULL and delete a stored file before storing the current text.
Recalling text
Instructions from the manualRecall a text file5 steps
- Turn Function to MEMORY and confirm with the dial or Return.
- Select RECALL and confirm;1-9? appears.
- Select the file using the dial, Left/Right or its 1-9 key.
- Confirm with the dial or Return to clear the display and recall the selected text.
- Delete cancels without changes.
Deleting a text file
Instructions from the manualDelete a stored text file5 steps
- Turn Function to MEMORY and confirm with the dial or Return.
- Select DELETE and confirm;1-9? appears.
- Select the file using the dial, Left/Right or its 1-9 key.
- Confirm with the dial or Return to delete that file.
- Delete cancels without changes.
General precautions
Instructions from the manualClean handle and store the machine6 steps
- Clean the machine only with a soft dry cloth; do not use alcohol or other organic solvents.
- Do not touch the print head mechanism; use a soft wipe such as a cotton swab or TZ-CL3 cleaning cassette.
- Do not touch the cutter edge, press the LCD, place foreign or heavy objects on the machine or leave rubber/vinyl on it.
- Do not disassemble or modify the machine or adapter.
- Keep them dry and away from extreme heat, humidity, sunlight, rain, heaters and dusty places.
- For prolonged storage remove batteries and unplug the adapter; after more than three minutes without power, text, formats and stored files clear.
Introduction
Instructions from the manualDispose of the machine separatelyView
At end of life, dispose of this marked equipment separately at an appropriate collection point, not in normal domestic unsorted waste.
Controls and parts
See the manual diagrams 1 diagram
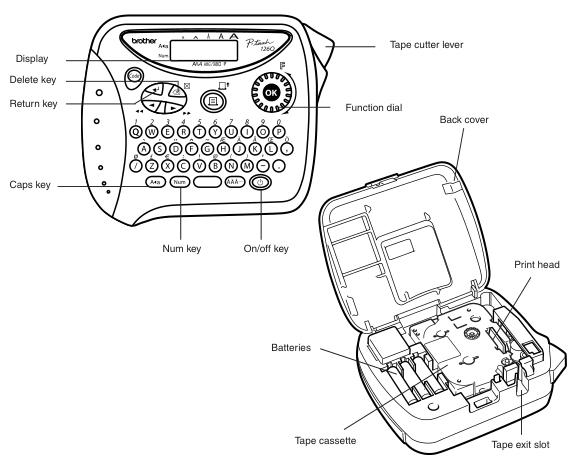
Diagram key
- Display: One row of eight characters views up to 55 entered characters.
- Delete key: Deletes left of cursor or cancels; Code plus Delete clears entered text.
- Return key: Confirms selections or starts a second line with 9 or 12 mm tape.
- Code key: Hold with another key to use its blue function or character.
- Caps key: Switches uppercase mode; Caps indicator lights at top-left.
- Num key: Switches number entry; Num indicator lights at bottom-left.
- On/off key: Starts the machine and restores the previous powered session; automatic off follows five idle minutes.
- Tape cutter lever: Cuts tape; do not touch during PRINT or FEED.
- Function dial: Turn to choose functions and settings; press to confirm.
- Back cover: Press its rough top area and fold open; close until it clicks.
- Print head: Do not touch the mechanism; clean with a soft wipe, dry swab or TZ-CL3 cassette.
- Batteries: Six AAA alkaline LR03 batteries; replace all together with correct polarity.
- Tape cassette: Brother TZ 6,9 or 12 mm tape; entire cassette back must contact the compartment bottom.
- Tape exit slot: Printed tape exits here; never pull the fed tape.
Model details
Model and compatibility
- Tape
- Brother TZ tapes in6,9and12mm widths; two-line text requires9or12mm.
- Power
- Six AAA alkaline LR03 batteries or optional7V1.2A MODEL-G1 adapter.
- Memory
- Up to300 characters divided among nine files;55characters maximum per file.
- Dimensions and weight
- 154×129×64mm (W×D×H);400g without batteries or cassette.