MODEL REFERENCE
Brother PT-65
1 error · 29 guides
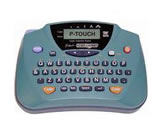
The checks and guides below come from the official manuals for this model.
No matches for this wording. Try a light name, error code or a shorter phrase.
Errors and messages
Messages and indicator states from the manual BATTERYlow batteries after printing
- BATTERY appears after printing when batteries are low.
- With very low batteries, the machine automatically switches off when you try to print or feed tape.
- The complete battery replacement sequence is provided under Change the batteries.
Guides
Care and precautions
Instructions from the manualCare and safe storage6 steps
- Clean the machine with a soft, dry cloth.
- Use only AA-size LR6 alkaline batteries.
- Keep the machine and cassette away from high temperatures, high humidity and excessive dust.
- Remove batteries for extended non-use.
- Do not touch the cutter button while printing or changing the cutter unit; do not touch the blade or block the tape exit.
- Never put labels in your mouth or stick them onto skin.
Machine does not respond to keys3 steps
- Press On/Off to turn the machine off.
- Hold Code and Backspace (Clear), then press On/Off once to turn it on again.
- This is the manual’s recovery sequence for a machine that locks up.
Fcc notice
Instructions from the manualRespond to radio or television interference3 steps
- Determine whether the equipment causes interference by turning it off and on.
- Try reorienting or relocating the receiving antenna, increasing separation between equipment and receiver, connecting the equipment to an outlet on a different circuit from the receiver, or consulting the dealer or an experienced radio/TV technician.
- Changes or modifications not expressly approved by Brother Industries, Ltd. could void authority to operate the equipment.
How to make a label
Instructions from the manualMake a label7 steps
- Insert batteries.
- Insert a tape cassette bearing the M TAPE logo.
- Press On/Off.
- Enter and format up to 55 characters, including spaces.
- Press Print; the back cover must be attached or printing is impossible.
- Cut the label, then peel off its backing.
- Do not force the cutter: its safety mechanism prevents operation when no cassette is installed and the back cover is removed; forcing it may prevent correct printing.
Changing the batteries
Instructions from the manualChange the batteries5 steps
- Press the rough area at the top end and pull off the back cover.
- If batteries are installed, first pull out any tape cassette, then remove the batteries negative end first.
- Insert six new AA-size LR6 alkaline batteries positive end first, following the compartment illustration: the positive ends of the bottom three point downward, and the upper three point oppositely.
- Always replace all six together with brand-new batteries.
- Insert the two hooks at the bottom of the back cover into the bottom slots, then press the cover firmly until it snaps into place.
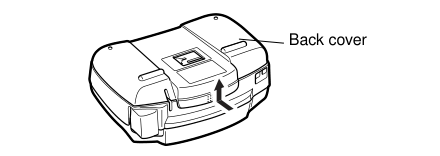
Diagram key
- Back cover: Press the rough top area and pull the cover off.
- Upward arrow: Shows the back cover being pulled away from the machine.
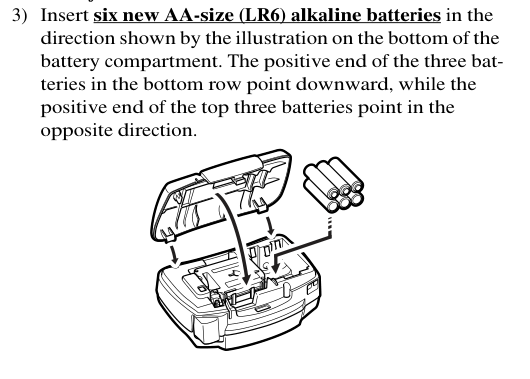
Diagram key
- 3: Insert six new AA LR6 alkaline batteries with the orientation stated in the complete instruction above the diagram.
- Six battery positions and repeated polarity marks: Use six new AA LR6 alkaline batteries. Bottom-row positive ends point downward; upper-row positive ends point oppositely. Insert positive ends first, remove negative ends first and replace all six together.
- Insertion arrows: Shows the batteries entering the compartment. Remove any tape cassette before removing installed batteries.
Changing the tape cassette
Instructions from the manualChange the tape cassette8 steps
- Press the rough area at the top and pull off the back cover.
- Pull an existing cassette straight out.
- Remove the paper tab from the new cassette and ensure the tape end feeds under its guides.
- Insert the cassette until it clicks, fitting it around both metal guides.
- Insert the two back-cover hooks into the bottom slots and press firmly until the cover snaps into place.
- Hold Code and press Space (Feed), then press the cutter button to cut.
- Remaining tape is visible through the back-cover window; green ribbon appears when usable tape is finished.
- The leaflet describes a 4 m starter tape and 8 m purchased tapes.
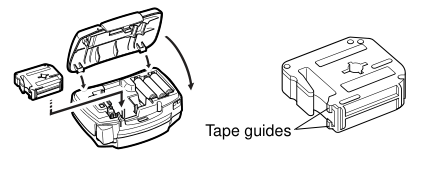
Diagram key
- Tape guides: The tape end must feed under the guides on the new cassette.
- Cassette insertion arrow: Insert until it clicks and fits around the two metal guides.
- Curved cover arrow: Shows the cover closing; attach its two bottom hooks into the slots and press firmly until it snaps into place.
- Repeated machine and separate cassette: The cassette enters the compartment; its tape end feeds under the labeled guides.
Changing the cutter unit
Instructions from the manualChange the cutter unit6 steps
- Replace a cutter that is blunt and no longer cuts cleanly.
- Remove the back cover and cassette.
- Grasp the tab on top of the cutter and pull it out without touching the blade.
- Grasp the new unit’s tab and insert it as shown in the reviewed figure.
- Do not touch the blade.
- Keep the cutter unit safely out of small children’s reach.
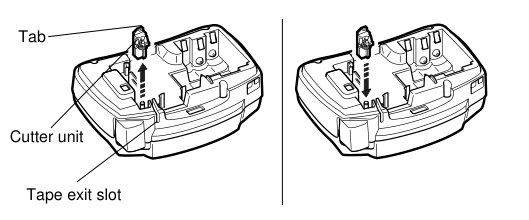
Diagram key
- Tab: Grasp this tab to remove or insert the cutter, without touching the blade.
- Cutter unit: Replace when blunt and no longer cutting cleanly.
- Tape exit slot: The labeled slot must not be blocked.
- Upward arrow: Pull the old cutter out by its tab after removing the back cover and cassette.
- Downward arrow: Insert the new cutter by its tab as shown. Keep the unit safely out of small children’s reach.
- Repeated compartments and tabs: Left shows removal of the old cutter; right shows insertion of its replacement.
Cleaning the print head
Instructions from the manualClean the print head6 steps
- If dust causes blank horizontal lines, turn the P-Touch off.
- Remove the back cover and cassette.
- Gently wipe the print head and rubber pinch roller up and down with a dry cotton swab.
- Reinsert the cassette, attach the cover and turn on the machine.
- Hold Code and press Space (Feed), then try printing.
- If blank lines remain, repeat this entire sequence, using a cotton swab dipped in isopropyl (rubbing) alcohol for the cleaning step.
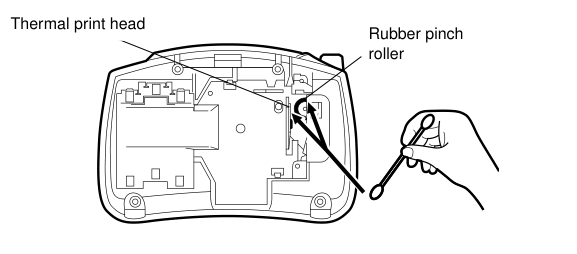
Diagram key
- Thermal print head: Gently wipe with a dry cotton swab after turning off and removing the cover and cassette.
- Rubber pinch roller: Wipe gently up and down with the same dry swab.
- Swab and repeated stroke arrows: Use an up-and-down motion. Reinstall, feed and test. If blank lines remain, repeat the entire sequence with isopropyl alcohol on the swab.
Accessories
Instructions from the manualFind replacement accessories4 steps
- The leaflet lists M-series 12 mm tapes M-931, M-831, M-531, M-731, M-E31 and M-231 for black on silver, gold, blue, green, pink and white; 9 mm tapes M-921, M-821, M-521, M-721 and M-E21 for black on silver, gold, blue, green and pink.
- It lists replacement cutter TC7 and carrying case 6991.
- Historical prices are not current purchase quotations.
- Most retailers and distributors carry tape cassettes; the leaflet refers to the separately included Accessory Order Form for direct orders.
Function keys
Instructions from the manualSwitch power on or off3 steps
- Press On/Off.
- The machine automatically switches off if no key is pressed for five minutes.
- Turning it off and on preserves the current text, size, style, underline/frame setting and Caps setting.
Use capital lettersView
Press Caps to toggle the Caps indicator. With the indicator on, character keys enter capitals; with it off they enter lowercase letters.
Enter numbersView
Press Num to toggle the Num indicator. With it on, the corresponding keys enter numbers; with it off they enter letters.
Enter a spaceView
Press Space to add a space.
Enter or confirm a second line3 steps
- Press Return to end the first line and start the second, or to confirm a setting such as a symbol or accent.
- Two-line text requires SIZE1 and NORMAL style.
- To return to one line, use Backspace to delete the line marker.
Use Code functionsView
Use either Code key to access functions or characters printed in yellow above the keys; the left and right Code keys work the same way.
Move the cursor3 steps
- Use the left or right arrow to move the cursor through text beyond the eight displayed characters.
- Hold an arrow to move several characters.
- Hold Code and press left to reach the first character, or Code and right to reach immediately after the last.
Delete or clear text2 steps
- Press Backspace to delete the character left of the cursor, or cancel the current function and return to text mode.
- Hold Code and press Backspace (Clear) to erase all current text; size, style, underline/frame and Caps/Num settings remain.
Review text and label length5 steps
- Hold Code and press H (Check).
- All text scrolls from the beginning, followed by its length.
- While scrolling, press M to change units.
- Press left, right or M until the desired unit appears, then Return.
- The current length appears briefly.
Feed tapeView
Hold Code and press Space (Feed) to feed about 1 inch (24 mm); FEED appears while feeding. Do not press the cutter during feeding: this causes a tape jam.
Print textView
Press Print to print entered text; PRINT appears during printing. Do not press the cutter during printing: this causes a tape jam.
Enter accented characters6 steps
- Set Caps as required, then hold Code and press F (Accent).
- At A–U?, press A, C, E, I, N, O or U.
- Move the cursor under the desired accent with left/right arrows and press Return.
- The selected character is added to the text.
- To cancel the list, press Backspace or Code plus F instead of Return.
- Available lowercase/uppercase sets are A: àáäâãæ / ÀÁÄÂÃÆ; C: ç / Ç; E: èéëê / ÈÉËÊ; I: íïî / ÍÏÎ; N: ñ / Ñ; O: óöôõ / ÓÖÔÕ; U: ùúüû / ÙÚÜÛ.
Advanced functions
Instructions from the manualChange text size4 steps
- Hold Code and press & (Size).
- The current size appears and is indicated above the display.
- Keep Code held and press & until the desired SIZE1, SIZE2, SIZE3, SIZE4 or SIZE5 appears and is indicated.
- It applies to all text.
Change text style4 steps
- Hold Code and press A (Style).
- Keep Code held and press A until the desired style appears.
- It applies to all text.
- Options are NORMAL, OUTLINE, BOLD, SHADOW, ITALIC, I+OUTL (italic/outline), I+BOLD (italic/bold), I+SHADOW (italic/shadow) and VERTICAL.
Add underlining3 steps
- Hold Code and press S (Underline).
- Keep Code held and press S to toggle TEXT (none) and UNDL.
- Underlining applies to all text, is not printed in VERTICAL style and cancels a previously chosen frame.
Add a frame4 steps
- Hold Code and press D (Frame).
- Keep Code held and press D until the desired frame appears.
- Options are TEXT (none), ROUND, WOODEN, POINTING, CANDY, DOT, DIAMOND and SLANT.
- A frame surrounds all text, is not printed in VERTICAL style and cancels previously chosen underlining.
Add a symbol5 steps
- Press Sym.
- At A–I?, press the letter for the symbol group in the manual’s complete symbol table.
- Use left/right to position the cursor under the symbol, then Return to add it.
- To cancel and return to text without adding a symbol, press Backspace or Sym instead of Return.
- The manual’s table supplies the available symbols; no additional symbols are inferred.
Print repeated copiesView
Hold Code and press G (Repeat). At 1–9?, press the number for the desired quantity. Press Return to print that number of copies of the current text with its formats.
Use preset formatted layouts6 steps
- Hold Code and press J (Preset).
- At 1–9?, press the preset number.
- When its name appears, press right to view its size, style and underline/frame settings.
- Press Return to select the format, then enter text.
- The label prints with those settings.
- Nine preset layouts are shown in the manual.
Important warranty information
Instructions from the manualGet help after reading the leaflet2 steps
- Keep the packing and other materials.
- The historical US leaflet asks users with product problems not to return the product to the store; after reading the manual, it lists Brother’s help line at 1-877-478-6824.
Model details
Model and compatibility
- Power
- Six AA LR6 alkaline batteries.
- Text capacity
- Up to 55 characters including spaces.
- Tape
- M TAPE cassettes; 9 mm and 12 mm widths.