MODEL REFERENCE
Canon SELPHY QX20
19 errors · 19 troubleshooting topics · 13 guides

The checks and guides below come from the official manuals for this model.
No matches for this wording. Try a light name, error code or a shorter phrase.
Errors and indicators
Light patterns and messages documented in the manualFind the indicator lights
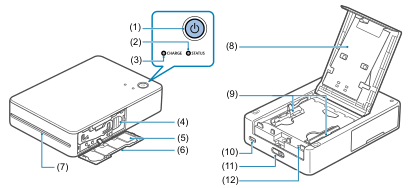
Diagram key
- 1: Power button; the enlarged inset retains its power symbol.
- 2: STATUS lamp; the enlarged inset shows the STATUS label.
- 3: CHARGE lamp; the enlarged inset shows the CHARGE label.
- 4: Eject lever.
- 5: QR code label.
- 6: Ink cassette compartment cover.
- 7: Delivery outlet.
- 8: Paper compartment cover.
- 9: Paper guides.
- 10: Charging terminal.
- 11: Open lever.
- 12: Forced shutdown switch.
Troubleshooting
Find the problem you are experiencingCannot turn on the printer2 checks
From the manual’s Troubleshooting section, under Power. Retained as troubleshooting.
- Remaining charge
- Check the remaining battery level.
- No charging when connected to power
- Press the forced shutdown switch with a thin, pointed object, then try charging again.
Battery cannot be charged3 checks
From the manual’s Troubleshooting section, under Charging. Retained as troubleshooting.
- Printing in progress
- Charging is unavailable during printing. Charge while ready to print or powered off.
- Charger
- Use a charger specified for the printer.
- No charging when connected
- Reconnect the charging cable. If charging still does not start, press the forced shutdown switch with a thin, pointed object and check that charging starts.
Battery runs out of power quickly4 checks
From the manual’s Troubleshooting section, under Charging. Retained as troubleshooting.
- Low temperature
- Battery performance falls at low temperatures.
- Print settings
- Some print settings use battery power faster.
- Waiting to print
- Turn the printer off after printing to maximize the number of prints before recharging.
- Reference-only battery indicators
- Printer and app battery indicators are approximate; some conditions can deplete the battery quickly. Charge as soon as possible after use.
Charging error: STATUS slowly blinks red and CHARGE slowly blinks green1 check
From the manual’s Troubleshooting section, under Charging. Retained as troubleshooting.
- High printer temperature
- Charging stops above a certain printer temperature without indicating a fault.
- Disconnect the charger, turn off the printer and let it cool.
- This is more likely during continuous printing or high ambient/internal temperature.
Charging takes longer, or STATUS quickly blinks red and CHARGE quickly blinks green3 checks
From the manual’s Troubleshooting section, under Charging. Retained as troubleshooting.
- Extended non-use
- Charging may take longer or an error may occur after extended non-use. Reconnect the charging cable and charge again.
- Charger
- Use a charger specified for the printer.
- Problem persists
- Contact a customer support help desk.
Cannot print5 checks
From the manual’s Troubleshooting section, under Printing. Retained as troubleshooting.
- Power
- Check that the printer is on.
- Consumables loaded
- Check that paper and ink cassette are correctly loaded.
- Loose ink sheet
- Check that the ink sheet is taut.
- Paper type
- Use paper designed for this printer.
- Consumables depleted
- Replace the ink cassette and replenish paper as needed.
Print quality is poor4 checks
From the manual’s Troubleshooting section, under Printing. Retained as troubleshooting.
- Dirt on consumables
- Check that the paper and ink sheet are free from dirt and dust.
- Dust inside
- Check that the inside of the printer is free from dust.
- Condensation
- Check that no condensation has formed.
- Interference
- Keep the printer away from electromagnetic-wave sources and strong magnetic fields.
Printed colors do not match the smartphone screen1 check
From the manual’s Troubleshooting section, under Printing. Retained as troubleshooting.
- Different color production
- A smartphone screen and printer produce colors differently. Screen calibration and the brightness/color temperature of viewing light can also change the apparent colors.
Printing takes too long: printer temperature2 checks
From the manual’s Troubleshooting section, under Printing. Retained as troubleshooting.
- High temperature
- Printing pauses above a certain printer temperature without indicating a fault.
- Wait before printing, or turn off the printer and let it cool.
- Continuous printing, hot surroundings or internal heat can cause pauses and increase print time.
- Print settings
- Some print settings cause more frequent pauses.
Cannot cancel printing1 check
From the manual’s Troubleshooting section, under Printing. Retained as troubleshooting.
- Current print
- The current print still finishes after cancellation. Canceling a multi-sheet job stops it after the current sheet finishes.
Paper feed problems or frequent paper jams5 checks
From the manual’s Troubleshooting section, under Paper. Retained as troubleshooting.
- Loading
- Check that paper is loaded correctly.
- Paper condition
- Do not use paper that is folded, peeling from the backing or already printed.
- Too much paper
- Load no more than 10 sheets.
- Paper type
- Use paper designed for the printer.
- Temperature
- If high or low temperature affects results, retry at 15–35°C (59–95°F).
Unused paper remains after ink runs out1 check
From the manual’s Troubleshooting section, under Paper. Retained as troubleshooting.
- Usage-dependent consumable remainder
- Some paper can remain unused when ink runs out, depending on use. The manual provides no additional remedy for this condition.
Paper is not ejected2 checks
From the manual’s Troubleshooting section, under Paper. Retained as troubleshooting.
- Paper protruding from the front
- Carefully pull out protruding paper.
- If gentle pulling does not free it, never force it.
- Turn the printer off and on; repeat until it ejects.
- After accidentally powering off during printing, restart and wait for paper ejection.
- Jam cannot be removed
- Contact the dealer or customer support. Never force jammed paper out; this can damage the printer.
Connection has failed.5 checks
From the manual’s Troubleshooting section, under Wi-Fi. Retained as troubleshooting.
- Power
- Check that the printer is on.
- Smartphone location
- Turn on smartphone location services.
- Register another printer
- Tap the menu icon in the upper left of the app home screen, then Register/reregister printer.
- Password changed
- After using Change the password, QR registration is unavailable; register manually.
- Changed password forgotten
- Reset and reregister: turn on the printer; hold power at least one second until STATUS goes out; keep holding; release when STATUS starts blinking.
Printing takes too long: Wi-Fi2 checks
From the manual’s Troubleshooting section, under Wi-Fi. Retained as troubleshooting.
- Radio interference
- Avoid microwave ovens, Bluetooth devices and other 2.4 GHz equipment.
- Distance or obstructions
- Keep the smartphone and printer close, without objects between them.
QR code cannot be scanned2 checks
From the manual’s Troubleshooting section, under App. Retained as troubleshooting.
- Lighting and angle
- Keep the QR code out of shadow and scan straight-on.
- Smartphone limitation
- Some smartphones may not scan it well; register the printer manually.
This photo cannot be used.1 check
From the manual’s Troubleshooting section, under App. Retained as troubleshooting.
- Image too large
- Reduce the image size or crop it, then retry printing.
Error messages3 checks
From the manual’s Troubleshooting section, under Error messages. Retained as troubleshooting.
- Message includes troubleshooting tips
- Follow the displayed instructions.
- Only a message is displayed
- Follow the manual’s Troubleshooting suggestions. Contact customer support if the problem remains.
- Restarting
- Before turning on again, check that paper and the ink cassette are loaded correctly.
App and printer updates3 checks
From the manual’s Troubleshooting section, under App and printer updates. Retained as troubleshooting.
- App version
- Use the latest app version.
- Required printer firmware update
- A firmware update may be needed before printing; it requires sufficient battery charge.
- Update in progress
- Do not turn off the printer or press the forced shutdown switch during firmware updates.
Guides
Lamp display
Instructions from the manualCheck the battery level while ready to print4 steps
- With the printer ready to print and not charging, press the power button to check battery level.
- One CHARGE blink means low battery: charge soon.
- Two blinks mean low battery, but printing remains possible.
- Three blinks mean the battery level is sufficient.
Printer and included accessories
Instructions from the manualCheck included items and purchase ink and labels4 steps
- Check that the printer and charging cable are included; printed matter is also supplied.
- Contact the dealer if anything is missing.
- Purchase the color ink/label set separately: XC-20L or XS-20L.
- The included cable is for charging only, not communication.
Safety instructions
Instructions from the manualUse the printer safely15 steps
- Use only the specified power sources.
- Do not disassemble or modify the printer, expose it to strong shocks or vibration, touch exposed internal parts, or touch parts inside.
- Stop using it if smoke, an unusual smell or other unusual circumstances occur.
- Keep liquids and foreign objects out.
- Do not use where flammable gases may be present.
- Do not clean with alcohol, benzine, paint thinner or other organic solvents.
- Do not touch the printer connected to an outlet during lightning storms.
- Periodically remove dust from the plug and outlet with a dry cloth.
- Do not connect or disconnect with wet hands or use a plug not fully inserted.
- Keep dirt, metallic pins and other metal objects away from the plug and terminals.
- Do not place heavy objects on the cord or damage, break or modify it.
- Do not wrap the printer in cloth while in use or still warm.
- Do not leave it connected to power for long periods.
- Charge only at 5–40°C (41–104°F).
- Turn the printer off where its use is forbidden; electromagnetic waves may interfere with other equipment.
Part names
Instructions from the manualIdentify controls and compartmentsView
Charging the battery
Instructions from the manualCharge the battery8 steps
- Connect the included charging cable between the printer and a USB AC adapter.
- The CHARGE lamp blinks green while charging and stays green when charging is complete.
- Canon recommends the optional PD-E2 or PD-E1 USB power adapter.
- A commercially available charger must supply at least DC 5.0 V, 1.5 A.
- Charge at 5–40°C (41–104°F).
- At room temperature charging takes about 80 minutes; time varies greatly with temperature and remaining capacity.
- A fully discharged battery, such as on first charging or after extended storage, takes about four hours.
- Charging stops when printing starts.
Installing selphy photo layout
Instructions from the manualInstall and start SELPHY Photo Layout4 steps
- Download and install the latest SELPHY Photo Layout app, then start it.
- Enable smartphone location services.
- Disable smartphone power-saving mode and other battery-saving functions.
- Follow the displayed instructions.
Preparing the printer and printing
Instructions from the manualPrepare the printer and print20 steps
- Hold the power button until STATUS blinks white.
- Wait for steady white.
- Slide the open lever to unlock and open the paper compartment.
- Raise the paper guides for card-size paper; do not raise them for square-format paper.
- Load up to 10 sheets with the printing surface, which has no Canon logo, face-down.
- Avoid touching that surface.
- Align the paper with the circled locations in the reviewed figure, rather than against the back of the compartment.
- Close the paper cover.
- Open the ink cassette compartment.
- Insert a new cassette in the correct orientation until it clicks.
- Use the cassette suitable for the loaded paper size.
- Following SELPHY Photo Layout, scan the printer’s QR code to connect and register it.
- Close the ink cassette cover.
- Print from SELPHY Photo Layout and remove the finished prints.
- After use, hold the power button until STATUS goes out.
- Keep the printer on a flat, stable table or surface, never tilted or unstable.
- Leave room at the delivery outlet.
- Save a photo of the QR code label for future registration, such as after changing smartphones.
- If the ink sheet is loose, gently turn the sprocket to tighten it.
- Do not touch the ink sheet, identified by callout (1) in the reviewed figure.
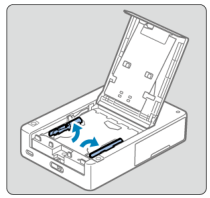
Diagram key
- First guide and upward arrow: Raise this paper guide for card-size paper.
- Second guide and upward arrow: Raise the other paper guide for card-size paper. Do not raise either guide for square-format paper.
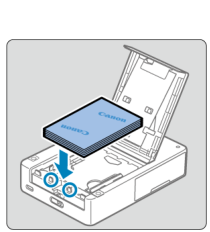
Diagram key
- Downward arrow: Load up to 10 sheets with the printing surface without the Canon logo face-down, avoiding contact with the printing surface.
- First circled alignment point: Align paper with this indicated part, not against the back of the compartment.
- Second circled alignment point: Align paper with this second indicated part as well; do not push it against the compartment back.
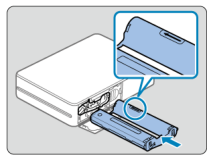
Diagram key
- Insertion arrow: Insert the new ink cassette into the printer until it clicks, in the illustrated orientation.
- Circled point and enlarged inset: The complete inset shows the cassette orientation at the circled position. Use the suitable cassette for the loaded paper size.
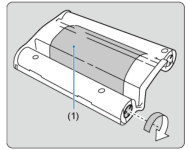
Diagram key
- 1: Ink sheet: do not touch this surface.
- Curved arrow: Turn the sprocket gently in the illustrated direction to tighten a loose ink sheet.
Printing precautions
Instructions from the manualObserve printing precautions8 steps
- Load paper with the printing surface without Canon logos face-down; do not touch that surface.
- Do not use paper that is peeling from its backing, partly peeled, already printed or written on.
- Paper moves out of the printer several times during printing.
- Do not pull it until the smartphone displays the removal message.
- Keep communication uninterrupted until printing finishes.
- Do not open either compartment cover while the printer operates.
- If temperature affects results, retry at 15–35°C (59–95°F).
- After about 10 minutes idle the printer turns off automatically; press power to resume printing.
Storing prints
Instructions from the manualStore and handle prints5 steps
- Use an oil-based pen to write on prints.
- Avoid storage above 40°C (104°F), humid or dusty places and direct sunlight.
- Do not put adhesive tape on the printed surface, wipe it with alcohol or volatile solvents, press it against other objects or let it contact vinyl/plastic desk mats, business-card cases or erasers; discoloration, fading or color transfer can result.
- Use albums with nylon, polypropylene or cellophane photo covers.
- Color can change with time or storage conditions; Canon disclaims responsibility for discoloration.
After printing
Instructions from the manualStore the printer after printing4 steps
- Turn the printer off.
- Leave the paper and ink cassette inside.
- Store on a flat surface away from dust and sunlight; internal dust may cause white bands or malfunction.
- Keep unused paper and ink cassettes in unopened packages away from sunlight.
Handling and maintenance
Instructions from the manualClean and protect the printer7 steps
- Avoid excessive force or vibration, which may damage the printer or jam paper.
- Keep insecticides and volatile substances away.
- Prolonged contact with rubber or vinyl may deform the casing.
- Before moving from a cold to a warm environment, place the printer in a sealed plastic bag and let it reach the new temperature before removing it.
- If condensation forms, let it dry naturally at room temperature before reuse.
- Wipe dirt with a soft, dry cloth.
- Never use detergent, benzene, paint thinner or other organic solvents.
Security
Instructions from the manualProtect wireless access and change Wi-Fi security settings11 steps
- Wireless transmissions can be monitored by malicious third parties.
- Anyone who can see the QR-code information may gain unauthorized use.
- Change the network password in SELPHY Photo Layout when needed.
- Normally Wi-Fi security settings do not need changing.
- To change security settings, turn on the printer.
- In smartphone Wi-Fi settings, add and join QX20-xxx, using the last three characters below the QR code for xxx and the nine-character string below that code as the password.
- The code is inside the ink cassette cover.
- In the smartphone browser, open http://192.168.0.1:8008/ and download and install the certificate.
- Then open https://192.168.0.1/ and change settings on the Wi-Fi Security screen as needed.
- Delete the SELPHY network added to the smartphone.
- Depending on smartphone OS, software version or other factors, changed security may prevent connection; reset printer settings if needed, using the reviewed reset instructions.
Before repair, disposal, lending, or transfer of ownership
Instructions from the manualReset before repair, disposal, lending or transfer4 steps
- Before repair, disposal, lending or transfer of ownership, reset settings.
- Turn on the printer.
- Hold power for at least one second until STATUS goes out.
- Continue holding power, then release it when STATUS starts blinking.
Model details
Model and compatibility
- Print method
- Dye-sublimation thermal transfer; 287 × 287 dpi; 256 shades per color.
- Paper capacity
- 10 sheets.
- Ink and labels
- XS-20L square-format 72.0 × 85.0 mm; XC-20L card-size 54.0 × 85.0 mm.
- Printing app
- SELPHY Photo Layout 4.0.0 or later for iOS and Android.