MODEL REFERENCE
CZUR Aura Mate Pro
15 troubleshooting topics · 14 guides

The checks and guides below come from the official manuals for this model.
No matches for this wording. Try a light name, error code or a shorter phrase.
Troubleshooting
Find the problem you are experiencingVideo call: device will not start and power indicator is off2 checks
- Power connection
- Check whether the outlet has power and the power adapter is properly connected.
- Firmware upgrade interruption
- Check whether power failed or an abnormal operation occurred during the automatic firmware upgrade.
- Contact customer service if the upgrade fails; contact information is in the manual’s final section.
Video call fails3 checks
- Network connection
- Check whether the device is connected to the network.
- Call availability indicator
- Check whether the video-call touch-button indicator is glowing faintly.
- Restart the call
- Touch the button again to restart the video call.
Scan: device will not start and power indicator is off2 checks
- Power connection
- Check whether the outlet has power and the power adapter is properly connected.
- Firmware upgrade interruption
- Check whether power failed or an abnormal operation occurred during the automatic firmware upgrade.
- Contact customer service if the upgrade fails; contact information is in the manual’s final section.
Foot pedal does not start scanning2 checks
- Foot pedal connection or device
- Unplug and reconnect the foot-pedal USB cable, or restart the device.
- Network connection
- Check whether the device is connected to the network.
Scanned images are distorted, deformed or stretched3 checks
- Pad placement
- Check that the black pad’s notch joins the base correctly and the pad fills the scanning preview.
- Position of material
- Place test papers, homework, books, identification documents, files or 3D objects within the preview area.
- Unrelated objects
- Check for objects other than the material being scanned. Erasers, phones, pens and similar objects can affect the algorithm and scan quality.
No images appear in app file management4 checks
- Refresh
- Pull down to refresh the interface.
- Upload progress
- Check the number on the LCD to confirm whether images have uploaded.
- Phone network
- Check the phone’s network connection.
- Device network
- Check whether the device is connected to the network.
CZUR computer software cannot be installed or installation errors occur4 checks
- Manual-version operating system
- The manual lists XP, Windows 7, Windows 8, Windows 10 and Mac OS. Use a compatible release; these historical instructions do not establish requirements for every current download.
- Serial number
- Check that the serial number is correct.
- Security software interference
- Check and enable the computer’s antivirus software and firewall.
- The manual then directs closing antivirus software or adding the application as trusted, and closing the firewall or lowering its security level.
- Download completion
- When downloading from the official website, ensure the software has fully downloaded before installing it.
Serial number is incorrect1 check
- Serial number characters
- Check the entered serial number (SN), distinguishing letters and numbers. No serial number contains the numeral 1.
First computer use shows no image and scanning does not work5 checks
- USB or software connection
- Reconnect the USB cable, restart the device or restart the computer client.
- Computer USB port
- Try another computer USB port; port performance differs.
- Security application interference
- Exit antivirus software, security guards or defensive background software.
- Device driver
- Check recognition in the computer’s Device Manager.
- If a yellow exclamation mark or unknown device appears, right-click to update the driver, or disable it and enable it again, then restart the software.
- Other imaging devices
- In Device Manager, disable other Scanner, Monitor or Camera devices.
Table lamp: device will not start and power indicator is off2 checks
- Power connection
- Check whether the outlet has power and the power adapter is properly connected.
- Firmware upgrade interruption
- Check whether power failed or an abnormal operation occurred during the automatic firmware upgrade.
- Contact customer service if the upgrade fails; contact information is in the manual’s final section.
CZUR app cannot control the table lamp2 checks
- Device network
- Check whether the device is connected to the network.
- Server connection
- Check the device status at the upper left of the current app page. Offline means it is not connected to the server. Online means it is connected and the app can control the lamp.
Table lamp brightness cannot be adjusted1 check
- Brightness limit
- Check whether brightness is already at its highest or lowest level. It cannot increase above the highest level or decrease below the lowest level.
Posture reminder: device will not start and power indicator is off2 checks
- Power connection
- Check whether the outlet has power and the power adapter is properly connected.
- Firmware upgrade interruption
- Check whether power failed or an abnormal operation occurred during the firmware upgrade.
- Contact customer service if the upgrade fails; contact information is in the manual’s final section.
No voice posture reminder2 checks
- Voice setting
- Check whether the voice function is enabled. If disabled, connect the device to the network and enable it in the CZUR app.
- Video camera
- Check whether the video-call camera and its indicator are on.
Posture reminder continues repeatedly3 checks
- Different user
- Check whether another person is using the table lamp.
- Changed position
- Check whether the lamp or user has changed position.
- Record a new standard
- Record a new standard sitting posture if another person uses the lamp or the lamp or user has changed position.
Guides
1 connect device to network
Instructions from the manualConnect Aura Mate Pro to the network2 steps
- Download the CZUR app from the official CZUR website or the manual’s app QR code.
- Install and run the CZUR app, scan the QR code and follow the app instructions to connect the device to the network.
2 table lamp
Instructions from the manualUse the table lamp and its four light modes8 steps
- Connect the power adapter; the device starts automatically.
- Press the knob to turn on the table lamp.
- Turn the knob to adjust brightness.
- When connected to the network, use the CZUR app to turn the lamp on or off and adjust the color-temperature mode.
- The four modes are eye protection, computer, reading and writing, and natural light.
- Each mode has six brightness levels.
- Turn clockwise to brighten or counterclockwise to dim.
- Changing the mode restores the default brightness.
3 sitting posture reminder
Instructions from the manualRecord and adjust the sitting posture reminder6 steps
- Connect the power adapter; the device starts automatically.
- After connecting the device to the network, use the app to enable or disable the sitting posture function.
- Tap Sitting Posture reminder to open its interface.
- Open Record Standard Sitting Posture.
- Sit properly in front of the device and press the record button to save the posture.
- Use the app to adjust the voice-reminder volume and sensitivity.
4 video call
Instructions from the manualStart or receive a video call6 steps
- Connect the power adapter; the device starts automatically.
- Connect it to the network.
- To call from the device, tap its video-call icon to call the phone bound to it.
- When the phone user answers, the device screen shows that user.
- To call from the phone, tap the video-call icon in the app interface.
- The device receives the call and answers automatically after five seconds.
5.1.1 preparation
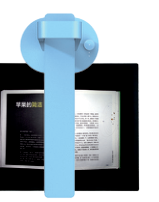
Instructions from the manualPrepare phone-app scanning9 steps
- Connect the device to power; it starts automatically.
- Scan the QR code to connect it to the network.
- Connect the foot pedal to the base.
- Unfold the black soft pad, aligning and joining its notch to the base.
- Open the device until the camera casing is at 90° to the base.
- Tap the scan icon to enable scanning.
- Check on the LCD that the black pad fully covers the preview.
- Correct pad placement is crucial to the processing algorithm; otherwise image-processing errors may occur.
- Press the foot pedal to scan.
5.1.2 function introduction
Instructions from the manualScan and manage uploaded images with the phone app5 steps
- Tap the scan icon on the device to enable scanning and view the preview on the LCD.
- Press the foot pedal to scan.
- The screen reports scanned N images and uploading N images.
- Open the app and tap the file icon at the lower right to enter file management.
- View, edit or sort the uploaded images.
5.2.1 preparation
Instructions from the manualPrepare computer scanning8 steps
- Connect the device to power; it starts automatically.
- Connect it to the computer with the USB cable.
- Connect the foot pedal to the base.
- Unfold the black pad, aligning and joining its notch to the base.
- Open the device until the camera casing is at 90° to the base.
- Check that the black pad fills the computer software preview.
- Correct placement is crucial to the processing algorithm; otherwise image-processing errors may occur.
- Click the computer software scan button or press the foot pedal to scan.
5.2.2 function introduction
Instructions from the manualSelect processing modes and scan with the computer6 steps
- The LED light defaults to its brightest level.
- Turn the knob clockwise or counterclockwise to select one of six brightness levels.
- Open the computer client and click the scan icon at the lower right to enter the scanning interface.
- Select a color mode or processing mode on the right.
- Click the scan icon to scan.
- Select the proper processing mode; an unsuitable mode can affect scanning.
3 product external view
Instructions from the manualIdentify the camera, display and connection controls8 steps
- The numbered diagram identifies the holder, base, camera casing, LED light, display module, scanning camera, knob, microphone, LCD, speaker, video-camera indicator, video camera, cooling holes, networking button, power and Wi-Fi indicators, video-call and scan touch buttons and indicators, reset, USB ports, DC port and foot pedal.
- The complete 25-part key accompanies the figure.
- Press the knob to turn the table lamp on or off.
- Turn clockwise to increase brightness or counterclockwise to reduce it.
- The device starts automatically when power is connected.
- Press Reset to restart it.
- The Type A USB port connects the foot pedal; the Type B USB port connects the computer.
- The DC port connects the 9 V, 1.5 A power adapter.
Understand network and activity indicators4 steps
- The power indicator lights when the device starts automatically after power connection.
- The Wi-Fi indicator is off when disconnected, on when connected, and flashes then goes off when the network is abnormal.
- The video-call indicator glows faintly when calling is available and brightly during a call.
- The scanning indicator glows faintly when scanning is available and brightly during scanning.
1 after sales services and warranty
Instructions from the manualObserve operating limits and service conditions4 steps
- Use the product only where ambient temperature is below 40°C.
- The manual describes a quality-issue return within seven days of receipt and a one-year scanner warranty, subject to the country’s laws.
- Consumables and exterior appearance are excluded.
- Warranty exclusions include incorrect installation or unsuitable heat or humidity; non-CZUR or user-replaced components; natural disasters, accidents or human factors; improper storage including rodents or liquid ingress; unauthorized repairs, modifications or abuse; unauthorized repair centers; and software installation, settings or computer-virus problems.
2 contact
Instructions from the manualContact technical supportView
Contact a known local distributor first, or contact CZUR directly. The manual’s service email is service@czur.com and its website is www.czur.com.
Fcc statement
Instructions from the manualAddress radio or television interference3 steps
- If switching the equipment off and on identifies it as the source of harmful radio or television interference, try one or more of the following measures.
- Reorient or relocate the receiving antenna, or increase the distance between the equipment and receiver.
- Connect the equipment to an outlet on a different circuit from the receiver, or consult the dealer or an experienced radio/TV technician.
Fcc radiation exposure statement
Instructions from the manualObserve radio exposure and recycling instructions2 steps
- The FCC statement requires a minimum 20 cm distance from the radiator during installation and operation.
- The crossed-out waste-bin symbol identifies separate electrical and electronic equipment collection under Directive 2012/19/EU for recycling or dismantling.
Controls and parts
See the manual diagrams 1 diagram
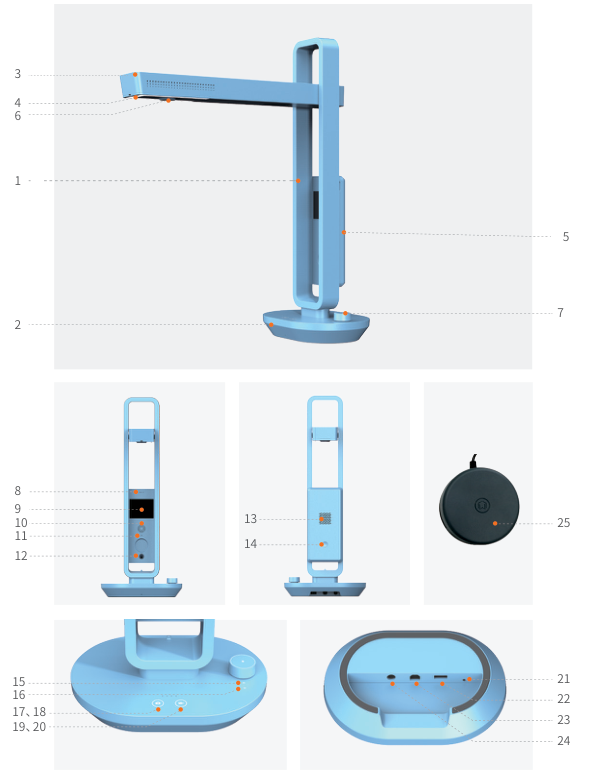
Diagram key
- 1: Holder.
- 2: Base.
- 3: Camera casing.
- 4: LED light.
- 5: Display module.
- 6: HD CMOS scanning camera.
- 7: Knob switch: press to turn the table lamp on or off; turn clockwise to increase brightness or counterclockwise to reduce it.
- 8: Microphone.
- 9: LCD screen.
- 10: Speaker.
- 11: Video-camera indicator.
- 12: Video camera.
- 13: Cooling holes.
- 14: Networking button.
- 15: Power indicator: the device starts automatically and the indicator lights when power is connected.
- 16: Wi-Fi indicator: off when disconnected; on when connected; flashes then goes off when the network is abnormal.
- 17: Video-call touch button.
- 18: Video-call indicator: faint when calling is available; bright during a call.
- 19: Scanning touch button.
- 20: Scanning indicator: faint when scanning is available; bright during scanning.
- 21: Reset button: press to restart the device.
- 22: Type A USB port: connects the foot pedal.
- 23: Type B USB port: connects the computer.
- 24: DC port: connects the 9 V DC, 1.5 A power adapter.
- 25: Foot pedal.
Model details
Model and compatibility
- Scanning camera
- 16 megapixels; highest resolution 4608 × 3456.
- Scan size
- Up to A3.
- Power input
- 9 V DC, 1.5 A from the supplied adapter.
- Screen
- 2.4-inch LCD.