MODEL REFERENCE

instax SHARE SP-1

4 errors · 8 troubleshooting topics · 14 guides

instax SHARE SP-1

The checks and guides below come from the official manuals for this model.

Errors and indicators

Light patterns and messages documented in the manual
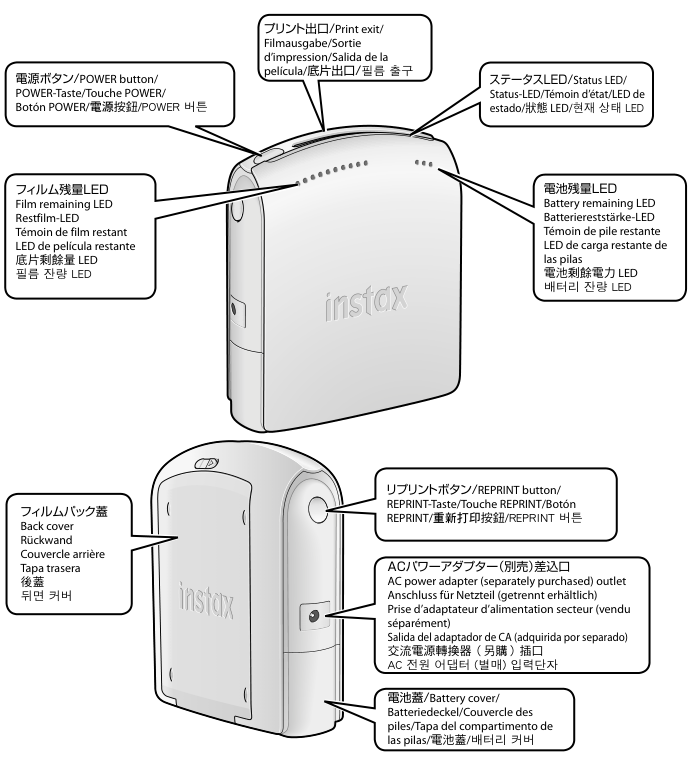
Find the indicator lights
SP-1 controls, indicators and covers. All nine original multilingual pointer labels are retained completely.

Diagram key

  • POWER button: POWER button.
  • Print exit: Print exit.
  • Status LED: Status LED.
  • Film remaining LED: Film remaining LED.
  • Battery remaining LED: Battery remaining LED.
  • Back cover: Back cover.
  • REPRINT button: REPRINT button.
  • AC power adapter (separately purchased) outlet: AC power adapter (separately purchased) outlet.
  • Battery cover: Battery cover.
The status LED flashes slowly, then the printer turns itself off.a printer error has occurred.
A printer error occurred: Turn on the printer.
The status LED flashes rapidly, then the printer turns itself off.the battery power is low.
Battery power is low: Insert new batteries.
The status LED flashes during communication and printing does not start.communication has been interrupted for some reason.
Communication was interrupted: Turn on the printer, then restart the application on the device.
The status LED flashes after the printer starts printing, or after you have loaded a film pack, and the film or film cover cannot be ejected.the film is jammed inside the printer.
Film is jammed inside the printer: Remove the jammed film, turn the printer off, then turn it on again.

Troubleshooting

Find the problem you are experiencing
The printer cannot be turned on.4 checks

From the User’s Guide Troubleshooting table, under During printing. Retained as troubleshooting.

Battery power is low; the battery remaining LED flashes
Insert new batteries.
The batteries are incorrectly inserted
Insert the batteries correctly.
The POWER button was not held long enough
Hold POWER for approximately one second.
The optional AC adapter is incorrectly connected
Connect the AC adapter correctly to the printer, or connect its plug correctly to the outlet.
You entered the password, but the device cannot be connected to the printer.1 check

From the User’s Guide Troubleshooting table, under During printing. Retained as troubleshooting.

The password is incorrect
Turn on the printer while holding REPRINT to reset the password to the factory default, 1111.
You transmitted an image, but the device cannot communicate with the printer.1 check

From the User’s Guide Troubleshooting table, under During printing. Retained as troubleshooting.

There was no operation for a period of time
Hold POWER for approximately one second to turn on the printer, then transmit the image again.
You pressed the REPRINT button, but you cannot print.3 checks

From the User’s Guide Troubleshooting table, under During printing. Retained as troubleshooting.

No image is stored; the status LED flashes for three seconds
Transmit an image to print.
No film remains; all film remaining LEDs are unlit
Load a new film pack.
No film pack is loaded; all film remaining LEDs flash
Load a new film pack.
The film pack cannot be loaded, or cannot be loaded smoothly.2 checks

From the User’s Guide Troubleshooting table, under During printing. Retained as troubleshooting.

The film pack is not for this printer
Use only Fujifilm instax mini instant color film. Other film cannot be used.
The film pack is loaded incorrectly
Align the yellow line on the film pack with the yellow positioning mark in the printer.
The finished print looks over exposed. (White in color)1 check

From the User’s Guide Troubleshooting table, under Printed pictures. Retained as troubleshooting.

Opening the back cover before the film was used up exposed the film
Load a new film pack.
The picture is blurred.2 checks

From the User’s Guide Troubleshooting table, under Printed pictures. Retained as troubleshooting.

Pressure was applied immediately after the picture came out
Do not shake, bend, fold or press the print.
The picture did not come out smoothly
Do not cover the film exit.
A black line is printed on the bottom of the finished print.1 check

From the User’s Guide Troubleshooting table, under Printed pictures. Retained as troubleshooting.

The printer was dropped and the film became misaligned
Retransmit the image.

Guides

Before using the printer

Instructions from the manual
Install the instax SHARE application2 steps
  1. Install instax SHARE from Google Play for Android or the App Store for iOS before using the printer.
  2. The guide lists Android 2.3.3 or later with Google Play, or iOS 5.1 or later; these are historical guide requirements, and some devices cannot print even when the application is installed and the listed requirements are met.

Inserting the batteries

Instructions from the manual
Insert the batteries5 steps
  1. Use two new CR2 lithium batteries of the same type and size.
  2. Do not replace batteries while the printer motor runs.
  3. Open the battery cover using the release and sliding movement shown in the official three-panel drawing.
  4. Insert both batteries with the polarity shown in the battery compartment, then slide the cover closed.
  5. New batteries provide approximately 100 prints under Fujifilm test conditions; actual capacity varies with image file size, operating temperature and other conditions.

Insert two new CR2 lithium batteries of the same type and size. Do not change them while the printer motor runs.

Diagram key

  • Standalone pair of CR2 cells and polarity marks: Use two new CR2 lithium cells of the same type and size. Their positive and negative terminals correspond to the polarity marks in insertion panel 2.
  • 1 — release inset and sliding arrow: Operate the battery-cover release and slide the cover open in the illustrated direction.
  • 2 — insertion arrows and polarity marks: Insert both CR2 batteries in the compartment positions shown. Match each positive (+) and negative (−) end to the illustrated polarity; the drawing shows the two cells in opposite orientations.
  • 3 — closing arrow: Slide the battery cover closed in the illustrated direction.
  • First grey transition arrow: Proceed from opening the cover to inserting the batteries.
  • Second grey transition arrow: Proceed from battery insertion to closing the cover.
Use the optional AC adapter3 steps
  1. The separately sold FUJIFILM AC-5VX AC power adapter can also be used; it may be unavailable in some countries or regions.
  2. Connect it to the adapter outlet shown in the complete parts reference.
  3. Incorrect connection is checked in the power troubleshooting topic.

Loading a film pack

Instructions from the manual
Load an instax mini film pack9 steps
  1. Use only Fujifilm instax mini Color Film.
  2. Other film, including FUJIFILM instax Digital Mobile Printer Photo Pack, cannot be used.
  3. Remove the film pack from its inner bag only immediately before loading.
  4. Never press the film cover or the two holes on its back.
  5. Following the official four-panel sequence, release and open the back cover.
  6. Align the yellow film-pack line with the yellow printer positioning mark, insert the pack and close the back cover.
  7. The black film cover ejects automatically; remove it as illustrated.
  8. A pack contains that black cover and ten film sheets.
  9. Do not open the back cover or unload the pack until all film has been used; otherwise the remaining film may be exposed.
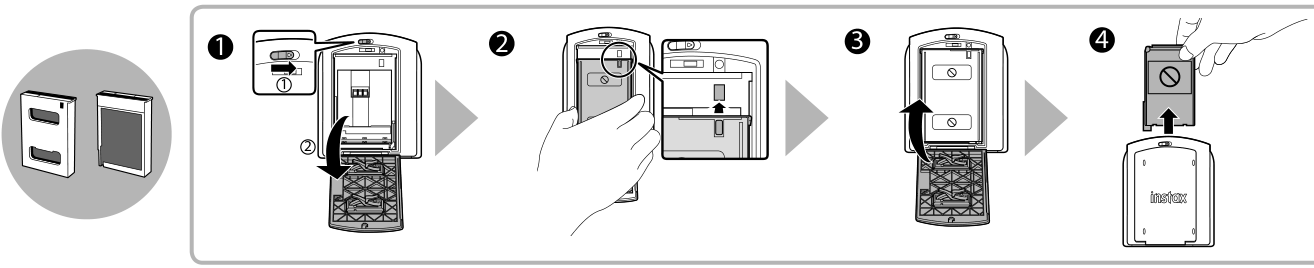
SP-1 film loading: open, align, close and remove the automatically ejected black cover. Do not press the film cover or rear holes.

Diagram key

  • Standalone front and rear film-pack views: Use Fujifilm instax mini Color Film only. Never press the film cover or the two holes shown on its back.
  • 1 — numbered inset and opening arrow: Operate the back-cover lock (circled 1), then open the back cover (circled 2).
  • 2 — circled alignment point, enlarged inset and insertion arrow: Align the yellow line on the film pack with the yellow printer positioning mark, then insert the pack as illustrated.
  • 3 — curved closing arrow: Close the back cover; this automatically ejects the black film cover.
  • 4 — ejection and removal arrows: Remove the black film cover that has been ejected. The circled prohibitions on the film-pack rear show the two holes that must not be pressed when loading.
  • First grey transition arrow: Continue from opening the back cover to inserting the film pack.
  • Second grey transition arrow: Continue from inserting the pack to closing the back cover.
  • Third grey transition arrow: Continue from closing the cover to removing the ejected black cover.

Wireless lan setup for ios devices

Instructions from the manual
Set up Wi-Fi on an iOS deviceView
In the iOS Settings menu, turn Wi-Fi on. Under Choose a Network, tap the network name of the printer.

Connecting and printing

Instructions from the manual
Connect and print an image9 steps
  1. Hold POWER for approximately one second.
  2. Start the installed instax SHARE application and select a picture to print or take a picture.
  3. Tap Connect and print.
  4. When the printer is found, choose Connect.
  5. If multiple printers are found, select the printer you want from the list; its name (SSID) is on the printer bottom.
  6. Enter the factory password 1111 or the password you set, then tap OK to print.
  7. The illustrated final panels show printing and removing the finished photo; one film remaining LED turns off for each image printed.
  8. Up to eight devices can connect, but another device cannot print while printing is already in progress.
  9. Printed colors may differ from those displayed on the device.
Change or reset the printer passwordView
At the password screen in step 6, tap Settings to specify a password. To restore the factory password 1111, turn on the printer while holding REPRINT.

Auto power off

Instructions from the manual
Understand automatic power offView
The printer turns off automatically after a period without operation. The guide does not specify the length of that period.

Reprinting

Instructions from the manual
Reprint the stored image3 steps
  1. Press REPRINT once to reprint the stored image.
  2. Real time templates cannot be reprinted.
  3. The last printed image remains stored when power is off; receiving a new image overwrites the stored image.

Deleting an image

Instructions from the manual
Delete the stored imageView
With the printer on, hold REPRINT for more than five seconds. The status LED flashes for one second and the image is deleted.

Unloading the film pack

Instructions from the manual
Unload an empty film pack3 steps
  1. Wait until every film remaining LED is off before unloading the film pack.
  2. Release and open the back cover and remove the empty film pack using the two holes, as shown in the official drawing.
  3. Do not open the back cover or unload a pack while film remains, because the remaining film may be exposed.

About the led indication

Instructions from the manual
Read the battery-capacity indicators3 steps
  1. Use the four reviewed battery-capacity diagrams: three steady lamps mean sufficient capacity; two steady lamps mean half capacity; one steady lamp means low capacity; the three flashing lamps mean no capacity remains.
  2. These are the separate battery remaining LEDs, not the status LED.
  3. If the printer will not turn on because battery power is low, insert new batteries, as directed in During printing.
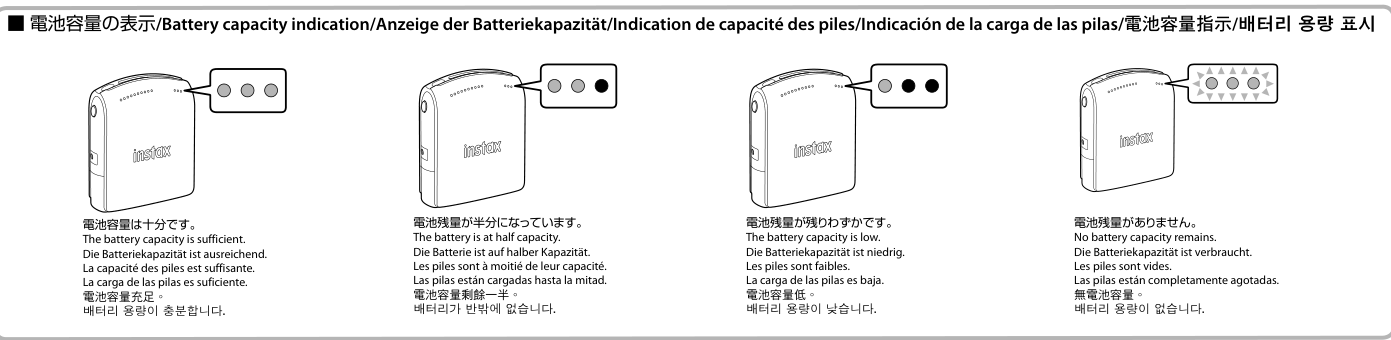
The four battery-capacity groups, in source order. Each group includes the printer, location pointer and enlarged three-lamp inset.

Diagram key

  • First group — all three lamps: Sufficient battery capacity; the left, middle and right lamp are shown steady.
  • Second group — all three lamps: Half capacity; the inset shows two steady lamps and one unlit lamp.
  • Third group — all three lamps: Low capacity; the inset shows one steady lamp and two unlit lamps.
  • Fourth group — all three lamps and flash rays: No battery capacity remains; all three lamps are shown flashing. These are battery LEDs, distinct from the status LED.

Cautions during printing

Instructions from the manual
Protect the printer during printing2 steps
  1. Follow all three crossed-out activities in the official pictogram panel: do not shake the printer, subject it to impact, or touch/pull the film while it is being ejected.
  2. The complete panel and its key retain every prohibition.
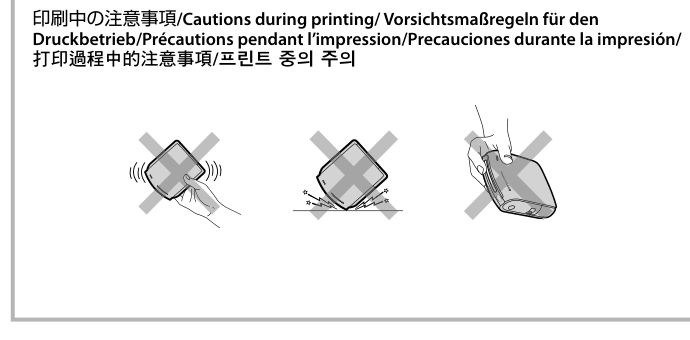
All three SP-1 printing prohibitions. Every cross and illustrated activity is retained.

Diagram key

  • First cross — printer and movement lines: Do not shake the printer while printing.
  • Second cross — printer striking a surface: Do not subject the printer to impact while printing.
  • Third cross — hand at the print exit: Do not touch or pull the film while it is being ejected.

Notes on handling photos and finished prints

Instructions from the manual
Handle photos and finished prints2 steps
  1. Follow the complete ten-symbol care panel: do not pull a photo from the printer while it is being ejected, bend it, fold it, heat it, put it in your mouth, expose it to direct sunlight, cut it, pierce it with a sharp object, rub its surface, or shake it.
  2. The troubleshooting instructions also explicitly prohibit shaking, bending, folding or pressing prints and covering the film exit.
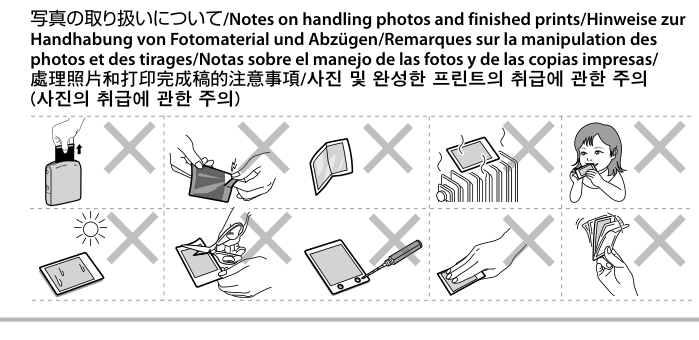
Complete ten-symbol print-handling panel, read across the top row and then the bottom row.

Diagram key

  • Top 1 — hand pulling a print from the printer: Do not pull a photo while it is being ejected.
  • Top 2 — hands bending a print: Do not bend the print.
  • Top 3 — folded print: Do not fold the print.
  • Top 4 — print beside heater: Do not heat the print.
  • Top 5 — print at mouth: Do not put a print in your mouth.
  • Bottom 1 — sun over print: Keep prints out of direct sunlight.
  • Bottom 2 — scissors cutting print: Do not cut a print.
  • Bottom 3 — sharp point piercing print: Do not pierce a print with a sharp object.
  • Bottom 4 — hand rubbing print: Do not rub the print surface.
  • Bottom 5 — hand shaking prints: Do not shake prints.

Model details

Model and compatibility

Batteries
Two new CR2 lithium batteries of the same type and size.
Film
Fujifilm instax mini Color Film only; ten film sheets per pack.
Optional power adapter
FUJIFILM AC-5VX, sold separately and not available in all countries or regions.

Related reviewed instructions

Manuals and sources

  1. instax SHARE SP-1 User’s Guide, ATI3056-500011 FFBX-315212
  2. instax model support and details