The checks and guides below come from the official manuals for this model.
No matches for this wording. Try a light name, error code or a shorter phrase.
Errors and indicators
Light patterns and messages documented in the manual
Message or indicatorWhat it meansCheck or action
—White LED lit — printer on
Not charging or charging complete.Check charging status on the connected smartphone app.
—White LED flashing — printer on
Charging.Check charging status on the connected smartphone app.
—LED off — printer off
Not charging or charging complete.Check charging status on the connected smartphone app.
—Green LED flashing — printer off
Charging.Check charging status on the connected smartphone app.
—Blue LED flashing
Firmware is being updated.The manual supplies this status meaning without a separate corrective procedure.
—Purple LED flashing
Reprinting.Use the reviewed reprinting instructions.
—Yellow LED lit for 3 seconds, then off
Low battery.Charge the printer. If this continues after charging, a malfunction may be present: contact a FUJIFILM authorized dealer.
—Yellow LED continuously flashing
A print error occurred.If this occurs frequently, a malfunction may be present: contact a FUJIFILM authorized dealer.
Troubleshooting
Find the problem you are experiencing
I cannot turn on the printer.2 checks
Battery may not be charged.
Charge the printer.
Power button was not held long enough.
Hold Power for approximately 1 second. If the problem persists after these actions, contact the FUJIFILM service center for repair in your country.
The battery loses its charge quickly.1 check
Very cold environment.
Keep the printer warm before printing. If the problem persists after these actions, contact the FUJIFILM service center for repair in your country.
The power cut off during use.1 check
Battery may be low.
Charge the printer. If the problem persists after these actions, contact the FUJIFILM service center for repair in your country.
Charging does not start.1 check
Power adapter connection.
Check that the USB power adapter plug is properly connected to the outlet.
If the problem persists after these actions, contact the FUJIFILM service center for repair in your country.
The printer takes too long to charge.1 check
Low temperature.
Charging can take longer at low temperatures; the manual gives no separate remedy.
If the problem persists after these actions, contact the FUJIFILM service center for repair in your country.
Charging stops during charging.1 check
Charging temperature.
Charge at +5°C to +40°C.
If charging is impossible within that range, contact your FUJIFILM dealer or support center.
If the problem persists after these actions, contact the FUJIFILM service center for repair in your country.
The printer does not function normally.2 checks
Temporary malfunction.
Press reset. If abnormal operation continues, contact the repair service center.
Battery may not be charged.
Charge the printer. If the problem persists after these actions, contact the FUJIFILM service center for repair in your country.
The film pack does not load or does not load correctly.2 checks
Film type.
Use only FUJIFILM instax SQUARE Instant Film.
Alignment.
Align the pack’s yellow mark with the yellow marker on the printer and load it.
If the problem persists after these actions, contact the FUJIFILM service center for repair in your country.
The film does not print.2 checks
Film may be misaligned after vibration or dropping.
Load a new film pack.
Film jam.
Turn the printer off, then on again.
If the problem persists, remove the jammed film and load a new film pack.
If the problem persists after these actions, contact the FUJIFILM service center for repair in your country.
Some or all of the finished prints are white.1 check
Film exposed by opening the door.
Keep the film door closed until all film is used; opening it with film remaining exposes it and turns it white.
If the problem persists after these actions, contact the FUJIFILM service center for repair in your country.
The print is uneven.2 checks
Handling immediately after printing.
Do not shake, bend, fold or hold the print immediately after printing.
Ejection slot obstruction.
Do not obstruct the film ejection slot. If the problem persists after these actions, contact the FUJIFILM service center for repair in your country.
I cannot reprint images.1 check
Power-off deletes the stored image.
The last stored printed image is deleted when power is turned off; use the app to print again.
If the problem persists after these actions, contact the FUJIFILM service center for repair in your country.
Guides
Before use
Instructions from the manual
Before Use3 steps
Check that the supplied USB Type-C charging cable (YG059291QBU0000) and User’s Guide are included.
Peel off the protective covers before use.
Fully charge the battery before first use; it is not fully charged at the factory.
Notes on disposing of the printer
Instructions from the manual
Notes on Disposing of the Printer7 steps
The built-in lithium-ion battery must not be removed by the user: injury may result.
Dispose of the printer under local regulations.
Use the supplied contact-information sheet; if your country or region is absent, contact your local distributor.
In the EU and other European countries with separate collection systems, take electrical/electronic equipment to the appropriate recycling collection point instead of household waste.
Contact your local city office, waste-disposal service or retailer for details.
Outside the EU, ask local authorities how to dispose of it.
Batteries or accumulators marked with the crossed-out bin must not be treated as household waste.
Part names
Instructions from the manual
Part Names5 steps
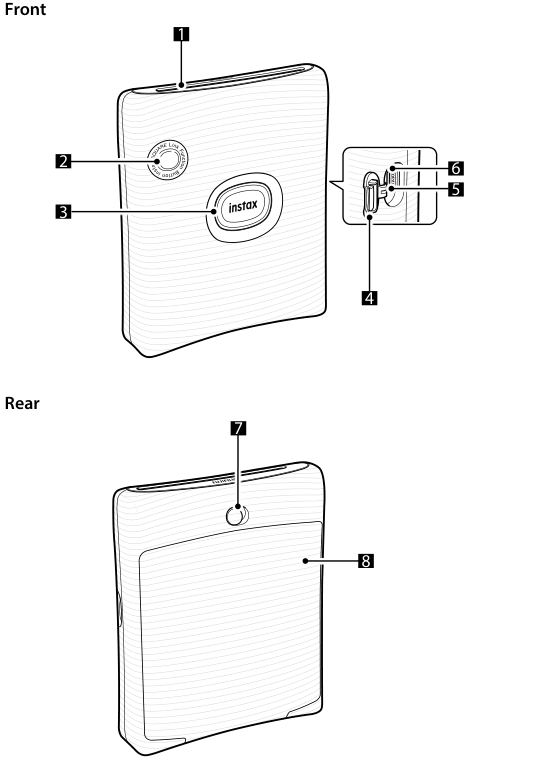
Front: 1 film ejection slot; 2 function button; 3 power button/LED; 4 USB port cover; 5 reset button; 6 USB Type-C port.
Rear: 7 film door lock; 8 film door.
For LED indications, use the charging and printer-status topics.
If the printer does not work properly, press the reset button to reset it.
Fully charge the battery before first use.
Installing the app
Instructions from the manual
Installing the App4 steps
Install the instax SQUARE Link app before using the printer: search Google Play Store on Android or App Store on iOS.
The guide’s historical requirements are Android 7.0 or later with Google Play Store, or iOS 12.0 or later.
Even a smartphone meeting those requirements may not support the app, depending on its model.
Check the current app download site for the latest system requirements.
Charging the battery
Instructions from the manual
Charging the Battery5 steps
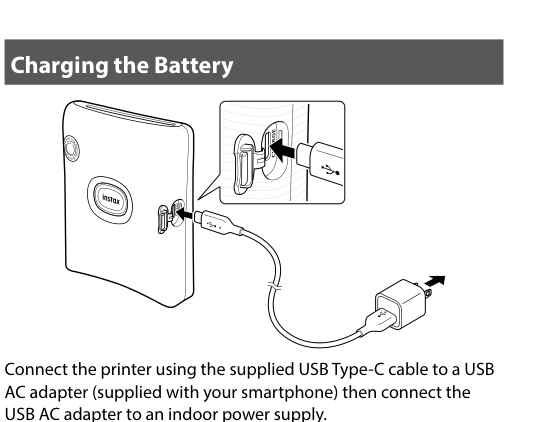
Connect the printer with the supplied USB Type-C cable to a USB AC adapter supplied with your smartphone, then connect the adapter to an indoor power supply.
Printing is possible during charging.
Charging takes approximately 80–120 minutes.
The battery cannot be removed and must be charged before first use.
Follow the battery precautions in Simple printer care.
Connect the supplied USB Type-C cable to the printer and smartphone USB AC adapter, then connect the adapter to an indoor power supply.
Diagram key
Printer connection: The supplied USB Type-C cable connects to the printer.
USB Type-C port inset: The enlarged view shows the charging port, identified as part 6 in the parts key.
Cable to adapter: Connect the supplied cable to the USB AC adapter supplied with your smartphone.
Adapter to indoor power: Connect the USB AC adapter to an indoor power supply.
instax control: The front instax-marked control is the power button/LED, part 3 in the parts key.
Inset insertion arrow: The enlarged view shows the cable insertion direction into the USB Type-C port.
Adapter plug arrow: Connect the adapter to an indoor power supply in the direction shown.
USB markings: Both pictured cable connectors belong to the supplied USB Type-C charging cable.
Port magnification lines: The inset enlarges the printer USB Type-C port, part 6 in the parts key.
Charging from a PC4 steps
Connect the printer directly to the PC, without a USB hub or keyboard.
If the PC sleeps, charging pauses.
Exit sleep mode and reconnect the USB Type-C cable to continue.
Charging may be unavailable depending on the PC’s specifications, settings or conditions.
Loading/unloading the “instax square” film
pack
Instructions from the manual
Loading/Unloading the “instax SQUARE” Film Pack8 steps
Use only FUJIFILM instax SQUARE Instant Film; instax mini and instax WIDE cannot be used.
Each pack contains one black protective cover and 10 sheets.
Do not open the film door until all film is used: remaining film will be exposed, turn white and become unusable.
Never press the two rectangular holes on the back of a loaded film pack.
Never use expired film; it may damage the printer.
Leave the pack in its inner foil packaging until ready to load.
The black cover ejects automatically when the film door closes.
Follow the film packaging’s instructions and warnings.
Loading a film pack
Instructions from the manual
Loading a Film Pack5 steps
Slide the film door lock to unlock, then open the film door.
Insert the film pack with its yellow mark aligned with the yellow mark on the printer.
Close the film door.
The black film cover ejects automatically; remove and dispose of it.
Do not open the door again until all film has been used.
Unloading a used film pack
Instructions from the manual
Unloading a Used Film PackView
Only after all film is used, slide the film door lock to open the film door. Grasp the rectangular holes, remove the empty cartridge and dispose of it.
Turning the printer on/off
Instructions from the manual
Turning the Printer on/off4 steps
Press and hold the Power button for approximately 1 second to turn the printer on or off.
The LED lights when power is on.
The printer automatically powers off after a period without use.
The specification provides 5 minutes / Off; disabling automatic power-off increases energy consumption.
When connecting to the printer for the first time
Instructions from the manual
When connecting to the printer for the first time18 steps
Hold Power for approximately 1 second to turn on the printer; its LED lights.
Open the instax SQUARE Link app.
For the historical setup dialogs pictured in the guide, tap OK on the media/location notice, then OK on the location notice.
Tap ALLOW for photos/media/files, then ALLOW for device location.
Read the terms, check Agree and tap Agree →.
Read the quick instructions and tap Let’s Play! →.
Tap Set.
Bluetooth connection can also be set while printing.
When detected, tap Connect; if several printers appear, select the one with the identifier on the printer’s underside.
If smartphone Bluetooth is off, tap Please turn on Bluetooth.
When the pairing message appears, check its box and tap PAIR.
Once connected, tap Cancel.
Select the desired image.
Before printing, you can add text/stickers, zoom/rotate, apply filters and adjust brightness.
Tap the print icon or swipe up.
Printing starts; the number of copies can also be selected during transfer.
Once film has ejected and the printer stops making a sound, hold the film edge and remove it.
The app shows the number of prints remaining.
When the printer and smartphone are already
connected
Instructions from the manual
When the Printer and Smartphone are Already Connected8 steps
Hold Power for approximately 1 second to turn on the printer; its LED lights.
Open the instax SQUARE Link app.
Select an image.
Before printing, you can add text/stickers, zoom/rotate, apply filters and adjust brightness.
Tap the print icon or swipe up.
Printing starts; select the copy count during transfer if needed.
When the film has ejected and the printer stops making a sound, hold the edge and remove it.
The app shows remaining prints.
Reprinting an image
Instructions from the manual
Reprinting an ImageView
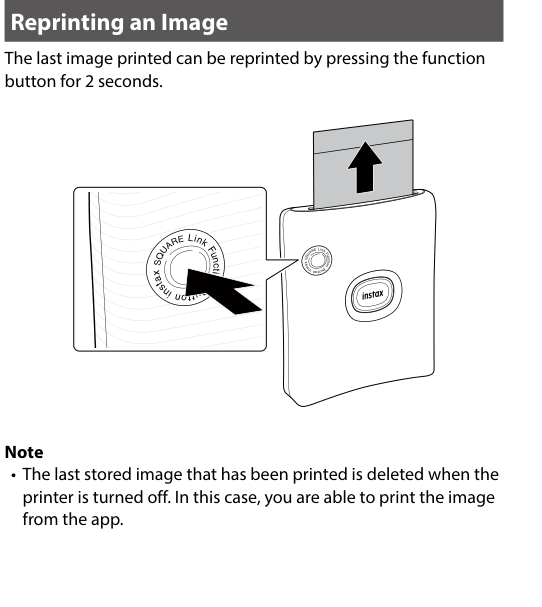
Hold the function button for 2 seconds to reprint the last printed image. The stored image is deleted when power is turned off; in that case print it again from the app.
Hold the function button for 2 seconds to reprint the last image; turning power off deletes the stored image.
Diagram key
Function button press: Press the function button for 2 seconds to reprint the last printed image.
Print ejection arrow: The reprinted film exits the film ejection slot, part 1 in the parts key.
instax control: The instax-marked control is the power button/LED. Turning the printer off deletes the stored image; it can then be printed from the app.
Taking a photo with the app
Instructions from the manual
Taking a Photo with the AppView
Enter INSTAX Camera mode and take a photo. The app supplies flash, front/rear camera selection, self-timer and date insertion options. Consult the app FAQ for details.
Enjoying ar print and instax connect
Instructions from the manual
Enjoying AR Print and INSTAX Connect3 steps
Create AR content with favorite words and effects and express it through prints.
INSTAX Connect can print and send memories.
For further feature instructions consult the manufacturer’s SQUARE Link site.
Important safety notice
Instructions from the manual
IMPORTANT SAFETY NOTICE10 steps
Use the printer and film only to print pictures under the guide and film instructions.
Keep the guide for future reference.
If the printer becomes hot, smokes, smells burnt or operates abnormally, or is dropped into water or receives foreign objects, immediately unplug the USB Type-C cable, turn it off and cease use.
Do not expose the built-in battery to heat/fire, dropping or impact; it could explode.
Never disassemble the product or repair it yourself.
If damage exposes internals, do not touch them; contact a FUJIFILM dealer.
Do not touch parts inside the back cover.
Never wet the product or handle it with wet hands: electric shock may result.
Unplug the USB Type-C cable promptly when fully charged.
Keep away from small children.
Simple printer care
Instructions from the manual
Handling the printer and battery3 steps
Do not expose the battery to excessive heat such as sunshine or fire during use, storage, transport or disposal: explosion or leakage of flammable liquid/gas may result.
Do not dispose of the battery in fire or a hot oven, mechanically crush or cut it.
Avoid extremely low air pressure at high altitude; explosion or flammable-liquid/gas leakage may result.
Printer care9 steps
Do not open the film door before all exposures are used: remaining film becomes unusable.
Protect the fragile printer from water, sand and grit.
Do not remove dirt with solvents such as thinner or alcohol.
Keep the film chamber and interior clean to avoid film damage; no separate dismantling or lubrication procedure is supplied.
Avoid direct sunlight, hot locations such as a car, and prolonged damp storage.
Naphthalene/moth-repellent gas can affect the printer and prints; store safely and dry.
Use the printer at +5°C to +40°C.
Printed material must respect copyright, image rights, privacy, other personal rights and public decency; violations/nuisance can be punishable.
The printer is for domestic/personal use, not commercial use.
Battery charging and life5 steps
Fully charge before first use with the supplied USB Type-C cable.
Charging takes longer below +10°C or above +35°C; do not attempt charging below +5°C or above +40°C, when the battery will not charge.
At normal temperatures the battery can recharge about 300 times.
A noticeable decline in charge-holding time indicates end of service life.
The battery and body becoming warm after extended use is normal.
Cautions during printing
Instructions from the manual
Cautions during printingView
Do not shake or drop the printer, or cover the film ejection slot, while printing.
“instax square” film and print care
Instructions from the manual
“instax SQUARE” Film and print care12 steps
Follow all film-packaging instructions.
Keep film cool, away from extreme heat such as a closed car for many hours.
Do not puncture, tear or cut film, and never use damaged film.
Use loaded film as soon as possible.
Bring film stored very hot or cold to room temperature before printing.
Use before expiry.
Avoid checked-baggage scanning and strong X-rays that can fog unused film; carry printer/film as hand luggage and check with each airport.
Avoid strong light; keep developed prints cool and dry.
Film contains caustic high-alkaline paste: never let children or animals put it in their mouths, or allow contact with skin or clothing.
If paste touches skin or clothing, wash immediately with plenty of water.
If it reaches eyes or mouth, wash immediately with plenty of water and contact a doctor.
The alkaline remains active for about 10 minutes after printing.
Bluetooth® devices: cautions
Instructions from the manual
Bluetooth® Devices: Cautions11 steps
Use only as part of a Bluetooth network; avoid medical or other life-critical applications.
For systems requiring higher reliability, take precautions against malfunction.
Use only in the country of purchase and follow location regulations.
Wireless image data can be intercepted and security is not guaranteed.
Avoid magnetic fields, static electricity, microwaves and radio interference.
Other 2.4 GHz devices can interfere.
The transmitter operates at 2.400–2.4835 GHz with maximum 8.28 mW radio-frequency power.
The frequency is shared with commercial/educational/medical devices and identification transmitters.
Confirm identification transmitters are not operating before use; contact FUJIFILM if interference occurs with low-voltage identification systems.
Disassembly/modification or removal of certification labels may be punishable.
For inquiries contact an authorized FUJIFILM dealer.
Controls and parts
See the manual diagrams 1 diagram
FI017W front and rear controls; all eight numbered parts and both footnotes are explained in the key.
Diagram key
1: Film ejection slot.
2: Function button.
3: Power button/LED.
4: USB port cover.
5: Reset button.
6: USB Type-C port.
7: Film door lock.
8: Film door.
*1: LED indications are described on manual pages 4 and 6; see the charging and printer-status topics.
*2: If the printer does not work properly, press reset to reset the printer.
Model details
Model and compatibility
Manufacturer
FUJIFILM Corporation; instax brand.
Film
FUJIFILM instax SQUARE Instant Film only; ten sheets per pack.
Interface
Bluetooth 4.2 BLE.
Dimensions
105 × 37.5 × 127.5 mm, excluding projecting parts.
Mass
Approximately 236 g, excluding film pack.
Operating environment
+5°C to +40°C;20–80% humidity without condensation.