MODEL REFERENCE
IRIS IRIScan Mouse Executive 2
1 error · 2 troubleshooting topics · 14 guides
The checks and guides below come from the official manuals for this model.
No matches for this wording. Try a light name, error code or a shorter phrase.
Software error messages
Messages shown by the scanning software Text too long for Google translatetranslation text exceeds the character limit
- The guide states that this message appears if the text exceeds the character limit.
- It specifies neither the limit nor a shortening procedure.
- For issues, the guide directs you to the Frequently Asked Questions or Technical Support at the official IRIS support site.
Troubleshooting
Find the problem you are experiencingThe scan window turns yellow or red1 check
- Mouse moved too quickly
- Slow down the scanning if the scan window turns yellow or red.
The scanned image appears distorted1 check
- Distorted scan image
- Stop moving the mouse briefly;the image is calibrated automatically.
Guides
Hardware overview
Instructions from the manualIdentify the scanner mouse controls and remove the camera film2 steps
- The numbered parts are: 1 left button, 2 wheel, 3 right button, 4 Scan button, 5 scan-surface indicators, 6 laser sensors, 7 scan surface(camera), 8 mouse label.
- Remove the film from the scan surface before scanning.
1 installation
Instructions from the manualInstall Cardiris before the scanner application12 steps
- This guide describes the Windows 10 software workflow.
- Obtain administrator rights before installation.
- Go to the official IRIS start page, scroll to IRIScan Mouse 2 Executive, select the version acquired, and choose Getting Started.
- Then choose Start now, complete the form and choose Register now.
- Select the required operating system, download the software, find the downloaded file and run it.
- In the installer, install Cardiris Pro first and follow its prompts.
- Return to the menu and install IRIScan Mouse Executive, following the prompts.
- Choose Finish.
- Unplug the regular mouse, then plug the scanner mouse directly into a free computer USB 2.0-or-higher port.
- Its driver installs automatically within a few seconds.
- Direct connection avoids performance issues.
- Cardiris must be installed before the scanner application; otherwise scans cannot be sent to Cardiris.
Step 1: scan documents
Instructions from the manualScan a document and inspect the captured area9 steps
- Place the mouse on the document.
- Press Scan once to start, and move it over the area to capture.
- Press Scan again to stop and open the Edit screen.
- To cancel scanning, press Esc on the keyboard.
- The view automatically zooms out while scanning.
- Use the wheel to zoom in or out to check the result.
- Documents up to A3 can be scanned.
- After scanning, the captured image is automatically cropped to a rectangle and aligned horizontally to the background.
- The scan screen shows 1 remaining scan memory, 2 function description, 3 current scan-area window and4 scan image.
Step 2: edit the scanned documents
Instructions from the manualEdit the scan and accept or discard it4 steps
- In Edit, rotate the result, resize the scan area with the handles, adjust colors, brightness and contrast, and adjust the background.
- Choose OK to accept the settings.
- To return later, choose Edit in the main screen.
- Choosing Cancel discards the scan result from memory.
Save documents in default applications.
Instructions from the manualSave using the default application4 steps
- Double-click the desired output format.
- The document opens in that format’s default application.
- Save from within that application.
- The XLS option uses XML; the result can be saved as.xlsx when convenient.
Save documents as output files.
Instructions from the manualSave a scan as an output fileView
Choose Save, enter a file name and select the file type:png, jpeg, bmp, pdf, xml, txt or doc. Choose Save again. For tables, the guide recommends.xml.
Drag-and-drop to applications.
Instructions from the manualDrag a scan to an application or folder3 steps
- Choose the desired format and open an application supporting it, such as Word for Doc or Adobe Reader for PDF.
- Drag that format icon into the application.
- Results may also be dragged directly to the Desktop or file folders.
Copy as image or text.
Instructions from the manualCopy a scan as an image or textView
Choose Copy, then Copy Image or Copy Text. Open an application supporting images, rich text or both, such as Word, and choose Paste. Copy-and-paste shortcuts may also be used.
Cardiris™
Instructions from the manualSend a business card to Cardiris7 steps
- Cardiris must be installed before the scanner application.
- If installed in the wrong order, uninstall IRIScan Mouse, install Cardiris, then reinstall IRIScan Mouse.
- Choose Apps > Cardiris.
- Cardiris opens with the scan.
- Double-click the scanned card, select its country and choose Recognize.
- The extracted data fills the corresponding fields.
- See the Cardiris Help file for more information.
Evernote
Instructions from the manualSend a scan to the legacy Evernote application4 steps
- In this guide’s legacy integration, install the latest Evernote application on the computer and log into the account.
- Choose Apps > Evernote.
- The message Evernote - Files synchronized with Evernote appears and the scans are sent.
- Text scans store both the recognized text and image.
Dropbox
Instructions from the manualSend a scan to the legacy Dropbox application4 steps
- In this guide’s legacy integration, install Dropbox on the computer and log into the account.
- Choose Apps > Dropbox.
- The message Dropbox - Files synchronized Dropbox appears.
- Scans are sent to the Scanner Mouse folder in Dropbox as.doc text files, .pdf files and.jpg images.
Google translate
Instructions from the manualSend recognized text to Google Translate5 steps
- For this guide’s integration, connect the computer to the internet and choose Apps > Google Translate.
- The recognized text is sent to Google Translate.
- First select the correct recognition language in IRIScan Mouse as described under Step 3.
- The guide reports a Text too long for Google translate message when the character limit is exceeded; it supplies no numeric limit or shortening procedure.
- For issues it directs readers to IRIS FAQs or technical support.
Controls and parts
See the manual diagrams 1 diagram
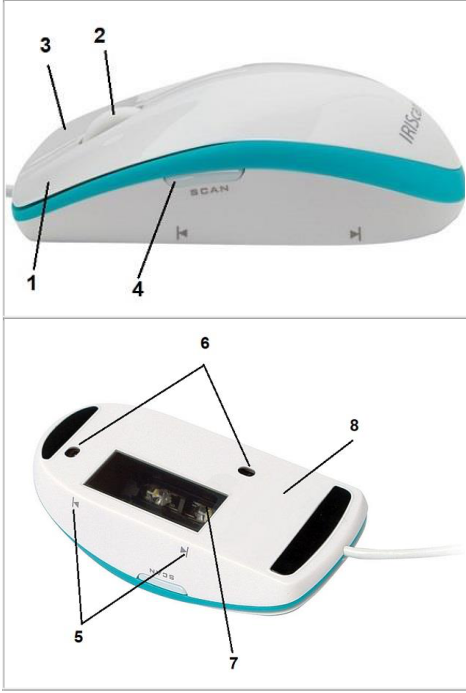
Diagram key
- 1: Left button.
- 2: Wheel.
- 3: Right button.
- 4: Scan button.
- 5: Scan surface indicators; both repeated leader lines identify the indicators.
- 6: Laser sensors; both repeated leader lines identify the sensors.
- 7: Scan surface (camera). Remove the film before scanning.
- 8: Mouse label.
Model details
Model and compatibility
- Document size
- Up to A3,as described in the user guide. [1]
- USB connection
- Direct connection to a computer USB2.0-or-higher port. [1]
Software version and support
- Legacy software
- The current manufacturer support page marks IRIScan Mouse as end of life, with no further software updates. [2]
- Platform scope
- The current manufacturer support page limits macOS compatibility to 10.14 (Mojave). This reference uses the Windows 10 user guide. [2]