MODEL REFERENCE
Janome Epolku
6 troubleshooting topics · 33 guides

The checks and guides below come from the official manuals for this model.
No matches for this wording. Try a light name, error code or a shorter phrase.
Troubleshooting
Find the problem you are experiencingUpper thread breaks6 checks
- Incorrect upper threading or tangling
- Switch off and rethread the upper thread correctly, removing unintended tangles.
- Upper tension too strong
- Reduce upper tension as described in the tension instructions.
- Bent or blunt needle
- Switch off and unplug, then replace the bent or blunt needle following the needle procedure.
- Needle installed incorrectly
- Switch off and unplug; insert the HAx1 needle fully with its flat side away and secure its screw.
- Thread tails not aligned under foot at start
- Align both threads under the foot toward the back before starting.
- Thread too thick for needle
- Match needle and thread to fabric using the reviewed selection guide and test on scraps.
Bobbin thread breaks3 checks
- Wrong bobbin threading
- Switch off and insert and thread the bobbin correctly through grooves A and B.
- Debris in bobbin holder
- Switch off and unplug, then clean the bobbin holder and hook using the reviewed care procedure.
- Damaged bobbin does not turn smoothly
- Replace the bobbin.
Needle breaks4 checks
- Wrong installation or bent needle
- Switch off and unplug; replace a bent needle and install the needle correctly.
- Loose clamp screw
- Switch off and unplug; install the needle fully and tighten its clamp securely.
- Selector turned with needle in fabric
- Raise the needle with the handwheel before turning the pattern selector.
- Needle too fine for fabric
- Choose an appropriate HAx1 needle and thread for the fabric and test on scraps.
Skipped stitches4 checks
- Wrong installation or bent needle
- Switch off and unplug; replace a bent needle and install it correctly.
- Needle and thread unsuitable for fabric
- Match fabric, thread and needle using the reviewed guide.
- No blue needle on stretchy or skip-prone fabric
- Use the optional Janome blue needle for stretchy or skipped-stitch-prone fabrics.
- Wrong upper threading
- Switch off and rethread with the foot raised and take-up lever fully up.
Seam puckers3 checks
- Unbalanced upper tension
- Adjust upper tension for a balanced seam.
- Wrong threading or tangling
- Switch off; thread the bobbin and upper thread correctly and remove unintended tangles.
- Unsuitable needle and thread
- Choose matching needle and thread for the fabric and test on scraps.
Machine will not run2 checks
- Incorrect power connection
- Connect the power and, if used, controller following the power instructions.
- Thread or debris in hook or take-up lever
- The safety device stops the motor in this condition. Switch off and unplug, then clean the accessible hook and feed areas using the care procedure; do not dismantle other parts.
Guides
安全上のご注意
Instructions from the manualSafety and stopping use16 steps
- This household machine is for use in Japan only with domestic 100 V AC supply, at 5–35°C.
- Keep away from heaters, irons, flammable spray products and gas.
- Do not obstruct ventilation or allow lint or dust in the power socket.
- Periodically wipe the plug with a dry cloth.
- Switch off and unplug when leaving the machine, after use, during a power failure, before maintenance, and before replacing the needle or needle plate.
- Switch off before changing presser feet or attachments or setting upper or bobbin thread.
- Watch the needle during operation.
- Keep hands clear of the moving needle, handwheel and take-up lever.
- Never force fabric by pushing or pulling.
- Secure the needle and the correct presser foot.
- Do not use a bent or blunt needle.
- Keep objects off the foot controller.
- Closely supervise use by or near children.
- Do not disassemble the machine.
- Unplug by holding the plug, not the cable.
- If operation is abnormal, the machine becomes wet or damaged by a fall, there is an unusual smell or sound, or cables or plugs are damaged or deteriorated, stop, switch off, unplug and have the supplying dealer inspect, repair or adjust it.
おとり扱いについてのお願い
Instructions from the manualBefore use, storage and carrying7 steps
- Before sewing, wipe oil, dust and dirt around the needle plate thoroughly with a dry soft cloth.
- Test on scrap to confirm it will not stain fabric.
- Never use thinner, benzine or scouring powder.
- Avoid prolonged sunlight, humidity and dust.
- Do not drop or strike the machine.
- Carry by its handle with one hand and support the machine with the other.
- If a fault occurs, check the manual troubleshooting instructions.
各部のなまえ
Instructions from the manualFit the spool pinView
Insert the supplied spool pin into its mounting hole as shown in the reviewed parts reference.
電源のつなぎ方
Instructions from the manualConnect power and the optional foot controller7 steps
- Switch OFF.
- Insert the machine plug into its socket, plug the supply plug into a domestic 100 V AC outlet, then switch ON.
- Unplug when unused and periodically clean the supply plug with a dry cloth.
- For the foot controller, which is optional for some models, switch OFF first.
- Insert the controller plug into the controller socket, insert the machine plug, plug into the wall outlet, then switch ON.
- Keep objects off the controller to prevent injury or fire.
- The start/stop button cannot be used while the controller is connected.
スタート・ストップボタン
Instructions from the manual速さの調節
Instructions from the manualAdjust sewing speed5 steps
- Set the speed-control slider to the desired speed.
- Maximum speed varies with stitch length and pattern.
- With a foot controller, pressing farther increases speed.
- If pressing does not run the machine, turn power on again and press slowly.
- The controller is optional for some models.
返しぬいレバー
Instructions from the manualSew in reverse3 steps
- While stopped, press the reverse lever to sew slowly in reverse; release to stop.
- During sewing, hold it to reverse, then release to sew forward.
- The lever inclines when pressed down; this is normal for this machine.
補助テーブルの外し方・付け方
Instructions from the manualRemove and fit the extension table3 steps
- Hold the underside and pull the extension table sideways to remove it.
- Refit along the free arm with the table projection inserted into the machine hole.
- Small accessories can be stored in the table.
フリーアームの使い方
Instructions from the manualUse the free armView
Remove the extension table to expose the free arm for sleeves, hems and the edges of bag openings.
押さえの外し方・付け方
Instructions from the manualChange the presser foot5 steps
- Switch off.
- Turn the handwheel toward you to raise the needle fully.
- Raise the presser-foot lifter.
- Push the holder release lever from the back toward you to release the foot; never press it from above, which can damage it.
- Align the new foot pin with the holder groove and lower the lifter gently.
押さえホルダーの外し方・付け方
Instructions from the manualRemove and fit the presser-foot holder3 steps
- Switch off before removing or fitting the holder.
- Turn its screw left with the screwdriver and remove the holder.
- Put the screw through the holder hole and turn right with the screwdriver to attach the holder to the presser bar.
押さえ上げのあげ方・さげ方
Instructions from the manualRaise and lower the presser footView
Lower the lifter for sewing. Raise it normally to remove fabric or change the foot. Raise it beyond its normal raised position to insert thick fabric.
下糸の準備
Instructions from the manualPrepare and wind the bobbin13 steps
- Use Janome-specific plastic bobbins, illustrated as 11.5 mm high; ask the supplying dealer for replacements.
- Do not use transparent nylon or metallic bobbin thread.
- Place the spool so thread comes toward you from underneath and secure it with the spool holder.
- Slide the bobbin-cover release button right, remove the cover and lift out the bobbin.
- For winding, set the speed slider fully right.
- Hold the spool thread lightly, pass through the thread guide from the back toward you, then firmly between the bobbin-winding guide discs.
- Pass thread through a bobbin hole from inside to outside and place on the winding spindle.
- Push the bobbin toward the stopper.
- Hold the tail and run for about three seconds, stop, and cut the held tail close to the hole.
- Restart to wind, then stop when wound.
- Return the spindle, remove the bobbin and cut the thread.
- Always stop before moving the spindle.
- Never loosen the bobbin-stopper screw.
【ボビンの内がまセット】
Instructions from the manualInsert the bobbin7 steps
- Switch off.
- Place the bobbin in the holder with the thread in the direction shown on its cover.
- Hold it against rotation while drawing thread into front groove A, between the metal and spring, toward the left and out at left groove B.
- Take thread toward the back through groove B.
- Pulling thread must rotate the bobbin counterclockwise.
- If clockwise, turn the bobbin over; wrong orientation causes poor sewing.
- Pull out about 10 cm of thread and refit the cover from its left side.
上糸の準備
Instructions from the manualThread the upper thread10 steps
- Switch off.
- Turn the handwheel toward you to raise the take-up lever fully and raise the presser foot.
- Threading with the foot down can cause tangles.
- Fit the spool with thread coming forward from underneath and secure the holder.
- Lightly hold the spool-side thread, take it around below the thread guide and forward along the groove.
- Follow the guide plate down, around its bottom and upward on the left.
- Holding the spool-side thread, lead around the take-up lever from its right, behind it and out left into the thread hole; draw forward and straight down.
- Seat it fully in the hole.
- Pass into the needle-bar thread guide from the left and thread the needle front to back.
- Use the needle-threader instructions if required.
【糸通しの使い方】
Instructions from the manualUse the needle threader10 steps
- Switch off.
- The threader works with household HAx1 needles sizes 11–16 or an optional Janome blue needle, and thread sizes 50–90.
- It must be held down with a finger during use.
- Turn the handwheel toward you to raise the needle fully.
- Lower and hold the threader knob fully so its hook passes through the needle eye; confirm that the hook protrudes.
- Pass thread from the left around the guide and hook.
- Lift the right-hand thread slightly to prevent slack between guide and hook.
- Return the knob gently; the hook pulls a loop behind the eye.
- Once thread appears, release the thread in the right hand and ease the finger holding the knob so the threader rises.
- Remove the loop from the threader and pull the tail through the eye.
【下糸の引き上げ方】
Instructions from the manualBring up bobbin thread3 steps
- Raise the presser foot and hold the upper-thread tail.
- Turn the handwheel toward you one full turn, then pull the upper thread lightly to bring up the bobbin-thread loop.
- Pass both threads under the presser foot and draw them together about 10 cm toward the rear.
模様の選び方
Instructions from the manualSelect a stitch pattern3 steps
- Turn the handwheel toward you to raise the needle.
- Turn the selector dial until the desired pattern appears in the pattern window.
- Never turn it while the needle is in fabric: the needle can bend or break.
糸調子の合わせ方
Instructions from the manualAdjust thread tension6 steps
- Begin with tension dial 4 at the index and adjust for the thread and fabric.
- In straight stitch the threads meet near the middle of the fabric; in zigzag a little upper thread appears on the underside.
- If bobbin thread appears on top, upper tension is too strong: turn the dial to a smaller number.
- If upper thread appears underneath, turn to a larger number.
- A normal top with towel-like loops underneath indicates weak upper tension or wrong upper threading.
- Rethread using the upper-thread instructions and adjust tension as shown.
直線ぬい
Instructions from the manualStraight stitching and securing seams8 steps
- Use basic foot A and tension 2–6 with one of the two illustrated straight-stitch patterns.
- Draw both threads under the foot toward the rear and lower the foot to start.
- Secure the start with a few reverse stitches.
- For a thick fabric edge, put the needle at the start, press the black button on basic foot A, and lower the foot while holding the button.
- Release and sew; the button releases automatically when the foot is fully on the fabric.
- To turn, stop, turn the handwheel toward you to put the needle into fabric, raise the foot and pivot around the needle.
- At the end, sew a few reverse stitches.
- Stop, raise the foot, draw fabric toward the rear, turn it toward you and cut the threads with the cutter.
針板ガイドラインの利用
Instructions from the manualUse needle-plate seam and corner guides4 steps
- Align the fabric edge with a plate guide for a consistent allowance.
- Distances from the central needle hole are: 15 = 1.5 cm, 20 = 2.0 cm, 4/8 = 1.3 cm, 5/8 = 1.6 cm and 6/8 = 1.9 cm.
- The corner guide is 1.6 cm from the needle.
- When the fabric edge reaches it, stop, leave the needle in fabric, raise the foot and pivot.
直線三重ぬい
Instructions from the manualTriple straight stitch3 steps
- Use basic foot A, the illustrated triple-straight pattern and tension 3–6.
- Its strong seam suits reinforced bags, trouser crotches and knit seams.
- The stitch moves backward and forward; guide carefully to keep it straight.
かがりぬい
Instructions from the manualOvercasting4 steps
- Use overcasting foot C, the illustrated overcasting pattern and tension 3–6.
- Guide the fabric edge against the foot guide.
- This joins and overcasts together where seams will not be pressed open.
- Check that the needle will not strike the foot wire, which could cause injury.
シェルステッチ
Instructions from the manualShell stitch4 steps
- Use basic foot A, the illustrated shell pattern and tension 6–8.
- Fold fabric on the bias.
- When the needle swings right, let it fall just outside the fold.
- Test and adjust tension for a clear shell edge.
普通地まつり
Instructions from the manualBlind hem on ordinary fabric5 steps
- Use basic foot A, the illustrated ordinary-fabric blind-hem pattern and tension 1–4.
- Fold with the wrong side exposed and 0.4–0.7 cm of the edge extending beyond the fold.
- Place fabric so the left needle swing barely catches the fold, lower the foot and set the speed slider fully left.
- Sew along the fold and turn right side out.
- Catching too much produces conspicuous stitches on the face.
伸縮地まつり
Instructions from the manualBlind hem on stretch fabric5 steps
- Use basic foot A, the illustrated stretch blind-hem pattern and tension 1–4.
- Fold with 0.4–0.7 cm projecting beyond the fold.
- Arrange for the left swing to catch only a little of the fold, lower the foot and use the lowest slider speed.
- Keep the needle catching the fold, then turn right side out.
- Too large a bite produces conspicuous face stitches.
伸縮地かがり
Instructions from the manualOvercast stretch or fraying fabric3 steps
- Use basic foot A, the illustrated stretch-overcasting pattern and tension 3–6.
- Sew with extra allowance to control fraying or curled edges.
- Trim excess close to the stitches without cutting the thread.
ジグザグぬい
Instructions from the manualZigzag stitching5 steps
- Use basic foot A, one of the three illustrated zigzag patterns and tension 2–5.
- For wide zigzag applique, glue or baste the patch and sew around it with the needle falling just outside its edge.
- At curves or turns stop with the needle outside the patch, raise the foot and pivot.
- For coarse zigzag overcasting, let the needle fall just outside the fabric edge.
- For fine decorative zigzag, put stabilizer behind the fabric for a better finish.
ボタンホール
Instructions from the manualFour-step buttonhole14 steps
- Use buttonhole foot J and tension 1–5.
- Test on the same fabric.
- Put non-stretch stabilizer behind stretch fabric.
- Raise the needle before each change of pattern.
- Select buttonhole step 1, pass upper thread through the foot hole and align with bobbin thread to the side.
- Pull the foot toward you to align its start mark with scale A.
- Put the needle at the start, lower the foot and sew the left side to the needed length; stop.
- Raise the needle by turning the handwheel toward you.
- Select step 2/4 and sew about five bartack stitches; stop.
- Raise the needle, select step 3 and sew a side equal to the left; stop.
- Raise the needle, select step 2/4 and sew about five bartack stitches; stop.
- Raise the foot, remove the fabric and cut leaving about 10 cm of both threads.
- Pull bobbin thread to draw upper thread underneath and tie both.
- Place a pin inside one bartack and use the seam ripper to open the middle without cutting the sewn threads.
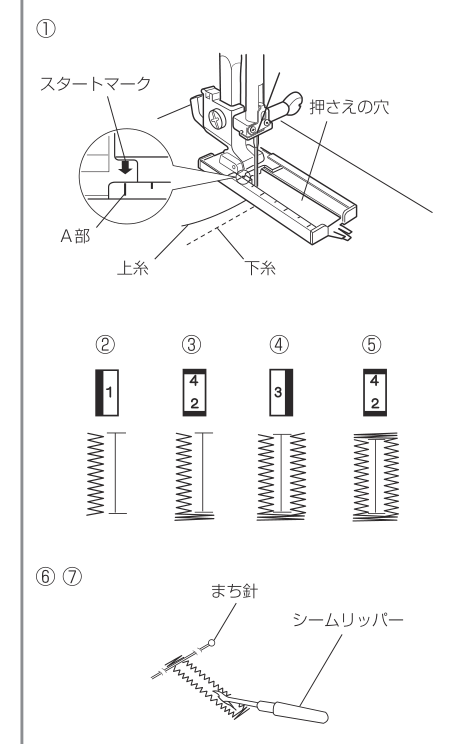
Diagram key
- 1: Select buttonhole pattern1; pass upper thread through the foot hole and align both tails to the side; pull the foot forward and align the start mark with scaleA
- Start mark: Align this mark to scaleA before starting
- Foot hole: Pass the upper thread through this hole
- Scale A: The scale used to align the start mark
- Bobbin thread: Align this with the upper-thread tail to the side
- Upper thread: Route through the foot hole before starting
- 2: Sew the left side to the required length and stop
- 3: Raise the needle, choose pattern2/4 and sew about5 bartack stitches
- 4: Raise the needle, choose pattern3 and sew a side equal to the left
- 5: Raise the needle, choose pattern2/4 and sew about5 bartack stitches
- 6: Raise the foot, remove fabric, leave about10cm thread tails, draw upper thread underneath and tie
- 7: Place a pin inside one bartack and slit the middle with a seam ripper without cutting sewn threads
- Pin: Protect the bartack by placing this inside it
- Seam ripper: Open the central slit carefully
芯入りボタンホール
Instructions from the manualミシンのお手入れ
Instructions from the manualClean and reassemble hook, bobbin holder and feed teeth16 steps
- Switch off and unplug.
- Do not dismantle any parts outside these instructions.
- Remove the needle and presser-foot holder.
- Loosen the needle-plate screw with the screwdriver and remove the plate.
- Remove the bobbin, lift the front of the bobbin holder and remove it.
- Brush the holder and wipe lightly with cloth.
- A cleaning brush is not supplied.
- Brush feed-tooth debris toward the front and wipe the outer hook.
- Wipe the central outer-hook area lightly with cloth.
- A vacuum can remove dry lint or dust that a brush cannot reach.
- Refit the bobbin holder with its projection left of the stopper.
- Turn the handwheel slowly toward you and confirm smooth rotation.
- Insert the bobbin, align both needle-plate guide pins with the plate holes and tighten the plate screw.
- With frequent use, lint can collect beyond these accessible areas: consult the supplying dealer about periodic cleaning.
- The machine was sufficiently oiled at the factory.
- Do not oil it yourself; doing so can cause a fault.
針の取りかえ方
Instructions from the manualReplace and inspect the needle6 steps
- Switch off and unplug under the general needle-replacement safety instruction.
- Turn the handwheel toward you to raise the needle fully.
- Turn the clamp screw toward you one or two turns to loosen, then remove the needle.
- Insert a household HAx1 needle with its flat side away from you until it touches the pin, and tighten securely with the screwdriver.
- Check a needle by laying its flat side on a flat surface such as the needle plate: the gap should remain even to the tip.
- Do not use bent or blunt needles.
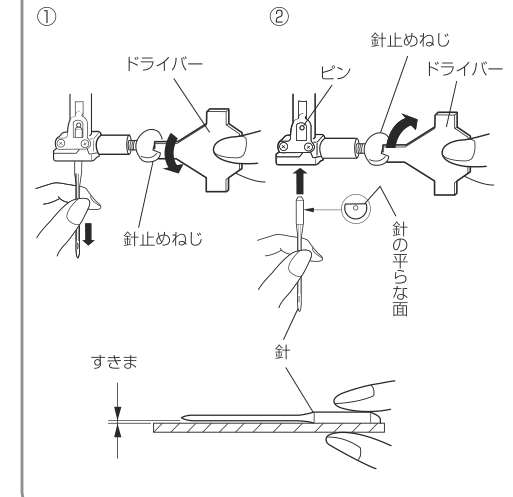
Diagram key
- 1: Turn the clamp screw toward you one or two turns to loosen and remove the needle
- Screwdriver: Use the screwdriver to secure the needle clamp
- Needle-clamp screw: Loosen to remove, then securely tighten after insertion; repeated leaders identify the same screw
- 2: Insert the new needle flat side away from you until it touches the pin, then tighten
- Pin: The needle must reach this insertion stop
- Needle flat side: Face the flat side toward the back of the machine
- Gap: With the flat side on a flat surface, the gap must be even to the tip; reject bent or blunt needles
- Needle: Remove and replace the needle as shown; do not use bent or blunt needles
布に適した糸や針を選ぶ目安
Instructions from the manualChoose fabric, thread and needle7 steps
- Use household HAx1 needles.
- Generally choose fine thread and needles for light fabric, thicker thread and needles for heavy fabric; test on scraps.
- Normally use the same upper and bobbin thread.
- Light fabrics such as lawn, georgette and tricot: polyester 90 with needles 9–11 or an optional Janome blue needle.
- Medium fabrics such as sheeting, jersey and wool: cotton 60 or polyester/nylon 50–90 with needles 11–14 or an optional blue needle; cotton 50 with needle 14.
- Heavy denim, jersey and coating: cotton 40–50 or polyester 40–50 with needles 14–16; polyester 30 or cotton 30 with needle 16.
- For stretchy jersey/tricot or skipped-stitch-prone fabric, an optional Janome blue needle helps prevent skipped stitches.
Controls and parts
See the manual diagrams 1 diagram
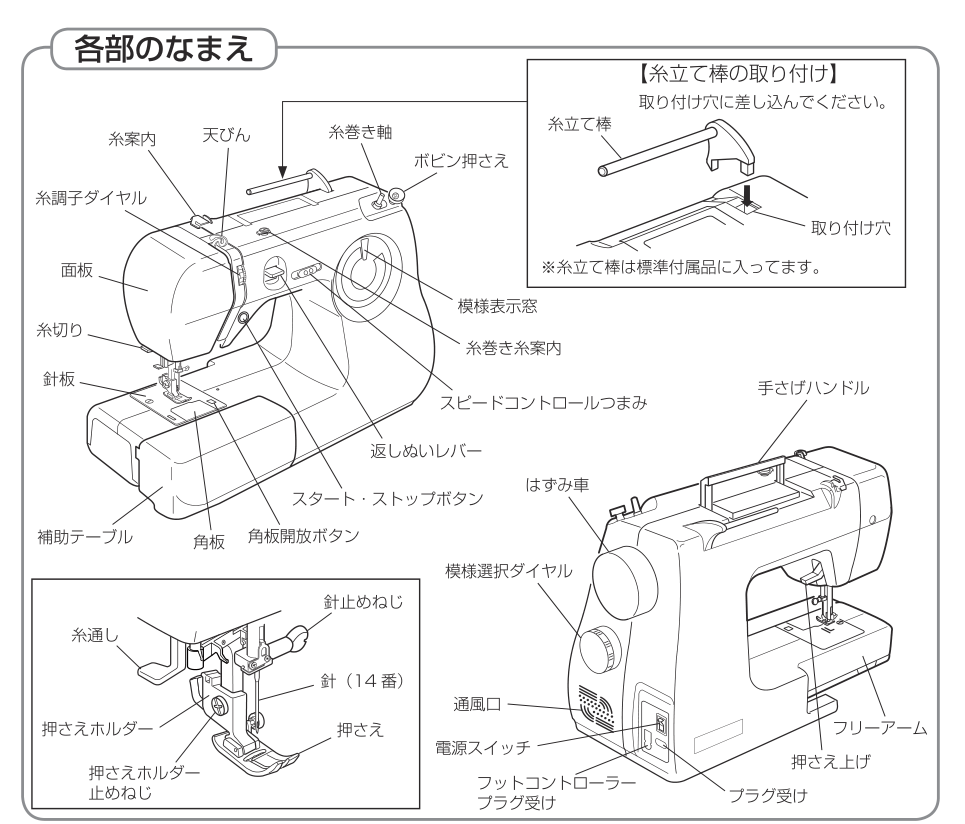
Diagram key
- Thread guide: Upper-thread guide
- Take-up lever: Thread take-up lever
- Thread-tension dial: Adjusts upper-thread tension
- Pattern window: Displays the selected pattern
- Bobbin-winding guide: Guides thread for winding
- Speed slider: Controls sewing speed
- Start/stop button: Starts and stops sewing
- Reverse lever: Operates reverse sewing
- Extension table: Removable accessory-storage table
- Needle plate: Plate below the needle
- Thread cutter: Cuts the thread
- Bobbin cover: Covers the bobbin
- Cover release: Releases the bobbin cover
- Face plate: Front-side cover
- Winding spindle: Holds the bobbin during winding
- Bobbin stopper: Stops bobbin filling
- Spool-pin inset: Insert the spool pin into its mounting hole; the spool pin is supplied
- Carry handle: Hold this handle while supporting the machine with the other hand
- Handwheel: Turn toward you for manual needle movement
- Pattern selector: Selects the stitch pattern
- Ventilation: Keep these openings clear
- Power switch: Main power switch
- Foot-controller socket: Connects the foot controller, optional for some models
- Power socket: Connects the supplied power cord
- Free arm: Used after removing the extension table
- Presser-foot lifter: Raises and lowers the foot
- Needle-clamp screw: Holds the needle
- Needle: The illustrated fitted needle is size14
- Presser foot: Holds fabric for sewing
- Holder screw: Secures the presser-foot holder
- Presser-foot holder: Supports the presser foot
- Needle threader: Assists threading the needle
Model details
Model and compatibility
- Region and power
- Japan household use only;100V50/60Hz.
- Rated power
- 45W.
- Body weight
- 5.5kg.
- Needle system
- Household HAx1.