The checks and guides below come from the official manuals for this model.
No matches for this wording. Try a light name, error code or a shorter phrase.
Errors and messages
Shown on the machine display
CodeWhat it meansCheck or action
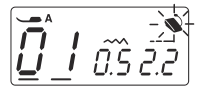
—Foot-control sign and start/stop warning
2 checks
The start/stop button is pressed with the foot control connected.
Disconnect the foot control.
The foot control is out of order; its sign keeps blinking.
Contact the service center or the store from whom the machine was purchased.
Foot-control warning: disconnect the control for start/stop use; persistent blinking requires service.
Diagram key
A: Recommended foot letter in the example display
01: Example stitch pattern number
0.5: Example stitch width
2.2: Example stitch length
Underlines: Cursor positions
Foot-control symbol and rays: Connected control warning; persistent blinking indicates a faulty control
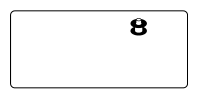
—Bobbin-winding symbol
The bobbin winder spindle is shifted to the right.: Shift the bobbin winder spindle to the left for stitching.
Bobbin-winding symbol; move the spindle left before stitching.
Diagram key
Bobbin symbol: Bobbin winder spindle is in its right-hand winding position; this is a graphic, not numeric error code 8
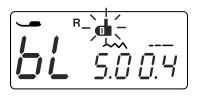
bLbuttonhole lever warning
The machine will stop if the buttonhole is sewn without lowering the buttonhole lever.: Lower the buttonhole lever and start the machine again.
bL warning: lower the buttonhole lever and restart.
Diagram key
bL: Buttonhole-lever warning
R: Recommended automatic buttonhole foot
Lever symbol and rays: Buttonhole lever must be lowered
5.0: Example stitch width
0.4: Example buttonhole stitch density
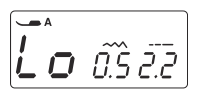
Looverload restart warning
The machine is started after halting due to overload.: Wait at least 15 seconds before restarting; switch off and remove thread tangles from the take-up lever and hook race.
Lo overload restart warning; wait at least 15 seconds, switch off and remove tangled thread.
Diagram key
Lo: Restart after overload
A: Recommended foot letter in the example display
0.5: Example stitch width
2.2: Example stitch length
Underline: Cursor position
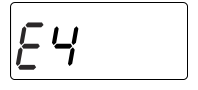
E1-E7control-circuit error
The machine does not work properly due to a problem in the control circuit.: Contact the service center or the store where the machine was purchased.
E4 is the printed example for the E1–E7 control-circuit error group; contact service.
Diagram key
E4: Illustrated member of the E1–E7 control-circuit error group; the manual gives the same service instruction for all seven
Troubleshooting
Find the problem you are experiencing
The needle thread breaks6 checks
The needle thread is not threaded properly.
Rethread the machine with power off.
The needle thread tension is too tight.
Loosen needle tension to correct the balance.
The needle is bent or blunt.
Replace a bent or blunt needle.
The needle is incorrectly inserted.
Insert the needle fully with its flat side to the rear and tighten.
The needle and bobbin threads are not set under the presser foot when start sewing.
Set the needle and bobbin threads under the foot as directed for starting.
The thread is either too heavy or too fine for the needle.
Match needle and thread to the fabric.
The bobbin thread breaks4 checks
The bobbin thread is not threaded properly in the bobbin holder.
Rethread the bobbin holder with power off.
Lint has collected in the bobbin holder.
Clean lint from the bobbin holder with power off and unplugged.
The bobbin is damaged and does not turn smoothly.
Change the bobbin.
The thread is wound loosely on the bobbin.
Wind the bobbin correctly.
The needle breaks5 checks
The needle is incorrectly inserted.
Insert the needle fully, flat side rearward.
The needle clamp screw is loose.
Tighten the needle clamp screw.
The threads were not drawn to the rear after sewing.
Draw the threads toward the rear as directed in Straight Stitch Sewing.
The needle is too fine for the fabric being used.
Use a needle suitable for the fabric.
An inappropriate presser foot is used.
Use the correct foot.
Skipped stitches5 checks
The needle is incorrectly inserted, bent or blunt.
Replace or correctly insert the needle.
The needle and/or threads are not suitable for the work being sewn.
Match needle and thread to the fabric.
A blue tip needle is not being used for sewing stretch, very fine fabrics and synthetics.
Use the blue-tip stretch-fabric needle.
The needle thread is not threaded properly.
Rethread with power off.
A poor quality needle is used.
Change the needle.
Seam puckering5 checks
The needle thread tension is too tight.
Loosen needle tension to correct the balance.
The needle thread is not threaded properly.
Rethread with power off.
The needle is too heavy for the fabric being sewn.
Use a finer suitable needle.
The stitch length is too long for the fabric.
Make stitch shorter.
A stabilizer is not used when sewing very fine fabrics.
Apply a stabilizer.
The fabric is not feeding smoothly3 checks
The feed dog is packed with lint.
Clean lint from the feed dog with power off and unplugged.
The stitches are too fine.
Make stitch longer.
The feed dog is not raised after “drop feed” sewing.
Raise the feed dog and turn the handwheel toward you.
Loops on the seams2 checks
The needle thread tension is too loose.
Tighten needle tension to correct the balance.
The needle is too thick or too fine for the fabric.
Match needle size to fabric.
The machine does not work3 checks
The machine is not plugged in.
Connect the machine to power as directed.
Thread has been caught in the hook race.
Remove thread caught in the hook race with power off and unplugged.
The bobbin winder spindle is not returned to the left after bobbin winding.
Return the bobbin winder spindle left.
Buttonhole sewing is not sewn properly3 checks
The stitch density is not suitable for the fabric being sewn.
Adjust buttonhole density for the fabric.
The interfacing has not been used for the stretch or synthetic fabric.
Apply an interfacing.
The buttonhole lever is not lowered.
Lower the buttonhole lever.
The machine is noisy2 checks
Thread has been caught in the hook race.
Remove caught thread from the hook race with power off and unplugged.
Lint has built up in the hook race or bobbin holder.
Clean lint from the hook race and bobbin holder with power off and unplugged.
One pip: normal operation1 check
Normal operation.
A single pip indicates normal operation.
Three pips: invalid operation1 check
Invalid operation or malfunction.
Three pips indicate invalid operation or malfunction. Use the displayed warning and the reviewed checks to identify the required action.
Long peep: E1–E71 check
E1-E7 error occurred.
A long peep indicates E1–E7. Contact the service center or selling store as directed for the control-circuit error.
Buttonhole completion sound1 check
Buttonhole is completed.
This sound indicates buttonhole completion.
Faint humming or warm LCD1 check
It is not abnormal that a faint humming sound comes out from inside the machine. LCD display may get warm when the machine has been used for hours.
A faint internal humming sound is not abnormal; the LCD can become warm after hours of use.
Guides
Important safety instructions
Instructions from the manual
Safety and stopping34 steps
Household use only.
Read all instructions.
DANGER— To reduce the risk of electric shock: 1.
An appliance should never be left unattended when plugged in.
Always unplug this sewing machine from the electric outlet immediately after using and before cleaning.
Do not allow to be used as a toy.
Close attention is necessary when this sewing machine is used by or near children.
Use this appliance only for its intended use as described in this owner’s manual.
Use only attachments recommended by the manufacturer as contained in this owner’s manual.
Never operate this sewing machine if it has a damaged cord or plug, if it is not working properly, if it has been dropped or damaged, or dropped into water.
Return this sewing machine to the nearest authorized dealer or service center for examination, repair, electrical or mechanical adjustment.
Never operate the appliance with any air opening blocked.
Keep ventilation openings of this sewing machine and foot controller free from accumulation of lint, dust and loose cloth.
Never drop or insert any object into any opening.
Do not use outdoors.
Do not operate where aerosol (spray) products are being used or where oxygen is being administered.
To disconnect, turn all controls to the off (“O”) position, then remove plug from outlet.
Do not unplug by pulling on cord.
To unplug, grasp the plug, not the cord.
Keep fingers away from all moving parts.
Special care is required around the sewing machine needle and/or cutting blade.
Always use the proper needle plate.
The wrong plate can cause the needle to break.
Do not use bent needles.
Do not pull or push fabric while stitching.
It may deflect the needle causing it to break.
Switch this sewing machine off (“O”) when making any adjustment in the needle area, such as threading the needle, changing the needle, threading the bobbin or changing the presser foot, and the like.
Always unplug this sewing machine from the electrical outlet when removing covers, lubricating, or when making any other adjustments mentioned in this owner’s manual.
SAVE THESE INSTRUCTIONS Please note that on disposal, this product must be safely recycled in accordance with relevant National legislation relating to electrical/electronic products.
If in doubt please contact your retailer for guidance. (European Union only) For Europe only: This appliance can be used by children aged from 8 years and above and persons with reduced physical, sensory or mental capabilities or lack of experience and knowledge if they have been given supervision or instruction concerning use of the appliance in a safe way and understand the hazards involved.
Children shall not play with the appliance.
Cleaning and user maintenance shall not be made by children without supervision.
For outside Europe (except U.S.A and Canada): This appliance is not intended for use by persons (including children) with reduced physical, sensory or mental capabilities, or lack of experience and knowledge, unless they have been given supervision or instruction concerning use of the appliance by a person responsible for their safety.
Children should be supervised to ensure that they do not play with the appliance.
Names of parts
Instructions from the manual
Carrying the machineView
Hold the carrying handle in one hand and support the machine with the other hand.
Connecting the power supply
Instructions from the manual
Connecting the Power Supply10 steps
Use foot control model 21371 or YC-485EC-1.
Keep eyes on the sewing area and hands away from the moving take-up lever, handwheel and needle.
Do not place anything on the foot control.
For foot-control use, switch off, connect the foot-control pin to its jack, connect the machine plug to the power inlet and the supply plug to the wall outlet, then switch on.
The LCD shows the foot-control sign.
For start/stop-button use, switch off, connect the machine plug to its power inlet and the supply plug to the wall outlet, then switch on.
Disconnect the foot control: the start/stop button cannot work while it is connected.
O on the switch means off.
Always switch off and unplug when leaving the machine unattended, attaching or removing parts, or cleaning.
For USA/Canada polarized plugs, do not modify the plug; if it does not fit, have a qualified electrician install the proper outlet.
Before using your sewing machine
Instructions from the manual
Before Using Your Sewing MachineView
For first use, place scrap fabric under the presser foot and run the machine without thread for a few minutes. Wipe away any oil that appears.
Controlling sewing speed
Instructions from the manual
Controlling Sewing SpeedView
Move the speed slider right to increase sewing speed or left to reduce it. Depress the foot control to start; pressing farther increases speed. The slider limits maximum speed.
Extension table
Instructions from the manual
Extension Table4 steps
Pull the extension table away for free-arm sewing.
To attach it, slide it along the free arm with its guides in the holes until it snaps in place.
Accessories are stored inside it.
The free arm is useful for tubular garments and darning knee or elbow areas.
Machine operating buttons
Instructions from the manual
Machine Operating Buttons12 steps
Press start/stop to start or stop.
The first stitches are slow, then the slider speed applies.
Holding this button makes the machine run slowly.
It cannot be used with the foot control connected.
On this 100-stitch model, patterns 00, 01, 12, 13, 14 and 20 sew in reverse while Reverse is held; release to sew forward.
With the machine stopped and foot control disconnected, holding Reverse sews slowly in reverse; release stops the machine.
For other patterns it immediately locks and stops, with the special 02/03/09/10 sequences described in their reviewed instructions.
On patterns 00, 01, 12, 13, 14 and 20, Auto-lock immediately locks and stops.
On other stitches it locks at the end of the current pattern and stops.
Needle up/down raises or lowers the needle and determines whether it stops up or down.
Left/right cursor buttons move the cursor.
Move it under the digit to change, then use up to increase or down to decrease the value.
Presser foot lifter
Instructions from the manual
Presser Foot LifterView
Lift or lower the presser-foot lifter to raise or lower the foot. The extra-high position is about 1/4 inch(0.7 cm) above normal, to remove the foot or insert thick fabric.
Changing the presser foot
Instructions from the manual
Changing the Presser Foot5 steps
Switch off before threading or changing the needle or presser foot.
Switch off and unplug before removing or attaching parts, removing covers or cleaning.
Use the correct letter-marked foot for the stitch: an incorrect foot can break the needle.
With the needle highest, reached by turning the handwheel counterclockwise, raise the foot and press the lever behind its holder to remove it.
Position the chosen foot pin beneath the holder groove and lower the presser bar to lock it in place.
Removing and attaching the foot holder
Instructions from the manual
Removing and Attaching the Foot Holder4 steps
Switch off before threading or changing the needle or presser foot.
Switch off and unplug before removing or attaching parts, removing covers or cleaning.
Remove the holder setscrew counterclockwise with a screwdriver.
To attach, align the holder hole with the threaded presser-bar hole, insert the setscrew and tighten clockwise with the screwdriver.
Dropping or raising the feed dog
Instructions from the manual
Dropping or Raising the Feed Dog4 steps
Set stitch length to its minimum before lowering the feed dog.
The lever is below the free-arm bed at the rear.
Follow the down arrow to lower it; follow the up arrow and turn the handwheel toward you to raise it.
Keep it raised for normal sewing.
Changing the needle
Instructions from the manual
Changing the Needle7 steps
Switch off before threading or changing the needle or presser foot.
Switch off and unplug before removing or attaching parts, removing covers or cleaning.
Raise the needle fully by turning the handwheel counterclockwise; lower the foot.
Loosen the needle-clamp screw counterclockwise and remove the needle.
Insert a new needle with its flat side to the rear, push it fully up and tighten the screw clockwise.
Check straightness with the flat side against a flat needle plate or glass: the gap must be consistent.
Never use a bent or blunt needle; damage can cause permanent snags or runs in knits and fine fabrics.
Fabric and needle chart
Instructions from the manual
Fabric and Needle Chart8 steps
For general sewing use 11/75 or 14/90.
Use fine needle/thread on light fabric and a large enough needle on heavy fabric to avoid fraying.
Test on a scrap; generally use matching needle and bobbin thread.
Fine lawn, georgette, tricot, organza or crepe: silk/cotton/synthetic 80–100 and needle 9/65–11/75.
Medium sheeting, jersey, broadcloth or fleece: silk 50, cotton/synthetic 50–80 and needle 11/75–14/90.
Heavy denim, tweed, coating or quilting: silk 30–50, cotton/synthetic 40–50 and needle 14/90–16/100.
The supplied packet 639804000 has three 14/90 needles.
A blue-tip needle 990311000, sold separately, is recommended for stretch, very fine and synthetic fabrics to prevent skipped stitches.
Setting the spool of thread
Instructions from the manual
Setting the Spool of Thread4 steps
Lift the horizontal pin, put on the thread spool and press the large holder firmly against it so the spool rests on its supporter.
Use the small holder for narrow or small spools.
For bobbin winding without unthreading, put the spool stand under the additional spool pin, insert the pin into its hole, add felt and the spool.
Point the additional pin toward the winding tension disc and route the thread around that disc as shown.
Removing the bobbin
Instructions from the manual
Removing the bobbin5 steps
Switch off before threading or changing the needle or presser foot.
Switch off and unplug before removing or attaching parts, removing covers or cleaning.
Slide the hook-cover release gently right and remove the cover; lift out the bobbin.
Use only the designated plastic bobbins for a horizontal hook.
Other bobbins, including pre-wound paper ones, can damage the holder or cause stitching problems.
Winding the bobbin
Instructions from the manual
Winding the bobbin7 steps
Set the speed slider to its fastest position.
Route spool thread around the bobbin winding tension disc, pass it through the bobbin hole from inside to outside, and put the bobbin on the spindle.
Push the bobbin right; the bobbin icon appears.
Hold the thread end, run a few layers, stop and cut the thread close to its hole.
Restart; the full bobbin stops spinning automatically.
Stop the machine, move the spindle left, remove the bobbin and cut the thread.
Restore the speed slider position.
Inserting the bobbin
Instructions from the manual
Inserting the bobbin6 steps
Switch off before threading or changing the needle or presser foot.
Switch off and unplug before removing or attaching parts, removing covers or cleaning.
Insert the bobbin with thread unwinding counterclockwise.
Guide it into the first front notch, draw it left between the tension-spring blades and continue gently until it enters the second notch.
Pull out about 6 inches(15 cm).
Refit the hook cover and check threading against its printed diagram.
Threading the machine
Instructions from the manual
Threading the Machine7 steps
Raise the presser foot and use Needle up/down to raise the take-up lever fully.
Switch off before threading.
Guide the end around the upper thread guide.
Hold near the spool while drawing the end down around the check-spring holder.
Draw it up from right to left over the take-up lever and down through its eye.
Pass the lower guide and slide behind the needle-bar guide on the left.
Use the reviewed needle-threader instructions.
Needle threader
Instructions from the manual
Needle Threader6 steps
Switch off.
Use a size 11–16 needle or a blue-tip needle; thread sizes 50–90 are recommended.
Lower the foot and raise the needle fully.
Pull the threader knob completely down so its hook enters the eye from behind.
Guide thread from the left guide to the right guide and under the hook, then forward along the right side of the right guide.
Raise the knob to draw a loop through the needle, then pull the thread through its eye.
Drawing up the bobbin thread
Instructions from the manual
Drawing up the Bobbin Thread3 steps
Raise the foot and hold the needle thread lightly in the left hand.
Switch on and press Needle up/down twice to pick up the bobbin thread.
Pull both threads 4–6 inches(10–15 cm) under and behind the foot.
Lcd display
Instructions from the manual
LCD Display4 steps
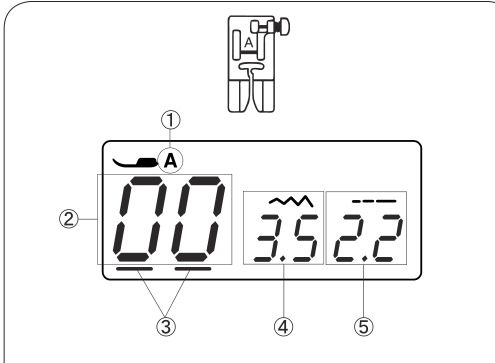
The LCD identifies the recommended foot letter, pattern number, cursor positions, stitch width and stitch length.
Use left/right cursor buttons under the pattern number; both digits have cursors at power-on.
Use up/down value buttons to change the pattern number by one.
Move the cursor under the tens digit to change by ten.
Reading the LCD; shown values are examples, not fault codes.
Diagram key
1: Recommended foot identification letter; A is shown
2: Stitch pattern number; 00 is shown
3: Cursor positions below the digits
4: Stitch width; 3.5 is shown
5: Stitch length; 2.2 is shown
Stitch chart
Instructions from the manual
Stitch ChartView
Pull the chart drawer right to see all available patterns. HZL-LB5100 uses the 100-stitch chart, numbered 00–99; use that branch of the shared guide.
Adjusting the needle thread tension
Instructions from the manual
Adjusting the Needle Thread Tension8 steps
An ideal straight stitch locks threads between the fabric layers, balanced on both sides.
Higher dial values tighten the needle thread; adjust for fabric stiffness/thickness, number of layers and stitch type.
If bobbin thread shows on the top and stitching feels bumpy, turn the dial lower.
If needle thread shows on the underside and stitching feels bumpy, turn it higher.
For zigzag, no bobbin thread should show on top and a little needle thread should show underneath.
Minimize the underside needle thread without puckering or bringing bobbin thread to the top.
Tight tension pulls zigzag corners together on top; loose tension pulls them together underneath.
Results vary with fabric, thread and sewing conditions.
Straight stitch sewing
Instructions from the manual
Straight Stitch Sewing6 steps
Select 00 or 01, tension 2–6 and zigzag foot A.
Raise the foot, align fabric with a seam guide, lower the needle at the starting point, draw threads rearward and lower the foot.
With satin foot F or buttonhole foot R, hold threads left instead.
Start with start/stop or the foot control.
Guide gently and allow natural feed.
Secure the seam end with several reverse stitches and cut threads with the face-cover cutter.
Changing sewing direction
Instructions from the manual
Changing Sewing DirectionView
Stop, lower the needle with Needle up/down, raise the foot and pivot the fabric around the needle. Lower the foot and sew in the new direction.
Turning square corners
Instructions from the manual
Turning Square Corners3 steps
For a 5/8 inch seam, stop when the front edge reaches the cornering guides.
Lower the needle with Needle up/down, raise the foot and turn the fabric 90 degrees counterclockwise.
Lower the foot and continue.
Sewing from the edge of thick fabric
Instructions from the manual
Sewing from the Edge of Thick Fabric3 steps
Lower the needle at the start point.
Hold in the black button on zigzag foot A while lowering the foot so it locks horizontally, preventing slipping at a thick edge or across a hem.
The button releases automatically after a few stitches.
Needle plate
Instructions from the manual
Needle Plate3 steps
The plate and hook-cover guides measure allowance from the center needle position to the fabric edge.
Metric marks 10, 15, 30 and 40 mean 1.0, 1.5, 3.0 and 4.0 cm; inch guides are 3/8, 1/2, 5/8, 1 and 1½inches.
The front guides are 1/4, 3/8 and 5/8 inch.
Altering the needle drop position
Instructions from the manual
Altering the Needle Drop Position3 steps
For 100-stitch patterns 00, 01, 02, 03, 20, 21, 22 and 23, place the cursor under stitch width, normally 3.5.
Down moves the needle left toward 0.0; up moves it right toward 7.0.
The middle is 3.5.
Altering the stitch length
Instructions from the manual
Altering the Stitch LengthView
Place the cursor under stitch length, normally 2.2. Down decreases and up increases it over 0.0–5.0. Reverse stitch length cannot exceed 4.0.
Lock-a-matic stitch
Instructions from the manual
Lock-a-matic Stitch2 steps
Use 02, tension 2–6 and foot A to secure the beginning and end with backstitching.
At seam end press Reverse once: four reverse stitches, four forward stitches and an automatic stop follow.
Locking stitch
Instructions from the manual
Locking Stitch4 steps
Use 03, tension 2–6 and foot A for an invisible lock.
Lower the needle close to the front fabric edge.
The machine locks in place then sews forward.
At the end, press Reverse to lock in place and stop automatically.
Triple stretch stitch
Instructions from the manual
Triple Stretch StitchView
For this 100-stitch model select 21, tension 2–6 and foot A. Use this durable elastic stitch to reinforce crotch/armhole seams or items such as backpacks.
Stretch stitch
Instructions from the manual
Stretch StitchView
Select 04 or 05, tension 3–6 and foot A. This narrow stretch stitch prevents puckering on knits and bias seams while allowing seams to press flat; use it for fine fabric seams.
Zigzag stitch
Instructions from the manual
Zigzag Stitch5 steps
Use 12 or 13, tension 3–7 and foot A for overcasting, mending, appliqué or decoration.
Use interfacing on stretch knit, jersey or tricot.
Place the cursor under width, normally 5.0.
Up increases and down decreases width over 0.0–7.0 with a centered needle position for pattern 12 or a fixed right needle position for pattern 13.
For length, normally 1.5, up increases and down decreases it over 0.2–5.0.
Overcasting with zigzag stitch
Instructions from the manual
Overcasting with Zigzag Stitch4 steps
Use 12, tension 3–7 and overedge foot C.
Set width to at least 4.5 so the needle does not strike the guide wires.
Place the fabric edge against the black ridge with the double wires at its edge.
Sew over the wires while keeping the edge against the ridge, which holds loose threads for stitching.
Multiple zigzag stitch
Instructions from the manual
Multiple Zigzag Stitch2 steps
Use 14, tension 3–7 and foot A to finish puckering-prone synthetic/stretch raw edges or mend tears.
Sew with an adequate allowance, then trim close to the stitches without cutting them.
Overedge stitch
Instructions from the manual
Overedge Stitch4 steps
Use 17, tension 3–7 and foot C for combined seaming/overcasting.
Use it for 0.6 cm(1/4 inch) knit seams, including ribbing, or narrow seams on medium/heavy woven fabric.
Keep width at least 4.5 to avoid hitting the foot wires.
Position raw edges beneath the guides touching the black ridge.
Buttonholes
Instructions from the manual
ButtonholesView
Standard buttonholes suit medium/heavy fabric; rounded-end ones suit fine/medium fabric, especially blouses and children’s clothes; keyhole ones suit medium/heavy fabric and larger, thicker buttons.
Standard buttonhole
Instructions from the manual
Standard buttonhole16 steps
Select 06, tension 1–4 and automatic buttonhole foot R.
The button holder accepts buttons 3/8–1 inch(1–2.5 cm) diameter.
Test on spare matching fabric and use interfacing on fine/stretch fabric.
Pull the holder back, insert the button and close tightly.
For an extremely thick button, test fit; a little extra holder gap lengthens the buttonhole if necessary.
Raise the needle with Needle up/down; switch off and unplug when fitting the foot.
Snap its pin into the holder groove; use the extra-high foot-lift position if needed.
Raise the foot.
Draw needle thread left through its hole, mark the buttonhole, place fabric and lower the needle at the start using the handwheel.
Lower the foot and buttonhole lever fully.
Use reference lines for positioning, with no gap between slider and front stopper to prevent an offset or sewing gap.
Start while drawing thread lightly left, release it after a few stitches and continue.
If the lever was not lowered, the LCD warns and the machine stops after a few stitches; lower the lever and restart.
The machine completes the illustrated sequence and stops automatically needle-up.
Remove fabric; put a pin below the bartack to prevent cutting stitches, then open with the seam ripper.
Raise the lever fully when finished.
Double layer buttonhole
Instructions from the manual
Double layer buttonholeView
For a stronger buttonhole, after the first layer do not raise the foot or lever: start again to sew a second layer over it. If feed is not smooth, increase the buttonhole density.
Adjusting the stitch width and density for buttonholes
Instructions from the manual
Adjusting the Stitch Width and Density for Buttonholes4 steps
Under width, normally 5.0, up increases and down decreases width.
Available width is 2.5–7.0 depending on buttonhole type.
Under density, normally 0.4, up makes stitches less dense and down makes them denser.
Available density is 0.3–0.8 depending on type.
Rounded end buttonhole
Instructions from the manual
Rounded end buttonholeView
For this 100-stitch model select 07, tension 1–4 and foot R; follow the complete Standard buttonhole instructions. Width is 2.5–5.5 and density 0.3–0.8.
Keyhole buttonhole
Instructions from the manual
Keyhole Buttonhole3 steps
Select 08, tension 1–4 and foot R; follow the complete Standard buttonhole instructions.
Width is 5.5–7.0 and density 0.3–0.8.
Open using a seam ripper and eyelet punch; the punch is not supplied.
Corded buttonhole
Instructions from the manual
Corded Buttonhole8 steps
Select 06, tension 1–4 and foot R.
Follow Standard buttonhole sewing and match width to cord thickness.
With the foot raised, hook filler cord on its rear spur, bring ends forward underneath and hook them into the front forks to hold tight.
Lower the needle at the start and lower the foot.
Sew both sides and bartacks over the cord.
Remove fabric and cut only the sewing threads.
Pull loose cord ends tight, thread each through a hand needle, take them to the underside and knot.
If the cord was stitched down and cannot be pulled, cut it at both ends.
Zipper sewing
Instructions from the manual
Zipper Sewing20 steps
Use 00, tension 1–4, foot A for preparation and zipper foot E for zipper sewing.
Switch off/unplug when changing feet.
Fit E’s right pin for the left zipper side and its left pin for the right side.
Add 3/8 inch(1 cm) to zipper length for the opening.
Put fabric right sides together and useA to seam to the opening end with 3/4 inch(2 cm) allowance; reverse to secure.
Increase length to 5.0 and loosen tension to 1–3 to baste the opening.
Fold back the left allowance and turn the right allowance under by the printed 1/8 inch(0.2–0.3 cm) margin.
Pin teeth beside the fold and restore normal length/tension.
FitE by its right pin.
Lower the foot at the opening end with the needle next to fold and tape.
Avoid striking the foot or zipper teeth.
Sew all layers near the fold.
Stop 2 inches(5 cm) before the slider; lower the needle slightly, raise the foot, open the zipper past the slider, lower the foot and finish.
Close the zipper; spread fabric right side up.
FitA; set length 5.0, width 3.5 and tension 1.
Baste open fabric and tape together.
FitE by its left pin; restore default length/width and tension 4.
Backstitch across the opening end by the printed 3/8 inch(0.7–1 cm), turn 90 degrees and sew through garment and tape with teeth beside the foot edge.
Stop 2 inches(5 cm) before slider, lower needle, raise foot and remove basting.
Open the zipper, lower foot and finish; remove upper-fabric basting.
Blind hemming
Instructions from the manual
Blind Hemming9 steps
Select 18, tension 1–4 and foot G.
Form a 1/4 inch(0.6 cm) allowance wrong-side-up.
Overcast raveling heavyweight edges first; fold hems under for lightweight fabric.
Place fold beside the foot guide, lower foot and adjust needle position if necessary.
Sew along the guide; open after sewing.
If the needle goes too far left, stitches show on the right side.
For needle position, cursor under width 0.6(default); up moves the left needle drop left and down moves it right.
The LCD shows distance from guide in millimetres, 0.0–1.2.
This changes position, not stitch width.
Button sewing
Instructions from the manual
Button Sewing6 steps
Use 12, tension 3–7 and satin foot F.
Lower the feed dog, set slow speed and minimum length 0.2.
Align button holes with the foot’s horizontal slot and lower to hold.
Adjust width for the left hole; turn the handwheel to check entry into the right hole, adjusting width again if needed.
Sew several times, cut leaving 4 inches(10 cm), use a hand needle to take top thread to the back and knot.
Raise feed dog for normal sewing afterward.
Gathering
Instructions from the manual
Gathering3 steps
Use 00, foot A, tension 1 and length 5.0.
Sew two straight rows 1/4 inch(0.6 cm) apart.
Knot at the beginning, pull bobbin threads at the end to gather, then knot ends and distribute gathers evenly.
Patchwork
Instructions from the manual
Patchwork5 steps
Use patterns 20 and 33, tension 3–6, zigzag foot A and satin foot F.
Patterns 29, 40 and 58 are additional decorative choices.
Place patchwork pieces right sides together and piece with pattern 20 and a precise 1/4 inch seam allowance.
Switch off and unplug while replacing A with satin foot F.
Select a patchwork pattern, press the seam allowance open, and stitch on the right side centered over the seam.
Shelltuck
Instructions from the manual
Shelltuck4 steps
Use 19, tension 6–8 and foot F on light fabric such as tricot.
Fold on the bias and sew so the needle barely clears the fold, forming shells.
Space repeated rows at least 5/8 inch(1.5 cm) apart.
On knits or soft silky woven fabric, shelltuck can run in any direction.
Applique
Instructions from the manual
Applique7 steps
Use pattern 52 or alternatives 53–57, tension 1–4 and satin foot F.
Baste or pin the appliqué in place.
Sew with the needle falling along its outer edge.
For a sharp corner, stop with the needle at the outer edge, raise the foot and pivot around the needle.
For pattern 52, move the cursor below the width, initially 3.5.
Down reduces width and up increases it symmetrically about the centered needle position.
Patterns 52–54 keep a fixed center; pattern 56 keeps its left needle drop, changing the right drop; patterns 55 and 57 keep the right drop, changing the left drop.
Fringing
Instructions from the manual
Fringing4 steps
Use 52–54, tension 1–4 and foot F with firm woven fabric such as linen whose threads remove easily.
Cut on grain and remove one strand at the desired fringe start.
Sew down the left side with right-hand stitches in the open space.
Remove excess yarn to the right of the stitching to make the fringe.
Drawn work
Instructions from the manual
Drawn Work4 steps
Use 52–54, tension 1–4 and foot F on firm woven fabric such as linen.
Cut on grain, choose the opening width and remove one strand at each end.
Sew the left side with right-hand stitches in the open space.
Turn 180 degrees and sew the other side, then remove fabric yarn between the stitched edges.
Fagoting
Instructions from the manual
Fagoting4 steps
Use 25, 29, 33, 35 or 58, tension 3–6 and foot A orF to join fabric edges with openwork.
Fold each edge under 5/8 inch(1.5 cm) and press.
Pin to paper or tear-away backing with a 1/8 inch(0.3–0.4 cm) gap.
Sew slowly so the needle catches both folds; tear away the paper afterward.
Scallop stitch
Instructions from the manual
Scallop Stitch3 steps
Use 97, 27 or 28, tension 3–6 and foot F.
Sew about 3/8 inch(1 cm) inside the edge and trim outside the stitches without cutting thread.
This is the scallop-edge technique; the separately headed satin-stitch technique uses its own tension range.
Smocking
Instructions from the manual
Smocking6 steps
Use 33 or 58, tension 3–6 and foot F for the decorative stage.
Choose soft light fabric such as batiste, gingham or challis; cut it three times the intended width.
First select straight stitch, length 5.0 and loose tension.
Sew rows 3/8 inch(1 cm) apart; knot one edge and pull bobbin threads from the other to distribute gathers.
Set tension 3–6 and 33 or 58.
Sew between the straight rows, then pull out the straight stitches.
Satin stitches
Instructions from the manual
Satin Stitches3 steps
For this 100-stitch model use 93–99, tension 1–4 and foot F.
On stretch/elastic fabric apply interfacing to the wrong side for better results.
Press Auto-lock to finish the pattern end.
Correcting deformed stitch patterns
Instructions from the manual
Correcting Deformed Stitch PatternsView
Stretch results vary with speed, fabric and layers. Use a screwdriver on the feed-balancing dial: turn toward+ for compressed patterns or toward− for elongated patterns.
Cleaning the hook race and feed dog
Instructions from the manual
Cleaning the Hook Race and Feed Dog10 steps
Raise the needle using Needle up/down, switch off and unplug.
Do not dismantle beyond this section.
Remove needle and foot.
Slide the cover-release right, remove hook cover and bobbin, then brush dust/lint or use a vacuum.
Remove needle-plate setscrews with the supplied screwdriver and lift the plate.
Lift out the bobbin holder.
Clean holder, feed dog and hook race with the lint brush.
Wipe inside race with a dry cloth; a vacuum may also be used.
Clean the exterior with a soft cloth and neutral soap.
Store cool and dry, away from high humidity, radiators and direct sunlight.
Installing the bobbin holder
Instructions from the manual
Installing the Bobbin Holder4 steps
Keep switched off and unplugged during reassembly.
Insert holder with its knob next to the hook-race stopper.
Refit needle plate and setscrews.
Ensure the needle and foot are attached after cleaning.
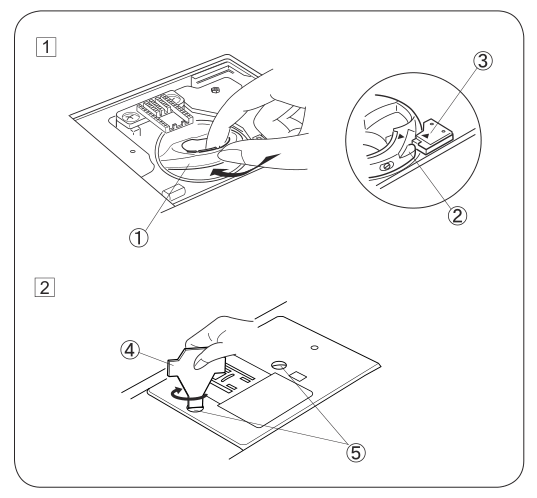
Refit the bobbin holder next to its stopper, then refit the needle plate. Keep switched off and unplugged.
Diagram key
Step 1: Insert the holder with its knob beside the hook-race stopper
1: Bobbin holder
2: Knob, in the magnified view
3: Stopper, in the magnified view
Step 2: Refit the needle plate with the setscrews; attach needle and foot after cleaning
4: Screwdriver
5: Setscrew
Introduction of optional accessory parts
Instructions from the manual
Introduction of optional accessory parts2 steps
These parts are optional purchases from the selling shop: transparent zigzag quilt foot for free-motion quilting including zigzag; walking foot for difficult-feed knits, jersey, vinyl, artificial leather, leather or quilting; wide table for large projects; quilt guide for equally spaced rows.
Do not infer an unprovided installation procedure.
Saddle stitch (100-stitch model only)
Instructions from the manual
Saddle Stitch (100-stitch model only)View
Use pattern 22, tension 3–6 and satin foot F for a hand-worked topstitch appearance on suits, blazers, jumpers and denim outfits.
Knit stitch (100-stitch model only)
Instructions from the manual
Knit Stitch (100-stitch model only)View
Use pattern 16, tension 3–6 and zigzag foot A. Allow a 5/8 inch (1.5 cm) seam and trim excess close to the stitching without cutting the stitches.
Darning stitch (100-stitch model only)
Instructions from the manual
Darning Stitch (100-stitch model only)12 steps
Use pattern 09, tension 3–6 and automatic buttonhole foot R.
Switch off and unplug while attaching the foot.
Pull its button holder fully out and draw needle thread left through its hole.
Position the fabric and lower the needle at the start, then lower the foot.
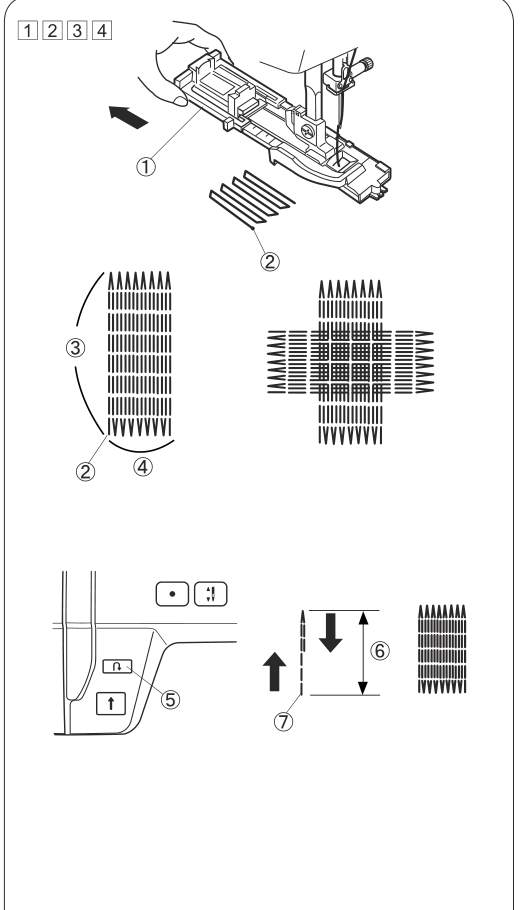
Start sewing: the machine locks, sews 16 rows of darning, locks again and stops automatically.
Turn the fabric and repeat in a different direction.
The illustrated full darn is 3/4 inch (2 cm) long and 9/32 inch (0.7 cm) wide.
For a darn shorter than 3/4 inch (2 cm), stop at the required length, then press Reverse.
Restart and let the machine finish and stop automatically.
Restart again to repeat the same size; select another pattern and reselect darning to reset the size.
To correct evenness, move the cursor under d5, the default.
If the right side is lower, use Up to choose d6–d9; if the left is lower, use Down to choose d1–d4.
Automatic darning sequence for the HZL-LB5100 100-stitch model; turn fabric and repeat in a different direction.
Diagram key
Steps 1–4: Fit foot R with holder extended, position fabric and lower needle/foot, sew the automatic 16-row sequence, then turn fabric and repeat
1: Button holder, pulled fully out
2: Starting point for the full darning sequence
3: Full darning length, 3/4 inch (2 cm)
4: Darning width, 9/32 inch (0.7 cm)
5: Reverse button for setting a shorter length
6: Required shorter length; stop at this length before pressing Reverse
7: Starting point for the shorter darn
Other button symbols: Auto-lock (dot), needle up/down (needle with arrows), and start/stop (up arrow); the numbered reverse button sets the shorter darning length
Tacking (100-stitch model only)
Instructions from the manual
Tacking (100-stitch model only)6 steps
Use pattern 10, tension 3–6 and satin foot F to reinforce pockets, crotches and belt carriers.
Start sewing and let the machine stop automatically after its 5/8 inch (1.5 cm) tack.
For a shorter tack, stop at the desired length and press Reverse.
Restart and let the machine finish and stop automatically.
Restart to repeat that length.
To reset length, select another pattern and then reselect tacking.
Eyelet (100-stitch model only)
Instructions from the manual
Eyelet (100-stitch model only)7 steps
Use pattern 11, tension 1–4 and satin foot F for belt holes and similar work.
Lower the needle at the starting point and lower the foot.
Start sewing; the machine stops automatically when complete.
Open using an awl, eyelet punch or pointed scissors; these tools are not provided.
Move the cursor under L3, the default shape.
For overlapping stitches use Up to select L4–L5; for an open gap use Down to select L1–L2.
The complete adjustment range is L1–L5.
Cross stitch (100-stitch model only)
Instructions from the manual
Cross Stitch (100-stitch model only)4 steps
Use patterns 65–67, tension 3–6 and satin foot F on plain close-woven fabric such as linen or wool flannel.
Support lightweight fabric with tear-away backing.
Sew from the center of the design outward.
Press Auto-lock before sewing to sew one cross-stitch unit and stop automatically.
French knots (100-stitch model only)
Instructions from the manual
French Knots (100-stitch model only)View
Use pattern 47, satin foot F and thread tension 5–8. The guide supplies no further sequence for this stitch.
Clasp stitches (100-stitch model only)
Instructions from the manual
Clasp Stitches (100-stitch model only)3 steps
Use pattern 34 or 69, tension 3–6 and satin foot F to close quilt layers.
Select the stitch, press Auto-lock and start.
The machine sews a clasp stitch and locking stitch, then stops automatically.
Decorative stitches (100-stitch model only)
Instructions from the manual
Decorative Stitches (100-stitch model only)View
Use pattern 75 or alternatives 76–92, tension 3–6 and satin foot F. Align and guide the fabric carefully; use tear-away backing if necessary.
Standard accessories
Instructions from the manual
Standard Accessories2 steps
Included accessories are zigzag foot A (on machine), overedge foot C, zipper foot E, satin foot F, blind hem foot G, automatic buttonhole foot R, large spool holder (one on machine), small spool holder, additional spool pin, spool stand, spool-pin felt, four bobbins (one on machine), assorted needle set, seam ripper/buttonhole opener, lint brush, screwdriver, instruction book, instructional DVD, hard cover, foot control and power cable.
The supplied power cable may differ from the illustration.
Controls and parts
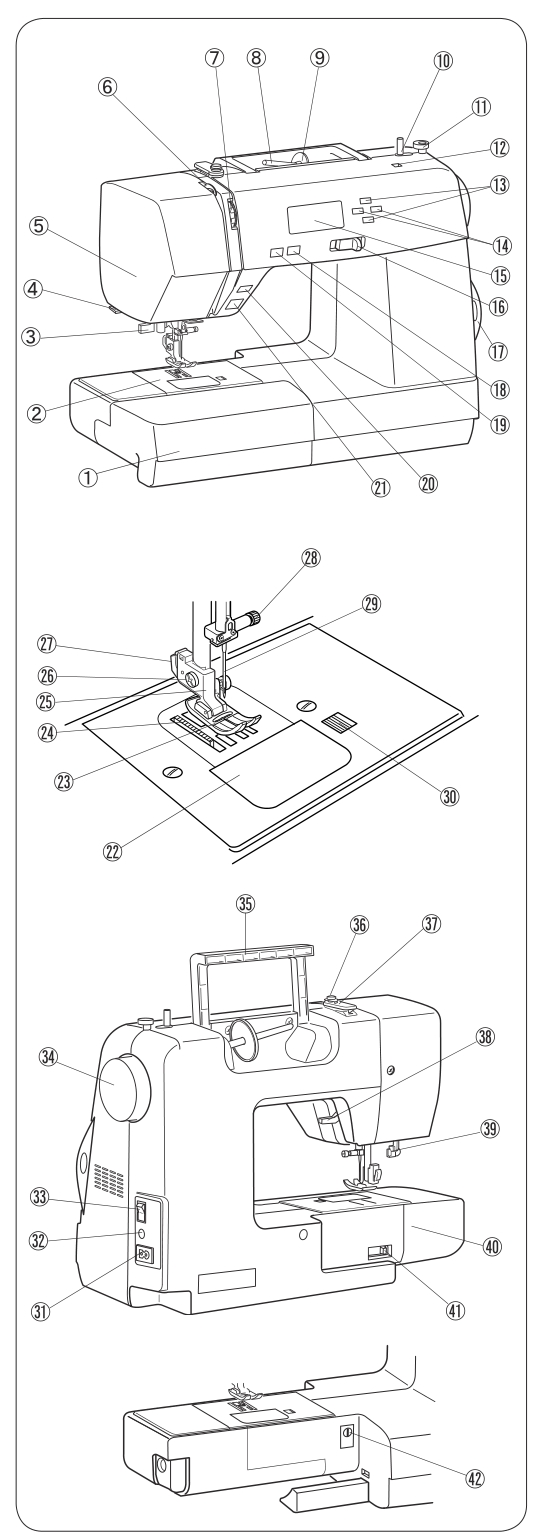
See the manual diagrams 1 diagram
Controls and parts — shared HZL-L-series diagram applicable to HZL-LB5100.
Diagram key
1: Extension table (accessory box)
2: Needle plate
3: Needle threader
4: Thread cutter
5: Face cover
6: Thread take-up lever
7: Thread tension dial
8: Spool pin
9: Large spool holder
10: Bobbin winder spindle
11: Bobbin winder stopper
12: Hole for additional spool pin
13: Value set buttons
14: Cursor buttons
15: LCD display
16: Speed control slider
17: Stitch chart drawer
18: Needle up/down button
19: Auto-lock button
20: Reverse button
21: Start/stop button
22: Hook cover plate
23: Presser foot (zigzag foot A)
24: Feed dog
25: Foot holder
26: Setscrew
27: Lever
28: Needle clamp screw
29: Needle
30: Hook cover release button
31: Power inlet
32: Foot control jack
33: Power switch
34: Handwheel
35: Carrying handle
36: Bobbin winding tension disc
37: Upper thread guide
38: Presser foot lifter
39: Buttonhole lever
40: Free arm
41: Drop feed lever
42: Feed balancing dial
Model details
Model and compatibility
Foot control
Use foot control21371 or YC-485EC-1.
Bobbins
Use designated plastic bobbins for horizontal hook; pre-wound paper bobbins are unsuitable.
Needle threader
Needle sizes11–16 or blue-tip needle; recommended thread sizes50–90.