MODEL REFERENCE
Panasonic KX-FLM671
38 errors · 46 troubleshooting topics · 137 guides

The checks and guides below come from the official manuals for this model.
No matches for this wording. Try a light name, error code or a shorter phrase.
Errors and indicators
Light patterns and messages documented in the manual Report: COMMUNICATION ERROR — 40-42 46-72 FFreport: COMMUNICATION ERROR — 40-42 46-72 FF
A transmission or reception error occurred.: A transmission or reception error occurred. Try again or check with the other party.
Report: COMMUNICATION ERROR — 43 44report: COMMUNICATION ERROR — 43 442 checks
Report: DOCUMENT JAMMEDreport: DOCUMENT JAMMED
Remove the jammed document (page 77)..: Remove the jammed document (page 77).
Report: ERROR-NOT YOUR UNIT — 53 54 59 70report: ERROR-NOT YOUR UNIT — 53 54 59 70
A transmission or reception error occurred because of a problem with the other party’s fax machine.: A transmission or reception error occurred because of a problem with the other party’s fax machine. Check with the other party.
Report: JUNK FAX PROH. REJECTreport: JUNK FAX PROH. REJECT
The junk fax prohibitor feature of this unit rejected fax reception..: The junk fax prohibitor feature of this unit rejected fax reception.
Report: MEMORY FULLreport: MEMORY FULL2 checks
Report: NO DOCUMENT / FAILED PICKUPreport: NO DOCUMENT / FAILED PICKUP
The document was not fed into the unit properly.: The document was not fed into the unit properly. Reinsert it and try again.
Report: OTHER FAX NOT RESPONDINGreport: OTHER FAX NOT RESPONDING4 checks
Report: PRESSED THE ‘Stop’ KEYreport: PRESSED THE ‘Stop’ KEY
Stop was pressed and fax communication was canceled..: Stop was pressed and fax communication was canceled.
Report: THE COVER WAS OPENEDreport: THE COVER WAS OPENED
The front cover was opened.: The front cover was opened. Close it and try again.
Report: OKreport: OK
Fax transmission or reception was successful..: Fax transmission or reception was successful.
CALL SERVICEcALL SERVICE
There is something wrong with the unit.: There is something wrong with the unit. Contact our service personnel.
CHANGE DRUMcHANGE DRUM
There is something wrong with the drum unit.: There is something wrong with the drum unit. Replace the drum unit and the toner cartridge.
CHECK DOCUMENTcHECK DOCUMENT
The document was not fed into the unit properly.: The document was not fed into the unit properly. Reinsert the document. If misfeeding occurs frequently, clean the document feeder rollers (page 78) and try again.
CHECK DRUMcHECK DRUM
The drum unit is not inserted properly.: The drum unit is not inserted properly. Reinsert it correctly (page 10).
CHECK PICK UPcHECK PICK UP
Recording paper was not fed into the unit properly.: Recording paper was not fed into the unit properly. Reinsert the recording paper (page 76).
COVER OPENcOVER OPEN
The front cover is open.: The front cover is open. Close it.
DIRECTORY FULLdIRECTORY FULL
There is no space to store new items in navigator directory.: There is no space to store new items in navigator directory. Erase unnecessary items (page 36).
DRUM LIFE LOW REPLACE
SOONdRUM LIFE LOW REPLACE SOON
The drum life is near its end.: The drum life is near its end. Replace the drum unit as soon as possible.
FAX IN MEMORYfAX IN MEMORY2 checks
KEEP COPYINGkEEP COPYING
Copying has stopped due to a lack of recording paper or a recording paper jam.: Copying has stopped due to a lack of recording paper or a recording paper jam. See the other displayed message instructions to continue copying.
LOW TEMP.lOW TEMP.
The inside of the unit is extremely cold and cannot be operated.: The inside of the unit is extremely cold and cannot be operated. Use the unit in a warmer area. While the unit cannot be operated, the received documents are temporarily stored into the memory, and will be printed out automatically when the unit warms up.
MEMORY FULLmEMORY FULL2 checks
MODEM ERRORmODEM ERROR
There is something wrong with the unit’s modem.: There is something wrong with the unit’s modem. Contact our service personnel.
NO FAX REPLYnO FAX REPLY
The other party’s fax machine is busy or has run out of recording paper.: The other party’s fax machine is busy or has run out of recording paper. Try again.
OUT OF PAPERoUT OF PAPER2 checks
PAPER JAMMEDpAPER JAMMED
A recording paper jam occurred.: A recording paper jam occurred. Remove the jammed paper (page 74).
PC FAIL OR BUSYpC FAIL OR BUSY2 checks
PLEASE WAITpLEASE WAIT
The unit is warming up.: The unit is warming up. Wait for a while.
REDIAL TIME OUTrEDIAL TIME OUT
The other party’s fax machine is busy or has run out of recording paper.: The other party’s fax machine is busy or has run out of recording paper. Try again.
REMOVE DOCUMENTrEMOVE DOCUMENT2 checks
REPLACE DRUM CHANGE
SUPPLIESrEPLACE DRUM CHANGE SUPPLIES
The drum unit’s service life is finished.: The drum unit’s service life is finished. Replace the drum unit immediately.
RX MEMORY FULLrX MEMORY FULL2 checks
TONER EMPTY / CHANGE SUPPLIEStONER EMPTY / CHANGE SUPPLIES
The toner’s service life is finished.: The toner’s service life is finished. Replace the toner cartridge immediately.
TONER LOW / CHANGE SUPPLIEStONER LOW / CHANGE SUPPLIES
The toner’s service life is near its end.: The toner’s service life is near its end. Replace the toner cartridge as soon as possible.
TRANSMIT ERRORtRANSMIT ERROR
A transmission error occurred.: A transmission error occurred. Try again.
WARMING UPwARMING UP
The inside of the unit is cold.: The inside of the unit is cold. Let the unit warm up. Wait for a while.
WRONG PAPERwRONG PAPER
The fax message was printed on paper which is shorter than letter-size paper.: The fax message was printed on paper which is shorter than letter-size paper. Use appropriate size paper (page 81).
Troubleshooting
Find the problem you are experiencingThe unit does not work.1 check
- Check the connections (page 17, 24)..
- Check the connections (page 17, 24).
A printing error is displayed while using PC FAX and Remote Control.1 check
- The printer driver is used for PC FAX and Remote Control.
- The printer driver is used for PC FAX and Remote Control. Transmission errors will be displayed as printing errors.
Multi-Function Station does not work properly.5 checks
- If you connect the USB cable to a USB hub, connect it to the USB port of your computer directly..
- If you connect the USB cable to a USB hub, connect it to the USB port of your computer directly.
- Make sure you have installed the latest Service Pack available for the version of Windows installed on your computer.
- Make sure you have installed the latest Service Pack available for the version of Windows installed on your computer. See the Microsoft web site for details.
- If you have any other multifunction software installed on your computer, uninstall it..
- If you have any other multifunction software installed on your computer, uninstall it.
- Check that your computer has enough memory and hard disk space.
- Check that your computer has enough memory and hard disk space.
- If your computer warns that there is insufficient memory, close other applications.
- If there is not enough space on the hard disk, delete unnecessary files.
- Uninstall Multi-Function Station once, and re-install it..
- Uninstall Multi-Function Station once, and re-install it.
I cannot install or uninstall Multi-Function Station.4 checks
- Some of the files needed to install or uninstall Multi-Function Station may be corrupted.
- Some of the files needed to install or uninstall Multi-Function Station may be corrupted.
- Use the MfsCleaner utility (found on the supplied CD-ROM) to solve the problem.
- 1.
- Insert the supplied CD-ROM into your CD-ROM drive.
- The setup program will start automatically.
- The setup program will start automatically. 2. [Tools] → [Cleanup Tool]
- The [MfsCleaner] window will appear.
- The [MfsCleaner] window will appear. 3. Click [Clean], then click [Yes] to restart the computer. Note:
- To install Multi-Function Station again, see page 23..
- To install Multi-Function Station again, see page 23.
I cannot view the operating instructions using Multi- Function Station.1 check
- Install the operating instructions to your computer beforehand (page 25)..
- Install the operating instructions to your computer beforehand (page 25).
I cannot find the unit in the [Target Device] or [Device Select] dialog box when operating the following functions. – Scanning – Remote Control – PC FAX – Device Monitor1 check
- The printer driver has not been installed.
- The printer driver has not been installed. Install it on your computer (page 23).
The printing quality is poor. ABC6 checks
- Some paper has instructions recommending which side to print on.
- Some paper has instructions recommending which side to print on. Try turning the recording paper over.
- You may have used paper with a cotton and/or fiber content that is over 20 %, such as letterhead or resume paper..
- You may have used paper with a cotton and/or fiber content that is over 20 %, such as letterhead or resume paper.
- The recording paper is too damp.
- The recording paper is too damp. Use new paper.
- The remaining toner is low.
- The remaining toner is low. Replace the toner cartridge.
- To check the drum life and quality, please print the printer test list (page 80).
- To check the drum life and quality, please print the printer test list (page 80). If printing quality is still poor, replace the toner cartridge and/or drum unit.
- The toner save mode of feature #482 is ON (page 52)..
- The toner save mode of feature #482 is ON (page 52).
A blank sheet is ejected.2 checks
- You placed the document facing the wrong way when using the copier..
- You placed the document facing the wrong way when using the copier.
- The other party placed the document in their fax machine the wrong way.
- The other party placed the document in their fax machine the wrong way. Check with the other party.
Black lines, white lines or smudges appear on the printed documents.1 check
- The glass or rollers are dirty with correction fluid, etc.
- The glass or rollers are dirty with correction fluid, etc. Clean them (page 78). Please do not insert a document before correction fluid has dried completely.
Colored and gray objects are printed in black instead of grayscale when printing from Microsoft PowerPoint or other applications.1 check
- Select [Color] or remove the check next to [Grayscale] in the print dialog so that colored or gray objects will be printed in grayscale properly..
- Select [Color] or remove the check next to [Grayscale] in the print dialog so that colored or gray objects will be printed in grayscale properly.
When using the unit as a printer, the printing result is distorted.1 check
- Your unit is connected to the computer by USB.
- Your unit is connected to the computer by USB. After canceling printing using your computer, you must wait for 60 seconds before re-printing to avoid distorted printing.
I cannot scan.6 checks
- When scanning at a high resolution, a large amount of available memory is required.
- When scanning at a high resolution, a large amount of available memory is required.
- If your computer warns that there is insufficient memory, close other applications and try again.
- The unit is in use.
- The unit is in use. Try again later.
- There is not enough space on the hard disk.
- There is not enough space on the hard disk. Delete unnecessary files and try again.
- Check the connection between the computer and the unit (page 17, 24)..
- Check the connection between the computer and the unit (page 17, 24).
- Restart the computer, and try again..
- Restart the computer, and try again.
- You attempted to scan a document longer than the paper size which you set.
- You attempted to scan a document longer than the paper size which you set. Change the setting or divide the document into the appropriate paper size, and try again.
The document is not fed into the unit when using the unit as a scanner.1 check
- Remove the document and re-insert it..
- Remove the document and re-insert it.
Even after clicking [Cancel], scanning continues.1 check
- Please wait.
- Please wait. It may take a while for the cancel request to be accepted.
The name of the desired computer will not be displayed on the unit when scanning documents from the unit (KX-FLM671, LAN connection only).4 checks
- The printer driver has not been installed.
- The printer driver has not been installed. Install it on your computer (page 23).
- The PC name list up feature has been set to [Off].
- The PC name list up feature has been set to [Off]. Set [PC name list up on device] to [On] (page 26).
- The maximum number of computers on the LAN is connected to the unit (up to 30 computers).
- The maximum number of computers on the LAN is connected to the unit (up to 30 computers). Set [PC name list up on device] to [Off] on the other computers (page 26).
- The IP address of the unit may have changed.
- The IP address of the unit may have changed.
- To detect the IP address, proceed as follows. [Start] → [All Programs] or [Programs] → [Panasonic] → the unit’s name → [IP Address Checker] The IP address for the unit will be detected.
The unit will not make a copy.3 checks
- You cannot make a copy during programming.
- You cannot make a copy during programming. Make the copy after programming.
- The document was not fed into the unit properly.
- The document was not fed into the unit properly. Reinsert the document.
- Recording paper is not installed or the unit has run out of paper.
- Recording paper is not installed or the unit has run out of paper. Install paper (page 15).
Letters on the copied documents are not clear.1 check
- The original document is too dark or too light.
- The original document is too dark or too light. Change the contrast (page 33) and try again.
The copied documents are too dark and cannot be read.1 check
- You used a colored paper as a document.
- You used a colored paper as a document. Change the contrast (page 33) and make a lighter copy of the document, using "TEXT" resolution (page 33).
I cannot send documents.4 checks
- The telephone line cord is connected to the [EXT] jack on the unit.
- The telephone line cord is connected to the [EXT] jack on the unit. Connect to the [LINE] jack (page 17).
- The other party’s fax machine is busy or has run out of recording paper.
- The other party’s fax machine is busy or has run out of recording paper. Try again.
- The other party’s machine is not a fax machine.
- The other party’s machine is not a fax machine. Check with the other party.
- The other party’s fax machine failed to answer the fax automatically.
- The other party’s fax machine failed to answer the fax automatically. Send the fax manually (page 38).
I cannot send a fax overseas.2 checks
- Use the overseas transmission mode (feature #411 on page 53)..
- Use the overseas transmission mode (feature #411 on page 53).
- Add two pauses at the end of the telephone number or dial manually..
- Add two pauses at the end of the telephone number or dial manually.
The other party complains that letters on their received document are distorted.2 checks
- If your line has special telephone services such as call waiting, the service may have been activated during fax transmission.
- If your line has special telephone services such as call waiting, the service may have been activated during fax transmission.
- Connect the unit to a line that does not have these services.
- Another telephone on the same line is off the hook.
- Another telephone on the same line is off the hook. Hang up the extension telephone and try again.
The other party complains about the quality of their received documents.2 checks
- Try copying the document.
- Try copying the document.
- If the copied image is clear, there may be something wrong with the other party’s machine.
- If the copied image is not clear, too dark, black and white lines or smudges appear, refer to "12.3.2 Printing problems", page 67.
- The original document is too dark or too light.
- The original document is too dark or too light. Change the contrast (page 38) and try again.
The other party complains that received documents are too dark and cannot be read.1 check
- You used a colored paper as a document.
- You used a colored paper as a document. Change the contrast (page 33) and make a lighter copy of the document, using "TEXT" resolution (page 33), and try again.
I cannot receive documents.3 checks
- The telephone line cord is connected to the [EXT] jack on the unit.
- The telephone line cord is connected to the [EXT] jack on the unit. Connect to the [LINE] jack (page 17).
- You may have subscribed to a voice mail service due to service packs offered by your telephone company.
- You may have subscribed to a voice mail service due to service packs offered by your telephone company.
- Fax reception may not be possible when voice mail is activated so we recommend you to: – contact your telephone company and request to deactivate voice mail service, or – subscribe to a Distinctive Ring service (page 48).
- Feature #442 is activated and the received fax documents are automatically transferred to the computer.
- Feature #442 is activated and the received fax documents are automatically transferred to the computer. View the received documents using the computer (page 45).
I cannot receive documents automatically.3 checks
- The receiving mode is set to TEL mode.
- The receiving mode is set to TEL mode. Set to FAX ONLY mode. Press Auto Answer repeatedly to turn ON the Auto Answer light.
- The time taken to answer the call is too long.
- The time taken to answer the call is too long. Decrease the number of rings before the unit answers a call (feature #210 on page 51).
- Make sure that the Distinctive Ring of feature #430 is set properly (page 48).
- Make sure that the Distinctive Ring of feature #430 is set properly (page 48).
- If you do not subscribe to the Distinctive Ring service offered by your local telephone company, this feature should be OFF.
The display shows “CONNECTING.....”, but faxes are not received.1 check
- The incoming call is not a fax.
- The incoming call is not a fax. Change the receiving mode to TEL mode. Press Auto Answer repeatedly to turn OFF the Auto Answer light.
The printing quality of the received documents is poor.2 checks
- If documents can be copied properly, the unit is working normally.
- If documents can be copied properly, the unit is working normally.
- The other party may have sent a faint document or there may be something wrong with the other party’s machine.
- Ask them to send a clearer copy of the document or to check their fax machine.
- If documents can not be copied properly, refer to "12.3.2 Printing problems", page 67..
- If documents can not be copied properly, refer to "12.3.2 Printing problems", page 67.
The other party complains that they cannot send a document.3 checks
- The memory is full of received documents due to a lack of recording paper or a recording paper jam.
- The memory is full of received documents due to a lack of recording paper or a recording paper jam. Install paper (page 15) or remove the jammed paper (page 74).
- If feature #442 is set to "ALWAYS" (page 55), check the connection between the computer and the unit..
- If feature #442 is set to "ALWAYS" (page 55), check the connection between the computer and the unit.
- The unit is not in FAX ONLY mode.
- The unit is not in FAX ONLY mode. Press Auto Answer repeatedly to turn ON the Auto Answer light.
I cannot select the desired receiving mode.3 checks
- If you want to set FAX ONLY mode: – press Auto Answer repeatedly to turn ON the Auto Answer light..
- If you want to set FAX ONLY mode: – press Auto Answer repeatedly to turn ON the Auto Answer light.
- If you want to set TEL mode: – press Auto Answer repeatedly to turn OFF the Auto Answer light..
- If you want to set TEL mode: – press Auto Answer repeatedly to turn OFF the Auto Answer light.
- The Distinctive Ring of feature #430 is activated (page 48)..
- The Distinctive Ring of feature #430 is activated (page 48).
When an extension telephone is connected, I cannot receive documents by pressing {*}{#}{9}.3 checks
- You must set remote fax activation to ON (feature #434 on page 54) beforehand..
- You must set remote fax activation to ON (feature #434 on page 54) beforehand.
- Press *#9 firmly..
- Press *#9 firmly.
- You may have changed the remote fax activation code from *#9 (default setting).
- You may have changed the remote fax activation code from *#9 (default setting). Verify the remote fax activation code (feature #434 on page 54).
I cannot hear a dial tone.5 checks
- The telephone line cord is connected to the [EXT] jack on the unit.
- The telephone line cord is connected to the [EXT] jack on the unit. Connect to the [LINE] jack (page 17).
- If you use a splitter/coupler to connect the unit, remove the splitter/coupler and connect the unit to the wall jack directly.
- If you use a splitter/coupler to connect the unit, remove the splitter/coupler and connect the unit to the wall jack directly.
- If the unit operates properly, check the splitter/coupler.
- Disconnect the unit from the telephone line and connect a known working telephone.
- Disconnect the unit from the telephone line and connect a known working telephone.
- If the working telephone operates properly, contact our service personnel to have the unit repaired.
- If the working telephone does not operate properly, contact your telephone company.
- The power cord or telephone line cord is not connected.
- The power cord or telephone line cord is not connected. Check the connections (page 17).
- If you connected the unit through a computer modem, connect the unit directly to a telephone line jack..
- If you connected the unit through a computer modem, connect the unit directly to a telephone line jack.
I cannot make calls.1 check
- The dialing mode setting may be wrong.
- The dialing mode setting may be wrong. Change the setting (feature #120 on page 18).
The unit does not ring.1 check
- The ringer volume is turned OFF.
- The ringer volume is turned OFF. Adjust it (page 20).
The other party complains they only hear a fax tone and cannot talk.2 checks
- FAX ONLY mode is set (page 41).
- FAX ONLY mode is set (page 41). Tell the other party the number is only used for faxes.
- If you use a Distinctive Ring service, make sure you have set the same ring pattern assigned by the telephone company (page 48)..
- If you use a Distinctive Ring service, make sure you have set the same ring pattern assigned by the telephone company (page 48).
The receiving mode does not function properly.1 check
- Distinctive Ring is set (feature #430 on page 48)..
- Distinctive Ring is set (feature #430 on page 48).
Whenever I try to retrieve my voice mail messages, I am interrupted by the fax tone.1 check
- You are probably entering * # 9.
- You are probably entering * # 9.
- This is the default setting for the fax activation code.
- If you use a voice mail service, turn the fax activation feature OFF or reprogram the activation code (feature #434 on page 54).
I cannot receive a fax document on the computer.1 check
- Make sure the following features are set beforehand.
- Make sure the following features are set beforehand. – PC fax reception (feature #442 on page 55) – Computer setting for the PC fax reception (feature #443 on page 23)
I cannot operate the following functions. – PC printing – Scanning – Remote Control – PC FAX – Device Monitor3 checks
- The IP address of the unit may have changed.
- The IP address of the unit may have changed.
- To detect the IP address, proceed as follows. [Start] → [All Programs] or [Programs] → [Panasonic] → the unit’s name → [IP Address Checker] The IP address for the unit will be detected.
- Note: If the IP address cannot be detected, enter it manually (feature #501 on page 58).
- The IP address of the computer and the unit must be in the same local IP address class as shown below.
- Set the IP address in the range of the number specified in the class corresponding to your local network scale.
- Class Subnet mask IP address Class A 255.0.0.0 10.0.0.1 - 10.255.255.254 Class B 255.255.0.0 172.xx.0.1 - 172.xx.255.254*1 Class C 255.255.255.0 192.168.xx.1 - 192.168.xx.254*2 *1 "xx" should be the same value for the unit and for the computer, as shown in the following example.
- Example: 172.16.0.1 - 172.16.255.254 (The available range of "xx" is 16 - 31) *2 "xx" should be the same value for the unit and for the computer, as shown in the following example.
- Example: 192.168.0.1 - 192.168.0.254 (The available range of "xx" is 0 - 255)
- Your firewall software is blocking the connection.
- Your firewall software is blocking the connection. Disable the firewall software or change the firewall settings to make the Multi-Function Station work properly.
- LAN features can be used when the unit and the computer are connected in same network segment only.
- LAN features can be used when the unit and the computer are connected in same network segment only.
- Make sure the network is configured correctly.
- Consult your network administrator.
The unit does not appear in the [Select a Network Device] dialog box when installing Multi-Function Station.2 checks
- Your firewall software is blocking the connection and the setup program may not list any units.
- Your firewall software is blocking the connection and the setup program may not list any units. Consult your network administrator and temporarily disable the firewall software.
- The unit is connected to another network segment and the setup program may not list any units.
- The unit is connected to another network segment and the setup program may not list any units. Make sure the network is configured correctly. Consult your network administrator.
The [Windows Security Alert] dialog box appears and asks if I want to block [PCCMFLPD] and I cannot operate the following functions after installing the Microsoft Windows XP Service Pack 2 or later. – PC printing – Scanning – Remote Control – PC FAX – Device Monitor1 check
- Click [Keep Blocking] and run the Windows Firewall Setting Tool to allow the data transmission for Multi-Function Station (page 72)..
- Click [Keep Blocking] and run the Windows Firewall Setting Tool to allow the data transmission for Multi-Function Station (page 72).
Answering machine: I cannot receive documents automatically.2 checks
- Your greeting message on the answering machine is too long.
- Your greeting message on the answering machine is too long. Shorten the message. Record a message up to 10 seconds long.
- The answering machine rings too many times.
- The answering machine rings too many times. Set to 1 or 2 rings.
Answering machine: I cannot receive voice messages.2 checks
- Check if the answering machine is turned ON and connected to the unit properly (page 43)..
- Check if the answering machine is turned ON and connected to the unit properly (page 43).
- Set the number of rings on the answering machine to 1 or 2..
- Set the number of rings on the answering machine to 1 or 2.
Answering machine: I pressed the remote access code to access the answering machine remotely, but the line was disconnected.1 check
- The code may include "#" which is used for certain features provided by telephone companies.
- The code may include "#" which is used for certain features provided by telephone companies. Change the code on the answering machine to another number which does not include "#".
Answering machine: Callers complain that they cannot send a document.2 checks
- There is no room left in the memory of your answering machine to record voice messages.
- There is no room left in the memory of your answering machine to record voice messages. See the operating instructions of the answering machine and erase unnecessary messages.
- You set the answering machine to only give a greeting message..
- You set the answering machine to only give a greeting message.
Guides
For best performance
Instructions from the manualFor best performance13 steps
- Keep the drum protected from light: do not expose it for more than five minutes, touch or scratch its green surface, place it near dust/dirt/high humidity or expose it to direct sunlight.
- Open its protective bag only after reading the installation cautions.
- Do not leave toner out of its protective bag for a long time.
- Genuine Panasonic toner and drum are recommended.
- Keep water and liquids away when replacing supplies.
- To extend drum life, leave the machine on for at least 30 minutes after printing rather than immediately switching it off.
- Touch grounded metal before internal components to prevent static damage.
- Keep away from magnetic TVs/speakers, electrical-noise sources such as lamps/motors, dust, high temperature, vibration, sunlight and heavy objects.
- Unplug when unused for a long period.
- Avoid heat sources and damp basements.
- Leave 10 cm (4 inches) clear at the right, left and back.
- Inspect ventilation openings and vacuum accumulated dust.
- Wipe exterior with a soft cloth; no benzine, thinner or abrasive powder.
5 toner cartridge and drum unit
Instructions from the manual1.5 Toner cartridge and drum unit16 steps
- Read the drum precautions first.
- Do not expose it to light for more than five minutes, touch/scratch the green surface, place near dirt/high humidity or expose to sunlight.
- Do not leave toner unbagged for a long time or add toner.
- Shake the unopened new toner cartridge vertically more than five times.
- Remove toner and drum from protective bags and peel the toner seal.
- Place toner vertically in the drum, press firmly until it snaps in, then turn both toner levers firmly.
- Confirm the arrows match.
- Lift the front cover while holding OPEN.
- Clean dirty lower glass only with a soft dry cloth.
- Hold the tabs to install the assembled drum and toner.
- Do not touch the transfer roller.
- Close both sides of the front cover until locked.
- Replace toner for TONER LOW or TONER EMPTY.
- Print the printer test to check drum life and quality; if quality remains poor or REPLACE DRUM appears, replace drum and toner.
- Clean ventilation openings and the interior when replacing either.
- Use KX-FA83 toner and KX-FA84 drum.
6 paper tray and paper tray cover
Instructions from the manual1.6 Paper tray and paper tray cover5 steps
- Insert the paper tray into the rear slot.
- Pull the tension plate forward, attach the cover, then push the tension plate back.
- Do not attach the cover for legal paper.
- Avoid placement where the paper tray is obstructed, for example by a wall.
- To remove the tray, pull it forward.
7 paper stacker
Instructions from the manual1.7 Paper stacker3 steps
- Align the stacker slots with the pegs under the machine, then insert its two tabs into the slots.
- Avoid bumping the stacker and keep the front clear.
- It holds approximately 100 printed sheets; remove paper before it fills.
8 document stacker
Instructions from the manual1.8 Document stackerView
Gently pull the stacker forward until it clicks; press its center to open the extender.
9 handset cord
Instructions from the manual1.9 Handset cordView
Connect the handset cord.
10 recording paper
Instructions from the manual1.10 Recording paper13 steps
- Use 60–90 g/m² paper: up to 250 sheets at 60–75 g/m², 230 at 80 g/m² or 200 at 90 g/m².
- Letter is default; set #380 for A4/legal.
- Test small quantities before bulk purchases.
- Avoid paper over 20% cotton/fiber, extremely smooth/shiny/highly textured, coated/damaged/wrinkled, with tabs/staples, dust/lint/oil, moist, inkjet or likely to melt/vaporize/scorch/discolor/emit fumes near 200°C (392°F).
- Long-grain paper is recommended.
- Do not mix thicknesses, print duplex or reuse these prints in other printers.
- Keep unused paper sealed in its original packaging, cool and dry; humid areas require air-conditioned storage.
- Try the other paper side for misfeeds or poor quality.
- Fan and straighten a stack.
- Pull tension plate forward, remove cover, pinch the right guide and slide it fully open.
- Insert print-side down under the tabs.
- Adjust guides to the paper width; correct misplaced paper to avoid jams.
- Attach cover and push tension plate back.
1 connections
Instructions from the manual2.1 Connections9 steps
- Keep the outlet nearby and accessible.
- Connect the power cord to 120 V AC, 60 Hz and the telephone cord to a single RJ11C line.
- For an answering machine or extension telephone, remove the EXT protective sheet if fitted and use EXT.
- Devices sharing the line can disturb operation.
- A surge protector is recommended; lightning/power-line-surge damage is not covered by the stated warranty.
- Do not connect USB until the Multi-Function Station installer prompts you.
- Connect the LAN interface to a network router/hub and networked computers using only shielded Cat-5 Ethernet cable; remove its protective sheet if attached.
- Consult the administrator for secure-network/firewall settings.
- On a shared DSL telephone line, fit a DSL filter to the telephone cord to prevent unreliable faxes, conversation noise or Caller ID failure; obtain one from the DSL provider if needed.
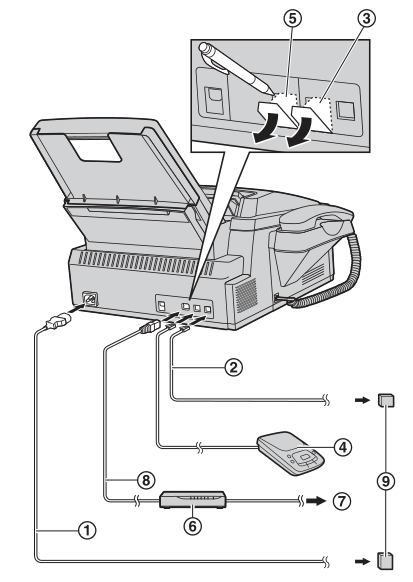
Diagram key
- 1: Power cord — 120 V, 60 Hz outlet
- 2: Telephone line cord — single RJ11C telephone line jack
- 3: EXT jack — answering machine or extension telephone; remove protective sheet if attached
- 4: Answering machine — not supplied
- 5: LAN interface connector — remove protective sheet if attached
- 6: Network router or hub — not supplied; also connect networked computers, using a secure environment with administrator advice
- 7: Internet connection
- 8: LAN cable — not supplied; shielded Category 5 Ethernet only
- 9: Surge protector — recommended for extra protection against surges/lightning
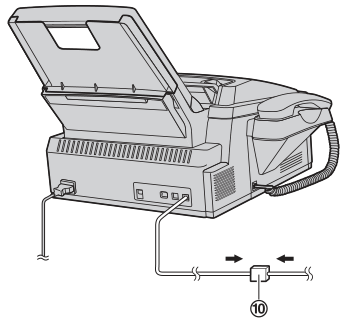
Diagram key
- 10: DSL filter — attach to the machine telephone line cord to prevent the stated DSL interference.
2 dialing mode
Instructions from the manual2.2 Dialing modeView
Use Menu, #120. Choose 1 PULSE for rotary/pulse or 2 TONE for tone (default), then Set and Menu.
3 selecting the operation mode (fax/copy/scan)
Instructions from the manual2.3 Selecting the operation mode (Fax/Copy/Scan)View
Use Fax for fax, Copy for copying or Scan for scanning. Default is fax; #463 changes the default and #464 sets the timer before returning to it.
4 setting the original
Instructions from the manual2.4 Setting the original9 steps
- Adjust guides to the document width.
- Insert up to 20 sheets face down until the beep and the feeder grasps them.
- Let ink, paste and correction fluid dry; remove clips/staples/fasteners.
- Photocopy unsuitable originals and use the copy: chemical/carbon paper, static-charged, badly curled/creased/torn, coated, faint or reverse printing visible through the page.
- Documents narrower than 210 mm are best copied onto A4/letter.
- Permitted size is 128 ×128 mm minimum and 216 ×600 mm maximum.
- Single sheets 45–90 g/m²; multiple sheets 60–80 g/m².
- Scanning width is 208 mm with 4 mm excluded at each edge.
- Photocopy originals that fail the size/weight requirements.
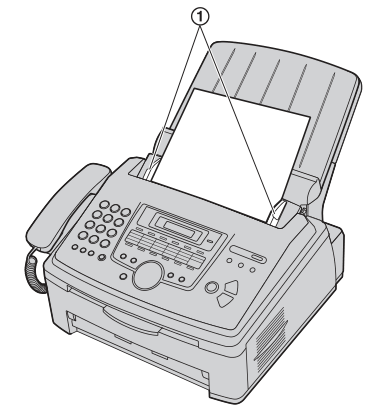
Diagram key
- 1: Document guides — adjust to the actual document width; insert up to 20 pages face down until the beep and the feeder grasps them.
5 help function
Instructions from the manual2.5 Help function3 steps
- Use Menu repeatedly until HELP.
- Select BASIC SETTINGS, FEATURE LIST, DIRECTORY, FAX SND/RCV, COPIER, Q and A, ERRORS, REPORTS or CALLER ID using left/right, then Set to print.
- Exit with Menu.
6 adjusting the volume
Instructions from the manual2.6 Adjusting the volume4 steps
- Switch to Fax before adjusting.
- With no documents in the entrance and the machine idle, use up/down for ringer volume.
- To mute ringing use down until RINGER OFF= OK?, then Set; up restores ringing.
- During handset or monitor use, up/down adjusts that receiver or monitor volume.
7 date and time
Instructions from the manual2.7 Date and time7 steps
- Use Menu, #101, Set.
- Enter two digits each for month, day, year, hour and minute.
- Use star repeatedly for AM/PM, then Set and Menu.
- Left/right moves the cursor for correction.
- Other machines print your date/time at their page top.
- Check the display in Fax mode.
- Subscribed Caller ID adjusts an already-set clock; #226 disables automatic adjustment.
8 your logo
Instructions from the manual2.8 Your logoView
Use Menu, #102, Set. Enter up to 30 characters, then Set and Menu. Left/right selects a character to correct. Stop erases it; hold Stop to erase all.
9 your fax number
Instructions from the manual2.9 Your fax number4 steps
- Use Menu, #103, Set.
- Enter up to 20 digits; star inserts +, hash a space, Flash a hyphen and Stop erases a number.
- Set then Menu saves.
- Left/right selects corrections; hold Stop to erase all.
11 installing multi-function station
Instructions from the manual2.11 Installing Multi-Function Station23 steps
- The supplied legacy software lists Windows 98/Me/2000/XP/Vista/7, not current operating systems.
- It requires the documented processor/RAM for the specific legacy OS, at least 150 MB free disk, a CD-ROM drive, USB and Internet Explorer 5.0 or later.
- Use a shielded Type-A male/Type-B male USB cable.
- Install software before connecting USB; close Found New Hardware if USB was connected early.
- Start Windows, close applications and use administrator login for Windows 2000/XP/Vista/7.
- Insert supplied CD-ROM, choose language and OK.
- If it does not auto-start, run the CD drive Install program, using the actual drive letter.
- Choose Easy Installation and follow prompts.
- Readiris OCR and Device Monitor install too.
- Select Connect directly with a USB cable and Next.
- Only when prompted connect USB and choose Next; the model is detected automatically.
- Rename if needed, select Install and follow prompts.
- The guide permits proceeding through its XP/Vista/7 signature warning.
- For operating instructions, use the CD Operating Instructions option; Adobe Reader is required.
- For another unit choose Modify then Add Multi-Function Station Driver and follow prompts; do not connect multiple units by USB simultaneously.
- Modify Utilities changes components.
- To uninstall use the Panasonic model Uninstall entry from the Windows Programs list; administrator login is required on Windows 2000 and later.
- Legacy minimum processor/RAM: Windows 98 Pentium 90 MHz and 24 MB (32 MB recommended); Me Pentium 150 MHz and 32 MB (64 MB recommended); 2000 Pentium 166 MHz and 64 MB; XP Pentium 300 MHz and 128 MB; Vista Pentium 4 and 512 MB; Windows 7 Pentium 4 and 1 GB (2 GB recommended).
- LAN installation also requires a 10Base-T/100Base-TX interface and shielded Cat-5 Ethernet cable.
- In Connect Type choose Connect via the Network, Next, Select in the searched list and the machine.
- If not listed but its IP is assigned, choose Direct input and enter that IP.
- Next; rename if needed; Install and follow prompts.
- Both interfaces remain available; do not connect USB before its installer prompt.
12 starting multi-function station
Instructions from the manual2.12 Starting Multi-Function Station11 steps
- Start Windows Programs → Panasonic → model → Multi-Function Station.
- Scan opens application scanning; PC FAX sends computer files and displays received faxes; Remote Control edits features/directories/broadcast records and views journal/Caller ID records.
- Utilities opens Viewer, Device Monitor or OCR.
- Settings changes launcher and scan configuration; Help gives instructions.
- A direct computer USB port is recommended; USB hubs, custom-built PCs and expansion-card USB may not work correctly.
- In Settings choose tabs and options, then OK.
- General offers launcher display and OCR path.
- Scan Save to chooses folder; application icons configure individual scans.
- On LAN, General provides PC name list up on device and PC name.
- Assign each computer a unique name to avoid sending scans to the wrong computer.
- Utilities also opens Configuration Web Page for LAN settings.
To select the default e-mail software
Instructions from the manualTo select the default E-mail software6 steps
- Select MAPI-compliant email software for scanned email attachments.
- On Windows 98/Me/2000 use Start → Settings → Control Panel → Internet Options → Programs → E-mail, choose the program and OK.
- XP uses Control Panel → Internet Options → Programs → E-mail.
- Vista uses Control Panel → Internet Options → Programs → Set programs → Set program access and computer defaults; continue the account prompt, choose Custom, the default MAPI email program and OK.
- Windows 7 uses Control Panel → Network and Internet → Internet Options → Programs → Set programs → Set program access and computer defaults → Custom, chooses MAPI email program and OK.
- These are legacy-OS instructions.
1 printing from windows applications
Instructions from the manual3.1 Printing from Windows applications10 steps
- Open the document in Windows.
- Use File → Print and select the model as active printer.
- Open Properties for Windows 98/Me, desired tab for Windows 2000 or Preferences for XP/Vista/7; set options and OK.
- Choose Print or OK to start.
- For PowerPoint choose Color or uncheck Grayscale so gray/color objects print properly in grayscale.
- Special media needs its matching Basic paper size and Transparency or Label media type; envelopes use Envelope #10 or Envelope DL.
- Computer printer Quality toner-save overrides #482.
- The driver offers paper/media/per-sheet, copies/collate, quality/contrast/toner-save, effects/profile settings.
- Use Stop cancellation instructions if necessary.
- Device Monitor opens automatically for print errors.
1.1 printing on special media
Instructions from the manual3.1.1 Printing on special media12 steps
- Use laser-printer media.
- Transparency examples are 3M CG3300/CG5000: feed one print-side down, remove it after printing onto a flat surface to cool and prevent curl.
- Do not reuse any transparency fed through the machine, even blank; try a new other-side transparency for poor quality.
- Label examples are Avery 5160/5161/5162/5163/5164/5165/5167/5168 and XEROX LWH100/LWH110/LWH120/LWH130/LWH140.
- Feed one print-side down and remove after printing.
- Reject wrinkled/damaged/separated labels, missing labels or sheets not fully covered.
- Use high-quality 90 g/m² envelopes with thin sharply creased leading edges, diagonal seams and 4–6% moisture.
- Feed up to 10 print-side down, adjust guides and remove each print.
- Store flat/dry without moisture/humidity; wrinkles may still occur.
- Do not use irregular, curled/wrinkled/nicked/twisted/dog-eared, side-seam, shiny/textured, peel-strip, multi-flap, self-adhesive, baggy/not sharply creased, embossed, used or cotton/fiber envelopes.
- No clasps/snaps/strings, transparent windows or encapsulated adhesive that seals without moistening.
- Wrong media may jam or damage the machine.
1.1 scan to multi-function viewer
Instructions from the manual4.1.1 Scan to Multi-Function Viewer10 steps
- Load the original.
- Use Scan, select VIEWER with up/down and Set.
- For USB choose USB HOST with up/down, then Set.
- For LAN choose the destination computer with up/down, then Set.
- To change scan settings, use right then select the setting with up/down and Set.
- Start scans.
- The image opens in Viewer; PDF opens its associated application.
- Formats are TIFF/JPEG/BMP/PDF.
- Black-and-white scanning has no contrast adjustment.
- Stop cancels; Settings chooses the automatic save folder.
1.2 scan to save as a file
Instructions from the manual4.1.2 Scan to save as a file6 steps
- Load the original.
- Use Scan → select FILE with up/down → Set → for USB select USB HOST → Set; for LAN select the destination computer with up/down → Set.
- If required use right, up/down to choose scan settings, then Set.
- Start saves to the Settings folder.
- Supported formats are TIFF, JPEG, BMP and PDF.
- Stop cancels.
1.3 scan to e-mail
Instructions from the manual4.1.3 Scan to E-mail6 steps
- Load the original.
- Use Scan → select E-MAIL with up/down → Set → for USB select USB HOST → Set; for LAN select the destination computer with up/down → Set.
- Change settings if necessary with right, up/down and Set; then Start.
- The default MAPI email program starts with the JPEG or PDF scan attached to a new message.
- Set the default email program first.
- Direct LAN email-server scanning is covered by the separate email-server procedure.
1.4 scan to ocr
Instructions from the manual4.1.4 Scan to OCR6 steps
- Install Readiris OCR with Multi-Function Station.
- Load the original; use Scan → OCR → Set → for USB select USB HOST → Set; for LAN select the destination computer with up/down → Set.
- Adjust settings if needed using right, up/down and Set, then Start.
- OCR opens with the scanned editable text.
- Supported scan formats are TIFF, JPEG and BMP.
- Consult OCR Help for details.
2.1 using multi-function scan application
Instructions from the manual4.2.1 Using Multi-Function scan application4 steps
- Load the original, start Multi-Function Station, choose Scan and the desired application icon.
- Custom starts its preprogrammed application.
- Set application scan parameters in advance if needed.
- Cancel stops scanning.
2.2 using multi-function viewer
Instructions from the manual4.2.2 Using Multi-Function Viewer9 steps
- Load original and start Multi-Function Station → Utilities → Viewer.
- Use Scan icon; if needed choose the model in Select, then OK.
- Choose scan settings.
- Preview scans only the first page; reload the original after preview.
- Changes after preview require Preview again to refresh; black-and-white type disables contrast.
- Scan starts and shows the result in Viewer.
- File → Save As saves TIFF/JPEG/PCX/DCX/BMP/PDF.
- Viewer displays all listed formats except PDF.
- Cancel stops.
2.3 using other applications
Instructions from the manual4.2.3 Using other applications6 steps
- Load original and start a TWAIN-capable application.
- Choose File → Acquire Image, adjust scan settings if necessary and Scan.
- The application displays the result.
- Choose Cancel to stop.
- Appearance depends on the application; if Select is available choose the model, then OK.
- This dialog is absent with only one installed printer driver.
1 making a copy
Instructions from the manual5.1 Making a copy6 steps
- Switch Copy on, load original and adjust resolution/contrast if necessary.
- Resolution selects TEXT/PHOTO, TEXT (default) or PHOTO, then Set.
- Contrast offers five levels, then Set.
- Enter up to 99 copies and Start.
- Stop resets selected copy settings afterward.
- Auto Answer on still permits fax reception. #461 changes default resolution; #462 holds prior contrast independently for copy and fax.
2.1 zoom copy (enlargement / reduction)
Instructions from the manual5.2.1 Zoom copy (enlargement / reduction)8 steps
- Load original with Copy on.
- Use Enhanced Copy; select ZOOM with left/right then Set.
- Use Enhanced Copy to cycle 100%, 50%, 200%, LTR>A4, A4>LTR, LGL>A4 or LGL>LTR.
- At 100%, up/down or numeric entry selects 25–400% in 1% steps.
- Set, enter up to 99 copies if needed and Start.
- Stop resets afterward.
- Zoom is unavailable for N in 1.
- Only upper-center area is enlarged; turn the document to enlarge its bottom. #468 can retain the prior zoom.
2.2 collate copy
Instructions from the manual5.2.2 Collate copy7 steps
- Load original with Copy on.
- Use Enhanced Copy → left/right COLLATE → Set → up/down ON → Set.
- Enter up to 99 copies and Start.
- Stop resets afterward.
- Collating stores pages in memory; if it fills only stored pages print. #469 can hold this setting.
- For a proof set choose PROOF SET rather than ON.
- The first set prints; check it and use Start to continue if correct, or Stop and restart from the beginning if incorrect.
2.3 n in 1 feature
Instructions from the manual5.2.3 N in 1 feature5 steps
- Load original in portrait for portrait output or landscape for landscape output.
- With Copy on use Enhanced Copy → N in 1 → Set.
- Select 2 in 1, 4 in 1 or 8 in 1 with up/down, Set, choose PORTRAIT or LANDSCAPE with up/down and Set.
- Enter up to 99 copies if needed and Start.
- Stop resets; #467 holds the previous setting.
2.4 copy reservation
Instructions from the manual5.2.4 Copy reservation3 steps
- While PC PRINTING or PRINTING appears, load original and switch Copy on.
- Set count, resolution, zoom and N in 1 as needed, then Start.
- COPY RESERVED appears and copying follows the current print job.
1 sending a fax manually
Instructions from the manual7.1 Sending a fax manually12 steps
- Switch Fax on, load original and set resolution and contrast if required.
- Resolution offers STANDARD/FINE/SUPER FINE/PHOTO, then Set; finer/photo settings take longer.
- Contrast offers five levels, then Set.
- Use Monitor, dial fax number and Start at a fax tone.
- If a person answers ask them to start their fax; Start when the tone begins, then replace handset if lifted.
- Stop cancels.
- Redial then Start retries the last number once if busy.
- For more than 20 pages load the first 20 then add the next up to 20 on top while the last is feeding.
- Predialing is number then original then Start.
- Quick scan loads original then number then Quick Scan to store/send.
- Dual Access reserves up to three jobs while sending or four while receiving: load original, number from keypad/one-touch/directory and Quick Scan or Start.
- If memory is exceeded the reservation cancels; send the entire document manually. #401 controls confirmation reports; #402 automatically journals each 30 new sent/received faxes.
3 broadcast transmission
Instructions from the manual7.3 Broadcast transmission13 steps
- With Fax on, program up to 20 parties in stations 1–3, replacing their one-touch function.
- Use Menu DIRECTORY SET, choose Broadcast or Manual broad; up/down chooses BROADCAST or MANUAL BROAD, then Set.
- Add one-touch stations (Lower first for 12–22), navigator item and Set, or for manual broadcast keypad number and Set.
- Stop removes a wrong item.
- Repeat up to 20 then Set; repeat other broadcast memories and Stop to finish.
- To add a stored party use Directory memory → Menu → star → item → Set; repeat then Stop.
- Manual broadcast additions can use only stored items.
- To erase use Directory memory → Menu → hash → item → Set → Set, repeat then Stop; Stop cancels.
- Send: original, desired resolution/contrast, Broadcast or Manual broad.
- High resolution reduces available pages.
- Memory overflow cancels sending.
- Busy/no-answer skips and redials once later.
- A report prints automatically.
4 sending a computer document as a fax message from your computer
Instructions from the manual7.4 Sending a computer document as a fax message from your computer5 steps
- Open a Windows document, File → Print, choose PC FAX as active printer and Print/OK.
- Enter fax number by keypad display or directory, then Send.
- Cancel stops; exceeding machine memory cancels sending.
- Configure using Multi-Function Station Help as needed.
- Select changes the active machine.
5 receiving a fax automatically – auto answer on
Instructions from the manual7.5 Receiving a fax automatically – Auto answer ON4 steps
- Use Auto Answer repeatedly until FAX ONLY MODE and its light on.
- The machine answers every call and receives only fax documents.
- Set #210 for ring count.
- Distinctive Ring subscribers follow its separate instructions.
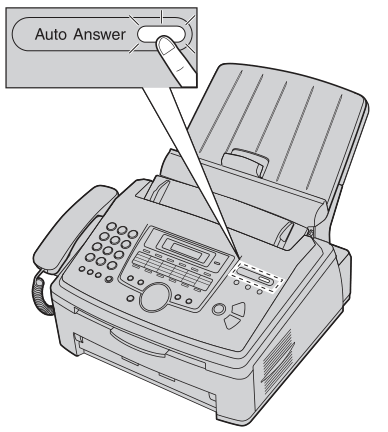
Diagram key
- Auto Answer: Press repeatedly until FAX ONLY MODE; the Auto Answer light turns on.
6 receiving a fax manually – auto answer off
Instructions from the manual7.6 Receiving a fax manually – Auto answer OFF7 steps
- Use Auto Answer repeatedly until TEL MODE and light off.
- Lift handset to answer.
- When fax requested, slow fax beeps or silence, use Start and replace handset.
- An unanswered call temporarily switches to fax after 10 rings.
- At an extension on EXT or the same line, lift its handset and when fax reception is needed enter star/hash/9 firmly then replace it.
- Remote activation #434 must first be on (default).
- Stop cancels reception.
7 using the unit with an answering machine
Instructions from the manual7.7 Using the unit with an answering machine7 steps
- Connect the answering machine to EXT, removing its protective sheet if fitted.
- Set its ring count to 4 or less and a greeting up to 10 seconds with no pause longer than4 seconds.
- Activate it and choose the fax receiving mode; in FAX ONLY set #210 to 5 EXT.
- TAM.
- Give the answering machine, fax activation and subscribed voicemail distinct remote codes.
- Caller voice message plus fax: call, leave message, use star/hash/9 to activate fax, then the caller fax Start. #434 must be on.
- An answering-machine memory full can prevent fax reception; erase unnecessary messages following its guide.
8 junk fax prohibitor (preventing fax reception from undesired callers)
Instructions from the manual7.8 Junk fax prohibitor (preventing fax reception from undesired callers)6 steps
- Caller ID subscription is required; it cannot block manual reception.
- Use Menu JUNK FAX PROH. → right → ON with up/down → Set → Stop.
- Up to 20 unwanted callers: Menu JUNK FAX PROH. → right JUNK LIST SET → Set → desired Caller ID item → Set; repeat, then Stop twice.
- Display list via right JUNK LIST DISP., Set, up/down and Stop.
- Print via right JUNK LIST PRINT, Set, Stop.
- Erase via JUNK LIST DISP., Set, select item, left, Set then Menu; Stop then Menu cancels.
9 receiving a fax on your computer
Instructions from the manual7.9 Receiving a fax on your computer7 steps
- Set #442 before receiving, use Auto Answer on and start Multi-Function Station PC FAX.
- Receive the document on the computer; stored format is TIFF G4.
- View via PC FAX → Received Log under Communication Log, item → File → View or toolbar View.
- Print/transfer follow software.
- To retrieve machine memory choose File → Receive a Fax.
- Active #442 transfers automatically.
- For LAN reception also select the receiving computer with #443 before receiving; without LAN, USB is the default.
1 caller id service
Instructions from the manual8.1 Caller ID service8 steps
- Subscribe to local Caller ID and use FAX ONLY ring count 2 or more (#210).
- Caller data appears after the first ring.
- The latest 30 calls are retained, with the oldest replaced.
- PBX may not deliver reliable data; consult its supplier.
- OUT OF AREA means the caller area lacks Caller ID; PRIVATE CALLER means the caller withheld details; LONG DISTANCE means a long-distance call.
- Print the Caller ID list or set #216 for automatic printing every 30 calls.
- Name-display service may be unavailable in some areas; ask the telephone company.
- A caller number matching a stored directory/one-touch entry displays that stored name.
2 viewing and calling back using caller information
Instructions from the manual8.2 Viewing and calling back using caller information6 steps
- Use Caller ID; down starts at the recent call and up reverses, then Monitor or handset calls back.
- Caller ID repeatedly toggles name/number.
- Previously viewed or answered calls show a check mark; Stop exits.
- Before dialing or storing, use star to cycle 1–area–local, local, area–local or 1–local.
- If the received information lacks an area code, the two patterns containing an area code are unavailable.
- Store the chosen format using the storing procedure from step 3.
3 erasing caller information
Instructions from the manual8.3 Erasing caller informationView
- Erase all: Menu until CALLER SETUP → Set → CALL LIST ERASE → Set → Set → Stop.
- Stop then Menu cancels.
- Erase a specific caller: Caller ID → up/down to the item → left → Set → Stop.
4 storing caller information
Instructions from the manual8.4 Storing caller information6 steps
- Caller ID → desired item with up/down → Menu.
- Stations 1–3: station, up/down DIAL MODE, Set, Set; 4–11: station, Set; 12–22: Lower, station, Set.
- Navigator: left/right, Set.
- Finally Set saves.
- An occupied station is overwritten; stations 1–3 may instead be broadcast memories.
- Edit names/numbers using the directory procedure.
1 distinctive ring service
Instructions from the manual9.1 Distinctive Ring service3 steps
- Subscribe to Distinctive Ring to assign different ring patterns to multiple numbers on a single line.
- The fax can automatically receive only its assigned pattern.
- Contact the telephone company for availability.
2 using two or more phone numbers on a single telephone line
Instructions from the manual9.2 Using two or more phone numbers on a single telephone line4 steps
- Use Menu #430, 1 ON, Set, Menu; 0 OFF disables.
- While Distinctive Ring is active the receiving mode cannot be changed.
- Calls matching the assigned fax pattern receive automatically; calls to the telephone number keep ringing.
- An external answering machine must be set to more than two rings.
1 programming
Instructions from the manual10.1 Programming4 steps
- Use Menu, hash and the three-digit feature code.
- Choose the desired selection; exact interaction can vary with the feature.
- Set saves, Menu exits.
- Web-browser programming applies only to KX-FLM671 LAN.
1 character entry
Instructions from the manual11.1 Character entry6 steps
- Use left/right to move the cursor and dial keys for characters/numbers.
- Stop deletes the highlighted character; hold Stop to clear all.
- For another character on the same dial key, move right first.
- Alternatively down cycles uppercase letters, numbers, symbols, lowercase letters; up reverses; right inserts; repeat.
- Hash switches case, Flash inserts a hyphen and Handset Mute a space.
- Use the printed keypad map in the manual for individual key characters.
2.1 using remote control
Instructions from the manual11.2.1 Using Remote Control7 steps
- Start Multi-Function Station → Remote Control, select a tab and the desired operation.
- Help explains functions; Cancel stops.
- OK saves; Apply continues without closing.
- Enter the #155 password and OK to transfer and close.
- Supported functions include programming, directories, broadcast items, journal view/save and Caller ID view/store/save.
- Some features cannot be programmed this way.
- Avoid simultaneous edits by another person because stored data may be overwritten.
2.2 using device monitor
Instructions from the manual11.2.2 Using Device Monitor4 steps
- Start Multi-Function Station → Utilities → Device Monitor and examine Status.
- Advanced Information gives toner, paper and unit data; Refresh updates.
- Printing errors automatically open Device Monitor.
- Use software Help for details.
3 canceling the operations
Instructions from the manual11.3 Canceling the operations4 steps
- Use Stop.
- USER STOPPED may appear; if it does not, proceed to the operation selection.
- Repeated Stop selects STOP PRINTING?, STOP SCANNING?, STOP COPYING?, STOP FAX?, BROAD CANCELED? or SEND CANCELED? for printing, scanning, copying, fax, broadcast or redial respectively.
- Set confirms.
3.8 if a power failure occurs
Instructions from the manual12.3.8 If a power failure occurs3 steps
- The machine cannot function or make emergency calls during a power failure; arrange alternative emergency access.
- Fax transmission/reception interrupts and all stored copy, print, send or receive documents are lost.
- Restored power prints a power down report listing erased fax items.
3.10 notice for kx-mb200/kx-mb700/kx-flb880 series users
Instructions from the manual12.3.10 Notice for KX-MB200/KX-MB700/KX-FLB880 series users2 steps
- If older KX-MB200/700/FLB880 software was already installed, use its original CD after installing FLM660/670 software: start Windows, insert CD, choose language and OK if asked, Easy installation → Modify → Next → Modify Utility or Add Printer Driver → Next and follow prompts.
- For versions before 1.12 download the latest software from Windows Programs → Panasonic → old unit name → Support Web Page and follow prompts.
1.1 when the recording paper has jammed near the drum and toner unit
Instructions from the manual13.1.1 When the recording paper has jammed near the drum and toner unit4 steps
- Lift the front cover holding OPEN.
- The fuser is hot; do not touch it.
- Carefully pull jammed paper toward you; do not touch the transfer roller.
- Close both sides of the front cover until locked.
1.2 when the recording paper has jammed near the recording paper exit
Instructions from the manual13.1.2 When the recording paper has jammed near the recording paper exit9 steps
- Lift the front cover holding OPEN; do not touch the hot fuser.
- Remove the paper tray cover.
- Remove recording paper then the drum and toner unit so jammed paper pulls free of the rear cabinet.
- Lift both green levers forward to the stop.
- Carefully pull paper upwards out of the fuser and install the drum and toner unit.
- Push green levers back to their original position.
- Close the front cover on both sides until locked.
- Pull the tension plate forward; fan and straighten paper before reinserting.
- Attach the tray cover and push the tension plate back.
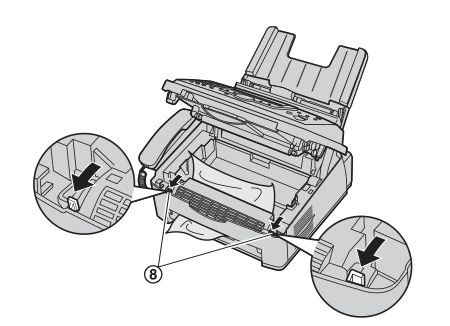
Diagram key
- 8: Both green levers — lift forward until stopped, as the two complete inset arrows show.
1.3 when the recording paper is not fed into the unit properly
Instructions from the manual13.1.3 When the recording paper is not fed into the unit properlyView
For CHECK PICK UP, pull the tension plate forward, remove the tray cover and paper. Fan and straighten paper, reinsert it, attach the cover and push the tension plate back.
2 document jams – sending
Instructions from the manual13.2 Document jams – sending6 steps
- Do not forcibly pull a jammed document before opening the front cover.
- Lift the front cover holding OPEN.
- Do not touch the hot fuser.
- Hold the center of the cover and open the inner cover; do not touch the transfer roller.
- Carefully remove the jammed document.
- Push the inner cover back, then close the front cover on both sides until locked.
1 cleaning the inside of the unit
Instructions from the manual14.1 Cleaning the inside of the unit14 steps
- Clean for frequent misfeeds or black/white lines or dirty patterns on sent/copied originals.
- Observe photosensitive drum precautions; do not use paper towels or tissues.
- Disconnect power and telephone cords.
- Lift the front cover holding OPEN; do not touch the hot fuser.
- Wipe the document separation roller with a cloth moistened with isopropyl rubbing alcohol and let all parts dry thoroughly.
- Hold the cover center and open the inner cover; do not touch the transfer roller.
- Wipe the document feeder roller with a cloth moistened with isopropyl rubbing alcohol; let all parts dry thoroughly.
- Wipe the upper glass with a soft dry cloth.
- Push the inner cover back.
- Hold the drum and toner unit by its two tabs to remove it.
- Wipe the lower glass with a soft dry cloth.
- Reinstall drum and toner holding the tabs.
- Close the front cover on both sides until locked.
- Reconnect power and telephone cords.
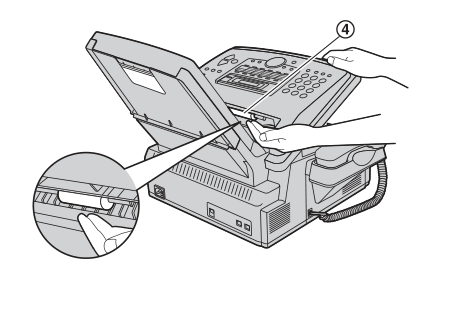
Diagram key
- 4: Document separation roller — wipe with a cloth moistened with isopropyl rubbing alcohol; let all parts dry thoroughly.
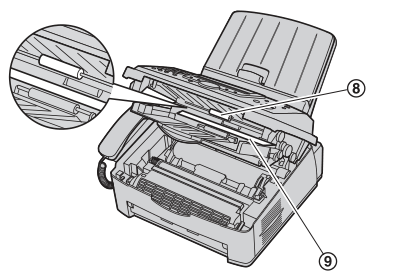
Diagram key
- 8: Document feeder roller — wipe with a cloth moistened with isopropyl rubbing alcohol and let all parts dry thoroughly.
- 9: Upper glass — wipe with a soft dry cloth.
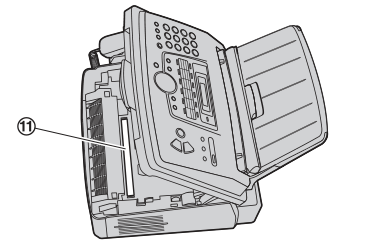
Diagram key
- 11: Lower glass — clean with a soft dry cloth.
1 reference lists and reports
Instructions from the manual15.1 Reference lists and reports5 steps
- Use Menu until PRINT REPORT; left/right selects SETUP LIST, TEL NO.
- LIST, JOURNAL REPORT, BROADCAST LIST, PRINTER TEST or CALLER ID LIST.
- Set prints; Menu exits.
- ADDRESS LIST is also available on this KX-FLM671.
- Test smudges, blurred points or lines require inside cleaning; persisting poor quality requires replacement toner and drum.
Drum life
Instructions from the manualDrum life5 steps
- The maximum estimated drum life is approximately 10,000 sheets.
- Temperature, humidity, paper, toner and sheets per job affect it; frequent small jobs can significantly reduce it.
- No minimum sheet count is guaranteed.
- Replace the drum regularly.
- Dispose of waste material under applicable national and local environmental rules.
2 basic features
Instructions from the manualSetting the quick setup {#}{1}{0}{0}17 steps
- General programming: Menu, #100, choose the desired selection (interaction varies by feature), Set, then Menu.
- You can print out the quick fax setup guide and select the desired receiving mode depending on your situation.
- 1 "FAX ONLY" (default): Use only as a fax (page 41).
- 2 "DIST.
- RING": With the Distinctive Ring service (page 48).
- 3 "EXT.
- TAM": With an external telephone answering machine (page 43).
- 4 "TEL ONLY": Mostly phone calls (page 42).
- 1.
- Menu → #100 2.
- Set 3.
- Press Set again to print the quick fax setup guide.
- If you do not wish to print it, press Stop.
- 4.
- Press 1 to 4 to display the desired setting.
- 5.
- Set → Menu
Setting the date and time {#}{1}{0}{1}3 steps
- General programming: Menu, #101, choose the desired selection (interaction varies by feature), Set, then Menu.
- Enter the date and time using the dial keypad.
- See page 21 for details.
Setting your logo {#}{1}{0}{2}View
General programming: Menu, #102, choose the desired selection (interaction varies by feature), Set, then Menu. Enter your logo using the dial keypad. See page 21 for details.
Setting your fax number {#}{1}{0}{3}View
General programming: Menu, #103, choose the desired selection (interaction varies by feature), Set, then Menu. Enter your fax number using the dial keypad. See page 22 for details.
Selecting the language {#}{1}{1}{0}7 steps
- General programming: Menu, #110, choose the desired selection (interaction varies by feature), Set, then Menu.
- The display and reports will be in the selected language.
- 1 "ENGLISH" (default): English is used.
- 2 "SPANISH": Spanish is used.
- 1.
- Menu → #110 2.
- Press 1 or 2 to select the desired language. → Set → Menu
Setting the dialing mode {#}{1}{2}{0}View
General programming: Menu, #120, choose the desired selection (interaction varies by feature), Set, then Menu. 1 "PULSE" 2 "TONE" (default) See page 18 for details.
Setting flash time {#}{1}{2}{1}4 steps
- General programming: Menu, #121, choose the desired selection (interaction varies by feature), Set, then Menu.
- The flash time depends on your telephone exchange or host PBX.
- 0 "900ms" 1 "700ms" (default) 2 "600ms" 3 "400ms" 4 "300ms" 5 "250ms" 6 "200ms" 7 "160ms" 8 "110ms" 9 "100ms" * "90ms" # "80ms" Note: If the unit is connected via a PBX, PBX functions (transferring a call, etc.) might not work correctly.
- Consult your PBX supplier for the correct setting.
Changing the LCD display contrast {#}{1}{4}{5}View
General programming: Menu, #145, choose the desired selection (interaction varies by feature), Set, then Menu. 1 "NORMAL" (default) 2 "DARKER"
Changing the password for feature programming via remote operation {#}{1}{5}{5}8 steps
- General programming: Menu, #155, choose the desired selection (interaction varies by feature), Set, then Menu.
- 1.
- Menu → #155 → Set 2.
- Enter the current password. → Set The default password is "1234".
- 3.
- Enter a new 4-digit password using 0–9. → Set 4.
- Enter the new password again. → Set → Menu Note: It is recommended that you change this password from the default password.
- This password is also used for feature programming via web browser (KX- FLM671, LAN connection only).
Setting the ringer pattern {#}{1}{6}{1}View
General programming: Menu, #161, choose the desired selection (interaction varies by feature), Set, then Menu. 1 "A" (default) 2 "B" 3 "C"
Changing the ring count in FAX ONLY mode {#}{2}{1}{0}3 steps
- General programming: Menu, #210, choose the desired selection (interaction varies by feature), Set, then Menu.
- 1 "1" 2 "2" 3 "3" (default) 4 "4" 5 "5 EXT.
- TAM" (External Telephone Answering Machine) Note: If you are using the unit with an answering machine, set to more than 4 (page 43).
Setting the Caller ID list to print automatically {#}{2}{1}{6}3 steps
- General programming: Menu, #216, choose the desired selection (interaction varies by feature), Set, then Menu.
- 0 "OFF" (default): The unit will not print the Caller ID list, but will keep records of the information for the last 30 callers.
- 1 "ON": The unit will print the Caller ID list automatically after every 30 new calls (page 46).
Setting the time adjustment {#}{2}{2}{6}4 steps
- General programming: Menu, #226, choose the desired selection (interaction varies by feature), Set, then Menu.
- Using this feature, the unit’s date and time setting will be automatically adjusted when caller information is received.
- 1 "AUTO" (default): The date and time setting will be automatically adjusted.
- 2 "MANUAL": Deactivates this feature.
Setting the recording paper size {#}{3}{8}{0}2 steps
- General programming: Menu, #380, choose the desired selection (interaction varies by feature), Set, then Menu.
- 1 "LETTER"(default): Letter-size paper 2 "A4": A4-size paper 3 "LEGAL": Legal-size paper
Holding the previous contrast setting {#}{4}{6}{2}4 steps
- General programming: Menu, #462, choose the desired selection (interaction varies by feature), Set, then Menu.
- 0 "DISABLED" (default): Deactivates this feature.
- 1 "ENABLED": The unit will hold the previous setting.
- Note: The previous setting will be held individually for copying and sending faxes.
Setting the default operation mode {#}{4}{6}{3}5 steps
- General programming: Menu, #463, choose the desired selection (interaction varies by feature), Set, then Menu.
- To select the default operation mode when the selected time of the mode timer (feature #464) passes.
- 1 "COPY": Copy mode is selected as default.
- 2 "FAX" (default): Fax mode is selected as default.
- Note: You cannot select the scan mode using this feature.
Setting the default operation mode timer {#}{4}{6}{4}4 steps
- General programming: Menu, #464, choose the desired selection (interaction varies by feature), Set, then Menu.
- To set the timer before returning to the default operation mode (feature #463).
- 0 "OFF": Deactivates this feature.
- 1 "30s": 30 seconds 2 "1min" (default): 1 minute 3 "2min": 2 minutes 4 "5min": 5 minutes
Setting toner save feature {#}{4}{8}{2}4 steps
- General programming: Menu, #482, choose the desired selection (interaction varies by feature), Set, then Menu.
- 0 "OFF" (default): Deactivates this feature.
- 1 "ON": The toner cartridge will last longer.
- Note: This feature may lower the print quality by reducing toner consumption.
3 fax features
Instructions from the manualPrinting a confirmation report {#}{4}{0}{1}4 steps
- General programming: Menu, #401, choose the desired selection (interaction varies by feature), Set, then Menu.
- 0 "OFF": Confirmation reports will not be printed.
- 1 "ON": A confirmation report will be printed after every fax transmission.
- 2 "ERROR" (default): A confirmation report will be printed only when fax transmission fails.
Setting the journal report to print automatically {#}{4}{0}{2}3 steps
- General programming: Menu, #402, choose the desired selection (interaction varies by feature), Set, then Menu.
- 0 "OFF": The unit will not print a journal report, but will keep a record of the last 30 fax transmissions and receptions.
- 1 "ON" (default): The unit will print a journal report automatically after every 30 new fax transmissions and receptions (page 39).
Sending documents overseas {#}{4}{1}{1}9 steps
- General programming: Menu, #411, choose the desired selection (interaction varies by feature), Set, then Menu.
- If you cannot send a fax overseas even if the number is correct and the line is connected, activate this feature before sending the fax.
- This feature improves the reliability by reducing the transmission speed.
- 0 "OFF": Deactivates this feature.
- 1 "NEXT FAX": This setting is effective only for the next attempted fax transmission.
- After transmission, the unit will return to the previous setting.
- 2 "ERROR" (default): When the previous fax transmission fails and you wish to re-send the document.
- Note: This feature is not available for broadcast transmission.
- Calling charges may be higher than usual.
Sending a fax at a specific time {#}{4}{1}{2}22 steps
- General programming: Menu, #412, choose the desired selection (interaction varies by feature), Set, then Menu.
- This feature allows you to take advantage of low-cost calling hours offered by your telephone company.
- This feature can be set up to 24 hours in advance of the desired time.
- 0 "OFF" (default) 1 "ON" To send a document: 1.
- If the Fax light is OFF, turn it ON by pressing Fax.
- 2.
- Set the original (page 19).
- 3.
- If necessary, change to the desired resolution (page 38) and the desired contrast (page 38).
- 4.
- Menu → #412 5.
- Press 1 to select "ON". → Set 6.
- Enter the fax number.
- To enter an item using one-touch dial feature and navigator directory, see step 3 on "7.2 Sending a fax using one-touch dial feature and navigator directory", page 39. (When using navigator directory, you do not have to press Directory before pressing V or ^.) 7.
- Set 8.
- Enter the transmission start time.
- Press * repeatedly to select AM or PM.
- 9.
- Set The document will be fed into the unit and scanned into memory.
- The unit will then send the data at the specified time.
- You cannot use this feature for another fax transmission until the former sending is completed.
- Note: To cancel after programming, press Stop while the unit is idle, and then press Set.
Setting the Error Correction Mode (ECM) {#}{4}{1}{3}4 steps
- General programming: Menu, #413, choose the desired selection (interaction varies by feature), Set, then Menu.
- This feature is available when the sending / receiving fax machines are ECM compatible.
- 0 "OFF": Deactivates this feature.
- 1 "ON" (default): If there is an error during fax transmission / reception, the unit will support the communication.
Setting the connecting tone {#}{4}{1}{6}8 steps
- General programming: Menu, #416, choose the desired selection (interaction varies by feature), Set, then Menu.
- If you often have trouble when sending faxes, this feature allows you to hear connecting tones: fax tone, ring back tone and busy tone.
- You can use these tones to confirm the status of the other party’s machine.
- 0 "OFF": Deactivates this feature.
- 1 "ON" (default): You will hear connecting tones.
- Note: If the ring back tone continues, the other party’s machine may not be a fax machine or may have run out of paper.
- Check with the other party.
- The connecting tone volume cannot be adjusted.
Activating the Distinctive Ring feature {#}{4}{3}{0}View
General programming: Menu, #430, choose the desired selection (interaction varies by feature), Set, then Menu. 0 "OFF" (default) 1 "ON" See page 48 for details.
Setting the ring pattern for fax (Distinctive Ring feature) {#}{4}{3}{1}View
General programming: Menu, #431, choose the desired selection (interaction varies by feature), Set, then Menu. 1 "A" 2 "B" 3 "C" 4 "D" 5 "B-D" (default) See page 48 for details.
Setting auto reduction feature {#}{4}{3}{2}4 steps
- General programming: Menu, #432, choose the desired selection (interaction varies by feature), Set, then Menu.
- To receive a fax document that is longer than your recording paper.
- 0 "OFF": Deactivates this feature.
- 1 "ON" (default): The unit will fit received documents onto your recording paper.
Changing the fax activation code {#}{4}{3}{4}11 steps
- General programming: Menu, #434, choose the desired selection (interaction varies by feature), Set, then Menu.
- If you wish to use an extension telephone to receive faxes, activate this feature and program the activation code.
- Important: The fax activation code must be different from the code that you programmed on the answering machine.
- 0 "OFF" 1 "ON" (default) 1.
- Menu → #434 2.
- Press 1 to select "ON". → Set 3.
- Enter your code from 2 to 4 digits, using 0–9, * and #.
- The default code is "*#9".
- Do not enter "0000".
- 4.
- Set → Menu
Setting the memory reception alert {#}{4}{3}{7}5 steps
- General programming: Menu, #437, choose the desired selection (interaction varies by feature), Set, then Menu.
- To alert you with a beeping sound when a received fax document is stored into memory due to some existing problem.
- 0 "OFF": Deactivates this feature.
- 1 "ON" (default): You will hear a beeping sound.
- Note: The slow beeps will continue until you solve the printing problem and make sure the unit is supplied with enough paper to print the stored document.
Setting friendly reception {#}{4}{3}{8}4 steps
- General programming: Menu, #438, choose the desired selection (interaction varies by feature), Set, then Menu.
- To receive a fax automatically when you answer a call and hear a fax calling tone (slow beep).
- 0 "OFF": You have to press Start for fax reception.
- 1 "ON" (default): You do not have to press Start for fax reception.
Receiving a fax into the computer {#}{4}{4}{2}7 steps
- General programming: Menu, #442, choose the desired selection (interaction varies by feature), Set, then Menu.
- If you wish to receive a fax into the computer, activate this feature and run [PC FAX] from Multi-Function Station.
- 0 "OFF" (default): Deactivates this feature.
- 1 "ALWAYS": If the unit recognizes the connection to the computer, it will transfer a received document to the computer.
- If the unit cannot recognize the connection, it will store a received document in the memory once, then transfer the data after recognition of the connection.
- 2 "CONNECTED": If the unit recognizes the connection to the computer, it will transfer a received document to the computer.
- If the unit cannot recognize the connection, it will print out the data.
Setting the computer for PC fax reception (KX-FLM671, LAN connection only) {#}{4}{4}{3}3 steps
- General programming: Menu, #443, choose the desired selection (interaction varies by feature), Set, then Menu.
- To select the computer that will be used for receiving a fax.
- See page 23 for details.
Resetting fax features to their default settings {#}{4}{5}{9}4 steps
- General programming: Menu, #459, choose the desired selection (interaction varies by feature), Set, then Menu.
- 0 "NO" (default) 1 "YES" To reset the fax features: 1.
- Menu → #459 2.
- Press 1 to select "YES". → Set → Set → Menu Note: The PC fax reception (feature #443 on page 23) will not be reset.
4 copy features
Instructions from the manualChanging the default copy resolution {#}{4}{6}{1}5 steps
- General programming: Menu, #461, choose the desired selection (interaction varies by feature), Set, then Menu.
- To change the default resolution setting for copying.
- 1 "TEXT/PHOTO": For documents containing both text and photographs.
- 2 "TEXT" (default): For documents containing only text.
- 3 "PHOTO": For documents containing photographs, shaded drawings, etc.
Holding the previous N in 1 setting {#}{4}{6}{7}3 steps
- General programming: Menu, #467, choose the desired selection (interaction varies by feature), Set, then Menu.
- 0 "DISABLED" (default): Deactivates this feature.
- 1 "ENABLED": The unit will hold the previous setting.
Holding the previous zoom setting {#}{4}{6}{8}3 steps
- General programming: Menu, #468, choose the desired selection (interaction varies by feature), Set, then Menu.
- 0 "DISABLED" (default): Deactivates this feature.
- 1 "ENABLED": The unit will hold the previous setting.
Holding the previous collate setting {#}{4}{6}{9}3 steps
- General programming: Menu, #469, choose the desired selection (interaction varies by feature), Set, then Menu.
- 0 "DISABLED" (default): Deactivates this feature.
- 1 "ENABLED": The unit will hold the previous setting.
5 pc print features
Instructions from the manualChanging the data timeout setting {#}{7}{7}{4}8 steps
- General programming: Menu, #774, choose the desired selection (interaction varies by feature), Set, then Menu.
- The unit will automatically print the remaining data in memory when the computer does not send data to the unit during the set time.
- 1.
- Menu → #774 → Set 2.
- Enter the desired data timeout setting from "005" seconds to "600" seconds, using the dial keypad.
- The default setting is "060" seconds.
- 3.
- Set → Menu
6 scan features
Instructions from the manualSetting the scan mode for Push Scan {#}{4}{9}{3}5 steps
- General programming: Menu, #493, choose the desired selection (interaction varies by feature), Set, then Menu.
- 1 "VIEWER" (default): The scanned image will be displayed in the [Multi- Function Viewer] window.
- 2 "FILE": The scanned image will be saved as a file.
- 3 "E-MAIL": The scanned image will be saved for e-mail attachment.
- 4 "OCR": The scanned image will be displayed in the OCR window.
Holding the previous scanning parameter for Push Scan {#}{4}{9}{4}3 steps
- General programming: Menu, #494, choose the desired selection (interaction varies by feature), Set, then Menu.
- 0 "DISABLED" (default): Deactivates this feature.
- 1 "ENABLED": The unit will hold the previous scan settings for each mode of push scan; scan type, resolution, file format, brightness, contrast, scan size.
SMTP setting for scan to e- mail (via e-mail server) (KX- FLM671, LAN connection only)View
This feature can be programmed only through the web browser interface (page 60).
Registering the scan to e-mail destinations (via e-mail server) (KX-FLM671, LAN connection only) L This feature can be programmed only through the web browser interface.13 steps
- When you send scanned files via the e-mail server, you can register e-mail destinations (up to 30 destinations) for the unit through the web browser interface in advance.
- 1.
- Start Multi-Function Station.
- 2. [Utilities] → [Configuration Web Page] → [Device Configuration] 3.
- Type "root" as the user name, then enter the password (feature #155 on page 51). → [OK] 4.
- Select the [SCAN FEATURE] tab.
- 5.
- Click [Edit] next to [SCAN TO E-MAIL].
- 6.
- Click [Edit] next to the desired scan to e-mail user.
- 7.
- Enter name and e-mail address, and then select the station key number from the drop-down list if necessary. → [Submit] 8.
- Close the web browser.
7 lan features (kx-flm671 only)
Instructions from the manualLAN setting with a DHCP server {#}{5}{0}{0}3 steps
- General programming: Menu, #500, choose the desired selection (interaction varies by feature), Set, then Menu.
- 0 "DISABLED": Deactivates this feature.
- 1 "ENABLED" (default): The following will be allocated automatically using a DHCP (Dynamic Host Configuration Protocol) server. – IP address – Subnet mask – Default gateway
Setting the IP address for the LAN connection {#}{5}{0}{1}5 steps
- General programming: Menu, #501, choose the desired selection (interaction varies by feature), Set, then Menu.
- This feature is available when feature #500 is deactivated.
- 1.
- Menu → #501 → Set 2.
- Enter the IP address of the unit on the LAN using the dial keypad. → Set → Menu
Setting the Subnet mask for the LAN connection {#}{5}{0}{2}5 steps
- General programming: Menu, #502, choose the desired selection (interaction varies by feature), Set, then Menu.
- This feature is available when feature #500 is deactivated.
- 1.
- Menu → #502 → Set 2.
- Enter the subnet mask of the network on the LAN using the dial keypad. → Set → Menu
Setting the default gateway for the LAN connection {#}{5}{0}{3}5 steps
- General programming: Menu, #503, choose the desired selection (interaction varies by feature), Set, then Menu.
- This feature is available when feature #500 is deactivated.
- 1.
- Menu → #503 → Set 2.
- Enter the default gateway of the network on the LAN using the dial keypad. → Set → Menu
Setting the primary DNS server for the LAN connection {#}{5}{0}{4}5 steps
- General programming: Menu, #504, choose the desired selection (interaction varies by feature), Set, then Menu.
- This feature is available when feature #500 is deactivated.
- 1.
- Menu → #504 → Set 2.
- Enter the primary DNS server of the network on the LAN using the dial keypad. → Set → Menu
Setting the secondary DNS server for the LAN connection {#}{5}{0}{5}5 steps
- General programming: Menu, #505, choose the desired selection (interaction varies by feature), Set, then Menu.
- This feature is available when feature #500 is deactivated.
- 1.
- Menu → #505 → Set 2.
- Enter the secondary DNS server of the network on the LAN using the dial keypad. → Set → Menu
Setting the machine name {#}{5}{0}{7}5 steps
- General programming: Menu, #507, choose the desired selection (interaction varies by feature), Set, then Menu.
- 1.
- Menu → #507 → Set 2.
- Enter the name of the unit to recognize on the LAN, up to 15 characters (see page 61 for character entry). → Set → Menu Note: In order to recognize the unit on the LAN, the default name of the unit is assigned automatically.
- If you change the name, assign an unique name to avoid overlapping.
Displaying the MAC address of the unit {#}{5}{0}{8}4 steps
- General programming: Menu, #508, choose the desired selection (interaction varies by feature), Set, then Menu.
- 1.
- Menu → #508 → Set 2.
- The MAC address of the unit will be displayed. → Menu
Approved users for the LAN connection {#}{5}{3}{2}4 steps
- General programming: Menu, #532, choose the desired selection (interaction varies by feature), Set, then Menu.
- 0 "DISABLED" (default): Deactivates this feature.
- 1 "ENABLED": The unit will deny/approve access from the pre-programmed IP patterns.
- Whether to deny or approve, and up to 4 patterns can be programmed through the web browser interface (page 49).
Setting the IP address automatically for the LAN connection {#}{5}{3}{3}4 steps
- General programming: Menu, #533, choose the desired selection (interaction varies by feature), Set, then Menu.
- This feature will be displayed only when feature #500 is activated.
- 0 "DISABLED" (default): Deactivates this feature.
- 1 "ENABLED": IP address will be allocated automatically without using a DHCP (Dynamic Host Configuration Protocol) server.
Setting HTTPD for the LAN connection {#}{5}{3}{4}3 steps
- General programming: Menu, #534, choose the desired selection (interaction varies by feature), Set, then Menu.
- 0 "DISABLED": Denies access to the web browser.
- 1 "ENABLED" (default): Allows access to the web browser.
8 network features (kx-flm671, lan connection only)
Instructions from the manualSetting the location where you use this unit5 steps
- LAN browser programming: start Multi-Function Station, Utilities, Configuration Web Page (or enter the machine IP address in a browser).
- Choose Network Configuration; log in as root with the #155 password.
- Select [LAN FEATURE]; Enter the location information of the unit.
- Use Submit to transfer settings, then close the browser.
- Reload refreshes displayed settings.
SMTP setting for scan to e-mail (via e-mail server)6 steps
- LAN browser programming: start Multi-Function Station, Utilities, Configuration Web Page (or enter the machine IP address in a browser).
- Choose Network Configuration; log in as root with the #155 password.
- Select [E-MAIL FEATURE]; Enter the SMTP server information to send scanned image from the unit via e-mail server.
- Consult your service provider or network administrator for details.
- Use Submit to transfer settings, then close the browser.
- Reload refreshes displayed settings.
Setting the error notify feature5 steps
- LAN browser programming: start Multi-Function Station, Utilities, Configuration Web Page (or enter the machine IP address in a browser).
- Choose Network Configuration; log in as root with the #155 password.
- Select [ERROR NOTIFY]; [ENABLED]: The unit will send an e-mail to registered destinations when the printing problem occurs. [DISABLED] (default): Deactivates this feature.
- Use Submit to transfer settings, then close the browser.
- Reload refreshes displayed settings.
SMTP setting for error notify feature5 steps
- LAN browser programming: start Multi-Function Station, Utilities, Configuration Web Page (or enter the machine IP address in a browser).
- Choose Network Configuration; log in as root with the #155 password.
- Select [ERROR NOTIFY]; Enter the SMTP server information to send an error notify e-mail.
- Use Submit to transfer settings, then close the browser.
- Reload refreshes displayed settings.
Registering destinations for error notify feature5 steps
- LAN browser programming: start Multi-Function Station, Utilities, Configuration Web Page (or enter the machine IP address in a browser).
- Choose Network Configuration; log in as root with the #155 password.
- Select [ERROR NOTIFY]; Enter the e-mail address to which error notify will be sent, and select the type of problems. [LIFE WARNING]: A warning indicating that the toner cartridge or drum unit needs to be replaced soon. [MEDIA PATH ERROR]: An error indicating that there is a problem with the paper tray. [LIFE ERROR]: An error indicating that the toner cartridge or drum unit needs to be replaced.
- Use Submit to transfer settings, then close the browser.
- Reload refreshes displayed settings.
10 configuring the unit to access the lan (kx-flm671 only)
Instructions from the manual2.10 Configuring the unit to access the LAN (KX-FLM671 only)13 steps
- Consult the network administrator for IP address, subnet mask and default gateway.
- For one machine on a DHCP-managed LAN, connect LAN cables to the machine/computer before power; DHCP sets these three addresses automatically.
- Then install Multi-Function Station.
- Multiple machines can use DHCP, but the guide recommends a separate static IP for each.
- Without DHCP or with multiple machines, use Menu, #500, 0 DISABLED, Set.
- For IP use 501, Set, enter address, Set.
- For subnet use 502, Set, enter mask, Set.
- For gateway use 503, Set, enter gateway, Set.
- Menu exits; install software.
- Use left/right to move to an incorrect digit and correct it.
- For PC fax reception first set #442 ALWAYS or CONNECTED; Menu, #443, Set; up/down selects the destination computer, Set, Menu.
- Without LAN, the USB computer is the default.
- Rename computers first to identify them easily.
To send the scanned image via e-mail server (kx- flm671, lan connection only)
Instructions from the manualTo send the scanned image via e-mail server (KX-FLM671, LAN connection only)6 steps
- Before scanning, program SMTP server settings and optionally register destination addresses through the browser.
- Load the original, Scan, choose E-MAIL with up/down, Set; choose E-MAIL SERVER, Set.
- Select destination: station 1–11 directly; 12–22 with Lower first; navigator with up/down; keypad with Set then enter the address using the character-entry method.
- Set.
- If needed use right, up/down to select scan settings, Set, Start.
- Black/white scans save TIFF or PDF; grayscale scans save JPEG or PDF.
To select features through the web browser interface (kx-flm671, lan connection only)
Instructions from the manualTo select features through the web browser interface (KX-FLM671, LAN connection only)6 steps
- Start Multi-Function Station, Utilities, Configuration Web Page, or enter the machine IP in a browser.
- Select Device Configuration for machine features or Network Configuration for network features.
- Log in as root using the #155 password, OK.
- Select the desired feature tab, change settings or information (interaction varies), then Submit.
- New data transfers to the machine; close the browser.
- Reload refreshes displayed settings.
2.3 using the web browser (kx-flm671, lan connection only)
Instructions from the manual11.2.3 Using the web browser (KX-FLM671, LAN connection only)4 steps
- Start Multi-Function Station, Utilities, Configuration Web Page, or enter the IP in a browser.
- Choose Status for toner/paper, Device for machine status, or Network for network information.
- Device and Network feature tabs change displayed information.
- Examine the status; Reload refreshes it.
3.9 firewall setting tool for microsoft windows xp service pack 2 or later/windows vista/windows 7 users (kx-flm671, lan connection only)
Instructions from the manual12.3.9 Firewall setting tool for Microsoft Windows XP Service Pack 2 or later/Windows Vista/Windows 7 users (KX-FLM671, LAN connection only)6 steps
- These legacy Windows firewalls block Device Monitor and LPD Manager.
- Insert the supplied CD; choose language and OK if prompted.
- Tools, Windows Firewall Setting; Add to the exceptions list, OK, OK.
- To confirm on XP: Start, Control Panel, Security Center, Windows Firewall, Exceptions; confirm Panasonic Trap Monitor Service and Panasonic LPD are displayed and checked under Programs and Services.
- On Vista: Start, Control Panel, Security Center, Windows Firewall, Change settings, Continue, Exceptions; confirm Panasonic Trap Monitor Service, Panasonic LPD Manager and Panasonic LPD under Program or port.
- On Windows 7: Start, Control Panel, System and Security, Windows Firewall, Advanced settings, Inbound Rules; confirm those three entries are displayed and checked.
4.2 rear view
Instructions from the manual1.4.2 Rear view3 steps
- Rear connections are the power inlet, USB interface, LAN interface, external telephone jack and telephone line jack; the rear also contains the speaker.
- The printed rear drawing is specifically KX-FLM671.
- Remove shipping tape before installation; its positions may change.
3 using three or more phone numbers on a single telephone line
Instructions from the manual9.3 Using three or more phone numbers on a single telephone line4 steps
- Assign a different ring pattern to each telephone number on a shared line.
- Select the fax number pattern with #431.
- The manual example assigns triple-ring C to fax.
- Default 5 B-D responds to patterns B, C and D.
4 programming the ring pattern assigned for fax
Instructions from the manual9.4 Programming the ring pattern assigned for faxView
First set #430 ON. Menu, #431; choose 1 A one long ring, 2 B two short rings, 3 C short-long-short, 4 D short-short-long, or 5 B-D (default: responds to B/C/D). Set, Menu.
1 for your safety
Instructions from the manualPower, installation and operating safeguards18 steps
- If smoke, abnormal smell or unusual noise occurs, unplug, confirm smoke stops and contact authorized service.
- Use only the marked power source; ask the supplier if uncertain.
- Use the grounded plug without modification.
- Keep objects off cords and avoid trip or step hazards.
- Do not overload outlets or extension cords; fully insert the plug.
- Unplug and remove plug dust with a dry cloth regularly; never handle a plug with wet hands.
- Install on a stable level surface away from rain/moisture with adequate ventilation, especially for extended/high-volume printing.
- Unplug before cleaning; do not use liquid or aerosol cleaners.
- Keep ventilation slots clear, away from radiators and inadequately ventilated locations.
- Do not insert objects or spill liquid.
- Do not disassemble; authorized service is required.
- Follow marked warnings.
- Keep the telephone plug dry; immediately disconnect a wet plug from its wall jack and do not use it.
- Unplug and seek authorized service for damaged/frayed power cord, rain/water/liquid entry, abnormal operation, dropping/physical damage or distinct performance changes.
- Do not microwave parts to dry them.
- Adjust only documented controls.
- Use shielded USB cable for emission compliance.
- Use only shielded Cat-5 Ethernet LAN cable for this KX-FLM671.
Installation and relocation
Instructions from the manualInstallation and relocation8 steps
- After moving from cold to warm, wait approximately 30 minutes before powering on to prevent condensation malfunction.
- Never turn the machine upside down or sideways during transport.
- Do not install telephone wiring in lightning storms or telephone jacks in wet areas unless designed for them.
- Do not touch uninsulated wires/terminals unless the line is disconnected at its network interface.
- Exercise caution modifying lines.
- Avoid unstable or vibrating locations.
- Use only documented laser adjustments; do not look directly at the scanner CIS LED.
- Do not touch the hot fuser during/immediately after printing.
Toner cartridge
Instructions from the manualToner cartridge precautions3 steps
- Avoid toner ingestion, inhalation and eye/skin contact.
- The guide instructs several glasses of water after ingestion, fresh air immediately after inhalation, soap and cold water then air drying after skin contact (no hot water or hair dryer), and thorough water flushing after eye contact.
- Seek medical treatment if adverse symptoms occur in any case.
2 important safety instructions
Instructions from the manualImportant safety instructions4 steps
- Do not use near water such as a bathtub, basin or sink.
- During thunderstorms avoid telephone use except cordless types because of lightning shock risk.
- Do not use this telephone near a gas leak to report it.
- Save these instructions.
3 illegal copies
Instructions from the manualIllegal copies3 steps
- Some document copies may be unlawful, including currency, bank notes/checks, bonds/securities, passports/ID, unauthorized copyrighted material/trademarks, stamps and negotiable instruments.
- This list is incomplete; consult legal counsel when uncertain.
- Install in a supervised location to discourage illegal copying.
7 fcc and other information
Instructions from the manualTelephone-network and radio-interference precautions6 steps
- For radio/TV interference, reorient/relocate receiving antenna, increase separation, use a different outlet circuit or consult dealer/experienced radio-TV technician.
- Avoid unauthorized modifications.
- Excessive total REN may prevent ringing; normally the total should not exceed 5.0, but ask the telephone company for its limit.
- If equipment harms the network, disconnect until resolved if requested.
- For specially wired home alarms, ensure installation does not disable the alarm; consult telephone company or qualified installer.
- When programming/test-calling emergency numbers, stay on the line and briefly explain the test; do it in off-peak hours.
Controls and parts
See the manual diagrams 3 diagrams
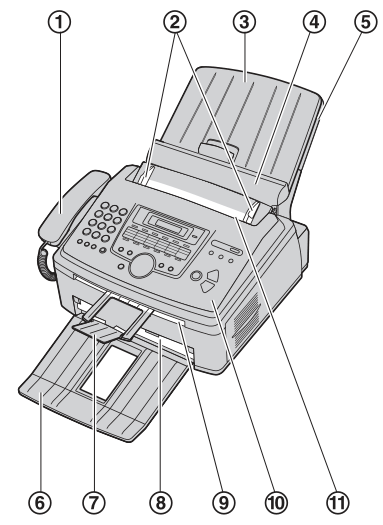
Diagram key
- 1: Handset
- 2: Document guides
- 3: Paper tray cover
- 4: Tension plate
- 5: Paper tray
- 6: Paper stacker
- 7: Document stacker
- 8: Recording paper exit
- 9: Document exit
- 10: Front cover
- 11: Document entrance
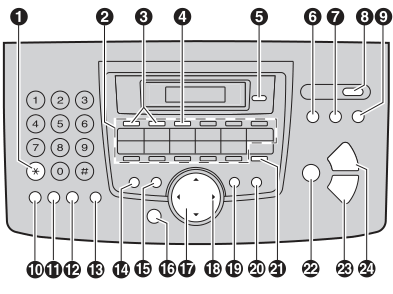
Diagram key
- 1: Tone — temporarily changes pulse to tone dialing
- 2: Station keys — one-touch dialing
- 3: Broadcast — sends to multiple parties
- 4: Manual broad — stores keypad destinations for multi-party sending
- 5: Caller ID — caller identification features
- 6: Fax — fax mode
- 7: Copy — copy mode
- 8: Auto Answer — toggles automatic answering
- 9: Scan — scan mode
- 10: Redial/Pause — retries once if busy using Monitor or fax, or inserts a dialing pause
- 11: Handset Mute — mutes your voice; repeat restores it
- 12: Flash — special telephone services or extension transfers
- 13: Monitor — initiates dialing; when receiving, you hear the caller but they cannot hear you
- 14: Quick Scan — scans to memory before sending
- 15: Resolution — copy and fax resolution
- 16: Menu — starts/exits programming
- 17: Navigator key — selects settings, volume and stored items
- 18: Directory — opens navigator directory
- 19: Contrast — copy/fax contrast
- 20: Enhanced Copy — collate, zoom or N in 1
- 21: Lower — stations 12–22
- 22: Set — stores programming selections
- 23: Start — copy, scan, send or receive fax
- 24: Stop — cancels operation/programming or deletes a character/number
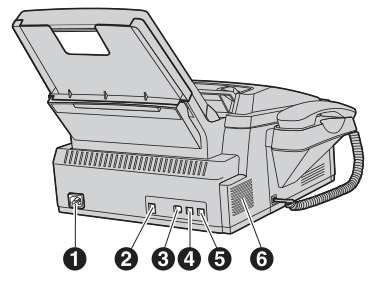
Diagram key
- 1: Power inlet
- 2: USB interface connector
- 3: LAN interface connector — KX-FLM671 only
- 4: External telephone jack
- 5: Telephone line jack
- 6: Speaker
Model details
Model and compatibility
- Supplies
- Replacement toner KX-FA83 and drum KX-FA84; genuine Panasonic supplies recommended.
- Power supply
- 120 V AC, 60 Hz.
- Recording paper
- Letter, legal or A4; 60–90 g/m². Letter is the default.
- Message locations
- Report-prefixed entries occur on printed sending and journal reports; other message entries occur on the machine display.