MODEL REFERENCE
Panasonic KX-PD205DW
27 errors · 61 troubleshooting topics · 80 guides

The checks and guides below come from the official manuals for this model.
No matches for this wording. Try a light name, error code or a shorter phrase.
Errors and messages
Shown on the machine display U41u41 — アイテガ U41 ハナシチュウデシタ シバラク マッテ ソウシン シテクダサイ
The recipient was busy: The recipient was busy. Wait a while, then send again.
U42u42 — アイテノファクスガ U42 オウトウ シマセンデシタ アイテニ カクニン シテクダサイ
The recipient fax did not answer: The recipient fax did not answer. Check with the recipient.
U31u31 — インサツデキマセン! U31 シバラク オマチ クダサイ
The base has excess heat and cannot print: The base has excess heat and cannot print. Wait until the message disappears.
U20u20 — キロクシガ アリマセン U20 カミヲ イレテクダサイ
Recording paper is absent and copying or printing is canceled: Recording paper is absent and copying or printing is canceled. Load paper and repeat the operation. If an original remains, open the operation panel and remove it. If the message appears with paper loaded, remove jammed paper, clean the feed roller and load correctly. Normally keep paper unloaded and the tray closed to prevent dust-related jams.
U12u12 — キロクシ ヅマリ U12 カバーヲ アケテ トリノゾイテ クダサイ
Remove jammed recording paper, clean the feed roller and reload correctly: Remove jammed recording paper, clean the feed roller and reload correctly. Normally keep paper unloaded and close the tray to prevent dust-related jams.
U14u14 — ゲンコウ ノコリ U14 [ストップ]ヲ オシテクダサイ
An original remains in its slot: An original remains in its slot. Press Stop to eject it.
U13u13 — ゲンコウ ヅマリ U13 パネルヲ アケテ カミヲ トリノゾイテ クダサイ2 checks
U15u15 — ゲンコウ ヅマリ U15 パネルヲ アケテ カミヲ トリノゾイテ クダサイ
Use originals no longer than 500 mm.: Use originals no longer than 500 mm.
H82h82 — コキ ショキカ エラー H82 オカイアゲノ ハンバイテンヘ ゴソウダン クダサイ
Registered handset information was erased from the base: Registered handset information was erased from the base. Consult the selling dealer.
H40h40 — ソウシン H40 デキマセン デシタ オカイアゲノ ハンバイテンヘ ゴソウダン クダサイ
A communication error prevented transmission. Consult the selling dealer.
U40u40 — ソウシン U40 デキマセン デシタ2 checks
H33h33 — ハードウェアエラー H33 デンワキ コード ヲ ハズシテ クダサイ オカイアゲノ ハンバイテンヘ ゴソウダン クダサイ
A hardware error prevents telephone-line use: A hardware error prevents telephone-line use. Disconnect the telephone cord from the base and consult the selling dealer.
U10u10 — バックカバーヲ U10 シメテ クダサイ
Close the back cover securely.: Close the back cover securely.
U23u23 — フィルムノコウカンガ ヒツヨウ フィルム(KX-FAN190)ヲ オカイモトメクダサイ U232 checks
U24u24 — フィルムノコリワズカ U24 ジュンビ シテクダサイ ヒンバン:KX-FAN190
With film-warning enabled, this appears when approximately 6 sheets or fewer remain: With film-warning enabled, this appears when approximately 6 sheets or fewer remain. Prepare new ink film and replace it soon.
H30h30 — プリンター エラー H30 オカイアゲノ ハンバイテンヘ ゴソウダン クダサイ
A printer error prevented printing: A printer error prevented printing. Consult the selling dealer.
—Protocol error — プロトコル エラー
Doorphone, handset, repeater or window/door-sensor registration did not finish within its specified time: Doorphone, handset, repeater or window/door-sensor registration did not finish within its specified time. Repeat the registration from the beginning.
U81u81 — メモリーガ イッパイ U81 ファクスジュシン デキマセン フヨウナ ファクスヲ ショウキョ シテクダサイ
Print and review faxes in base fax memory, then erase unwanted faxes to free the full memory.: Print and review faxes in base fax memory, then erase unwanted faxes to free the full memory.
U82u82 — メモリーガ イッパイ U82 ロクオン デキマセン フヨウナ ヨウケンヲ ショウキョ シテクダサイ
Play answering messages and call recordings, then erase unwanted ones to free the full recording memory.: Play answering messages and call recordings, then erase unwanted ones to free the full recording memory.
H32h32 — モーター エラー H32 オカイアゲノ ハンバイテンヘ ゴソウダン クダサイ
A motor error occurred. Consult the selling dealer.
H36h36 — ヨミトリ エラー H36 オカイアゲノ ハンバイテンヘ ゴソウダン クダサイ
The original could not be scanned: The original could not be scanned. Consult the selling dealer.
U83u83 — ロクオンチュウテイデン U83
Power failed during message or other recording and recording stopped: Power failed during message or other recording and recording stopped. If it failed while saving nuisance-prevention recording, repeat saving. Press Stop to dismiss the display.
—Handset cannot connect — オヤキニ セツゾク デキマセン2 checks
—Handset out of range — [ケンガイ]2 checks
—This is not the base — コレハ オヤキデハ アリマセン
For handset registration, press and hold Internal on the base for at least 5 seconds, rather than pressing Internal on the handset.: For handset registration, press and hold Internal on the base for at least 5 seconds, rather than pressing Internal on the handset.
—Search stopped — サーチ テイシチュウ サイカイハ[サーチ]オス
The handset has been out of range for approximately 3 hours and cannot be used: The handset has been out of range for approximately 3 hours and cannot be used. Press Search to resume.
—In use / cannot now — シヨウチュウ イマ デキマセン2 checks
Troubleshooting
Find the problem you are experiencingCannot make calls — 電話をかけられない3 checks
- Check and manually set the telephone line type.
- Check and manually set the telephone line type.
- Check the telephone cord connection.
- Check the telephone cord connection.
- Release key lock.
- On the cordless handset, release key lock.
No dial tone in the receiver — 受話器から「ツー」音が聞こえない1 check
- Push both ends of the handset cord fully into the receiver and base.
- Push both ends of the handset cord fully into the receiver and base.
Cannot call a mobile number — 携帯電話にかけられない1 check
- If 選んでケータイ is enabled, register the correct fixed-line carrier identification number.
- If 選んでケータイ is enabled, register the correct fixed-line carrier identification number.
- Try adding Auto Answer (Pause) after that carrier number.
- For hikari telephone service, disable 選んでケータイ.
- For an IP telephone line, register the correct IP-service bypass number.
- If still unable to call, contact the fixed-line or IP provider.
Dial with 184 or 186 — 184や186を付けてかけたい1 check
- Dial 184 or 186, press base Auto Answer (Pause) or handset Pause, then dial the number.
- Dial 184 or 186, press base Auto Answer (Pause) or handset Pause, then dial the number. On the handset, if Talk was pressed before dialing, use the right arrow for the pause.
Cannot dial toll-free, weather or 184/186 numbers — フリーダイヤル、天気予報、184や186を付けてかけられない2 checks
- On IP telephone service, a pause can prevent connection; omit the pause in that case.
- On IP telephone service, a pause can prevent connection; omit the pause in that case.
- Base pause is Auto Answer; handset is Pause, or right arrow when Talk was pressed before dialing.
- Manually set the line type to match the NTT contract.
- Manually set the line type to match the NTT contract. If the problem remains, check the hikari/ADSL connection guidance.
Cannot receive calls — 電話を受けられない2 checks
- On a PBX set 構内交換機接続 to アリ.
- On a PBX set 構内交換機接続 to アリ.
- With Caller ID service, on the base press Function, #133, Set; select ジドウ using up/down, Set, Stop.
- With Caller ID service, on the base press Function, #133, Set; select ジドウ using up/down, Set, Stop.
Call waiting cuts off or will not switch — キャッチホンの操作をすると、元の相手との通話が切れたり、切り替わらないことがある1 check
- Call waiting may fail or disconnect the original party depending on the telephone-line types at each end.
- Call waiting may fail or disconnect the original party depending on the telephone-line types at each end. Consult the line provider.
Base beeps repeatedly — 親機から「ピーピー」と音がする1 check
- If the receiver was left off hook, replace it.
- If the receiver was left off hook, replace it.
Holding or transferring a call disconnects it — 電話を保留したら、電話が切れた1 check
- Perform the transfer after elapsed call time is displayed.
- Perform the transfer after elapsed call time is displayed. Operating within 10 seconds of answering can disconnect the call.
Caller cannot hear my voice — 通話中、自分の声が相手に聞こえない2 checks
- Check that a finger or face is not covering the receiver or handset microphone.
- Check that a finger or face is not covering the receiver or handset microphone.
- On the cordless handset, if ミュート is displayed, release mute.
- On the cordless handset, if ミュート is displayed, release mute.
Broken audio or noise — 相手の声が途切れたり、雑音が入る4 checks
- Handset: move closer to the base if too far away.
- Handset: move closer to the base if too far away.
- Handset: move away from metal or concrete obstacles; if movement is impossible, consider the specified optional repeater.
- Handset: move away from metal or concrete obstacles; if movement is impossible, consider the specified optional repeater.
- Handset: do not cover the antenna area with your hand.
- Handset: do not cover the antenna area with your hand.
- Base or handset: for a quiet caller or loud ambient noise, set echo suppressor ヨワイ; if ineffective, try オフ.
- Base or handset: for a quiet caller or loud ambient noise, set echo suppressor ヨワイ; if ineffective, try オフ.
- On the base use Function, #031, Set, up/down to select, Set, Stop.
- Default is ヒョウジュン; some line types automatically select ヨワイ.
Caller becomes harder to hear over time — しばらく話していると、だんだん相手の声が聞こえにくくなる2 checks
- Align the receiver or handset earpiece with your ear again.
- Align the receiver or handset earpiece with your ear again.
- Set echo suppressor 弱い, then オフ if ineffective, using base Function, #031, Set, up/down, Set, Stop.
- Set echo suppressor ヨワイ, then オフ if ineffective, using base Function, #031, Set, up/down, Set, Stop.
- Default is ヒョウジュン; some lines automatically select ヨワイ.
Echo of my voice — 自分の声が反響する、エコーがする2 checks
- Set TA/スプリッタ接続 to あり(2).
- Set TA/スプリッタ接続 to アリ(2).
- If ineffective, try アリ(3) then アリ(4) in that order.
- If already アリ(4), set echo suppressor ツヨイ through base Function, #031, Set, up/down, Set, Stop.
- When speaking with the receiver, reduce receiver volume.
- When speaking with the receiver, reduce receiver volume.
Handset beeps after removal from charger — 子機を充電台から取り、しばらくすると「ピピッ」と鳴り始める1 check
- Quick call is enabled.
- Quick call is enabled. Press Off or return the handset to its charger.
Charging message absent on charger — 充電台に置いても、「ジュウデンチュウ」と表示されない2 checks
- With a new or nearly empty battery, leave the handset on the charger for several minutes until the message appears.
- With a new or nearly empty battery, leave the handset on the charger for several minutes until the message appears.
- Check that the charger power cord is firmly connected.
- Check that the charger power cord is firmly connected.
Low-battery icon flashes after a few minutes despite full charge — 充電完了まで充電しても、通話数分後に が点滅する1 check
- The battery has reached the end of its life.
- The battery has reached the end of its life. Replace the battery pack using the reviewed battery procedure.
Charge not complete after about 10 hours — 充電時間が長い(約10時間充電しても、「ジュウデンカンリョウ」と表示されない)3 checks
- Using the handset during charging extends charging time.
- Using the handset during charging extends charging time.
- Low ambient temperature or low supply voltage extends charging time.
- Low ambient temperature or low supply voltage extends charging time.
- With the base unpowered or handset out of range, charging takes longer: connect base power and move the handset close enough for ケンガイ to disappear before charging.
- With the base unpowered or handset out of range, charging takes longer: connect base power and move the handset close enough for ケンガイ to disappear before charging.
Cannot send fax — ファクスを送信できない3 checks
- If the recipient blocks withheld numbers, send with the 186 caller-notification prefix.
- If the recipient blocks withheld numbers, send with the 186 caller-notification prefix.
- For hikari/ADSL, check the applicable connection guidance.
- For hikari/ADSL, check the applicable connection guidance.
- Some recipient machines require your number: set あなたの電話番号.
- Some recipient machines require your number: set あなたの電話番号.
Cannot receive fax — ファクスを受信できない5 checks
- Install recording paper or ink film if exhausted.
- Install recording paper or ink film if exhausted.
- For hikari/ADSL check the applicable connection guidance.
- For hikari/ADSL check the applicable connection guidance.
- When answering slow fax beeps, perform fax reception before hanging up.
- When answering slow fax beeps, perform fax reception before hanging up.
- Erase unwanted faxes if fax memory is full; reception is unavailable even with paper and ink film installed when that memory is full.
- Erase unwanted faxes if fax memory is full; reception is unavailable even with paper and ink film installed when that memory is full.
- If reception stops part way depending on the original or quality setting, ask the sender to lower its quality setting.
- If reception stops part way depending on the original or quality setting, ask the sender to lower its quality setting.
Cannot send fax with 184 or 186 — 184や186を付けてファクスを送信できない1 check
- On ADSL, manually set line type to match the NTT contract.
- On ADSL, manually set line type to match the NTT contract. If still unable to send, check the applicable connection guidance.
Cannot send overseas — ファクスを海外へ送信できない1 check
- Line noise can impede transmission.
- Line noise can impede transmission. Before sending, set 海外送信 to 1カイ.
Cannot receive from F-Net — Fネットからのファクスを受信できない1 check
- With a 16 Hz F-Net contract or without F-Net membership, blocking number 161 through nuisance-call blocking prevents reception.
- With a 16 Hz F-Net contract or without F-Net membership, blocking number 161 through nuisance-call blocking prevents reception.
Erase memory-received fax — メモリー代行受信されている内容を消去したい1 check
- Delete individually or all together.
- Delete individually or all together. Deleted content cannot subsequently be printed.
Receiving a B4 or A3 fax — B4サイズやA3サイズのファクスを受信するとどうなる?1 check
- Most sending fax machines reduce it to approximately A4 under the fax communication rules; some machines are exceptions.
- Most sending fax machines reduce it to approximately A4 under the fax communication rules; some machines are exceptions.
Displayed destination differs from dialed fax number — ファクスを送る際、ダイヤルした番号と違う番号が表示される1 check
- The display shows the number registered in the recipient fax.
- The display shows the number registered in the recipient fax. If you dialed correctly, this difference is not a problem.
Film wraps around a roller — インクフィルムがローラーに巻きつく1 check
- Loose film or incorrect winding direction can wrap around the roller.
- Loose film or incorrect winding direction can wrap around the roller. Install the film correctly and turn the orange gear toward the back to remove slack.
Same fax content prints repeatedly — 同じ内容が何度も印刷される2 checks
- If paper runs out during printing, replenishing restarts at the first page.
- If paper runs out during printing, replenishing restarts at the first page. Load more paper, preferably 15 sheets.
- After paper runs out you can print one fax at a time and specify a starting page.
- After paper runs out you can print one fax at a time and specify a starting page.
Recording sheets overlap or skew — 記録紙が重なって(ずれて)印刷される2 checks
- Fan and load paper correctly, preferably 15 sheets.
- Fan and load paper correctly, preferably 15 sheets. When adding paper, remove the remaining stack and reload it together with the new sheets.
- Clean a dirty internal feed roller.
- Clean a dirty internal feed roller.
Stored fax does not print after paper or film is installed — メモリー代行受信時、記録紙やインクフィルムを入れても印刷しない1 check
- Unplug power, wait at least 10 seconds, reconnect and try the operation again.
- Unplug power, wait at least 10 seconds, reconnect and try the operation again.
Received fax is reduced — 受けたファクスが縮小される1 check
- Default A4 reception reduces vertical size to approximately 92 percent.
- Default A4 reception reduces vertical size to approximately 92 percent. The original size or orientation, such as landscape B5, can cause further reduction.
Received fax is faint — 受けたファクスがかすれている4 checks
- Fine or pale characters
- Small, fine or pale original characters may appear faint. Try smooth recording paper.
- Received-print density
- Try received-print density コク.
- Economy reception
- Try economy reception アリ(2) or ナシ.
- Sender quality
- Ask the sender to change its quality setting.
Lines, dots or crushed text on received fax or copy — 受けたファクスやコピーに白や黒い線・黒い点が入ったり、文字がつぶれたりする3 checks
- Clean dirty recording-paper transport rollers or the paper guide.
- Clean dirty recording-paper transport rollers or the paper guide.
- If call-waiting signaling interrupted reception, ask for retransmission.
- If call-waiting signaling interrupted reception, ask for retransmission.
- Do not use a parallel telephone during fax transmission or reception.
- Do not use a parallel telephone during fax transmission or reception.
Lines or crushed text on a sent fax — 相手に送ったファクスに白や黒い線が入ったり、文字がつぶれたりする3 checks
- Clean the scanning glass and white flat surface.
- Clean the scanning glass and white flat surface.
- If call-waiting signaling interrupted sending, resend.
- If call-waiting signaling interrupted sending, resend.
- Do not use a parallel telephone during fax transmission or reception.
- Do not use a parallel telephone during fax transmission or reception.
Recording paper jams — 記録紙が詰まる1 check
- Clean a dirty internal feed roller.
- Clean a dirty internal feed roller. Dust can cause jams; normally leave no paper loaded and close the recording-paper tray.
Answering greeting is silent — 留守番電話の応答メッセージが流れない1 check
- A custom greeting may have been recorded silently.
- A custom greeting may have been recorded silently. Record it again or select a fixed greeting.
Auto Answer button cannot set, cancel or play messages — 【留守】を押しても、留守設定/留守設定の解除/用件再生ができない1 check
- Replace the off-hook receiver, then operate Auto Answer.
- Replace the off-hook receiver, then operate Auto Answer.
Cannot operate answering machine remotely — 外出先から留守番電話を操作できない1 check
- Source condition: Cannot operate answering machine remotely
- Call from a telephone that sends touch-tone signals and register the remote-control PIN.
Auto Answer indicator flashes — 留守ランプが点滅している1 check
- New messages were recorded with answering mode set.
- New messages were recorded with answering mode set. Play the messages.
Message recording cuts off — 用件が録音の途中で切れている1 check
- Recording stops if silence lasts at least 6 seconds or the caller is too quiet.
- Recording stops if silence lasts at least 6 seconds or the caller is too quiet. Ask the caller to speak continuously or louder.
Answering mode announces that recording is impossible — 留守設定すると留守番電話に録音できないメッセージが聞こえる1 check
- Memory may be full.
- Memory may be full. Listen to answering messages and call recordings, then erase unwanted ones.
Recording time shows January 1 at 00:00 — 録音した日付・時刻が「1月1日 0:00」や「1/1 0:00」と表示される1 check
- The date/time remains at its initial setting or returned there after a power outage.
- The date/time remains at its initial setting or returned there after a power outage. Set the date and time.
Ringer does not sound — 呼出音が鳴らない2 checks
- Adjust ringer volume if set to off.
- Adjust ringer volume if set to off.
- Charge the handset if its battery is empty and it does not ring.
- Charge the handset if its battery is empty and it does not ring.
Ringer starts late — 呼出音が鳴り出すのが遅い1 check
- Silent fax reception waits to distinguish a voice call from a fax, so ringing begins slightly later.
- Silent fax reception waits to distinguish a voice call from a fax, so ringing begins slightly later.
Keep ringing until answered at home — 在宅時、電話に出るまで呼出音を鳴り続けるようにしたい1 check
- Set 在宅呼出回数 to 自動応答しない.
- Set 在宅呼出回数 to ジドウ オウトウ シナイ.
Ringing despite silent fax reception — 無鳴動受信に設定しても呼出音が鳴る2 checks
- Ringing still occurs for voice calls, answering mode with its lamp lit, full base fax memory, and manually dialed faxes sent after the sender lifts its receiver.
- Ringing still occurs for voice calls, answering mode with its lamp lit, full base fax memory, and manually dialed faxes sent after the sender lifts its receiver.
- Caller-line types or connected devices may also cause ringing.
- Caller-line types or connected devices may also cause ringing.
Doorphone does not ring — ドアホンの呼出音が鳴らない2 checks
- Unsupported adapter
- VE-DA10/VE-DA10-H doorphone adapters cannot connect to this fax.
- Doorphone ringing
- Reconnect the power plugs of both this unit and the wireless-adapter television doorphone base.
Incoming caller number not displayed — かけてきた相手の電話番号を表示しない7 checks
- Confirm the NTT contract and installation are complete, or contract for an equivalent Caller ID service from the other provider.
- Confirm the NTT contract and installation are complete, or contract for an equivalent Caller ID service from the other provider.
- PBX/home-telephone connections cannot display Caller ID.
- PBX/home-telephone connections cannot display Caller ID.
- Parallel telephone connections may prevent display.
- Parallel telephone connections may prevent display.
- With Caller ID service use base Function, #133, Set, select 自動 with up/down, Set, Stop.
- With Caller ID service use base Function, #133, Set, select ジドウ with up/down, Set, Stop.
- With contracted call-waiting Caller ID, set キャッチホン・ディスプレイ to あり.
- With contracted call-waiting Caller ID, set キャッチホン・ディスプレイ to アリ.
- On ISDN check terminal-adapter settings; if not resolved, contact its manufacturer.
- On ISDN check terminal-adapter settings; if not resolved, contact its manufacturer.
- If either party uses IP telephone service, numbers may not be displayed; consult the IP provider.
- If either party uses IP telephone service, numbers may not be displayed; consult the IP provider.
Cannot display caller information / incoming external call — 「ヒョウジデキマセン」(子機は「ガイセン チャクシン」)と表示されるView
Poor or noisy telephone-line conditions during the incoming call can cause ヒョウジデキマセン on the base or ガイセン チャクシン on the handset.
Incoming-call time shows January 1 at 00:00 — 着信した日付・時刻が「1月 1日 0:00」や「1/1 0:00」と表示される1 check
- The initial date/time or a power-outage reset is being shown.
- The initial date/time or a power-outage reset is being shown. Set the date and time.
Incorrect operation despite correct controls — 正しく操作しても動かない、動作がおかしい2 checks
- Base: hold Stop for at least 5 seconds.
- Base: hold Stop for at least 5 seconds.
- When リセット シマスカ? appears, press star.
- If the prompt does not appear or operation remains abnormal, unplug power, wait at least 10 seconds and reconnect.
- Handset: remove its battery, wait at least 10 seconds, then reinstall it.
- Handset: remove its battery, wait at least 10 seconds, then reinstall it.
Caller ID log / Fax Print indicator lit — 着信履歴/ファクス印刷ランプが点灯している2 checks
- For a missed call, review call history.
- For a missed call, review call history.
- For memory-received faxes, print the stored faxes.
- For memory-received faxes, print the stored faxes.
Changing screens and spoken demonstration — 次々に画面が切り替わり、操作案内が流れる1 check
- After approximately 20 minutes without a telephone cord, demo mode starts.
- After approximately 20 minutes without a telephone cord, demo mode starts. Connect the telephone cord to exit demonstration and start automatic line-type setup.
Base, handset or charger feels warm — 親機、子機、子機用充電台が温かい1 check
- Ordinary warmth is normal and can feel greater in summer.
- Ordinary warmth is normal and can feel greater in summer. If abnormally hot, unplug power and consult the selling dealer.
Quiet sound from base on standby — 親機から音が聞こえる1 check
- A small standby sound can be normal.
- A small standby sound can be normal.
Ink film has run out — インクフィルムがなくなったときは2 checks
- Source condition: Ink film has run out
- Faxes will not print without ink film. Obtain the specified replacement ink film.
- Source condition: Ink film has run out
- Replace the film through the reviewed ink-film replacement procedure.
Back cover will not close — バックカバーが閉まらない1 check
- During film replacement, remove the used white axle before installing new film.
- During film replacement, remove the used white axle before installing new film. Leaving the old white axle in place prevents closing.
Telephone number changed after moving — 転居などで電話番号が変わったときは?1 check
- Register the new telephone number again.
- Register the new telephone number again.
Use during power outage — 停電のとき使えますか?2 checks
- Source condition: Use during power outage
- Neither base nor handset can be used during a power failure.
- Source condition: Use during power outage
- Registered settings, greetings, messages and memory-received faxes remain stored. Date/time may return to the initial value; set it again if that happens.
Forward incoming calls directly — かかってきた電話を直接転送したい1 check
- The manual identifies NTT Voice Warp for this purpose and directs enquiries to NTT.
- The manual identifies NTT Voice Warp for this purpose and directs enquiries to NTT.
- It forwards voice and fax calls without distinguishing them; this is a provider service rather than a device fax-only forwarding feature.
CS digital television picture interference — CSデジタル放送(特定チャンネル)の画像が乱れる1 check
- This unit and optional 1.9 GHz repeaters can interfere with the CS antenna signal path.
- This unit and optional 1.9 GHz repeaters can interfere with the CS antenna signal path.
- Use CS/BS-compatible receiving equipment, including combiners, distributors and separators; CS/BS cable names beginning with S, such as S-4C-FB; and F-type connectors compatible with CS/BS cables.
Wi-Fi internet unavailable or unstable — 無線LAN経由で、パソコンやスマートフォンなどがインターネットに接続できない。接続が不安定である1 check
- This unit and optional 1.9 GHz repeaters can interfere with a nearby wireless router.
- This unit and optional 1.9 GHz repeaters can interfere with a nearby wireless router.
- The manual recommends separating this equipment and the router by approximately 3 metres or more.
Guides
安全上のご注意
Instructions from the manualSafety and when to stop10 steps
- Use only AC 100 V and the specified KX-FAN57 battery.
- Do not disassemble, modify, short, heat or place batteries in fire; do not peel their covering.
- Do not wet equipment or touch power plugs with wet hands.
- Insert power plugs fully; unplug and remove accumulated plug dust with a dry cloth.
- Do not overload outlets or damage power cords.
- Keep the base at least 15 cm from implanted pacemakers and follow medical-facility restrictions.
- Stop use and unplug immediately for smoke, unusual smell/noise, damaged housing, liquid or foreign objects inside; consult the selling dealer.
- If battery liquid enters eyes, do not rub: wash with clean water and immediately seek medical attention.
- Do not touch the base, charger, plugs or telephone cord during lightning.
- Place on a stable surface, away from heat, steam and direct sunlight.
使用上のお願い
Instructions from the manualPlacement, radio range and data protection11 steps
- Keep the tray normally closed without recording paper to reduce dust.
- Avoid direct light at the document outlet, rapid temperature changes, heat, moisture, heavy dust, OA equipment and CS receivers.
- Keep the power plug accessible.
- Keep the handset charger away from AM radio, televisions and magnets.
- Unobstructed handset range is approximately 100 m; walls, metal doors, concrete, foil insulation and multiple floors reduce it.
- Move the handset nearer when ケンガイ appears; consider the specified repeater if moving is impractical.
- Radio privacy is not absolute; use the base for important calls.
- Back up important phonebooks, fax memory and blocked-number lists before service.
- Before repair, disposal or transfer, remove used film and disconnect the telephone cord; reset base and handset separately to erase personal data.
- Cut used film because it retains print information.
- Neither base nor handset works during power failure.
インクフィルムを取り付ける・交換する
Instructions from the manualInstall or replace ink film11 steps
- Open the operation panel.
- Raise the green lever and open the back cover.
- For replacement, remove the used orange-axle film and the old white axle.
- Fit new film with its orange gear at the front-left U-shaped recess and the white gear tip in its U-shaped recess.
- Turn the orange gear toward the back to remove slack.
- Press both marked ends of the back cover until they click, then close the operation panel.
- Do not touch the thermal head.
- Use only KX-FAN190/190W/190V/191/191W.
- The trial roll is about 5 m, approximately 15 A4 sheets; each sheet uses about 32 cm even for a few printed lines.
- Cut discarded film and dispose of it and its axles as plastic under local rules to protect recorded information.
- Stop ends spoken replacement guidance.
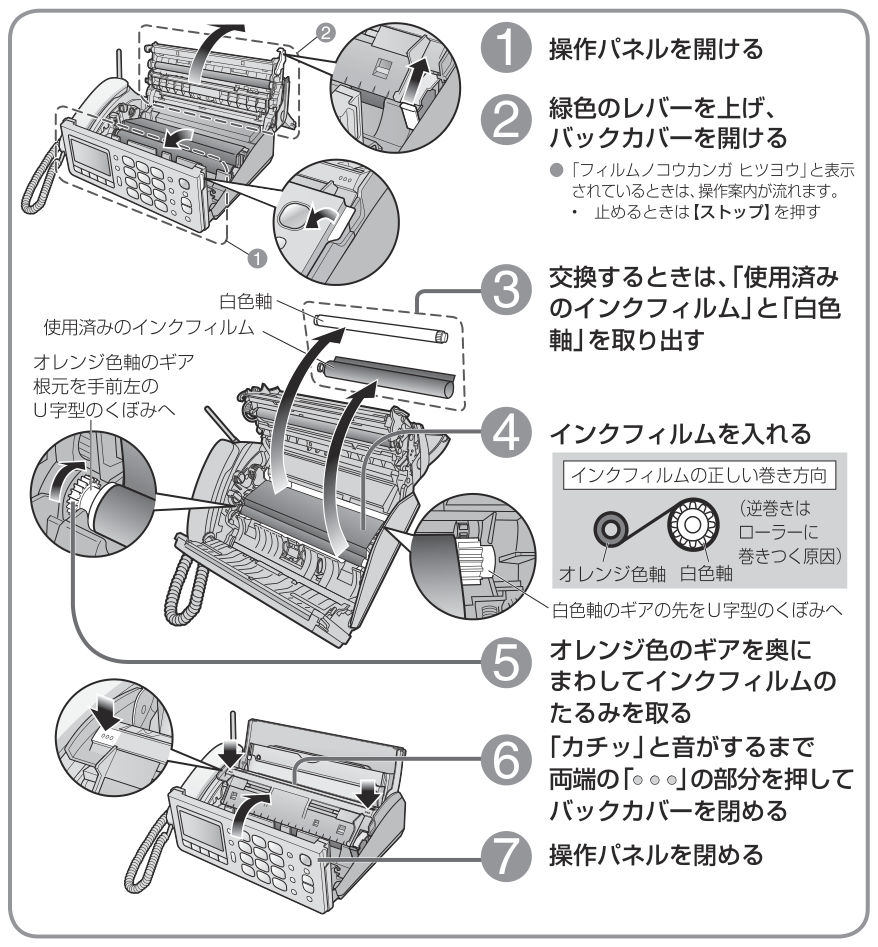
Diagram key
- 1: Open the operation panel.
- 2: Raise the green lever and open the back cover.
- Green-lever inset: The complete inset arrow shows the same lever-lifting direction.
- 3: When replacing film, remove the used orange-axle ink film and the old white axle.
- Used ink film: Remove the exhausted film assembly.
- White axle: Remove the old separate white axle before fitting new film.
- Orange-gear root: Fit it into the front-left U-shaped recess.
- 4: Insert the new film.
- White-gear tip: Fit its tip into the U-shaped recess.
- Winding-direction inset: The orange and white axles must follow the complete printed winding-direction diagram; reversing the winding can wrap film around a roller.
- 5: Turn the orange gear toward the back to remove slack.
- 6: Press both marked back-cover ends until they click closed.
- Repeated ••• closure marks: Both illustrated marked ends must be pressed; the inset enlarges the same closing action.
- 7: Close the operation panel.
- Thermal-head warning: Do not touch the thermal head; this can cause white or black print lines.
- Replacement guidance: When the film-replacement message is present, spoken guidance plays; Stop ends it.
Set film-remaining warning after replacement4 steps
- Immediately after installing a new 15 m film roll and before using it, set base Function, #098, Set, up/down to アリ, Set, Stop.
- Approximately 6 sheets remaining triggers U24.
- After opening and closing the back cover, confirm whether the film was actually replaced using star for yes or hash for no.
- Setting the warning after film has already been used gives an inaccurate remaining indication.
親機の接続・設定
Instructions from the manualConnect base and perform initial setup10 steps
- Raise the antenna.
- Install the receiver and push its cord connectors fully in until they click.
- Connect base power to AC100 V.
- Connect the supplied six-position two-conductor telephone cord, clicking both ends into place; other conductor arrangements can cause noise.
- Do not operate while automatic line-type checking runs.
- At the date/time prompt press Function, enter year, month, day and 24-hour time, then Set.
- Verify calling using the source-listed 177 weather-service test, which incurs charges; when using optical/ADSL service also verify the listed service/emergency numbers can connect.
- Without the telephone cord, a demonstration starts after about twenty minutes; connection exits it and starts automatic line setup.
- Consult the provider for three-pin or directly wired sockets.
- Do not connect an unspecified business/home telephone system.
Set telephone line type manually5 steps
- On the base press Function, #079, Set.
- Select ジドウ, プッシュ, 20 or 10 with up/down; press Set, then Stop when a manual type was selected.
- If calling fails, try プッシュ, then 20, then 10 in that order.
- If none works, consult NTT at the source-listed 116.
- Match contracted NTT line type for IP/ADSL service.
いろいろな接続
Instructions from the manualConnect hikari, ADSL, ISDN or PBX service11 steps
- This fax follows NTT analog-line standards; optical/IP service may not work with every adapter.
- Ask the provider how to connect the supplied cord to the adapter telephone port.
- Disable 選んでケータイ on hikari service.
- Set line type manually if calling fails.
- For echo, distortion or varying volume, change TA/スプリッタ接続; try アリ(1) through アリ(4) in order as needed.
- For ADSL noise or continuing fax/caller-ID problems, test directly at the telephone socket and consult the provider if direct operation is normal.
- For optical service consult its provider.
- Connect ISDN through an analog terminal-adapter port and select プッシュ; follow that adapter manual for caller ID, call waiting, polarity and DSU issues.
- On PBX or the specified discontinued Panasonic home systems, set 構内交換機接続 to アリ; caller ID/call-waiting display is unavailable.
- The specified home systems need the discontinued VJ-6651M adapter and Fネット enabled.
- This model has no dial-in feature.
Parallel telephone and remote fax reception5 steps
- Do not parallel-connect when using caller ID or call-waiting display.
- A parallel cordless phone can prevent handset use.
- Do not lift the parallel receiver during fax transmission or reception.
- Wait until elapsed call time appears before transfer; operation within 10 seconds after answering can disconnect.
- On a parallel phone that answered a fax, switch to touch-tone if using a dial line, press star then 9, and replace its receiver gently to start reception.
子機の電池パックを入れる・交換する・10時間充電する
Instructions from the manualInstall, replace and charge handset battery10 steps
- Open the battery cover by pressing the marked position and sliding it toward you.
- When replacing, unplug the old connector and remove the pack.
- Insert the specified KX-FAN57 connector and pack with red/black leads positioned as illustrated; keep the outer film intact.
- Close the cover without removing its rear cushion.
- Connect the charger to AC 100 V and charge the handset approximately 10 hours.
- It does not overcharge if left on the charger.
- If leaving it off the charger or disconnecting charger power for at least a week, remove the pack and charge before reuse.
- Replace a pack whose low-battery icon flashes after a few minutes despite full charge.
- Insulate retired pack terminals with tape or a plastic bag and take it to an appropriate rechargeable-battery collection point.
- Do not short, disassemble or peel its covering.
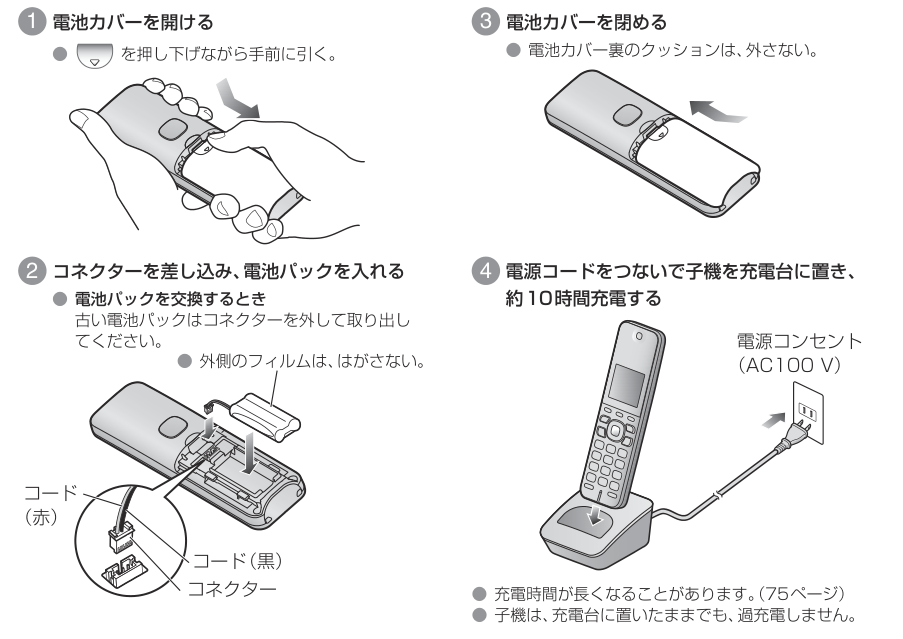
Diagram key
- 1: Press and pull the battery cover toward you to open it.
- ▽ cover mark: Press the indicated cover position while sliding it open.
- 2: Insert the connector and install the pack; for replacement unplug the old battery connector first.
- Outer covering: Do not peel off the outer film of the battery pack.
- Red wire: Red battery lead as pictured.
- Black wire: Black battery lead as pictured.
- Connector: Plug the battery connector into the illustrated socket.
- 3: Close the battery cover; do not remove the cushioning on its reverse.
- 4: Connect charger power, place the handset on the charger and charge approximately 10 hours. Charging can take longer; the handset does not overcharge if left on the charger.
- AC 100 V: The depicted charger outlet is AC 100 V.
電話のかけかた・受けかた
Instructions from the manualMake and answer voice calls7 steps
- Base: lift the receiver, wait for dial tone and dial; replace it to end.
- Answer by lifting it when ringing.
- Handset: remove from charger, press Talk, wait for dial tone and dial; end with Off or return to charger.
- Answer with Talk.
- If slow fax beeps or silence indicate an incoming fax, on the base press Fax and replace the receiver; on the handset use Function, select ファクス ジュシン, Set, Yes.
- Automatic fax reception is off by default.
- With automatic reception enabled, the base normally answers after three rings even if answering mode is off, so callers incur charges even without a person answering.
ファクスの送りかた
Instructions from the manualSend a fax and load originals8 steps
- Press Fax.
- Open the recording-paper tray and raise the recording-paper stands.
- Adjust the document guides and insert up to five aligned originals face up until the beep.
- Select チイサイジ for small text or シャシン for photos/tonal originals with up/down; ordinary quality is フツウジ.
- Dial and carefully verify the destination, then press Fax.
- When unanswered, automatic redial tries up to three times at one-minute intervals; this does not apply when sending with the receiver lifted or Monitor used.
- Fax-result announcements can be disabled through ファクス音声案内.
- Follow the separate original-size/thickness requirements.
ファクスを自動で受ける
Instructions from the manualReceive and print an incoming fax8 steps
- Automatic reception is off by default.
- Set Function, #116, Set, up/down to スル or シナイ, Set, Stop.
- Enabled automatic reception answers after three rings, optionally five through home ring count, even with answering mode off; connection starts caller charges.
- A fax is received automatically.
- A voice call rings another nine times before the unavailable message and disconnection.
- Nuisance prevention overrides this behavior when enabled.
- Canceling automatic reception sets home ring count to 15.
- Memory-received faxes light Caller ID Log/Fax Print; load paper, press Fax Print, then Copy to print new faxes, and use the reviewed deletion confirmation only if you want them erased.
Receive a fax after answering5 steps
- If slow fax tones are recognized after answering, friendly fax reception starts automatically; replace base receiver.
- Answering after seven or eight rings can prevent reception.
- Base manual reception: lift, after speech/fax tones/silence press Fax, replace.
- Handset: Talk, Function, ファクス ジュシン, Set, Yes.
- Base Stop cancels reception.
Automatic, silent and fax-only reception6 steps
- Silent reception uses #114, Set, choose ツネニスル or タイマー with 24-hour start/end, Set, Stop; answering mode must be off.
- It answers without ringing, receives fax, or for voice begins ringing after about seven seconds and ends after nine rings.
- Ringing can still occur with answering mode, full fax memory, manually sent fax, IP-service conditions or a parallel phone.
- For fax-only use #115, Set, スル, Set, star, Stop and enable Auto Answer: normally one ring then fax reception; voice calls cannot be answered.
- Off ringer suppresses that ring.
- Nuisance prevention overrides ordinary reception.
記録紙をセットする
Instructions from the manualLoad recording paper9 steps
- Open the tray.
- Raise its front recording-paper stand before its rear stand.
- Fan and align up to 15 A4 sheets, with the printing side toward the back, and insert gently without pushing or dropping them.
- Use A4 ordinary copier paper, 64–75 g/m².
- Do not add paper during printing or mix thicknesses.
- Before replenishing, remove the remaining stack and reload it with the new paper.
- Always raise stands for printing/copying.
- Normally unload paper, fold either stand first, and close the tray to limit dust; use the specified optional cover if paper must remain loaded.
- Avoid drafts that make paper lean forward.
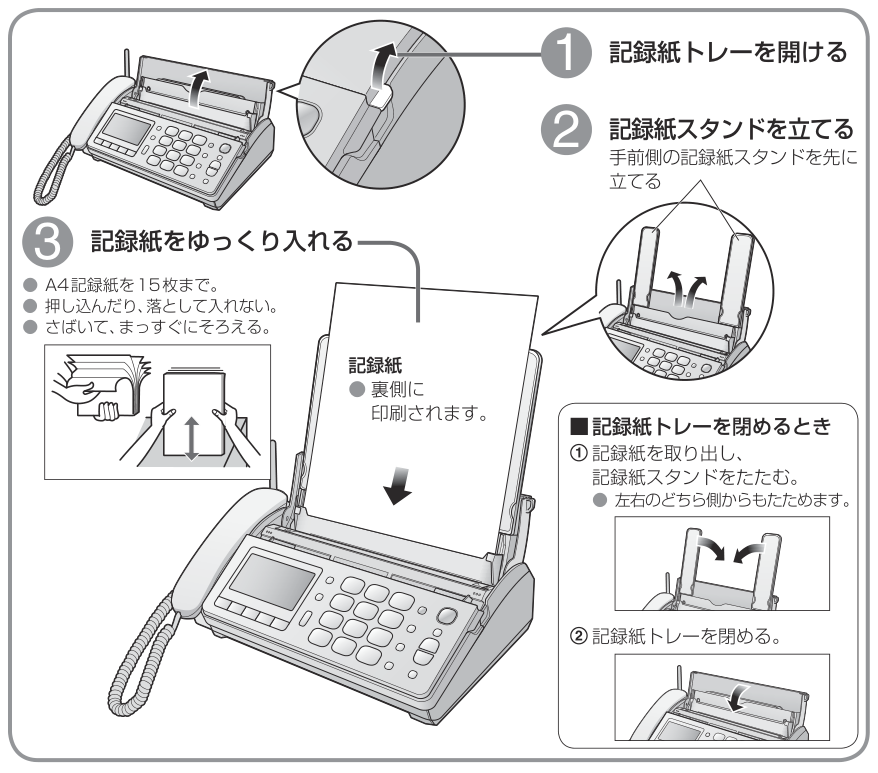
Diagram key
- 1: Open the recording-paper tray.
- 2: Raise the front recording-paper stand before the rear one.
- 3: Fan/align up to 15 A4 sheets and insert gently; do not force or drop them into the tray.
- Recording paper: The back of the sheet is the printing side.
- Close ①: Remove paper and fold down both stands; either side can be folded first.
- Close ②: Close the recording-paper tray.
各部のなまえとはたらき(親機)
Instructions from the manualBase controls and parts8 steps
- The KX-PD205 base has receiver, receiver cord, antenna, LCD, operation panel, recording-paper tray and stands, document insertion and output slots, two original guides, back cover, speaker, power cord and telephone/receiver modular jacks.
- Open the operation panel/back cover for film service; open the tray for originals and recording paper.
- LCD backlight illuminates on operation, incoming calls and notices.
- Caller ID Log/Fax Print illuminates for missed calls or memory-received faxes.
- Auto Answer lights when enabled and flashes for newly recorded messages.
- The base Monitor lets you hear the other end but does not send your voice; lift the receiver to speak.
- Base dial keys do not illuminate.
- Use the separate exact English control key for numbered buttons.
各部のなまえとはたらき(子機)
Instructions from the manualHandset controls and displayed status8 steps
- KX-FKD404 has earpiece, LCD, softkeys/one-touch keys, phonebook, Talk, Off, Hold/Internal, speakerphone, microphone, Flash, star/Tone, hash/key-lock, navigation/volume keys, Function/Set, rear antenna area and speaker.
- Softkey functions change with the display; press the corresponding key, with Set also usable for center softkey 2.
- Do not cover the microphone or antenna.
- Align the earpiece with your ear. ケンガイ means base radio is unavailable: move closer.
- Flashing low battery requires prompt charging, with a beep every four seconds during calls and a ten-hour-charge notice in standby.
- At 20 °C a fully charged pack gives approximately 10 hours talk or 150 hours unused standby; poor reception or out-of-range reduces these times.
- Date/time comes from the base and is unavailable out of range.
- Dial keys do not illuminate.
文字入力のしかた
Instructions from the manualEnter names and characters11 steps
- For base name entry, Playback cycles kana, AB and 12 input modes.
- On the handset the current Kana/English/Number softkey cycles modes.
- Repeatedly press numeric keys to select characters from the printed character table.
- Move right before entering another character from the same key.
- Hold inserts a space, which counts as one character.
- Move to a character and Clear to delete it; hold Clear at least two seconds to delete from the cursor onward.
- At the start, that deletes all text.
- Insert before the next character; replace by clearing then reentering.
- Handset left/right moves the cursor.
- The base cursor moves only right with hash; to edit on its left, Stop and restart.
- Printed/displayed character shapes may differ.
親機の電話帳に登録する
Instructions from the manualRegister a base phonebook entry9 steps
- The base phonebook is search-only and holds up to 150 entries: register on the handset, then transfer to the base.
- Base redial and incoming history cannot register entries directly.
- Edit on the handset and transfer; the transferred edit is added as another entry.
- Standard 117/177/115/104 entries are preloaded and may be deleted.
- Search with Phonebook Search and up/down; Hold shows the number or its hidden part; finish with Stop.
- Delete a selected entry with Clear then star.
- Use Function #144, Set, star to delete all base entries.
- Groups 1–9 support group searches.
- Phonebooks persist through power loss or handset battery removal.
子機の電話帳に登録する
Instructions from the manualRegister a handset phonebook entry8 steps
- Press Phonebook, Register.
- Enter a name up to 12 characters, Set; enter the telephone number including area code up to 24 digits, Set; choose group 1–9, Set.
- Repeat entry steps for another contact, then Off.
- For external-access codes or 184/186 prefixes insert Pause after the prefix.
- Check with Phonebook and up/down, Details then right for the number, Off to finish.
- Edit a selected contact with Edit, name, Set, number, Set, group, Set, Off.
- Delete a selected contact with Clear, Yes, Off; Function #144, Set, Yes deletes all.
- From redial choose the entry, Register, then enter name and finish normal registration.
電話帳を転送する
Instructions from the manualTransfer phonebooks between base and handset6 steps
- From base to handset: base Function #143, Set, select destination, Set; select individual or all, Set.
- For individual select a contact, Set and repeat; for all press Set to start.
- Finish with Stop.
- From handset to base or another handset: Phonebook, Transfer, choose destination, Set; choose individual or all, Set.
- Individual selects an entry then Transfer; all uses Set to start; finish Off.
- Choose base as destination when transferring the handset phonebook for base searching.
親機でワンタッチダイヤル を使う
Instructions from the manualRegister base one-touch dialing6 steps
- Press Function, one-touch 1–3, enter an area-code-inclusive number up to 24 digits, Set.
- For PBX access or 184/186 insert Auto Answer/Pause after the prefix.
- To inspect, Function, selected one-touch key, then Stop.
- To edit, Function, key, Clear the old number and enter the new number, Set.
- To erase, Function, key, hold Clear at least two seconds, Set.
- Spoken registration guidance can be disabled through 親切音声案内.
子機でワンタッチダイヤル を使う
Instructions from the manualRegister handset one-touch dialing5 steps
- Register the contact in the handset phonebook first.
- Press Function, one-touch 1–3, Register, select the contact with up/down, Register.
- Check with Function and key; Details shows the number; finish Off.
- To change, Function, key, Change, select contact, Register.
- To delete, Function, key, Clear, Yes.
親機で電話をかける
Instructions from the manualCall from base redial, phonebook or one-touch dial8 steps
- For redial, press Redial, select from up to 10 entries with up/down and lift the receiver; Hold shows details.
- Clear then star deletes a selected redial entry; finish Stop.
- For phonebook press Phonebook Search, optionally enter name or hash then group 1–9 and Set, select entry, lift receiver.
- Hold toggles number details.
- For one-touch lift the receiver then key 1–3, or key first and lift when answered.
- Monitor, dial, then lift when answered makes an audible monitored call without initially transmitting voice.
- For PBX dial access prefix, Auto Answer/Pause, number and lift.
- After connecting on a dial line, star/Tone enables tone services.
Intercom and transfer calls5 steps
- Base Internal, select handset if needed or dial 1–6, then lift the receiver when answered; replace to end.
- Handset Internal, select base/another handset or dial 0 for base and 1–6 for handset; Off ends.
- With multiple handsets star calls all.
- Answer intercom on base by lifting, or handset Internal then Off to finish.
- An external ring during intercom requires base replace/re-lift or handset Off then Talk.
子機で電話をかける
Instructions from the manualHandset redial, one-touch and speakerphone8 steps
- Redial: right, choose one of up to 10 entries, Talk; delete a selected entry with Clear, Yes, Off.
- Phonebook: Phonebook, optionally enter name or hash then select group and Set, select contact, Talk.
- Details then right displays its number.
- One-touch: Talk then 1–3, or key 1–3 alone.
- Speakerphone: Speakerphone, dial and speak within about 50 cm of the microphone, alternating turns to avoid cut-outs.
- End with Off or the charger.
- For PBX dial external access, Pause, number, Talk.
- On a dial line press star/Tone after connecting for tone services.
通話中にできること
Instructions from the manualHold, call waiting, mute and voice settings7 steps
- Hold pauses a call; press Hold again on base or Talk on handset to resume.
- Handset hold beeps every four seconds unless hold-notification sound is disabled.
- With contracted NTT call waiting press Flash to switch, again to return; call rejection, nuisance prevention, differentiated ringing and incoming blocking do not operate on call-waiting arrivals.
- On a handset telephone call use Function, select ジュワオンシツ, Set, choose standard, weak/strong noise cut, treble or bass emphasis, Set; unavailable for speakerphone, intercom and doorphone.
- Handset Voice Change uses Function, ボイスチェンジ, Set, Yes during an incoming telephone/doorphone call; repeat to cancel, or it cancels at call end.
- It is unavailable on outgoing calls, outgoing-call waiting, later joining a parallel-answered call, intercom or recording.
- Handset mute uses Function, ミュート, Set; release through ミュートカイジョ, Set.
Call recording and pre-recording10 steps
- Recording shares the approximately 12-minute answering memory.
- Base: during a call press Call Record, star, then star for a warning announcement or hash without one; Stop ends recording.
- Handset: Function, ツウワ ロクオン, Set, スル, Set to announce, or シナイ, Set without warning; end through Function, ロクオン チュウシ, Set.
- For recording from before the command, before hanging up use base Call Record then hash, or handset Function, マエカラ ロクオン, Set, Yes.
- It includes about 10 previous minutes by default, configurable to one minute with #016.
- Stop or the handset recording-stop menu saves it.
- Holding the call makes its earlier portion unavailable.
- Intercom/doorphone cannot be recorded.
- While saving, only making/answering calls and doorphone answering remain available.
- Replay and erase through the normal answering-message procedures.
迷惑な電話をお断りする (通話拒否)
Instructions from the manualReject an unwanted caller7 steps
- Base rejection while ringing uses Call Reject; during a call use Call Reject, star.
- The rejection message repeats twice and disconnects.
- To play a visitor chime during a call use Call Reject, hash, then end the call yourself.
- Handset ringing: Reject, Yes; during call Function, ツウワ キョヒ, Set, オンセイ, Set; for chime choose チャイム instead and end yourself.
- Answer before rejection finishes using base receiver or handset Talk; base Stop cancels a rejection during an already answered call.
- With Caller ID, withholding/payphone/out-of-area calls receive their respective refusal messages.
- Confirm offered blocking with base star or handset Yes to block next time; undo through its appropriate block setting.
自動的に電話に応答し、迷 惑防止のメッセージを流 す(迷惑防止)
Instructions from the manualNuisance-call prevention and stored recording10 steps
- Hold Nuisance Prevention at least three seconds until the enable or cancel notice; a brief press, less than two seconds, checks state.
- Incoming calls receive a recording warning before ringing, so charges begin at connection.
- With Caller ID, base phonebook/one-touch entries and the listed Panasonic support calls bypass it; without Caller ID it applies to all callers.
- If answered, recording begins about two seconds later, up to about ten minutes in one overwritten slot; Hold stops recording.
- If unanswered, ringing and warning repeat six times by default then disconnect with the absence message, or answering mode takes over.
- Home-ring automatic-answering and toll saver are overridden; intercom, doorphone and copying bypass prevention.
- To save before overwrite, disable prevention, Function, メイワクボウシメニュー, Set, ロクオンヲ ホゾン, Set, star, wait, Stop, then reenable.
- To play its temporary slot disable prevention, same menu, ロクオンヲ サイセイ, Set, then Stop and reenable.
- During playback: up/down volume, Playback restart, 2 pause/resume, 7 back ten seconds, 8 forward thirty, Stop ends.
- Handset cannot save/play the temporary slot; saved recordings use normal message playback.
ファクスを送る
Instructions from the manualAlternative fax sending methods8 steps
- For redial: Fax, load originals/set quality, Redial, select recipient with up/down, Fax.
- Hold checks redial details.
- For phonebook: Fax, originals/quality, Phonebook Search, optionally name search or hash, group 1–9, Set, select recipient, Fax; Hold checks details.
- For one-touch: Fax, originals/quality, key 1–3.
- For overseas monitored sending: load original, Monitor, dial, wait for fax tones, Fax.
- To send without spoken guidance, disable 自動操作案内, load originals, dial and Fax; redial/phonebook/one-touch continue at their respective selector step.
- PBX: Fax, load originals, external prefix, Auto Answer/Pause, destination, Fax.
- After voice conversation, load originals, tell the recipient to start fax reception, wait for fax tones, Fax, replace receiver.
ファクスを印刷する
Instructions from the manualPrint and delete memory-received faxes12 steps
- Without recording paper, received faxes enter memory, about 50 standard pages; the base display cannot show their image.
- If paper is always loaded, reception prints directly without retaining a reprintable copy; paper or film exhaustion switches to memory.
- Print new faxes: load preferably 15 sheets, Fax Print, Copy; star deletes printed faxes, hash retains them.
- Print one: Fax Print, down only with Caller ID service, Set, choose with up/down, Copy.
- To restart at a page: choose the fax, Fax, enter starting page, Set; starting after page one omits the erase prompt.
- Delete one: Fax Print, down only with Caller ID service, Set, choose, Clear, star.
- Delete all: Function #088, Set, star.
- Deleted content cannot be printed afterward.
- Memory holds approximately fifty A4 standard pages; received faxes cannot be viewed on this base display.
- Direct printing with loaded paper stores no reusable memory copy unless film or paper runs out.
- Memory-search marks distinguish never-printed faxes and high-capacity photos/newspaper pages.
- Disable 親切音声案内 to silence its announcements.
コピーする
Instructions from the manualCopy a document5 steps
- Load recording paper, then face-up originals within the reviewed paper/original limits.
- Set quality if needed; spoken guidance can be disabled with 自動操作案内.
- Press Copy for one copy; this model cannot specify multiple copies.
- Ordinary quality automatically changes to fine.
- For an original longer than A4, only A4 is copied unless 分割コピー is enabled through #091, Set, アリ, Set, Stop to put the continuation on another sheet.
留守番電話について
Instructions from the manualAnswering memory and greetings11 steps
- Enabled answering mode normally answers after four rings, records voice and receives fax; nuisance prevention overrides it.
- New messages flash Auto Answer, memory-received faxes light Fax Print.
- Answering can be interrupted by answering personally.
- No sound for at least six seconds or low voice can cut recording.
- Existing messages are retained when enabling mode.
- Default maximum per message is two minutes; #030 can select maximum.
- Shared answering/call recording capacity is approximately twelve minutes and fifty messages.
- Two custom greetings up to twenty seconds are supported.
- For a custom greeting use Function #147, Set, 1 or 2, lift receiver, Set, record after beep within twenty seconds, Stop, replace receiver.
- Choose greeting with #128; custom options require a prior recording.
- Full voice/fax memory selects the manual’s corresponding fixed inability message. #074 disables the answering speaker monitor if desired.
留守セットする
Instructions from the manualEnable or cancel answering mode7 steps
- Base: press Auto Answer to enable; its indicator lights.
- While setting, hash cycles fixed/custom greetings; custom choices require an existing recording.
- Set answering ring count with Function #121, Set, choose 2, 4, 6, 9 or toll saver, Set, Stop.
- Nine rings can outlast the sender fax signal.
- Handset: Function, ルスデンソウサ, Set, Enable.
- To cancel and listen, base Auto Answer with receiver on hook, or handset Function, ルスデンソウサ, Set, Cancel.
- After new-message playback, base star twice or handset Yes twice deletes those played new messages; hash or No retains them.
親機で用件を再生・消去する
Instructions from the manualPlay and erase messages on the base4 steps
- Base Playback plays new messages if present, otherwise all messages/call recordings.
- Star twice at the erase prompt deletes; hash retains.
- Playback controls: up/down volume; 1 previous/current restart; 3 next; Playback restart from first; Clear then star deletes current; 2 pause/resume; 7 back ten seconds; 8 forward thirty; Stop ends.
- Function #163, Set, star deletes all.
外出先から留守番電話を 再生する
Instructions from the manualRemote answering playback and forwarding10 steps
- Use a touch-tone telephone.
- Register a hard-to-guess four-digit PIN through Function #006, Set, number, Set, Stop; avoid 0000/telephone-number parts and change it regularly.
- Enable answering before departure; fax-only prevents remote playback.
- Call home and enter PIN during greeting.
- Press 4 or wait about four seconds for new messages, 5 for all, then hang up.
- Remote controls: 1 previous/current restart, 2 pause/resume, 3 next, 7 back ten, 8 forward thirty, 9 stop, star, 4, 4 to erase the current message; star, 5, 5 to erase all messages; before/after playback 4 new, 5 all, 1 enable already-configured forwarding, 2 disable forwarding, 0 turn answering off.
- Set #142 to スル with destination up to 24 digits and PIN if absent for forwarding.
- It calls after new recording; answer, enter PIN during its repeated forwarding message and play.
- No answer ends after about fifty seconds, retrying three times at one-minute intervals then three at thirty-minute intervals.
- Tone-capable destination required; PBX/home/terminal adapter may fail, automatic answering at the destination can prevent forwarding; charges start when the destination answers.
Toll saver and remote answering activation5 steps
- Set answering ring count #121 to トールセーバー.
- Call home: up to three rings means a new message; four or more means none.
- Hang up before answering to avoid call charges.
- To enable answering from away, call home, enter PIN when ringing becomes quieter, press 8, listen for greeting and hang up.
- This requires a PIN and home ringing behavior that connects the line; home count ジドウ オウトウ シナイ cannot remotely enable answering.
ナンバー・ディスプレイ サービス
Instructions from the manualCaller ID service6 steps
- Contract the appropriate NTT or equivalent provider Caller ID service.
- This base needs no ordinary caller-ID enable operation, but call-waiting display requires #137 アリ and its separate contract.
- With no contract, numbers are not displayed.
- PBX/home telephone and parallel connections can prevent display.
- Phonebook matches show a stored name; withholding, payphone, out-of-area and unusable signal display their actual source notices.
- Handset-only differentiated ringtones use #135 and corresponding group/category.
親機で着信履歴を使う (ナンバー・ディスプレイ契約時)
Instructions from the manualUse base Caller ID history7 steps
- Shared base/handset history holds thirty arrivals; rejected calls are retained by default; #185 ホゾンシナイ omits them.
- Base Incoming History, up, Set, down selects; lift to call, or load originals and Fax to send.
- For 184/186 prefix first dial prefix, Auto Answer/Pause, Incoming History, choose, lift.
- Delete one with Incoming History, up, Set, choose, Clear, star, Stop.
- Delete all with Incoming History, up, Clear, star; print through Function #087, Set.
- Block a selected entry with Call Reject, star, Stop.
- Turn off the relevant block setting on the base to undo blocking.
「選んでケータイ」を使う
Instructions from the manualChosen mobile carrier and IP bypass8 steps
- The manual’s February 2016 mobile-carrier section describes automatically prefixing a configured fixed-line carrier number for registered mobile prefixes.
- Ask the provider for its correct carrier code and current service availability; do not infer a current tariff.
- Do not enable on NTT hikari service; other optical/cable IP services may also reject it.
- For 050 IP service configure the provider’s bypass number if the feature is used.
- Base #198 sets enabled/disabled and a carrier code up to ten digits; #199 sets the IP bypass up to eight. #197 manages only mobile prefixes, never carrier codes.
- The recorded 0901–0909, 0801–0809 and 0701–0709 prefixes are the manual’s initial values.
- Prefix 1111 temporarily omits carrier selection.
- The carrier-selection symbol appears when enabled and flashes about five seconds when used.
子機でキーロックを使う
Instructions from the manualHandset key lock2 steps
- Hold the handset hash button at least three seconds until the beep to lock buttons; repeat for at least three seconds until the beep to unlock.
- The complete operation manual documents this key-lock sequence for the handset only; no base-unit key-lock sequence is supplied.
外からかかってきた電話 の呼出音を変える
Instructions from the manualChange the external ringtone3 steps
- Base Function #054, Set, select with up/down, Set, Stop.
- Handset Function #054, Change, select with up/down, Set, Off.
- Choices are eight bells and four listed melodies: JUPITER, Valkyrie, CANTATA and Nutcracker.
音量を変える
Instructions from the manualRinger and volume settings6 steps
- During ringing, a call or playback, up/down adjusts that current sound.
- In standby use up/down, select volume type, base Set or handset Change, adjust, Set or Stop/Off.
- At minimum, down disables ringer; up reenables.
- Ringer offers eight levels plus off; receiver base three/handset six; speaker base eight/handset six.
- Base answering monitor can be silenced by down at minimum only while answering; next use returns to level two.
- Intercom, doorphone, low-level sensor and preliminary alarms still sound at minimum when ringer is off; high-level sensor alarms sound at maximum.
親機への名前・電話番号の 登録
Instructions from the manualRegister owner name and telephone number6 steps
- Base Function #002, Set, name up to thirty characters, Set, Stop.
- Function #004, Set, telephone number up to twenty digits, Set, Stop.
- Hold inserts a space, star inserts plus, Clear corrects errors.
- Sender name/number is printed at the recipient; the name also displays on compatible Panasonic recipient fax.
- Dialing with 184 suppresses these identifications.
- Register a changed telephone number again after moving.
日付・時刻を 合わせるとき
Instructions from the manualSet date and time5 steps
- Base Function #001, Set, enter year/month/day and 24-hour time (midnight 00:00), Set, Stop.
- At continuous power the clock can drift approximately sixty seconds per month.
- Power loss/reconnection can reset or shift it; existing message/history timestamps remain.
- Correct the clock so timer functions work.
- The handset mirrors the base time only within range.
親機の機能一覧
Instructions from the manualUse base function settings7 steps
- Press Function, hash plus the printed three-digit function code, Set; follow the specific source option/entry and confirmation, then Stop.
- The hash is not displayed. #000 prints the complete registration list on three sheets.
- The six-page table covers initial identity/line settings, ringer counts, voice guidance, phonebooks, fax reception/quality/printing, answering/PIN/greetings, Caller ID blocking/history, accessories, film warning, display, connection and reset settings.
- Codes are configuration selectors rather than error codes.
- Destructive erases/reset require the shown star confirmations; do not infer an omitted confirmation from another setting.
- The complete operation-manual function table supplies no SD or base sleep/key-lock sequence; none is inferred.
- The connection chapter states that dial-in is unavailable.
Set the home ring count3 steps
- Base Function #112, Set, select 3, 5, 10, 15, 20, ルス or ジドウ オウトウ シナイ, Set, Stop.
- Selecting 3 or 5 gives automatic fax reception after that count. ルス enables answering after fifteen rings. ジドウ オウトウ シナイ keeps ringing without automatic answering.
- See each option’s source conditions before changing reception behavior.
Print phonebook or fax communication history5 steps
- Load recording paper.
- For phonebooks use base Function #041, Set, select オヤキ(サイダイ 4マイ) or コキ(サイダイ 4マイ), Set.
- For handset printing first transfer all handset entries with destination オヤキ as described in the handset-transfer procedure.
- Phonebook output uses at most four sheets.
- Fax send/receive history: Function #040, Set prints the latest twenty-five communications.
Set fax quality, density and F-Net5 steps
- Base Function #023, Set, 1カイ, Set, Stop enables overseas sending once; it is slower and resets to ナシ after sending. #105 with アリ configures contracted F-Net or the specified home telephone system; ナシ cancels.
- Received print density #099 offers コク, フツウ, ウスク.
- Original read density #051 offers コク or フツウ; シャシン quality always reads フツウ even if コク was selected.
- Each uses Function, code, Set, up/down selection, Set, Stop.
- Do not infer current availability of the June 2016 F-Net service.
Adjust base display and sounds2 steps
- Base Function, the reviewed code, Set, up/down selection, Set, Stop. #022 hold melody: アイノアイサツ, JUPITER, ヴァルキューレノキコウ, CANTATA. #058 button beep: アリ or ナシ. #037 text size: オオキイ or フツウ; large shows names/numbers about 1.5 times wider and taller.
- Normal size permits caller-ID numbers to be displayed with names. #052 LCD contrast: コク, ヤヤ コク, フツウ, ヤヤ ウスク, ウスク. #165 notification backlight: アリ or ナシ; ナシ prevents notification lighting.
Adjust spoken operation guidance2 steps
- Base Function, code, Set, choose アリ or ナシ, Set, Stop. #020 fax-result announcements; #021 fax-sending/copy spoken guidance; #167 friendly guidance for one-touch registration, calling phonebook entries, fax printing and missed-call/fax notices; #176 nuisance-prevention warning after rings.
- Cancel a selected guidance option using ナシ.
Name a connected doorphone and print block list2 steps
- Base Function #086, Set, select connected doorphone with up/down, Set, enter name up to twelve characters, Set, Stop.
- For the current nuisance-block list, Function #042, Set prints at most four sheets; load recording paper first.
Configure sensor names, areas and delayed alerts5 steps
- For sensor name: base Function #026, Set, select sensor, Set, choose one of twenty-five printed names or トウロク シナイ, Set, Stop; the latter hides its name on opening.
- The printed names are living room; western-style rooms 1–3; Japanese-style rooms 1–3; bedroom; kitchen; corridor; stairs; floors 1–2; store; office; entrances 1–2; rear entrance; study; grandparents; father; mother; children 1–3, displayed in kana/numbers.
- For area: #025, Set, select sensor, Set, choose area 1–3, Set, Stop.
- High-level door return prewarning #027 and exit delay #082 each offer 1プン, 3プン or 5フン through Function, code, Set, selection, Set, Stop.
- Motion prewarning #159 offers 15ビョウ, 30ビョウ, 1プン, 3プン in the same sequence.
Configure remote sensor notification destinations3 steps
- Window/door notification: base Function #085, Set, choose シナイ, ルス or スル, Set. ルス or スル then accepts destination up to twenty-four digits, Set, Stop; ルス notifies only in answering mode, スル always, and シナイ cancels.
- High alarm level is required.
- Motion notification for optional KX-FKD603: #119, Set, スル, ルス or シナイ, Set; スル/ルス takes destination up to twenty-four digits, Set, Stop. ルス applies only when answering is enabled.
Reset private data before disposal or repair5 steps
- Disconnect the telephone cord first.
- Base Function #111, Set, star, then Set after completion.
- Handset Function #111, Set, Yes, then Set after completion.
- Remove used ink film, which retains printed information, and cut it before disposal.
- Follow the separate data-protection warnings; record needed contacts before erasing.
子機の機能一覧
Instructions from the manualUse handset function settings4 steps
- Press Function, hash plus the source three-digit code; follow its specific menu, entry and Set/Register/Change confirmation, then Off.
- The complete two-page table covers name, ringer, off-hook answering, any-key answering, sounds, quick call, differentiated rings, answering monitor, phonebook/groups, registration/removal and factory reset.
- Any-key answering allows dial keys, Phonebook, Hold, Talk and Speakerphone; disabling leaves Talk/Speakerphone. #002 names a handset up to twelve characters; #029 names groups up to twelve. #058 changes key beep, #069 hold beep, #008 quick calling, #009 off-hook answering and #064 any-key answering.
- Factory reset #111 requires Set, Yes and the remaining displayed confirmation; perform it after disconnecting the telephone cord for data disposal.
ワイヤレスアダプター機能を 使ってドアホンを接続する
Instructions from the manualConnect supported wireless-adapter doorphone12 steps
- Only one Panasonic 1.9GHz wireless-adapter television doorphone base can connect for audio; 2.4GHz doorphones and VE-DA10/VE-DA10-H adapters cannot.
- The June2016 supported list is VL-SWD701KL/SVD701KL/SWD701KS/SVD701KS/SWD501KL/SVD501KL/SWD501KS/SVD501KS/SWD303KL/SVD303KL/SWD302KL/SVD302KL/SWD210K.
- Follow the applicable doorphone manual too.
- Disconnect the telephone cord during registration.
- Base Function #164, Set, 2.
- Within two minutes on the illustrated VL-SWD701KL: Settings/Information, Change Settings, Register/Remove, Register, Wireless Adapter Function; completion displays registration complete, then Finish.
- Check reception at the installation location.
- Press each doorphone call button once to verify ringing; otherwise outgoing calls to that doorphone are unavailable.
- No repeater can relay the fax-to-doorphone link.
- Across fax and doorphone only two repeaters are permitted and their registration numbers must differ.
- Removal: base Function #164, Set, 1, star, Stop.
- On the VL-SWD701KL use Settings/Information, Change Settings, Register/Remove, Remove, Wireless Adapter Function, Yes, then Finish.
ドアホンに出る
Instructions from the manualAnswer and call a connected doorphone6 steps
- Answer at base by lifting receiver, replace to end; handset Internal, then Off.
- During an external call either end it then answer doorphone, or Hold, Internal to answer and base Internal/handset Talk to return.
- For an external call during doorphone speech end that conversation first, then lift base receiver or press Talk.
- To call the doorphone use Internal, select doorphone with up/down and Set or number 7–9; lift base receiver or speak on handset.
- Alternate speaking turns.
- No handset speakerphone, call transfer, answering visitor recording, fax-time doorphone speech or doorphone call recording is available.
窓/ドアセンサーを 接続する
Instructions from the manualRegister or remove window and door sensors8 steps
- Connect up to fourteen specified KX-HJS100 window/opening sensors or ECID30A door sensors in three areas; use their own manuals.
- Disconnect telephone cord during registration.
- Base Function #084, Set, 2, select sensor, Set, area 1–3, Set, sensor name, Set.
- Within two minutes set sensor Mode 1, insert its battery, hold Register at least three seconds within two minutes.
- Three short beeps then about one-second long beep confirms registration.
- First registration defaults to low alarm level.
- Remove through #084, Set, 1, choose sensor, Set, star, Stop; remove its unused battery.
- Alerts suppress external/doorphone ringing while sounding; a later opened sensor replaces the previous alarm.
Sensor warning levels, state and history17 steps
- Set level through base Function, Sensor Menu, マド/ドアセンサー:ホウチレベルノ セッテイ, Set, area, Set, high/low/answering-high/off, Set, Stop; handset Function, window/door sensor, Set, alarm-level setting, Set, area, Set, level, Set, Off.
- Answering-high is high with answering enabled and low otherwise.
- High window alarm displays the opened window and sounds base/handset at maximum for about three minutes, sensor about thirty seconds.
- High door mode allows approximately three minutes exit delay, then approximately twenty-second-interval prewarnings for about three minutes before full alarm; on return stop and set low or cancel answering-high before full alarm.
- Low opens display for about ten seconds and base/handset sound about three seconds.
- Stop on base or handset Stop/Off stops high alarms; low uses handset Off.
- Off level cancels alerts.
- Sensor information menus select area and show open, closed, all closed, confirmation required, out-of-range or empty battery.
- For out-of-range check sensor connection; for empty battery replace it.
- Base Sensor Menu shows latest fifty openings or prints at most two sheets.
- A confirmation-required notice must be followed by checking the affected sensor/area.
- For base status: Function, センサーメニュー, Set, マド/ドアセンサー: センサージョウホウヲ ミル, Set, area, Set, up/down to inspect, Stop.
- Handset: Function, マド/ドアセンサー, Set, センサージョウホウ, Set, area, Details, up/down to inspect, Off.
- For history: base Sensor Menu, マド/ドアセンサー: アイタリレキヲ ミル, Set, up/down, Stop.
- To print select マド/ドアセンサー: アイタリレキヲ インサツスル サイダイ2マイ, Set.
- Status meanings: アイテイマス open, トジテイマス closed, スベテ トジテイマス all in area closed, カクニン シテクダサイ an out-of-range or battery-replacement sensor in the area, ケンガイ unable to communicate, デンチギレ battery replacement needed.
- At a confirmation-required alarm-level prompt, press star and inspect the selected area starting with the base status procedure’s area selection.
Remote sensor status and alerts8 steps
- Use a touch-tone phone, configured answering PIN and answering enabled.
- Call home, enter PIN during greeting, hash+2 announces window/door state; hang up.
- Hash+1 enables notification, hash+0 disables; hash+4 high, +5 low, +6 off, +7 answering-high applies to every area.
- Notification requires configured destination and high level; it calls when full alarm starts.
- Answer, listen to the five repeated opened-sensor messages and hang up.
- No answer ends after about fifty seconds and retries ten times about thirty seconds apart, then five times about thirty minutes apart.
- Local cancellation ends the remote call.
- Avoid automatic answering at destination; toll-free destinations unavailable, PBX/home/terminal adapters may fail and each call incurs charges.
中継アンテナを使用する
Instructions from the manualRegister or remove a repeater7 steps
- Up to two specified 1.9 GHz repeaters, not 2.4 GHz, extend handset/sensor radio; follow the repeater manual and check placement after registration.
- Register the first before the second; connect repeater power near the base and disconnect telephone cord.
- Base Function #101, Set, 2, repeater number.
- For number two select 1 independent or 2 serial.
- Within two minutes hold repeater Register about three seconds; its signal/register lamp flashes green, then lights steadily.
- Removal: #101, Set, 1, number, star, Stop; remove farther repeater first in a serial pair.
- No repeater-side removal action is required.
子機を増やす(増設・減設)
Instructions from the manualAdd or remove a handset9 steps
- Up to six handsets including supplied KX-FKD404 can register; other models differ in functions.
- Disconnect telephone cord while registering.
- Remove new handset from charger, hold base Internal at least five seconds, then place new handset on charger within two minutes to allocate the lowest unused intercom number.
- To choose the number: base Function #123, Set, desired number; within two minutes on KX-FKD404 use Function #123, Register.
- Dual doorphone/telephone handsets need numbered registration and their own manual.
- To remove, charge the handset and keep it near the base: base Function #178, Set, number, star.
- No handset-side action is needed; remove its unused battery.
- Without the handset it takes about ten seconds.
- Do not continue using the system with handset 1 removed; it preserves the clock during power failure until its battery empties.
人感センサー付子機を使う
Instructions from the manualOptional motion-sensor handset functions9 steps
- Requires the separately registered KX-FKD603 and its own manual; supplied KX-FKD404 has no motion sensor.
- This is not a burglary-prevention device.
- Announcement sensor reports new faxes, messages and missed calls.
- Safety sensor gives twenty-second-interval prewarning for about thirty seconds, then speaks the affected handset and sounds at maximum in eight cycles.
- Reporting handsets are KX-FKD404/505/506/603.
- Base Stop or handset Stop/Off stops an alert; disable safety mode on the sensor handset to prevent further triggering.
- Window/door high alarms override a motion alarm.
- Base Sensor Menu shows the latest fifty motion events or prints up to two sheets.
- Safety notification requires a configured destination, verified detection location and enabled safety sensor.
Motion-sensor calling and monitoring configuration11 steps
- Safety notification calls after prewarning: the affected handset notice repeats five times; no answer ends after about fifty seconds, retries ten times about thirty seconds apart then five times about thirty minutes apart.
- Monitoring notification uses base Function #118, Set, reaction/no-reaction or disabled, Set; destination up to twenty-four digits, Set; 24-hour time, Set; daily or individual Monday–Sunday notification choices, Set, Stop.
- All days initially notify.
- No-answer monitoring retries three times about a minute apart then six times about ten minutes apart.
- Its message repeats three times; for reaction notification press hash when prompted for handset/count; nonreaction announces no response.
- No notification occurs when its condition is absent or during power failure at notification time.
- Local cancellation hangs up.
- Counts reset after notification and at scheduled times on non-notifying days; Function, 0 resets manually and suppresses detection for about ten minutes.
- Remote touch-tone/PIN access after greeting uses star+6 safety notification on, star+8 off, star+7 monitoring counts, star+9 reset, then hang up after completion.
- Count query/reset requires monitoring enabled.
- Destination automatic answering and PBX/home/terminal adapters can prevent notification; toll-free destinations unavailable and calls incur charges.
お手入れ
Instructions from the manualClean base, handset and charger4 steps
- Unplug power before cleaning.
- Wipe the base with a soft water-dampened cloth wrung firmly; dry-wipe handset and charger.
- Do not use alcohol, polishing powder, powder soap, benzine, thinner, wax, petroleum or boiling water; do not spray insecticide, glass cleaner or hair spray.
- Clean recording-paper transport and feed rollers at least monthly using the reviewed internal-cleaning procedures.
子機を壁(柱)に掛ける
Instructions from the manualWall-mount handset charger4 steps
- Use specified KX-AN162 wood screw and washer for the handset charger; the base cannot wall-mount.
- The diagram specifies twenty-millimetre screw, approximately twenty-five-millimetre position, 2.5–3 mm exposed gap and washer diameter 9.3 mm.
- Hang the charger hole on the screw, push diagonally down-right and secure firmly against falling.
- Avoid weak plasterboard, aerated concrete, concrete block and plywood eighteen millimetres thick or less; use the specified mounting method.
原稿について
Instructions from the manualOriginal and recording-paper requirements10 steps
- Originals: 128–210 mm wide, 128–500 mm long; one sheet 0.06–0.2 mm thick, two to five sheets 0.06–0.13 mm.
- Align same-size/thickness leading edges.
- About five millimetres at each original edge is outside the documented reading area.
- Remove clips/staples and dry ink/glue/correction fluid completely.
- Thin originals below 0.06 mm, undersized originals, torn/creased/curled/folded sheets, film/tracing, coatings, chemically treated paper and punched originals may use the specified KX-A130 carrier or a separate copier.
- Thick originals above 0.2 mm, fabric/metal, glued/taped combinations and stiff originals require a separate copier, not that carrier.
- Put a carrier original toward its closed end and feed that end downward, one at a time.
- Ordinary A4 reception reduces vertically about 92%; #090 アリ(2) prints actual size but clips excess, ナシ prints excess on a second page.
- Larger incoming pages normally reduce to A4.
- Do not infer sensor-width specifications as safe printable margins.
記録紙について
Instructions from the manualRecording paper, print storage and supported originals8 steps
- Use A4 copier paper 64–75 g/m² or specified KX-FAN150A4, up to fifteen sheets.
- Do not add during printing, mix thicknesses, or use torn, creased, curled, advertising-backside, previously printed or damp-stored sheets.
- Use smooth paper for faint results.
- Do not write on printed sheets face down: ink may transfer to the surface.
- Do not reuse these prints in another printer/copier.
- The printed paper/fax diagrams exclude approximately 5 mm at the top and sides and 8 mm at the bottom.
- Follow the original/carrier suitability table, remove clips/staples and dry ink/glue/correction fluid before use.
- The source lists restrictions on copying currency, securities, unused postal/tax documents and copyrighted works; follow applicable restrictions rather than inferring permission.
白や黒の線などが入るとき
Instructions from the manualClean scanning surfaces and paper transport rollers10 steps
- Unplug power, remove remaining recording paper and fold down stands; either side may fold first.
- Open the operation panel.
- Raise the green lever and open the back cover.
- Wipe the document-reading glass and white flat surface, recording-paper transport rollers and indicated paper-guide area with a water-dampened, firmly wrung cloth.
- Do not touch the separately indicated fault-sensitive part, and do not touch glass with fingers.
- Press both marked back-cover ends until they click closed.
- Close the panel and reconnect power.
- Reload paper correctly.
- Make a copy to confirm lines are gone.
- If prints still soil, ask the sender to check its original/scanner; if they are not at fault and cleaning fails, consult the selling dealer.
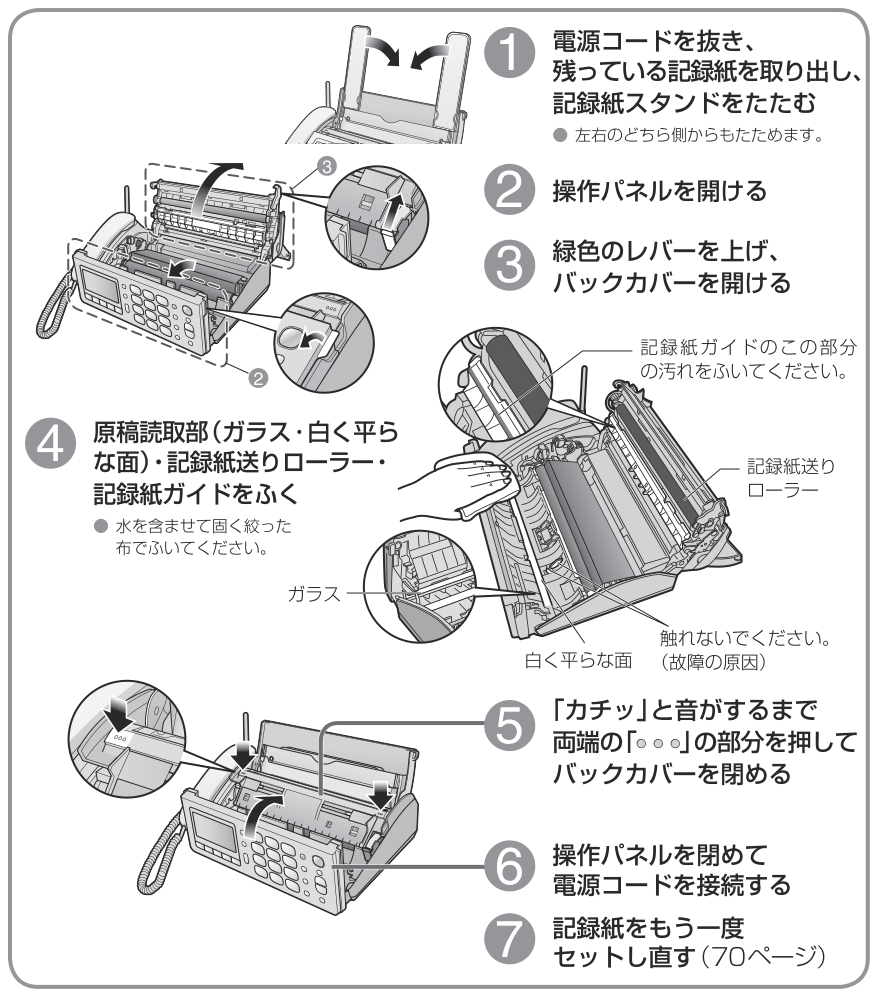
Diagram key
- 1: Unplug power, remove remaining recording paper and fold the stands; either side can fold first.
- 2: Open the operation panel.
- 3: Raise the green lever and open the back cover.
- 4: Wipe the glass, white flat surface, transport rollers and paper guide with a water-dampened, firmly wrung cloth.
- Glass: The document-scanning glass to wipe as instructed.
- White flat surface: The illustrated white document-reading surface.
- Paper transport rollers: The illustrated paper transport rollers require cleaning.
- Paper guide: Wipe the specific portion highlighted in the inset.
- Do-not-touch area: Do not touch the separate part indicated by the warning leader; doing so can cause failure.
- 5: Press both marked ends until they click and the back cover closes.
- ••• marks: Both repeated closure marks identify where to press; the inset enlarges the same action.
- 6: Close the operation panel and reconnect power.
- 7: Reload recording paper correctly using the paper-loading guide.
記録紙が詰まったとき
Instructions from the manualClear recording-paper jam and clean feed roller8 steps
- Unplug power, remove recording paper and fold stands.
- Open the operation panel, raise the green lever and open the back cover.
- Hook a finger on the recording-paper guide and open it downward.
- Remove the jammed recording paper from inside.
- Wipe the feed roller with a water-dampened, firmly wrung cloth.
- Close both marked ends of the back cover until they click.
- Close the operation panel, reconnect power and reload recording paper correctly.
- This expands the source references to cleaning steps 1–3 and 5–7 on page 71 without dropping those steps.
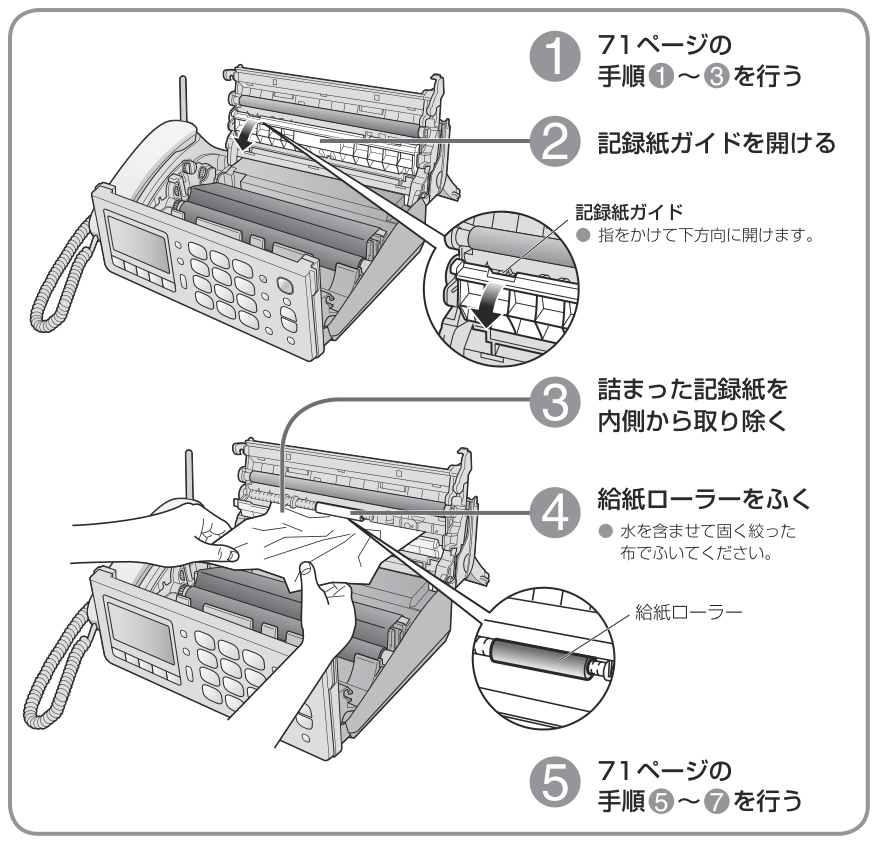
Diagram key
- 1: Follow page 71 steps 1–3: unplug power, remove recording paper, fold stands, open the operation panel, lift the green lever and open the back cover.
- 2: Open the recording-paper guide downward using the indicated finger position.
- Recording-paper guide: Hook a finger and open downward.
- 3: Remove jammed recording paper from the inside.
- 4: Wipe the feed roller with a water-dampened, firmly wrung cloth.
- Feed roller: The inset identifies the feed roller to clean after jam removal.
- 5: Follow page 71 steps 5–7: click both marked back-cover ends closed, close the panel, reconnect power and reload paper correctly.
原稿が詰まったとき
Instructions from the manualClear original jam and clean document roller5 steps
- Unplug power before cleaning as required by general care.
- Open the operation panel.
- Remove the jammed original.
- Wipe the document-feed roller using a water-dampened, firmly wrung cloth.
- Close the operation panel.
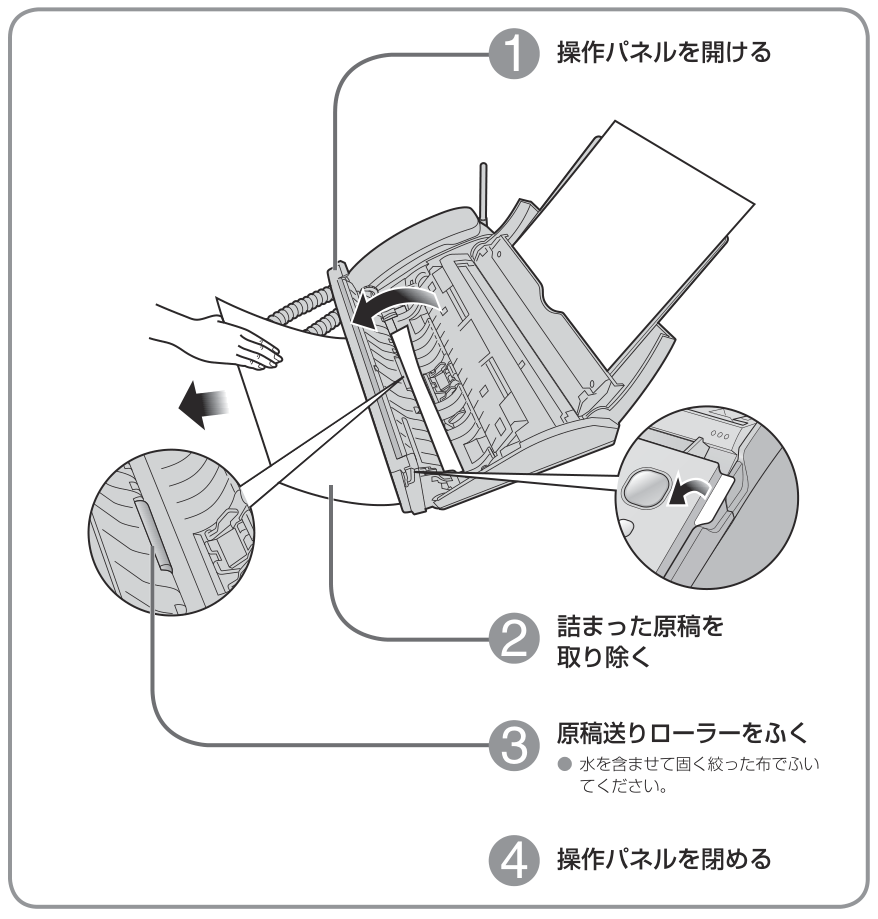
Diagram key
- 1: Open the operation panel.
- 2: Remove the jammed original.
- 3: Wipe the document-feed roller using a water-dampened, firmly wrung cloth.
- 4: Close the operation panel.
保証とアフターサービス
Instructions from the manualArrange service after reviewed checks6 steps
- First check all troubleshooting and display-message rows.
- If unresolved, unplug power and contact the selling dealer with purchase date, model KX-PD205DW and a detailed description.
- Before repair protect and erase personal data and remove used ink film as specified.
- This Japan-only product has no service outside Japan.
- The manual warranty/parts-retention statements do not establish present eligibility or availability.
- Stop and unplug for intermittent failure to power, burnt smell, unusual noise/vibration, hot power plug/cord, frequent recording-paper or original jams, greatly delayed clock or other abnormalities, and request inspection.
電話をまわす
Instructions from the manualTransfer an external call4 steps
- To transfer, the calling unit presses Hold, hash, selects destination if needed; destination answers the intercom, caller announces the transfer then replaces receiver or presses Off.
- If no answer, return with base Internal or handset Talk.
- If destination is nearby, Hold and call to them; they lift the base receiver or press handset Talk.
- Wait for elapsed call time before transfer; operation within ten seconds after answering may disconnect.
相手の声を確認して電話に出る (あんしん応答)
Instructions from the manualScreen a caller before answeringView
Screening: during ringing press Secure/あんしん応答, listen, lift receiver or Talk to answer; star plays refusal, hash repeats the name request, and Stop/Off hangs up.
迷惑電話を受けないようにできます(着信拒否)
Instructions from the manualBlock selected incoming calls8 steps
- Blocking requires Caller ID: #184 withheld, #186 payphone, #187 out-of-area, #190 0120/0800 categories choose キョヒスル/キョヒシナイ.
- Base phonebook/one-touch contacts bypass 0120/0800 blocking.
- Specific block list #136 holds up to 300 numbers, 5–20 digits each; アリ enables, ナシ disables without deleting the list.
- To remove one choose its number, hold Clear at least two seconds at the first cursor position, Set. #139 chooses one of two refusal messages or busy tone; optical adapters may deliver ringing instead.
- Blocking 161 can prevent F-Net faxes.
- Source service/applicability limitations remain Japan-specific.
- Blocking does not apply to call-waiting arrivals or ordinary intercom/doorphone conversations, except the manual’s busy-tone nuisance blocking exception.
- The Panasonic consultation/repair numbers also bypass 0120/0800 blocking.
子機で着信履歴を使う (ナンバー・ディスプレイ契約時)
Instructions from the manualUse handset Caller ID history5 steps
- Handset left opens history; down selects, Talk calls.
- Clear, Yes, Off deletes one; All Erase, Yes deletes all.
- Register, メイワク セッテイ or キョヒ セッテイ, Set, Yes, Off blocks.
- Register, デンワチョウ トウロク, Set starts normal phonebook registration.
- Turn off the relevant block setting on the base to undo blocking.
子機で用件を再生・消去する
Instructions from the manualPlay and erase messages on the handset4 steps
- Handset: Function, ルスデンソウサ, Set, Playback, select new/all, Set.
- Yes twice erases, No retains.
- Left/1 previous, right/3 next, First restart, 4 new-message restart, 5 all-message restart; star+4 then Yes deletes current, star+5 then Yes deletes all (only new messages during new-only playback); 2 pause/resume, 7 back ten, 8 forward thirty, 9 stop.
- Handset all-erase: Function, answering operation, Set, Playback, All Erase, Yes.
Parts descriptions
Instructions from the manualEnglish control names for the Japan-only bundle35 steps
- Japan-only KX-PD205DW contains one KX-PD205 base and two KX-FKD404 handsets.
- 1: Liquid crystal display.
- 2: Function/Set/Secure button.
- 3: Redial/Block button.
- 4: Caller ID Log/Fax Print button and indicator.
- 5: Clear/Flash button.
- 6: Auto Answer button and indicator.
- 7: Playback/Call Record button.
- 8: Fax button.
- 9: Copy button.
- 10: Stop button.
- 11: Hold/Intercom button.
- 12: Monitor button.
- 13: Numeral/Character buttons.
- 14: Tone button: switches pulse to tone dialing.
- 15: Volume/Resolution/Select button.
- 16: Phonebook Search button.
- 17: One-touch Dial buttons.
- 18: Nuisance Call Prevention button.
- 19: Earpiece.
- 20: Liquid crystal display.
- 21: Multi-operation/One-touch Dial buttons.
- 22: Hold/Intercom button.
- 23: Caller ID left, Redial right, Volume up/down buttons.
- 24: Off button.
- 25: Numeral/Character buttons.
- 26: Speakerphone button.
- 27: Microphone.
- 28: Flash button.
- 29: Tone button: switches pulse to tone dialing.
- 30: Function/Set button.
- 31: Talk button.
- 32: Phonebook button.
- 33: Speaker.
- 34: Battery cover.
Controls and parts
See the manual diagrams 2 diagrams
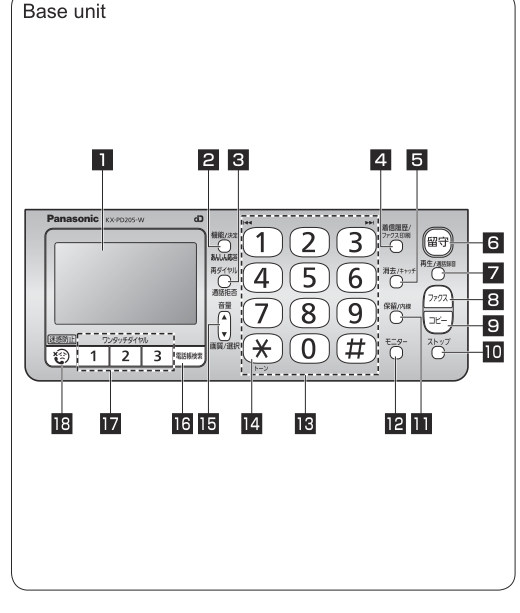
Diagram key
- 1: Liquid crystal display.
- 2: Function/Set/Secure button.
- 3: Redial/Block button.
- 4: Caller ID Log/Fax Print button and indicator.
- 5: Clear/Flash button.
- 6: Auto Answer button and indicator.
- 7: Playback/Call Record button.
- 8: Fax button.
- 9: Copy button.
- 10: Stop button.
- 11: Hold/Intercom button.
- 12: Monitor button.
- 13: Numeral/Character buttons.
- 14: Tone button: switches pulse to tone dialing.
- 15: Volume/Resolution/Select button.
- 16: Phonebook Search button.
- 17: One-touch Dial buttons.
- 18: Nuisance Call Prevention button.
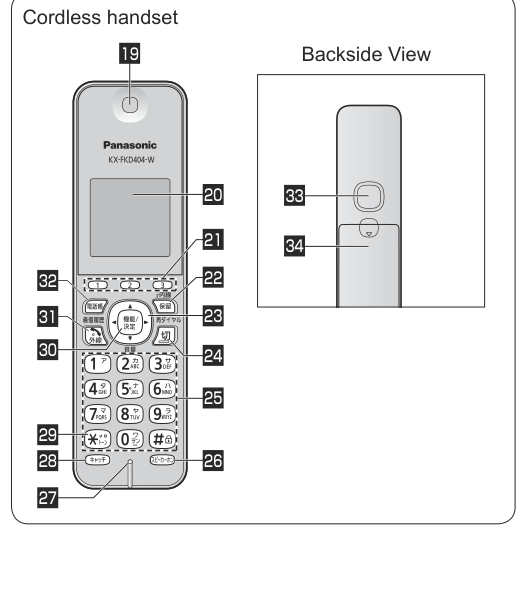
Diagram key
- 19: Earpiece.
- 20: Liquid crystal display.
- 21: Multi-operation/One-touch Dial buttons.
- 22: Hold/Intercom button.
- 23: Caller ID left, Redial right, Volume up/down buttons.
- 24: Off button.
- 25: Numeral/Character buttons.
- 26: Speakerphone button.
- 27: Microphone.
- 28: Flash button.
- 29: Tone button: switches pulse to tone dialing.
- 30: Function/Set button.
- 31: Talk button.
- 32: Phonebook button.
- 33: Speaker.
- 34: Battery cover.
Model details
Model and compatibility
- Power and environment
- AC100 V, 50/60 Hz; operating environment 5–35 °C, 45–85% humidity. Designed for Japan only.
- Recording paper
- A4 ordinary copier paper, 64–75 g/m²; up to fifteen sheets.
- Supplies
- Specified KX-FAN190/190W/190V/191/191W ink film and KX-FAN57 handset battery; listed availability is historical.
Related reviewed instructions
- Install or replace ink film
- Install, replace and charge handset battery
- Load recording paper
- Clean scanning surfaces and paper transport rollers
- Clear recording-paper jam and clean feed roller
- Clear original jam and clean document roller
- Set date and time
Manual table scope
- Troubleshooting boundaries
- 困ったとき, PDF74–79: 電話; 通話; 子機の充電; ファクス送受信; 印刷; 留守番電話; 呼出音; ナンバー・ディスプレイ; こんなときは. All 61 rows remain troubleshooting; procedure references inside the table do not create guide headings.
- Display boundaries
- こんな表示が出たら(親機), PDF79–81; こんな表示が出たら(子機), PDF81. Twenty-one numeric U/H codes and six uncoded display bands remain distinct.