MODEL REFERENCE
Roborock Q10 S5 Plus
19 troubleshooting topics · 44 guides
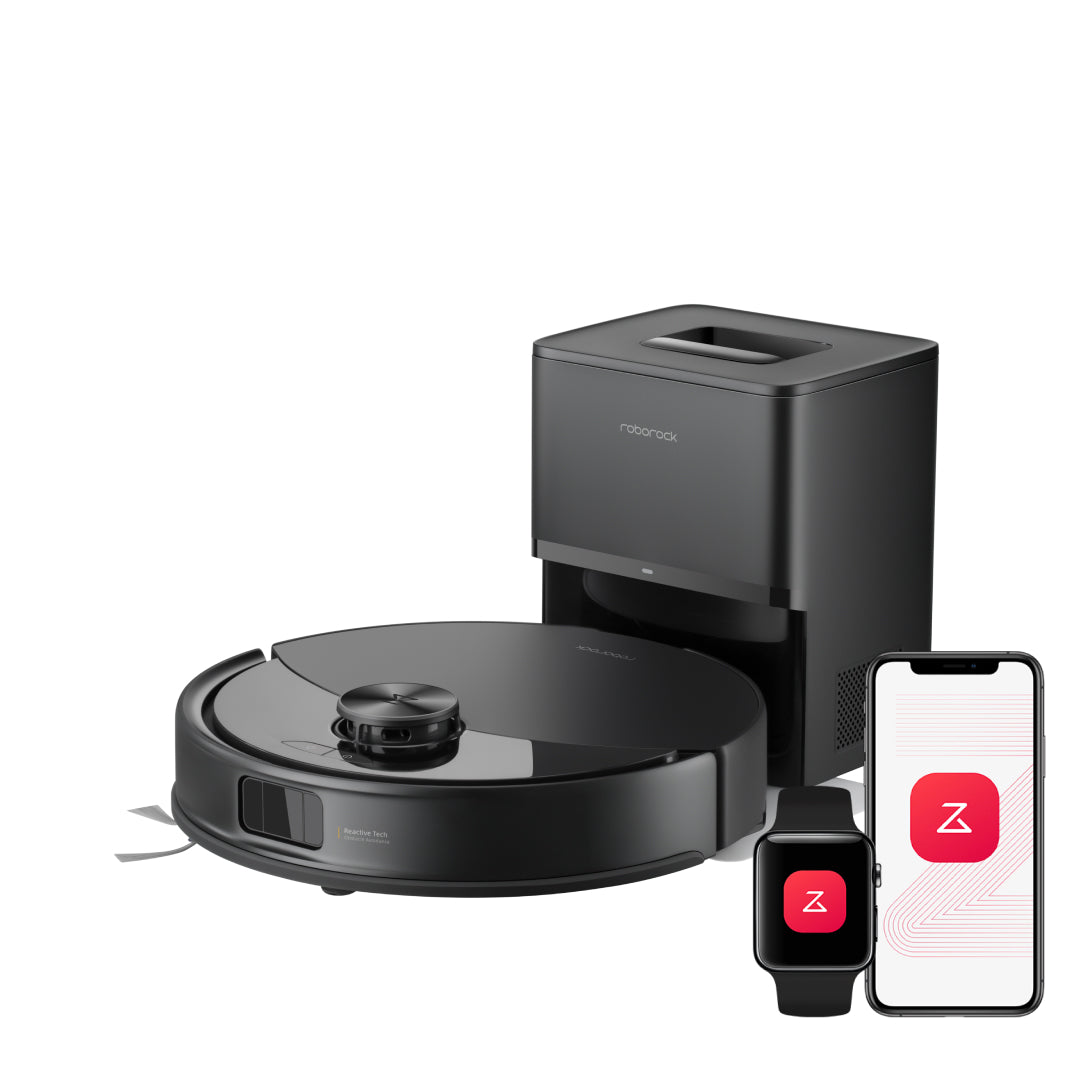
The checks and guides below come from the official manuals for this model.
No matches for this wording. Try a light name, error code or a shorter phrase.
Troubleshooting
Find the problem you are experiencingUnable to power on2 checks
- Battery low. Put the robot on the dock and charge it before use.
- Battery low. Put the robot on the dock and charge it before use.
- Battery temperature too low or too high. Only use the robot within the range of 4-40°C (39-104°F).
- Battery temperature too low or too high. Only use the robot within the range of 4-40°C (39-104°F).
Unable to charge3 checks
- Dock not connected to power. Check whether both ends of the power cord are properly connected.
- Dock not connected to power. Check whether both ends of the power cord are properly connected.
- Poor contact. Clean the charging contacts of the dock and the robot.
- Poor contact. Clean the charging contacts of the dock and the robot.
- Battery temperature too low or too high. Only use the robot within the range of 4-40°C (39-104°F).
- Battery temperature too low or too high. Only use the robot within the range of 4-40°C (39-104°F).
Unable to return to dock2 checks
- Too many obstacles near the dock. Clear them up or move the dock to an open area.
- Too many obstacles near the dock. Clear them up or move the dock to an open area.
- Robot too far from the dock. Place it closer and retry.
- Robot too far from the dock. Place it closer and retry.
Abnormal behavior1 check
- Restart the robot.
- Restart the robot.
Unable to connect to WiFi4 checks
- WiFi disabled. Reset the WiFi and try again.
- WiFi disabled. Reset the WiFi and try again.
- Poor WiFi signal. Move the robot to an area with better WiFi.
- Poor WiFi signal. Move the robot to an area with better WiFi.
- Abnormal WiFi connection. Reset the WiFi, download the latest app version and retry.
- Abnormal WiFi connection. Reset the WiFi, download the latest app version and retry.
- Unable to connect to WiFi abruptly. There may be an error with your router settings. Contact Roborock customer service for help with troubleshooting.
- Unable to connect to WiFi abruptly. There may be an error with your router settings. Contact Roborock customer service for help with troubleshooting.
Robot becomes offline1 check
- Check that your robot is connected to Roborock app and is always within WiFi coverage.
- Check that your robot is connected to Roborock app and is always within WiFi coverage.
Noise during cleaning3 checks
- The main brush, side brush, or main wheels may be jammed. Turn off the robot and clean them.
- The main brush, side brush, or main wheels may be jammed. Turn off the robot and clean them.
- The omnidirectional wheel may be jammed. Use a screwdriver to remove it for cleaning.
- The omnidirectional wheel may be jammed. Use a screwdriver to remove it for cleaning.
- Check that no objects are stuck around the mopping module.
- Check that no objects are stuck around the mopping module.
Poor cleaning performance and/or dust leakage3 checks
- The dustbin is full and needs emptying.
- The dustbin is full and needs emptying.
- The filter is blocked and needs cleaning.
- The filter is blocked and needs cleaning.
- The main brush are tangled up. Clean the main brush.
- The main brush are tangled up. Clean the main brush.
Scheduled cleaning is not working1 check
- Keep the robot charged. Scheduled cleaning can only begin when the battery level is above 15%.
- Keep the robot charged. Scheduled cleaning can only begin when the battery level is above 15%.
The robot does not resume cleaning after recharging2 checks
- Make sure that the robot is not in DND mode. DND mode will prevent auto top-up.
- Make sure that the robot is not in DND mode. DND mode will prevent auto top-up.
- If the robot is placed manually on the dock or sent to dock by pressing buttons, it will not be able to resume cleaning.
- If the robot is placed manually on the dock or sent to dock by pressing buttons, it will not be able to resume cleaning.
Slow charging2 checks
- When used at high or low temperatures, the robot will automatically reduce its charging speed to extend battery life.
- When used at high or low temperatures, the robot will automatically reduce its charging speed to extend battery life.
- Charging contacts dirty. Wipe them with a soft, dry cloth.
- Charging contacts dirty. Wipe them with a soft, dry cloth.
Is power always being drawn when the robot is on the dock?1 check
- The robot will draw power while it is docked to maintain battery performance, but the power consumption is extremely low.
- The robot will draw power while it is docked to maintain battery performance, but the power consumption is extremely low.
Does the robot need to be charged for at least 16 hours for the first three uses?1 check
- No. Lithium-ion batteries have no memory effect. The robot can be used once fully charged.
- No. Lithium-ion batteries have no memory effect. The robot can be used once fully charged.
The robot begins to miss certain spots1 check
- The cliff sensors or carpet sensor may be dirty. Clean them with a soft, dry cloth.
- The cliff sensors or carpet sensor may be dirty. Clean them with a soft, dry cloth.
No or little water during mopping2 checks
- Use the mobile app to increase the water flow.
- Use the mobile app to increase the water flow.
- Check whether there is water in the water tank and check the manual for instructions on how to correctly install the dustbin and water tank combo unit, mop cloth mount and mop cloth.
- Check whether there is water in the water tank and check the manual for instructions on how to correctly install the dustbin and water tank combo unit, mop cloth mount and mop cloth.
The robot cannot return to the auto-empty dock after spot cleaning or when it has been moved manually1 check
- After spot cleaning or a significant position change, the robot will re-generate the map. If the charging dock is too far away, it may not be able to return to recharge and must be placed on the charging dock manually.
- After spot cleaning or a significant position change, the robot will re-generate the map.
- If the charging dock is too far away, it may not be able to return to recharge and must be placed on the charging dock manually.
The status indicator light is steady red1 check
- The dust bag is not in place. Check and install in place.
- The dust bag is not in place. Check and install in place.
Reduced emptying performance or unusual noise when emptying2 checks
- The main brush or main brush cover is not properly installed. Check and install in place.
- The main brush or main brush cover is not properly installed. Check and install in place.
- The filter, air duct, disposable dust bag, suction inlet, air inlet, or dustbin is blocked. Clean to remove blockages.
- The filter, air duct, disposable dust bag, suction inlet, air inlet, or dustbin is blocked. Clean to remove blockages.
Unable to auto-empty4 checks
- Auto-emptying is disabled. Check in-app settings.
- Auto-emptying is disabled. Check in-app settings.
- The dust container cover is not installed. Check and install.
- The dust container cover is not installed. Check and install.
- Auto-emptying will not be triggered if the robot returns to the dock without cleaning.
- Auto-emptying will not be triggered if the robot returns to the dock without cleaning.
- The robot will not auto-empty after returning to the dock in DND mode. Adjust the cleaning time or DND period.
- The robot will not auto-empty after returning to the dock in DND mode. Adjust the cleaning time or DND period.
Guides
Safety information
Instructions from the manualSafety information23 steps
- Use only the specified AED09LRR or SPCDZ04RR dock (SPCDZ04RR requires BLJ24WJ200120P-U power supply) for the 14.4V/5200 mAh battery.
- Switch off and unplug when not in use and before cleaning or maintenance.
- The polarized plug fits one way: reverse if necessary; if it still does not fit, ask a qualified electrician to install a proper outlet.
- Never modify the plug.
- Follow the manual; supervise use near children.
- Do not rinse the robot or dock, clean hard or sharp objects, sit or stand on either unit, or carry the robot by its vertical bumper, side brush or bumper.
- Install the dustbin, filter, dust bag, side brush, mop cloth, main brush and cover before cleaning.
- Use only Roborock-recommended cleaning solution; no disinfectant.
- Keep low objects away from stairs; keep floors free of water.
- Do not use in a room where a child or infant is sleeping.
- Remove wires and unstable, fragile, precious or dangerous objects from the floor.
- Keep hair, clothing, fingers, people and pets away from openings and moving parts.
- Put the dock on a hard, flat floor away from fire and heat; avoid humid, narrow or suspended locations.
- Children aged 8 or older and people with reduced capabilities or insufficient experience require supervision or safe-use instruction and understanding of hazards.
- Children must not play with the appliance or clean or maintain it unsupervised.
- Never dismantle, repair or modify the battery or dock.
- Protect against thunderstorms or unstable voltage.
- Avoid high-pile carpets; dark carpets may reduce effectiveness.
- Keep the robot, dock and dock suction inlet uncovered and free of objects.
- Use barriers on elevated surfaces.
- Do not use the dock to pick up stones, paper scraps or other air-duct blockages.
- Stop using damaged equipment and contact customer service.
- Operate in well-ventilated areas.
Battery and charging
Instructions from the manualBattery, charging, storage and transport6 steps
- Never wipe charging contacts with a wet cloth or wet hands.
- For long storage, fully charge, unplug and switch off; store cool and dry and recharge at least every three months.
- Use only at 4–40°C(39–104°F), with no liquid or sticky substance on the floor.
- Send waste batteries to a professional recycling organization.
- Before transport, unplug the dock, switch off and empty the water tank; original packaging is advised.
- Match the supply voltage to the dock label.
Battery temperature limitsView
Charge and use the battery pack at 4–40°C (39–104°F). Storage temperature is −20–45°C (−4–113°F) for three months or −20–20°C (−4–68°F) for six months.
International symbols explanation
Instructions from the manualInternational power symbolsView
The tilde denotes alternating current; the direct-current symbol denotes direct current. The house symbol means indoor use only.
Product overview
Instructions from the manualControls and indicator states7 steps
- Hold Power/Clean to turn on or off; press it to clean.
- Press Dock to start docking.
- Any button pauses a running robot during cleaning or docking.
- The power light is white at 15%or more battery, red below 15%, breathing during charging or startup, rapidly flashing red on error, slowly flashing blue while waiting for WiFi, rapidly flashing blue while connecting, and steady blue when connected.
- The dock status light is steady white when powered and the robot is away, slowly flashing white during emptying, steady red when the dust bag is missing, and off when unpowered or charging.
- Secure the mop cloth flat.
- The power cord can exit either side.
Installation
Instructions from the manualPrepare the cleaning area4 steps
- Tidy cords, hard or sharp objects such as nails and glass, and loose items; move unstable, fragile, precious or dangerous objects to prevent tangling, collisions, injury or damage.
- Use a physical barrier in raised areas to prevent falls.
- Follow the robot throughout its first full route and watch for problems.
- Vacuum floors at least three times before the first mopping cycle.
Positioning the dock6 steps
- Place the dock on a hard, flat floor against a wall.
- Connect the power cord and tidy excess cord.
- Choose good WiFi coverage; plug in and check that the status light is on.
- Keep at least 0.5 m(1.6 ft)clearance on each side and 1.0 m(3.3 ft)in front; the figure specifies more than these distances.
- Avoid a cord hanging vertically, which could move or disconnect the dock.
- Keep direct sunlight and obstructions away from the dock location beacon.
Attach the moisture-proof mat5 steps
- Fix the dock in place.
- Clean the mat location with a dry cloth, remove the bottom double-sided tape and stick the mat to the floor.
- Always use the mat on wooden floors.
- Smooth surfaces provide the best attachment.
- Remove tape slowly when necessary to reduce adhesive residue.
Powering on and charging6 steps
- Remove the film from front and rear dock locators.
- Hold Power/Clean to switch on.
- Wait for steady white and place the robot on the dock.
- Keep the lithium-ion battery charged to maintain performance.
- If low battery prevents startup, place the robot on the dock.
- The robot cannot be turned off while charging.
Starting mopping12 steps
- Vacuum floors at least three times before the first mopping cycle.
- Remove the dustbin/water-tank combo unit, open its stopper, fill with tap water and reinstall the stopper.
- Never immerse the unit.
- Dampen the mop cloth and wring until it stops dripping.
- Insert it to the bottom of the attachment slot and stick it flat and firmly.
- Align the mount with the bottom of the combo unit and slide until it clicks.
- After cleaning and docking, press both mount latches inward with both hands and pull backward to remove the mount.
- Empty unused tank water immediately after mopping.
- Use cold water to prevent deformation.
- Never rinse or immerse the combo unit.
- Use no disinfectant and only Roborock-recommended solution.
- Small residual water from factory testing is normal.
Connecting to the app
Instructions from the manualConnect to the Roborock app8 steps
- Find Roborock in the App Store or Google Play, or scan the manual QR code, and install it.
- Hold Power/Clean and Dock together until the voice says Entering network configuration mode.
- Slowly flashing blue confirms reset and readiness.
- Reset WiFi and add as a new device if router configuration, a forgotten password or another problem prevents connection.
- Open the app, tap Add Device or + and follow its guide.
- App updates may change the process; follow current in-app instructions.
- Only 2.4GHzWiFi is supported.
- Network setup stops automatically after more than five minutes.
Instructions for use
Instructions from the manualTurning on and offView
Hold Power/Clean to switch on; the light comes on and the robot waits for orders. Hold it to switch off and end the cleaning cycle. It cannot switch off while charging.
Starting cleaning8 steps
- Press Power/Clean.
- The robot maps a route, cleans room edges, then fills each room in a zigzag pattern, one room at a time.
- First tidy cords, including the dock cord, and valuables so the robot cannot drag or disconnect them.
- Install the mop cloth properly before each task.
- Start from the dock and do not move the dock so the robot can return.
- Charge first if the battery is too low.
- With low battery during cleaning, it returns, charges and resumes.
- It retracts the mop mount on carpets; carpets can also be designated no-go zones in the app.
Mop onlyView
Start mopping-only in the app. The brush and fan slow down and the mopping module lowers. This mode makes less noise than other cleaning modes.
PauseView
Press any button while running to pause; press Power/Clean to resume. Press Dock while paused to recharge. Manually placing a paused robot on the dock ends the cleanup.
Sleep4 steps
- After more than ten minutes paused, the robot sleeps and the power light flashes every few seconds.
- Press any button to wake.
- It will not sleep while charging.
- It shuts down after more than twelve hours asleep.
Emptying5 steps
- After cleaning, the robot returns and auto-emptying starts as needed.
- Press Dock on the docked robot or the corresponding app button to empty manually.
- After a long unused period, empty the dustbin manually and clear its air inlet.
- Auto-emptying can be disabled in the app.
- Avoid frequent manual emptying.
Charging3 steps
- The robot returns automatically after cleaning.
- Press Dock on a paused robot to send it to recharge; the power light breathes while charging.
- If it cannot find the dock, it returns to its starting position; place it on the dock manually.
Error indication4 steps
- A fault makes the robot light flash red or the dock light stay red.
- The app shows a pop-up and a voice alert may sound.
- A malfunctioning robot sleeps after more than ten minutes.
- Placing it on the dock manually ends the cleanup.
Do not disturb modeView
Default DND is 22:00–08:00. In the app, disable or adjust the period and set auto top-up, emptying and drying, light dimming and voice volume during DND.
Resetting the systemView
If buttons do not respond or the robot cannot switch off, press Reset. Existing scheduled-cleaning and WiFi settings are restored to factory settings.
Deactivating WiFiView
Reset WiFi successfully, then wait five minutes for automatic deactivation. To reconnect, follow the connection instructions.
Restoring factory settings4 steps
- If a system reset does not correct operation, power on.
- Hold Dock while pressing Reset until the voice says Restoring factory settings.
- This will take about 5 minutes.
- The robot restores factory settings.
Routine maintenance
Instructions from the manualMaintenance precautionsView
Switch off and unplug before cleaning or maintenance. Replacement intervals vary with actual conditions; replace abnormally worn parts immediately.
Clean the main brush9 steps
- Clean every two weeks and replace every 6–12 months.
- Switch off and unplug first.
- Turn over the robot and press both cover latches inward to remove the cover.
- Pull out the brush and remove its left bearing as shown.
- Remove tangled hair and dirt at both ends and reinstall the bearing.
- Reinstall the brush and cover; press the cover securely.
- Wiping with a wet cloth is recommended.
- If soaked, air-dry away from direct sunlight.
- Do not use corrosive cleaning fluid or disinfectant.
Clean the side brushView
Clean monthly and replace every 3–6 months. Switch off and unplug first. Unscrew the side-brush screw, remove and clean the brush, reinstall it and tighten the screw.
Clean the omnidirectional wheel4 steps
- Clean as required.
- Switch off and unplug first.
- Use a tool such as a small screwdriver to pry out the axle and remove the wheel; its bracket cannot be removed.
- Rinse the wheel and axle to remove hair and dirt, air-dry, reinstall and press both back in place.
Clean the main wheelsView
Clean as required with a soft, dry cloth. Switch off and unplug before maintenance.
Clean the dustbin and water tank combo unit8 steps
- Clean as required.
- Switch off and unplug first.
- Open the top cover and remove the unit.
- Open its dustbin lid and remove the washable filter, then empty and clean the dustbin.
- Open the water-tank stopper and empty unused water.
- Reinstall the unit.
- After mopping, empty the tank, wash the cloth and air-dry them to prevent odors.
- Do not rinse or immerse the combo unit.
Clean the washable filter6 steps
- Clean every two weeks and replace every 6–12 months.
- Switch off and unplug first.
- Open the dustbin lid and remove the filter.
- Rinse repeatedly and tap out as much dirt as possible.
- Let it dry thoroughly for at least 24 hours before reinstalling.
- Never touch its surface with hands, brushes or sharp objects.
Clean the VibraRise mop clothView
Clean after each use and replace every 3–6 months. Switch off and unplug first. Hold both ends of the mount to remove it; remove the cloth, wash and air-dry it.
Clean the robot sensorsView
Clean as required. Switch off and unplug first. Wipe the dock locator, Reactive Tech obstacle-avoidance sensor, carpet sensor and cliff sensors with a soft, dry cloth.
Clean the charging contactsView
Clean as required. Switch off and unplug first. Wipe the robot and dock charging contacts with a soft, dry cloth.
Moving the dockView
Grip the dock from its bottom as shown in the paired diagram to move it.
Maintain the auto-empty dock6 steps
- Replace a full dust bag immediately to maintain emptying performance.
- Switch off and unplug first.
- Open the cover, lift out and discard the bag.
- Clean the filter with a dry cloth.
- Fit a new bag along the slot and close the cover; correct installation prevents leakage and dock damage.
- Wipe the dock beacon and charging contacts with a soft, dry cloth.
Environment protection information
Instructions from the manualRemove the battery for disposal only8 steps
- These instructions apply only to disposal, not daily operation.
- Send the lithium-ion battery to a professional recycling facility to prevent pollution.
- Run the robot away from its dock until the battery is drained; switch off.
- Unscrew and remove the battery cover.
- Press the latch, pull out the connector and remove the battery.
- Before removal, ensure the battery is fully drained and the robot disconnected from the dock.
- Remove the entire pack; do not damage its casing, which could cause short-circuit or hazardous leakage.
- For accidental battery-fluid contact, rinse thoroughly with water and seek immediate medical care.
Important safety instructions
Instructions from the manualImportant safety instructions55 steps
- Do not use outdoors or on wet surfaces.
- User must read instruction manual.
- Risk of Injury.
- Brush May Start Unexpectedly.
- Disconnect the main Brush Before Cleaning or Servicing.
- Do not allow to be used as a toy.
- Close attention is necessary when used by or near children, pets or plants.
- Use only as described in this manual.
- Use only manufacturer’s recommended attachments.
- Do not use with damaged cord or plug.
- If appliance is not working as it should, has been dropped, damaged, left outdoors, or dropped into water, return it to a service center.
- Do not pull or carry by cord, use cord as a handle, close a door on cord, or pull cord around sharp edges or corners.
- Do not run appliance over cord.
- Keep cord away from heated surfaces.
- Do not unplug by pulling on cord.
- To unplug, grasp the plug, not the cord.
- Do not handle charger, including charger plug, and charger terminals with wet hands.
- Do not put any object into openings.
- Do not use with any opening blocked; keep free of dust, lint, hair, and anything that may reduce air flow.
- Keep hair, loose clothing, fingers, and all parts of body away from openings and moving parts.
- Do not use to pick up flammable or combustible liquids, such as gasoline, or use in areas where they may be present.
- Do not pick up anything that is burning or smoking, such as cigarettes, matches, or hot ashes.
- Do not use without dust bag.
- Prevent unintentional starting.
- Ensure the switch is in the off-position before connecting to battery pack, picking up or carrying the appliance.
- Carrying the appliance with your finger on the switch or energizing appliance that have the switch on invites accidents.
- Recharge only with the charger specified by the manufacturer.
- A charger that is suitable for one type of battery pack may create a risk of fire when used with another battery pack.
- Use appliances only with specifically designated battery packs.
- Use of any other battery packs may create a risk of injury and fire.
- English Turn off the appliance before making any adjustments, changing accessories, or storing appliance.
- Such preventive safety measures reduce the risk of starting the appliance accidentally.
- When battery pack is not in use, keep it away from other metal objects, like paper clips, coins, keys, nails, screws or other small metal objects, that can make a connection from one terminal to another.
- Shorting the battery terminals together may cause burns or a fire.
- Under abusive conditions, liquid may be ejected from the battery; avoid contact.
- If contact accidentally occurs, flush with water.
- If liquid contacts eyes, additionally seek medical help.
- Liquid ejected from the battery may cause irritation or burns.
- Do not use a battery pack or appliance that is damaged or modified.
- Damaged or modified batteries may exhibit unpredictable behavior resulting in fire, explosion or risk of injury.
- Do not expose a battery pack or appliance to fire or excessive temperature.
- Exposure to fire or temperature above 130°C (265°F) may cause explosion.
- Follow all charging instructions and do not charge the battery pack or appliance outside of the temperature range specified in the instructions.
- Charging improperly or at temperatures outside of the specified range may damage the battery and increase the risk of fire.
- Have servicing performed by a qualified repair person using only identical replacement parts.
- This will ensure that the safety of the product is maintained.
- Do not modify or attempt to repair the appliance or the battery pack except as indicated in the instructions for use and care.
- Do not use the product when the temperature is higher than 40°C (104°F) or lower than 4°C (39°F), or there is any liquid or sticky substance on the floor.
- Place the cords from other appliances out of the area to be cleaned.
- Do not allow the product to operate in an area with an unattended infant/child or where someone is laying on the floor.
- Do not operate the product in an area where there are lit candles or fragile objects on the floor to be cleaned.
- Do not operate the product in a room that has lit candles on furniture that the appliance may accidentally hit or bump into.
- Do not allow children to sit on the robot or dock.
- Be aware of the potential trip hazard in the area where an automatic floor cleaner is being operated.
- WARNING
Fcc/ic statement
Instructions from the manualFCC interference precautions2 steps
- If this equipment causes harmful radio or television interference, determined by switching it off and on, reorient or relocate the receiving antenna, increase equipment–receiver separation, connect to an outlet on a different circuit, or consult the dealer or an experienced radio/TV technician.
- Unapproved modifications may void authority to operate.
Mpe requirements
Instructions from the manualRF exposure separationView
Keep at least 20 cm between the device antenna and people during operation to meet FCC/IC RF exposure requirements. Closer operation is not recommended.
Low power mode
Instructions from the manualLow power mode3 steps
- While docked, hold Dock for 15 seconds to activate low power mode.
- Power consumption falls, indicators dim and all functions unrelated to charging stop, including cleaning and WiFi remote control.
- Press Power/Clean or move the robot off the dock to deactivate it.
A
Instructions from the manualRead the complete product diagram keys2 steps
- Read the paired source diagrams with their complete keys and corresponding reviewed instructions.
- Preserve all callouts, repeated locations, arrows and quantities with their full explanations.
B
Instructions from the manualUse the complete installation and brush diagrams2 steps
- Read the paired source diagrams with their complete keys and corresponding reviewed instructions.
- Preserve all callouts, repeated locations, arrows and quantities with their full explanations.
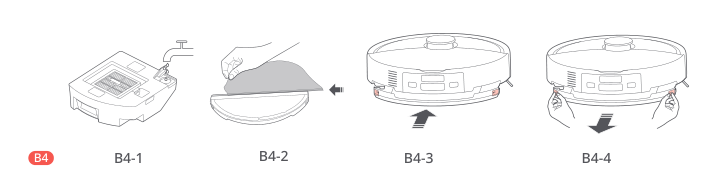
Diagram key
- B4: Starting mopping. Vacuum floors at least three times before the first mopping cycle.
- B4-1: Remove the combo unit, open its stopper, fill with tap water and replace the stopper. Do not immerse the unit. Use cold water and only Roborock-recommended cleaning solution; no disinfectant.
- B4-2: Dampen the cloth, wring until it stops dripping, insert in the slot and stick flat and firmly. Complete insertion arrow retained.
- B4-3: Align the mount with the bottom of the combo unit and slide until it clicks. Complete insertion arrow retained.
- B4-4: After cleaning and docking, press both latches inward with both hands and pull backward. All release and withdrawal arrows retained. Empty unused tank water immediately.
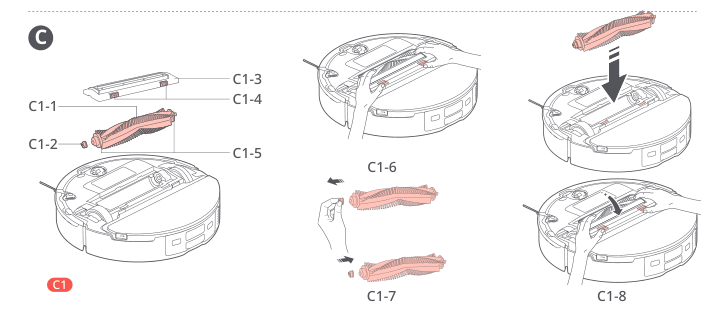
Diagram key
- C: Routine maintenance. Switch off and unplug before maintenance.
- C1: Main brush: clean every two weeks and replace every 6–12 months.
- C1-1: Main brush.
- C1-2: Main brush bearing.
- C1-3: Main brush cover.
- C1-4: Both main brush cover latches.
- C1-5: Hair-blocking rings.
- C1-6: Turn over the robot and press both latches inward to remove the cover. Complete release arrows retained.
- C1-7: Pull out the brush and remove its left bearing as shown. Remove hair and dirt at both ends; reinstall the bearing. Both removal views and arrows retained.
- C1-8: Reinstall the brush and cover and press securely. Complete insertion arrows retained. A wet cloth is recommended; if soaked, air-dry away from sunlight. No corrosive cleaning fluid or disinfectant.
C
Instructions from the manualUse the complete cleaning and sensor diagrams2 steps
- Read the paired source diagrams with their complete keys and corresponding reviewed instructions.
- Preserve all callouts, repeated locations, arrows and quantities with their full explanations.
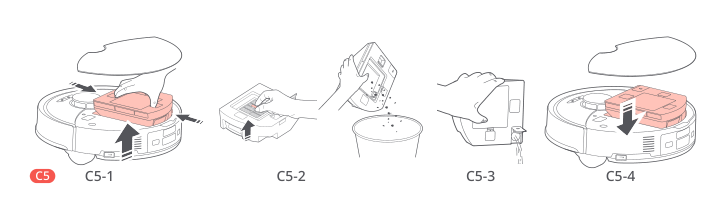
Diagram key
- C5: Dustbin and water tank combo unit: clean as required. Switch off and unplug first. Never rinse or immerse the unit.
- C5-1: Open the top cover and remove the unit. Both latch arrows and the lifting arrow are retained.
- C5-2: Open the dustbin lid, remove the washable filter, empty and clean the dustbin. Complete filter-removal arrow and emptying panel retained.
- C5-3: Open the tank stopper and empty unused water. Complete pouring panel retained.
- C5-4: Reinstall the unit. Complete downward arrow retained. After mopping, empty the tank, wash the cloth and air-dry them to prevent odors.
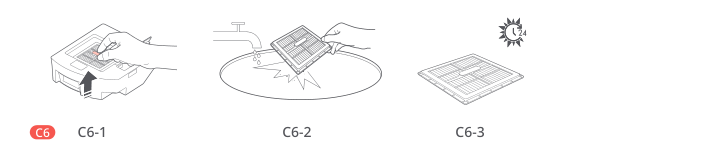
Diagram key
- C6: Washable filter: clean every two weeks and replace every 6–12 months. Switch off and unplug first.
- C6-1: Open the dustbin lid and remove the filter. Complete upward arrow retained.
- C6-2: Rinse repeatedly and tap out dirt. Do not touch the surface with hands, brushes or sharp objects.
- C6-3: Allow at least 24 hours to dry thoroughly before reinstalling.
- 24-hour drying symbol: Complete printed 24-hour drying symbol retained.
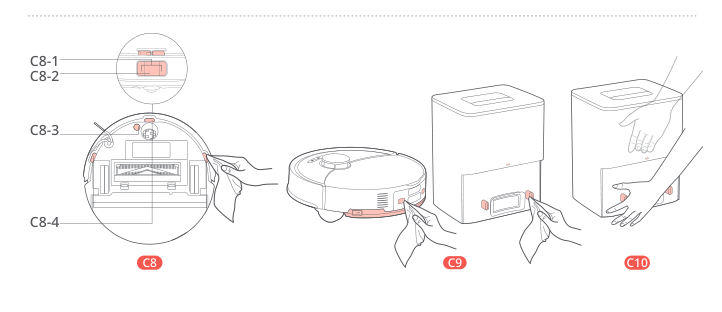
Diagram key
- C8: Robot sensors: clean as required with a soft, dry cloth. Switch off and unplug first.
- C8-1: Dock locator; complete front inset retained.
- C8-2: Reactive Tech obstacle avoidance sensor; complete front inset retained.
- C8-3: Carpet sensor.
- C8-4: All cliff sensors; every repeated location and leader retained.
- C9: Wipe all robot and dock charging contacts with a soft, dry cloth. Both units and all contact locations retained.
- C10: Move the dock by gripping its bottom. Complete hand positions retained.
C11
Instructions from the manualUse the complete auto-empty dock diagram2 steps
- Read the paired source diagrams with their complete keys and corresponding reviewed instructions.
- Preserve all callouts, repeated locations, arrows and quantities with their full explanations.
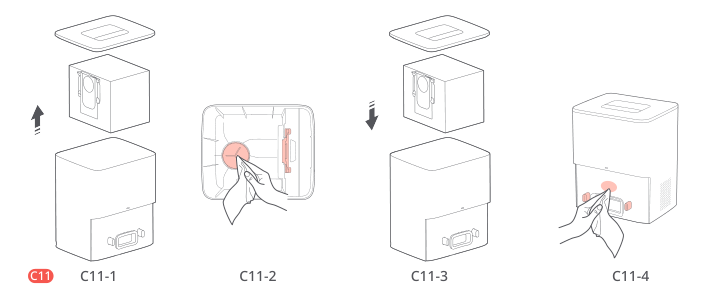
Diagram key
- C11: Replace the dust bag immediately when full. Switch off and unplug first.
- C11-1: Open the cover, lift out and discard the bag. Complete upward arrow and bag/cover view retained.
- C11-2: Clean the filter with a dry cloth. Complete filter and slot view retained.
- C11-3: Install a new bag along the slot and close the cover. Complete downward arrow retained. Correct installation prevents dust leakage and dock damage.
- C11-4: Wipe the dock beacon and charging contacts with a soft, dry cloth. All contact locations and the wiping panel retained.
Controls and parts
See the manual diagrams 3 diagrams
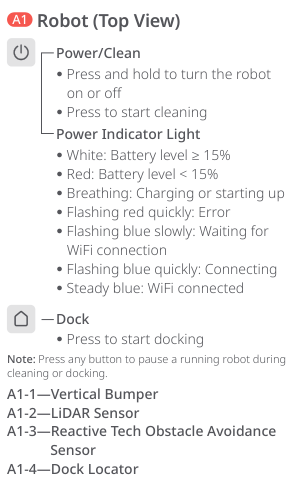
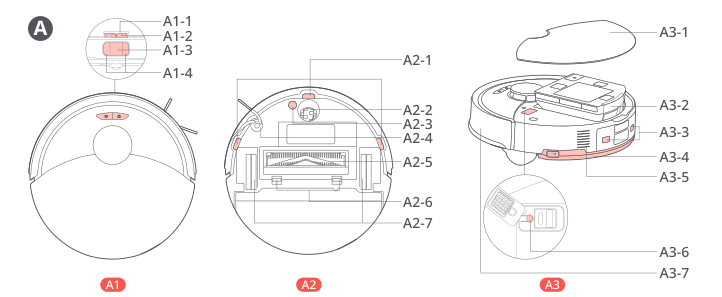
Diagram key
- A: Product overview.
- A1: Robot top view; complete enlarged front sensor inset.
- A1-1: Vertical bumper.
- A1-2: LiDAR sensor.
- A1-3: Reactive Tech obstacle avoidance sensor.
- A1-4: Dock locator.
- A2: Robot bottom view.
- A2-1: All cliff sensors and repeated leaders.
- A2-2: Omnidirectional wheel.
- A2-3: Carpet sensor.
- A2-4: Side brush.
- A2-5: Main brush.
- A2-6: Main brush cover latches.
- A2-7: Both main wheels.
- A3: Robot with top cover removed; full reset-button inset.
- A3-1: Top cover.
- A3-2: Dustbin and water tank combo unit.
- A3-3: Charging contacts.
- A3-4: VibraRise module.
- A3-5: Air outlets.
- A3-6: Reset button.
- A3-7: Bumper.
- Power/Clean symbol: Hold to turn on or off; press to start cleaning.
- Dock symbol: Press to start docking. Any button pauses a running robot during cleaning or docking.
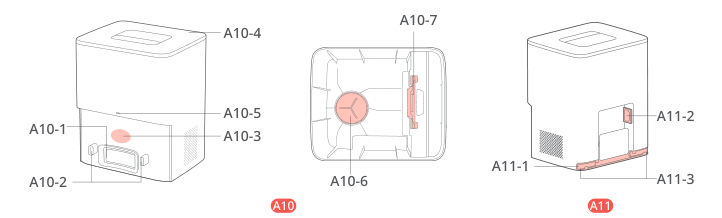
Diagram key
- A10: Auto-empty dock.
- A10-1: Suction inlet.
- A10-2: All charging-contact locations.
- A10-3: Dock location beacon.
- A10-4: Dust container cover.
- A10-5: Status light: steady white means powered with robot away; slowly flashing white means emptying; steady red means bag missing; off means unpowered or charging.
- A10-6: Filter.
- A10-7: Dust bag slot.
- A11: Rear dock view.
- A11-1: Power cord storage slot.
- A11-2: Power port.
- A11-3: Cord outlets; the cord can exit either side.
Model details
Model and compatibility
- Battery
- 14.4V/5200mAh typical lithium-ion battery;20V1.2A rated input.
- Auto-empty dock
- AED09LRR:120V60Hz;5A dust collection and0.4A charging input;20V1.2A output.