The checks and guides below come from the official manuals for this model.
No matches for this wording. Try a light name, error code or a shorter phrase.
Errors and indicators
Light patterns and messages documented in the manual
Find the indicator lights
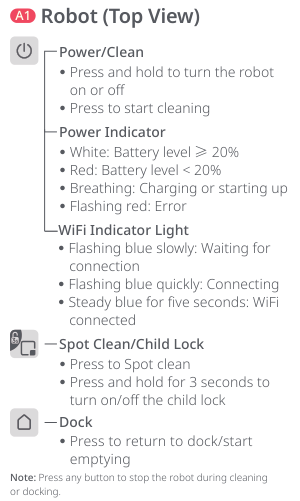
Actual robot controls with complete power, WiFi and child-lock explanations. Q8 Max+ US/FCC auto-empty dock configuration; base/Pro/TT excluded.
Message or indicatorWhat it meansCheck or action
—Flashing red power indicator with a voice alert
An error makes the power indicator flash red and a voice alert sound.
The robot sleeps automatically after more than 10 minutes in a malfunctioning state.
Placing it manually on the dock ends the current cleanup.
Guides
Common issues
Instructions from the manual
Unable to power on2 checks
Low battery
Put the robot on the charging dock and charge it before use.
Battery temperature
Use the robot only within 4–40°C (39–104°F).
Unable to charge2 checks
Power connections
Check that the dock power indicator lights and both ends of the power cable are properly connected.
Poor charging contact
Clean the contact areas on the dock and robot if contact is poor.
Slow charging2 checks
Ambient temperature
At high or low temperatures, charging slows automatically to extend battery life.
Dirty charging contacts
Wipe dirty charging contacts with a dry cloth.
Unable to dock2 checks
Dock obstacles
Move the dock to an open area if there are too many nearby obstacles.
Robot too far away
Place the robot closer to the charging dock and retry.
Abnormal behavior1 check
Restart
Restart the robot.
Noise during cleaning.1 check
Jammed brush or wheel
Turn off the robot and clean the main brush, side brush, main wheels or omnidirectional wheel if jammed.
Unable to connect to WiFi4 checks
Disabled WiFi
Reset WiFi and try again.
Poor signal
Move the robot to an area with good WiFi reception.
Abnormal connection
Reset WiFi, download the latest mobile app and retry.
Abrupt connection failure
Router settings may be responsible. Contact Roborock customer service for further support.
Poor cleaning ability or dust falling out3 checks
Full dustbin
Empty the dustbin.
Blocked washable filter
Clean the washable filter.
Jammed main brush
Clean the main brush.
Scheduled cleaning is not working1 check
Battery charge
Keep the robot charged; scheduled cleaning can begin only above 20% battery.
Is power always being drawn when the robot is on the charging dock?1 check
Docked power use
The robot draws minimal power while docked to maintain battery performance.
Does the robot need to be charged for at least 16 hours the first three times it is used?1 check
Initial charging
No. It may be used whenever fully charged.
No or little water during mopping1 check
Water and installation
Check for water in the tank, set water flow in the mobile app, or follow the manual instructions to install the dustbin/water-tank combo unit, mop-cloth mount and cloth correctly.
Cleaning does not resume after recharging1 check
DND or manual docking
Ensure DND is off because it prevents resuming cleanup.
For a cleanup needing a top-up charge, manually placing the robot on the dock before its automatic return prevents continuation.
The robot cannot return to the charging dock after spot cleaning or when it has been moved manually1 check
Map regeneration and distant dock
After spot cleaning or a significant move, the map is regenerated. If the dock is too far away, place the robot on it manually to charge.
The robot has begun to miss certain spots1 check
Dirty wall or cliff sensors
Wipe wall and cliff sensors with a soft, dry cloth.
It takes a long time to fill the water tank1 check
Blocked water filter
The water filter may be blocked and need cleaning. The manual does not provide a cleaning method for this filter.
Red LED indicator on the Auto-Empty Dock.3 checks
Dustbin cover missing
Check and correct installation of the dustbin cover.
Fan fault or overheating protection
Frequent starts and stops may trigger overheating protection. Unplug the power cable and try again after 30 minutes.
Voltage error
Check that local voltage matches the requirements listed on the dock.
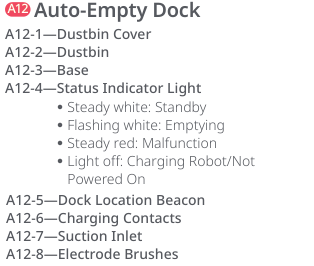
Auto-empty dock: complete status-light and A12-1–A12-8 key. Q8 Max+ US/FCC auto-empty dock configuration; base/Pro/TT excluded.
Reduced emptying performance or unusual noise when emptying.2 checks
Main-brush installation
Check and correct installation of the main brush and cover.
Blocked airflow
Remove blockages from the washable filter, air duct, suction inlet, air inlet or dustbin.
Auto-emptying does not start when the robot returns to the dock.6 checks
Auto-emptying disabled
Check the in-app auto-emptying setting.
Dustbin cover missing
Check and install the dustbin cover.
Robot manually placed on dock
Auto-emptying does not start after manual placement. Start emptying manually.
No cleanup before return
Auto-emptying does not start if the robot returns without cleaning.
Do Not Disturb mode
Adjust cleaning or DND duration, or start emptying manually.
Battery below 10%
Charge the robot until its battery reaches 10%.
Product overview
Instructions from the manual
Read controls and battery/WiFi indicators9 steps
Hold Power/Clean to turn on or off; press it to start cleaning.
Press Dock to return to the dock or start emptying.
Press Spot Clean/Child Lock for spot cleaning, or hold it for 3 seconds to toggle child lock.
Any button stops the robot during cleaning or docking.
The power indicator is white at battery level 20% or more and red below 20%.
Breathing means charging or starting; flashing red means error.
WiFi flashes blue slowly while waiting, quickly while connecting, then stays blue for five seconds when connected.
The auto-empty dock status indicator is steady white in standby, flashing white while emptying and steady red for malfunction.
It is off while charging the robot or when not powered on.
Important information
Instructions from the manual
Prepare the cleaning area3 steps
Tidy ground cables and loose items; move unstable, fragile, precious and dangerous items to prevent entanglement, impact, injury or damage.
In a raised area, always use a secure physical barrier to prevent falls.
Follow the robot along its whole first cleaning route and watch for problems before allowing later independent cleaning.
Power on and charge the
robot
Instructions from the manual
Power on and charge5 steps
Hold Power/Clean to switch on.
When its power light lights, put the robot on the dock.
Confirm that the dock power indicator goes off and the charging voice alert sounds.
Keep it charged to maintain battery performance.
If a low battery prevents switching on, place the robot directly on the dock.
Mopping
Instructions from the manual
Prepare and install the mopping module12 steps
Before first-time mopping, vacuum the floor at least three times to prevent excessive dirt buildup.
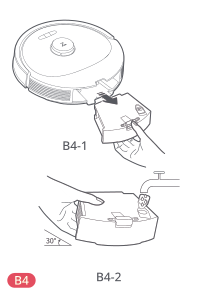
Press the latch and slide the dustbin/water-tank combo unit backward.
Remove the tank stopper, fill the tank and close it tightly.
Use only Roborock-branded floor cleaner; never use hot water because it may deform the tank.
Tilt the tank 30° while filling to avoid wetting the filter.
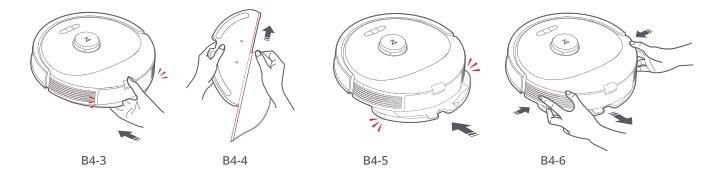
Slide the combo unit back into the robot until it clicks.
Wet the official Roborock mop cloth and wring until it stops dripping, then slide it along the cloth slot and stick it firmly in place.
Slide the mount forward under the robot until it clicks.
Clean the cloth after 60 minutes of mopping to maintain water flow and cleaning quality.
After the robot returns to the dock, press both mount latches and slide the mount backward to remove it.
Wash the cloth after every use and regularly empty unused tank water.
Remove the mount when not mopping; never use it on carpet.
Connect to the app
Instructions from the manual
Connect to the Roborock or Mi Home app7 steps
Choose either Roborock or Mi Home.
Find the chosen app in the App Store or Google Play, or use its official manual QR code to install it.
Reset WiFi if router configuration, a forgotten password or another problem prevents connection; add the robot as a new device.
In Roborock, choose Scan to Connect or Search for device; in Mi Home, use + at top right.
Follow the current in-app instructions, which may change with updates.
Only 2.4 GHz WiFi is supported.
After more than 30 minutes waiting for connection, WiFi is disabled automatically; reset it before reconnecting.
Reset wifi
Instructions from the manual
Reset WiFi3 steps
Hold Dock and Spot Clean/Child Lock together until the Resetting WiFi voice alert.
When the WiFi light flashes blue slowly, reset is complete and the robot waits for a connection.
Add it again using the chosen app.
On/off
Instructions from the manual
Switch the robot on or off3 steps
Hold Power/Clean to switch on; its power indicator lights and it enters standby.
Hold the same button to switch off and finish the cleaning cycle.
It cannot be turned off while charging.
Starting cleaning
Instructions from the manual
Start a cleaning cycle7 steps
Press Power/Clean.
The robot scans the room, divides it into zones, follows each edge, then fills each zone in a zigzag route.
Start from the dock so it can vacuum and return automatically; do not move the dock during cleaning.
If the battery is too low, charge before starting.
A cleanup completed in less than 10 minutes cleans the area twice.
A low battery during cleaning triggers return to charge and then resumption.
Before every mopping task, confirm the mop is properly fitted.
Spot cleaning
Instructions from the manual
Spot cleanView
Press Spot Clean/Child Lock. It cleans a 1.5 m (4.9 ft) by 1.5 m square centered on itself. Afterward it returns to the starting point and enters standby.
Pause
Instructions from the manual
Pause and resumeView
While running, press any button to pause. Press Power/Clean to resume, or Dock to send it back. Manually docking a paused robot ends the current cleanup.
Refilling the water tank or
cleaning the mop cloth
Instructions from the manual
Refill water or clean the mop during a taskView
Press any button to stop the robot and remove the mopping module. Add water or clean the cloth, reinstall the module, then press Power/Clean to continue.
Sleep
Instructions from the manual
Sleep and wake3 steps
A pause longer than 10 minutes puts it to sleep; the power indicator flashes every few seconds.
Any button wakes it.
It does not sleep while charging and shuts off automatically after more than 12 hours asleep.
Dnd mode
Instructions from the manual
Set Do Not Disturb3 steps
The default DND period is 22:00–08:00.
Change it or disable DND in the app.
During DND, cleanup does not resume automatically, the power light dims and voice prompts become quieter.
Child lock
Instructions from the manual
Enable or disable child lock4 steps
Hold Spot Clean/Child Lock to toggle the lock; the controls key specifies 3 seconds.
The app also supports setting it.
When stationary with lock enabled, button presses have no effect.
During cleaning or docking, any button still stops the robot.
Charging
Instructions from the manual
Return to charge4 steps
After cleaning it returns automatically.
When paused, press Dock to send it back; the power indicator breathes during charging.
If it cannot find the dock, it returns to its starting position.
Put it on the dock manually to charge.
System reset
Instructions from the manual
Reset the system3 steps
If buttons do not respond or it cannot be switched off, press the combo-unit latch to remove the dustbin/water-tank unit and find Reset.
Press Reset; the system resets automatically.
Scheduled cleaning and WiFi settings revert to factory settings.
Restore factory settings
Instructions from the manual
Restore factory settings3 steps
If system reset does not resolve the fault, switch it on.
Hold Dock and press Reset at the same time until the Restoring factory settings voice prompt.
Factory settings are restored.
Main brushes
Instructions from the manual
Clean the main brushes7 steps
Clean every 2 weeks and replace every 6–12 months.
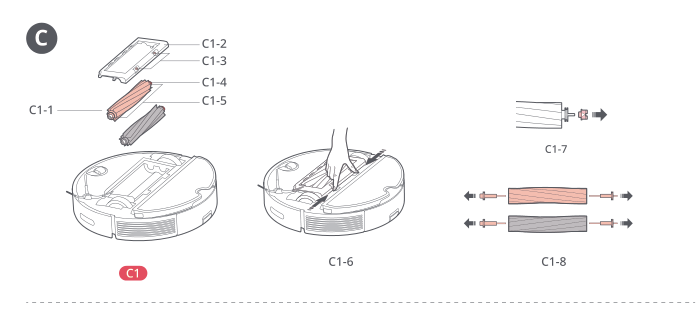
Turn the robot over and press the latches to remove the cover.
Remove the main brush and pull out its bearing.
Pull off the brush caps.
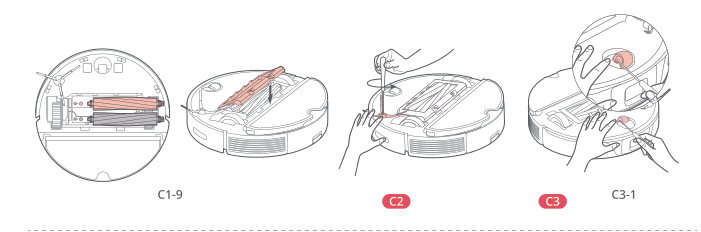
Remove tangled hair or dirt at both ends, reinstall the brush and press the cover to lock it.
Wipe the main brush with a wet cloth and let it dry away from direct sunlight.
Do not use corrosive cleaning fluids or disinfectants.
Side brush
Instructions from the manual
Clean the side brushView
Clean monthly and replace every 3–6 months. Unscrew the side-brush screw. Remove and clean the brush; reinstall it and tighten the screw.
Omnidirectional wheel
Instructions from the manual
Clean the omnidirectional wheel5 steps
Clean as required.
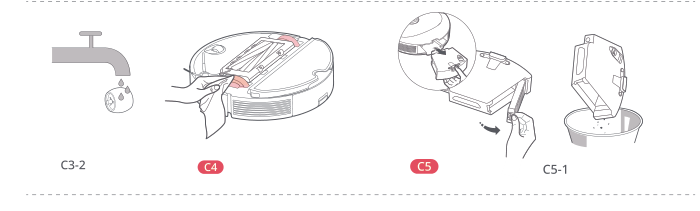
Use a tool such as a small screwdriver to pry out the axle and remove the wheel.
Its bracket cannot be removed.
Rinse wheel and axle with water to remove hair and dirt.
Dry them, reinstall the wheel and press firmly into place.
Main wheels
Instructions from the manual
Clean the main wheelsView
Clean monthly using a soft, dry cloth.
Dustbin and water tank
combo unit
Instructions from the manual
Clean the dustbin and washable filter10 steps
Clean weekly and replace the filter every 6–12 months.
Press the latch to remove the combo unit.
Remove the washable filter and empty the dustbin.
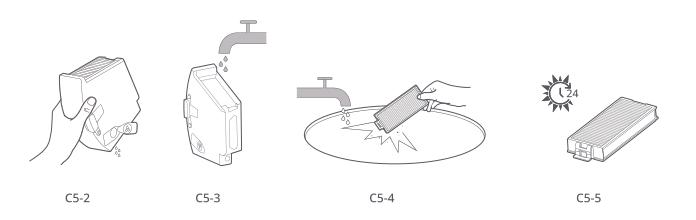
Empty unused tank water.
Fill the dustbin with clean water, shake gently and pour out the dirty water.
Use only clean water without cleaning liquid to prevent blockage.
Rinse the filter repeatedly and tap out dirt.
Do not touch its surface with hands, brushes or hard objects because this may damage it.
Allow 24 hours to dry thoroughly before refitting.
Buy another filter and alternate if necessary.
Mop cloth
Instructions from the manual
Clean the mop clothView
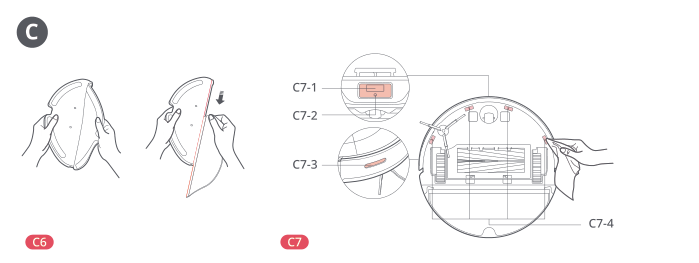
Clean after every use and replace every 3–6 months. Remove it from the mount, clean it and air-dry. Clean a dirty cloth before use because it affects mopping performance.
Robot sensors
Instructions from the manual
Clean robot sensorsView
Clean monthly with a soft, dry cloth. Include the dock locator, Reactive Tech obstacle-avoidance sensor, wall sensor and all cliff sensors.
Charging contact areas
Instructions from the manual
Clean charging contacts3 steps
Clean as required.
Use a soft, dry cloth to wipe robot charging contacts and clean the dock location beacon, charging contacts and electrode brushes.
Do not use wet cloth or wet hands on charging contacts.
Battery
Instructions from the manual
Maintain the battery and store the robot4 steps
Keep the built-in lithium-ion battery charged during normal use.
For long non-use, fully charge, turn off and store cool and dry.
Recharge at least every 3 months to prevent over-discharge damage.
Turn off and use original packaging for shipment.
Position the charging dock
Instructions from the manual
Assemble and position the auto-empty dock17 steps
Take the screwdriver from its storage bin under the base.
Hold the dustbin cover securely when upside down so it cannot fall and be damaged.
Place the dock upside down on a soft, flat surface such as carpet, towel or cloth.
Attach the base using the six supplied screws.
Connect the power cable to the dock and store the excess in its storage slot.
The cable can exit either side.
Place the assembled dock on a hard, flat floor such as wood, tile or concrete, flat against a wall.
Choose good WiFi coverage and plug it in.
The written placement note requires at least 0.3 m (1 ft) on either side and 1 m (3.3 ft) in front and above; the figure key labels these clearances as more than 0.3 m and more than 1 m.
Both conditions are retained.
The dock light is off when charging and red for an error.
Never use it without a dustbin cover or dust bag.
Keep it away from fire, heat, water and narrow locations where the robot could be suspended.
A soft floor surface can cause tilting and problems docking or departing.
Keep excess cable stored so the robot cannot tangle, drag the dock or disconnect power.
Avoid direct sunlight or obstruction of its location beacon.
Maintain it as instructed; never clean the dock with a wet cloth.
Emptying
Instructions from the manual
Empty the robot dustbin into the dockView
Auto-emptying begins when the robot returns after cleaning. Press Dock to start emptying manually; any button stops emptying. Avoid frequent manual emptying.
Dust bag replacement
Instructions from the manual
Replace the dock dust bag6 steps
Replace as required.
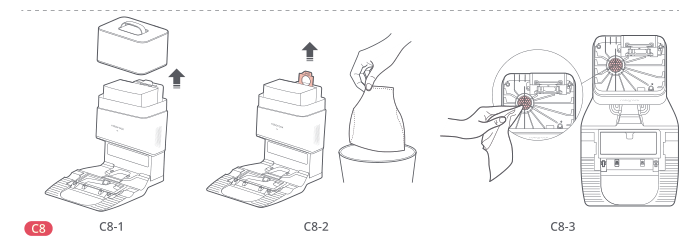
Turn off the product and unplug it before cleaning or maintenance.
Remove the dustbin cover vertically.
Lift the dust bag out and discard it; its handle seals the bag to prevent dust leakage.
Clean the dock filter with a dry cloth.
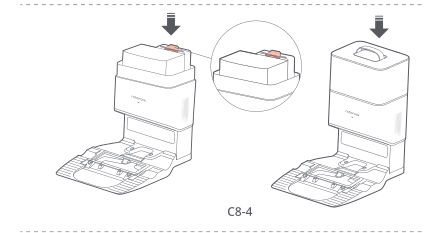
Install a new dust bag along its slot and replace the dustbin cover.
Air duct
Instructions from the manual
Clean the auto-empty dock air duct5 steps
Clean as required.
Turn off the product and unplug it before cleaning or maintenance.
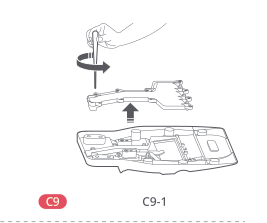
Unscrew the 10 air-duct-cover screws and remove the cover.
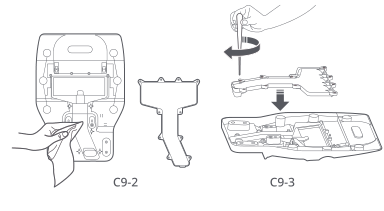
Wipe the air duct and cover with a dry cloth.
Reinstall the cover and screw it back in place.
Warning
Instructions from the manual
Observe operating and charging safety14 steps
Use only Roborock CDZ12RR, CDZ20RR, AED06LRR or AED07LRR chargers; this reference covers the 120V AED06LRR/AED07LRR auto-empty dock.
Move other appliance cords out of the cleaning area.
Never operate where an infant or child sleeps, where lit candles or fragile objects are on the floor, or where candles on furniture could be hit.
Never let children sit on the robot or use its mopping module on carpets.
Unplug before adjustments, accessory changes or storage to reduce accidental startup.
Do not carry it by a dock base or dustbin.
Switch off and remove the plug when not in use and before cleaning or maintenance.
Place the dock flat, away from fire, heat and water; avoid narrow places where the robot may be suspended.
Keep it away from radiators.
Take protection measures in thunderstorm-prone locations or where voltage is unstable.
The operation guide permits children aged 8 or older and people with reduced physical, sensory or mental ability or limited experience only with safe-use supervision/instruction and understanding of hazards.
Children must not play with it or clean/maintain it without supervision.
Never use wet cloth or liquids on charging contacts.
Do not dismantle, repair or modify the battery or charging dock.
Battery and charging
Instructions from the manual
Use the polarized plug safely8 steps
The polarized plug has one wider blade and fits a polarized outlet only one way.
If it does not fit fully, reverse it.
If it still does not fit, ask a qualified electrician to install the proper outlet.
Never change the plug.
Keep charging contacts dry:no wet cloth or hands.
Turn off and use original packaging for shipment.
Fully charge before storage, turn off and store cool and dry; recharge at least every 3 months.
Do not use above 40°C (104°F), below 4°C (39°F), or on a floor with liquid or sticky substances.
Battery and charger service limits4 steps
Do not charge non-rechargeable batteries.
Battery replacement is for skilled persons only.
Do not dismantle, repair or modify the battery or dock.
Stop using a damaged power cord immediately; the manufacturer, service agent or similarly qualified person must replace it.
Environmental protection
description
Instructions from the manual
Remove the battery only for disposal or failed-battery handling10 steps
This procedure is only for disposal or when the battery cannot function normally after recharging.
The linked safety guide limits battery replacement to skilled persons.
Recycle the removed pack through local authorities or a battery-recycling facility.
Operate the robot without connecting to the dock until the battery is exhausted.
Turn the robot off.
Unscrew the battery cover and remove it.
Press the clip to disconnect the battery connector, then remove the battery.
It must be fully drained; never attempt removal while the robot is connected to the dock.
Remove the entire pack without damaging its casing to avoid short circuits or hazardous leakage.
If battery fluid contacts you, rinse thoroughly with water and seek immediate medical care.
Restrictions
Instructions from the manual
Observe restrictions and supervision11 steps
Supervise children so they do not play with it.
The CB guidance requires supervision/instruction for people with reduced physical, sensory or mental ability or limited experience.
EU guidance permits use from age 8 with safe-use supervision/instruction and understanding of hazards; children may not clean or maintain it unsupervised.
Keep at least 20 cm between people and the operating transmitter.
Do not co-locate its antenna with another antenna or transmitter.
Use only for indoor floor cleaning, not outdoors, on non-floor surfaces such as sofas, or in commercial/industrial settings.
Tidy wires and unstable, fragile, precious or dangerous objects first.
Do not use on high-pile carpet; effectiveness can be reduced on dark carpet.
Never mop carpet.
Keep charging contacts and power cords dry: no wet wipes, damp cloths or wet hands.
Do not charge or discharge the battery in high humidity or outside 4–40°C (39–104°F).
A
Instructions from the manual
Read robot and auto-empty dock diagram keys2 steps
Read A1–A14 with the complete Product Overview key: robot controls, all repeated sensor/contact locations, combo unit, mop cloth/mount, dock dustbin/bag, base, filter and power-cable storage.
Preserve 6 base screws and 10 air-duct screws as distinct quantities.
B
Instructions from the manual
Use dock assembly and placement figures2 steps
Follow B2-1–B2-4 with the ordered assembly and placement instructions.
Retain the screwdriver location, 6 base screws, all cable-routing arrows and side/front/above clearance arrows; do not use the dock without a dustbin cover or bag.
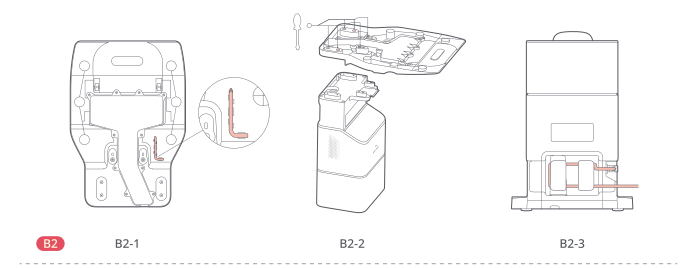
Complete base-assembly and cable-storage arrows. Q8 Max+ US/FCC auto-empty dock configuration; base/Pro/TT excluded.
Diagram key
B2: Position the charging dock.
B2-1: Take the screwdriver from storage under the base; full enlarged tool inset retained.
B2-2: Hold dustbin cover securely; turn dock upside down on soft flat carpet/towel/cloth and attach base with 6 supplied screws. All screw/insertion arrows retained.
B2-3: Connect the power cable and store excess in its slot; full cable-routing arrows retained.
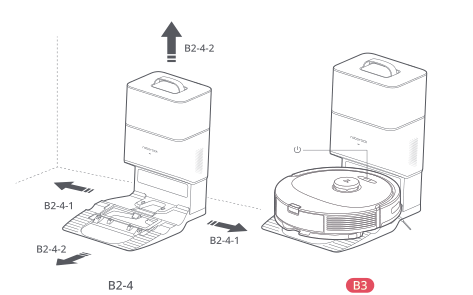
All four dock-clearance arrows and power-on/charging panel. Q8 Max+ US/FCC auto-empty dock configuration; base/Pro/TT excluded.
Diagram key
B2-4: Hard, flat floor against a wall, in good WiFi coverage. No soft surface for normal dock operation; avoid heat, fire, water, sunlight and beacon obstruction. Do not use without cover or dust bag.
B2-4-1 left: Figure/key: more than 0.3 m (1 ft) left; written note: at least 0.3 m.
B2-4-1 right: Figure/key: more than 0.3 m (1 ft) right; written note: at least 0.3 m.
B2-4-2 above: Figure/key: more than 1 m (3.3 ft) above; written note: 1 m.
B2-4-2 front: Figure/key: more than 1 m (3.3 ft) in front; written note: 1 m.
B3: Hold Power/Clean to power on, then dock to charge. Dock status light turns off and charging voice alert sounds. If battery is too low to power on, place directly on dock.
Power/Clean symbol: Hold to power on before placing the robot on the dock to charge; full printed button symbol retained.
Use mopping installation figuresView
Follow B4-1–B4-6 with the complete ordered mopping instructions. Retain the 30°fill angle, all insertion/removal arrows, cloth slot and both release latches.
Complete combo-unit release and 30° filling panels. Q8 Max+ US/FCC auto-empty dock configuration; base/Pro/TT excluded.
Diagram key
B4: Mopping; vacuum at least 3 times before first use.
B4-1: Press latch and slide combo unit backward; full release/withdrawal arrows retained.
B4-2: Remove stopper, fill and close tightly; only Roborock floor cleaner, no hot water.
30°: Tilt tank 30° while filling to keep filter dry; full angle/arrow retained.
Complete mopping steps 3–6 with both release-latch directions. Q8 Max+ US/FCC auto-empty dock configuration; base/Pro/TT excluded.
Diagram key
B4-3: Reinstall combo unit until it clicks; full insertion arrow retained.
B4-4: Wet official cloth, wring until no dripping, slide along slot and stick firmly; all cloth/slot arrows retained.
B4-5: Slide mount forward until it clicks; clean cloth after 60 minutes.
B4-6: After return to dock, press both latches and slide mount backward; wash cloth after every use, regularly empty unused water and remove mount when not mopping. Never mop carpet.
C
Instructions from the manual
Use main-brush maintenance figuresView
Read C1-1–C1-9 with the main-brush instructions. Retain both rollers, the bearing and cap removal arrows, and the full refitting continuation.
Main-brush parts and complete cover, bearing and cap-removal arrows. Q8 Max+ US/FCC auto-empty dock configuration; base/Pro/TT excluded.
Diagram key
C: Routine maintenance.
C1: Main brushes: clean every 2 weeks; replace 6–12 monthly.
C1-1: Main brush; both rollers shown.
C1-2: Main-brush cover.
C1-3: Paired cover latches.
C1-4: Main-brush bearing.
C1-5: Main-brush caps.
C1-6: Turn over robot, press latches and remove cover; full paired arrows retained.
C1-7: Remove main brush and pull bearing out; full extraction arrow retained.
C1-8: Pull off caps; both rollers, endcaps and all four arrows retained.
Use wheel and side-brush figuresView
Read C2–C4 with the side-brush and wheel instructions. Retain the wheel-removal arrow and wash/dry/refit continuation; its bracket cannot be removed.
Complete main-brush refitting continuation, side-brush and wheel-removal panels. Q8 Max+ US/FCC auto-empty dock configuration; base/Pro/TT excluded.
Diagram key
C1-9: Remove hair/dirt at brush ends, reinstall brush and lock cover. Both refitting panels retained; wipe brush with wet cloth, dry away from sunlight, no corrosive cleaner/disinfectant.
C2: Side brush: clean monthly, replace 3–6 monthly; unscrew, remove/clean, reinstall and tighten.
C3: Omnidirectional wheel: clean as required.
C3-1: Use a small screwdriver or similar tool to pry axle out and remove wheel; full removal arrow retained. Bracket cannot be removed.
Use dustbin and filter maintenance figuresView
Follow C5-1–C5-5 with all unit/filter removal and rinsing panels; preserve the 24-hour drying symbol and no-cleaning-liquid condition.
Complete wheel-rinsing continuation, main-wheel wiping and combo-unit/filter removal. Q8 Max+ US/FCC auto-empty dock configuration; base/Pro/TT excluded.
Diagram key
C3-2: Rinse wheel/axle with water, remove hair/dirt, dry, refit and press firmly.
C4: Clean main wheels monthly with a soft, dry cloth.
C5-1: Press latch and remove combo unit, remove washable filter and empty dustbin; all release/removal/pouring arrows retained.
Complete combo-unit/filter rinsing and 24-hour drying panels. Q8 Max+ US/FCC auto-empty dock configuration; base/Pro/TT excluded.
Diagram key
C5-2: Empty unused water from tank.
C5-3: Fill dustbin with clean water, shake gently and pour dirty water away; no cleaning liquid.
C5-4: Rinse/tap filter to remove dirt; do not touch its surface with hands, brushes or hard objects.
C5-5: Dry thoroughly for 24 hours, then refit; an extra filter may be alternated.
24-hour sun/clock: Dry the filter thoroughly for 24 hours before refitting.
Use mop-cloth and sensor figuresView
Read C6–C7 with the mop-cloth and sensor key. Retain all four cliff-sensor leaders and both front-sensor and wall-sensor insets.
Complete cloth-removal and sensor-wiping panels with every inset and sensor leader. Q8 Max+ US/FCC auto-empty dock configuration; base/Pro/TT excluded.
Diagram key
C: Routine maintenance.
C6: Remove cloth from mount, clean and air-dry after each use; replace 3–6 monthly. A dirty cloth reduces mopping performance; clean before use.
C7: Wipe all robot sensors monthly with a soft, dry cloth.
C7-1: Dock locator; complete front inset retained.
C7-2: Reactive Tech obstacle-avoidance sensor; front inset retained.
C7-3: Wall sensor; complete side inset retained.
C7-4: All four cliff-sensor leaders and locations retained.
Use dust-bag replacement figures2 steps
Follow C8-1–C8-4 with the complete bag-replacement key: remove cover, discard sealed bag, dry-wipe filter, fit new bag and replace cover.
All removal/insertion arrows and filter inset remain visible.
Complete cover/bag-removal and filter-wiping panels. Q8 Max+ US/FCC auto-empty dock configuration; base/Pro/TT excluded.
Diagram key
C8: Dust-bag replacement as required; switch off and unplug first.
C8-1: Remove cover vertically; full upward arrow retained.
C8-2: Lift bag out and discard; handle seals bag to prevent leakage; full removal arrow retained.
C8-3: Clean filter with dry cloth; full enlarged filter inset and wiping panel retained.
Complete new-bag installation and cover-replacement continuation. Q8 Max+ US/FCC auto-empty dock configuration; base/Pro/TT excluded.
Diagram key
C8-4: Install new bag along slot and replace cover; both down arrows and full bag-slot inset retained.
Use air-duct and charging-contact figures2 steps
Read C9-1–C9-3 and C10 with the full air-duct and contact-cleaning key.
Retain 10 screws, all cover-removal/refitting arrows and both robot/dock contact panels; switch off and unplug before maintenance.
Complete air-duct-cover screw removal and lift arrows. Q8 Max+ US/FCC auto-empty dock configuration; base/Pro/TT excluded.
Diagram key
C9: Air-duct maintenance as required; switch off and unplug first.
C9-1: Unscrew 10 cover screws and remove cover; full screwdriver rotation and cover-lift arrows retained.
Complete air-duct cleaning and cover-refitting continuation, with all rotation and insertion arrows. Q8 Max+ US/FCC auto-empty dock configuration; base/Pro/TT excluded.
Diagram key
C9-2: Wipe duct and cover with a dry cloth; all cover/duct outlines retained.
C9-3: Reinstall cover and screw into place; full downward and screwdriver rotation arrows retained.
Controls and parts
See the manual diagrams 3 diagrams
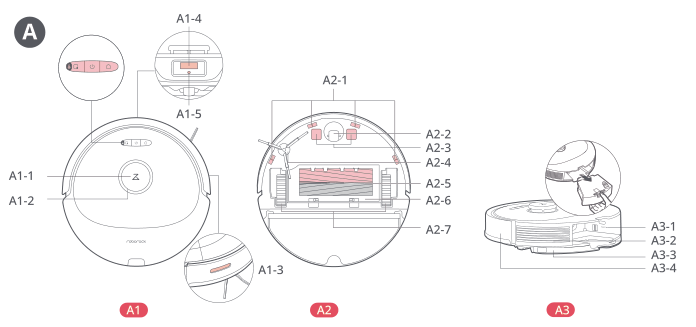
All robot top, bottom and Reset-location labels with complete insets. Q8 Max+ US/FCC auto-empty dock configuration; base/Pro/TT excluded.
Diagram key
A: Product overview.
A1: Robot top view.
Spot/Clean lock symbol: Press to spot clean; hold 3 seconds to toggle child lock.
Power/Clean symbol: Hold to turn on/off; press to clean.
Dock symbol: Press to return to dock/start emptying.
A1-1: Vertical bumper.
A1-2: LiDAR sensor.
A1-3: Wall sensor; entire side inset and leader retained.
A1-4: Dock locator; enlarged front inset retained.
A1-5: Reactive Tech obstacle-avoidance sensor; shared front inset retained.
A2: Robot bottom view.
A2-1: All four cliff-sensor location leaders.
A2-2: Omnidirectional wheel.
A2-3: Both charging-contact locations.
A2-4: Side brush.
A2-5: Both main brushes.
A2-6: Main-brush cover.
A2-7: Both main wheels.
A3: Robot with combo unit removed and enlarged Reset inset.
A3-1: Reset button.
A3-2: Air vent.
A3-3: Mop-cloth mount.
A3-4: Bumper.
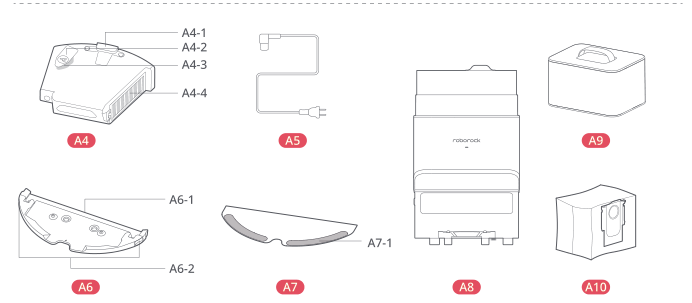
Complete combo unit, mop mount/cloth, cable and dock dustbin/bag parts. Q8 Max+ US/FCC auto-empty dock configuration; base/Pro/TT excluded.
Diagram key
A4: Dustbin/water-tank combo unit.
A4-1: Latch.
A4-2: Stopper.
A4-3: Water filter.
A4-4: Washable filter.
A5: Power cable.
A6: Mop-cloth mount.
A6-1: Mop-cloth attachment slot.
A6-2: Both mop-cloth mount latches.
A7: Mop cloth.
A7-1: Hook-and-loop pads.
A8: Dustbin with disposable bag pre-installed.
A9: Dustbin cover.
A10: Disposable dust bag.
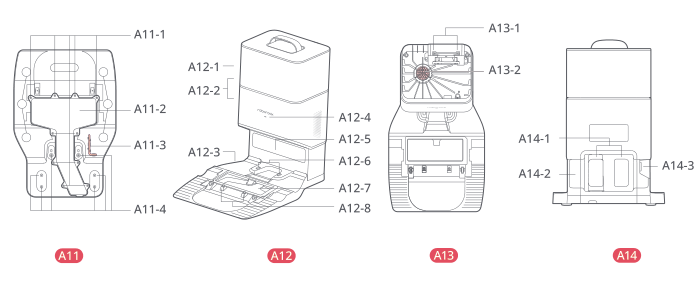
Complete base, dock, filter and cable-storage labels: 6 base screws and 10 air-duct screws. Q8 Max+ US/FCC auto-empty dock configuration; base/Pro/TT excluded.
Diagram key
A11: Dock base.
A11-1: Air-duct-cover screws: 10, with every printed repeated screw leader retained.
A11-2: Air-duct cover.
A11-3: Screwdriver stored under the base.
A11-4: Base-fastening screws: 6, with all repeated leaders retained.
A12: Auto-empty dock.
A12-1: Dustbin cover.
A12-2: Dustbin.
A12-3: Base.
A12-4: Status indicator: steady white standby; flashing white emptying; steady red malfunction; off while charging robot or not powered.
A12-5: Dock location beacon.
A12-6: Charging contacts; all paired locations retained.
A12-7: Suction inlet.
A12-8: Electrode brushes; all paired locations retained.
A13: Dock with cover removed.
A13-1: Dust-bag slot.
A13-2: Filter.
A14: Power-cable storage.
A14-1: Power-cable storage slot.
A14-2: Cable outlet; cable can exit either side.
A14-3: Power port.
Model details
Model and compatibility
Model and reference scope
Q8 Max+ (Q8 Max Plus), English US/FCC Q80ULL robot with 120V AED06LRR/AED07LRR Auto-Empty Dock. Base Q8Max, TT, Pro and CE variants excluded.
Battery and charging
14.4V/5200 mAh (typical)lithium-ion battery; charging takes less than 6 hours.