The checks and guides below come from the official manuals for this model.
No matches for this wording. Try a light name, error code or a shorter phrase.
Troubleshooting
Find the problem you are experiencing
Unable to power on2 checks
The battery level is low. Put the robot on the charging dock and charge it before use.
The battery level is low. Put the robot on the charging dock and charge it before use.
The battery temperature is too low or too high. Only use the robot within the range of 4-40°C (39-104°F).
The battery temperature is too low or too high. Only use the robot within the range of 4-40°C (39-104°F).
Unable to charge2 checks
Check the power indicator light turns on and that both ends of the power cable are properly connected.
Check the power indicator light turns on and that both ends of the power cable are properly connected.
If contact is poor, clean the contact areas on the charging dock and the robot.
If contact is poor, clean the contact areas on the charging dock and the robot.
Slow charging2 checks
When used at high or low temperatures, the robot will automatically reduce its charging speed to extend battery life.
When used at high or low temperatures, the robot will automatically reduce its charging speed to extend battery life.
The charging contacts may be dirty. Wipe them with a dry cloth.
The charging contacts may be dirty. Wipe them with a dry cloth.
Unable to dock2 checks
There are too many obstacles near the charging dock. Move it to an open area.
There are too many obstacles near the charging dock. Move it to an open area.
The robot is too far from the charging dock. Place it closer and retry.
The robot is too far from the charging dock. Place it closer and retry.
Abnormal behavior1 check
Restart the robot.
Restart the robot.
Noise during cleaning2 checks
The main brush, side brush, main wheels, or omnidirectional wheel may be jammed. Turn off the robot and clean them.
The main brush, side brush, main wheels, or omnidirectional wheel may be jammed. Turn off the robot and clean them.
VibraRise system abnormal. Check for jammed objects.
VibraRise system abnormal. Check for jammed objects.
Unable to connect to WiFi5 checks
WiFi is disabled. Reset the WiFi and try again.
WiFi is disabled. Reset the WiFi and try again.
The WiFi signal is poor. Move the robot to an area with good WiFi reception.
The WiFi signal is poor. Move the robot to an area with good WiFi reception.
Abnormal WiFi connection. Reset the WiFi, download the latest mobile app, and retry.
Abnormal WiFi connection. Reset the WiFi, download the latest mobile app, and retry.
The current Roborock robot is not supported. You can find supported models in the app.
The current Roborock robot is not supported. You can find supported models in the app.
Unable to connect to WiFi abruptly. There may be an error with your router settings. Contact Roborock customer service for additional support.
Unable to connect to WiFi abruptly. There may be an error with your router settings. Contact Roborock customer service for additional support.
Poor cleaning ability or dust falling out3 checks
The dustbin is full and needs emptying.
The dustbin is full and needs emptying.
The filter is blocked and needs cleaning.
The filter is blocked and needs cleaning.
The main brush is jammed and needs cleaning.
The main brush is jammed and needs cleaning.
Scheduled cleaning is not working1 check
Keep the robot charged. Scheduled cleaning can only begin when the battery level is above 20%.
Keep the robot charged. Scheduled cleaning can only begin when the battery level is above 20%.
Is power always being drawn when the robot is on the charging dock?1 check
The robot will draw power while it is docked to maintain battery performance, but power consumption is minimal.
The robot will draw power while it is docked to maintain battery performance, but power consumption is minimal.
Does the robot need to be charged for at least 16 hours the first three times it is used?1 check
No, the robot can be used any time after it has been fully charged.
No, the robot can be used any time after it has been fully charged.
No or little water during mopping1 check
Check whether there is water in the water tank and use the mobile app to set the scrub intensity or check the manual for full instructions on how to correctly install the mop cloth and mop cloth mount.
Check whether there is water in the water tank and use the mobile app to set the scrub intensity or check the manual for full instructions on how to correctly install the mop cloth and mop cloth mount.
Cleaning does not resume after recharging1 check
Make sure that the robot is not in DND mode. DND mode will prevent cleanup. When cleaning a space requiring a top-up charge, if the robot was placed manually on the charging dock before it returned to the dock automatically, it will not be able to continue cleanup.
Make sure that the robot is not in DND mode.
DND mode will prevent cleanup.
When cleaning a space requiring a top-up charge, if the robot was placed manually on the charging dock before it returned to the dock automatically, it will not be able to continue cleanup.
The robot cannot return to the charging dock after spot cleaning or when it has been moved manually1 check
After spot cleaning or a significant position change, the robot will re-generate the map. If the charging dock is too far away, it may not be able to return to recharge and must be placed on the charging dock manually.
After spot cleaning or a significant position change, the robot will re-generate the map.
If the charging dock is too far away, it may not be able to return to recharge and must be placed on the charging dock manually.
The robot has begun to miss certain spots1 check
The wall sensor or cliff sensors may be dirty. Wipe them with a soft dry cloth.
The wall sensor or cliff sensors may be dirty. Wipe them with a soft dry cloth.
It takes a long time to fill the water tank1 check
The filter may be blocked and need cleaning.
The filter may be blocked and need cleaning.
Red LED indicator on the Auto-Empty Dock.3 checks
The dustbin cover is not in place. Check and correct installation.
The dustbin cover is not in place. Check and correct installation.
The fan is not operating properly. Potentially due to overheating protection resulting from frequent starting and stopping. Unplug the power cable and try again after 30 minutes.
The fan is not operating properly. Potentially due to overheating protection resulting from frequent starting and stopping. Unplug the power cable and try again after 30 minutes.
Voltage error. Check that local voltage meets the requirements listed on the dock.
Voltage error. Check that local voltage meets the requirements listed on the dock.
Reduced emptying performance or unusual noise when emptying.2 checks
The main brush or main brush cover is not properly installed. Check and correct installation.
The main brush or main brush cover is not properly installed. Check and correct installation.
The filter, air duct, suction inlet, air inlet, or dustbin is blocked. Clean to remove blockages.
The filter, air duct, suction inlet, air inlet, or dustbin is blocked. Clean to remove blockages.
Auto-emptying does not start when the robot returns to the dock.6 checks
Auto-emptying is disabled. Check in-app settings.
Auto-emptying is disabled. Check in-app settings.
Dustbin cover is not in place. Check and install.
Dustbin cover is not in place. Check and install.
Auto-emptying will not be triggered if the robot is moved to the dock manually. Start emptying manually.
Auto-emptying will not be triggered if the robot is moved to the dock manually. Start emptying manually.
Auto-emptying will not be triggered if the robot returns to the dock without cleaning.
Auto-emptying will not be triggered if the robot returns to the dock without cleaning.
The robot will not auto-empty after returning to the dock in Do Not Disturb (DND) mode. Adjust cleaning or DND duration, or start emptying manually.
The robot will not auto-empty after returning to the dock in Do Not Disturb (DND) mode. Adjust cleaning or DND duration, or start emptying manually.
The battery level is lower than 10%. Charge the robot until the battery reaches 10%.
The battery level is lower than 10%. Charge the robot until the battery reaches 10%.
Guides
Safety information
Instructions from the manual
Safety restrictions18 steps
Do not use this product on elevated surfaces without barriers such as the floor of a loft, an open-ended terrace, or on top of furniture.
To prevent blocking the product and to avoid damage to valuables, remove lightweight items (such as plastic bags) and fragile objects (such as vases) from the floor before cleaning.
Do not place any object (including children and pets) on the product, whether it is in operation or not.
Do not use the product on burning objects (such as cigarette butts).
Do not use the product to clean hard or sharp objects (such as decoration wastes, glass and nails).
The product must be switched off and the plug must be removed from the socket outlet when not in use, before cleaning or maintaining the product.
Do not place any object near the suction inlet of the dock.
Do not put fingers into the seam of the dock to avoid possible injury.
Do not operate the product in a room where an infant or child is sleeping.
Do not carry the product using a dock base or dustbin.
Make sure the robot is compatible with the dock, otherwise emptying or charging may fail.
Do not use the dock to pick up stones, paper scraps, or other objects that may block the air duct.
If the air duct gets blocked, clean it immediately.
Place the dock on a flat floor away from fire, heat, and water.
Avoid narrow spaces or locations where the robot may be suspended in air.
Do not place any object (including children and pets) on the dock or cover it with any item (including dust-proof cover), whether it is in operation or not.
Do not pick up anything that is burning or smoking, such as cigarettes, matches, or hot ash.
Do not use the dock to pick up flammable or explosive objects such as fire lighter, gasoline, and toner used in printers or copiers.
Battery, charging and storage9 steps
For the purposes of recharging the battery, only use the detachable supply unit roborock CDZ12RR, CDZ20RR, AED06HRR or AED07HRR provided with this product.
If placing the robot into storage, charge it fully and turn it off before placing it in a cool dry place.
Recharge it at least every three months to prevent the battery over discharging.
In order to avoid a hazard due to inadvertent resetting of the thermal cut-out, this appliance must not be supplied through an external switching device, such as a timer, or connected to a circuit that is regularly switched on and off by the utility.
Be sure that the supply voltage meets the requirements listed on the dock.
Only use the power cable provided with the product to prevent potential smoke, heat or fire.
Do not use the product with any type of power adapter, as this may cause danger and void the warranty.
If the dock is placed in an area susceptible to thunderstorms or with unstable voltage, take protection measures.
Unplug the power cable before placing the dock into storage.
Product overview
Instructions from the manual
Robot buttons and indicators6 steps
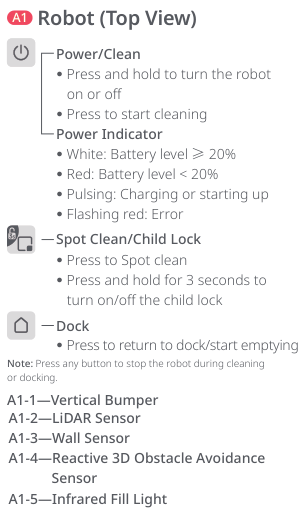
Hold Power/Clean to turn on or off; press to start cleaning.
Press Spot Clean to spot clean; hold it for 3 seconds to switch child lock on or off.
Press Dock to return to the dock or start emptying.
Any button stops the robot during cleaning or docking.
Power indicator: white at 20%or more battery; red below 20%; pulsing while charging or starting; flashing red on error.
WiFi indicator: off when disabled; slowly flashing while waiting; quickly flashing while connecting; steady when connected.
Dock indicator statesView
Steady white means waiting for orders; flashing white means emptying; steady red means malfunction; off means charging the robot or no power. The power cable can exit either side.
Installation
Instructions from the manual
Prepare the cleaning area3 steps
Tidy cables and loose items; move unstable, fragile, precious or dangerous objects to prevent injury or damage from tangling, collisions or items being knocked over.
Use a secure physical barrier in raised areas.
Follow the first entire cleaning route and watch for problems.
Assemble and position the dock14 steps
Take the screwdriver from its storage bin under the base.
Turn the dock upside down on a soft, flat carpet, towel or cloth; hold the dustbin cover securely so it cannot fall.
Attach the base with the six supplied screws.
Connect the power cable and keep excess cable in its storage slot.
Place the dock on a hard, flat wood, tile or concrete floor against a wall.
Keep at least 0.3 m (1 ft) on either side and 1 m (3 ft) in front and above; the figure labels more than these distances.
Choose good WiFi coverage, then plug in.
The status light goes off while charging and turns red on error.
Install the dustbin cover and bag.
Keep the dock away from fire, heat, water, narrow or suspended locations; a soft surface may tilt it and impede docking/departure.
Store excess cord so the robot cannot tangle, drag or disconnect it.
Avoid direct sunlight or blocked dock beacons.
Store the standard robot dock before using the auto-empty dock to avoid return problems.
Follow maintenance instructions; never clean the dock with a wet cloth.
Power on and charge5 steps
Hold Power/Clean to start the robot.
When the power light comes on, place it on the dock.
Confirm the dock indicator goes off and the charging voice alert sounds.
Keep the rechargeable lithium-ion battery charged.
If low battery prevents startup, place the robot directly on the dock.
Mopping setup and removal12 steps
Vacuum floors at least three times before first mopping to limit dirt buildup.
Press the water-tank latch and slide the tank backward.
Open its stopper, fill with water and close tightly.
Use only Roborock-branded floor cleaner; never hot water, which can deform the tank.
Slide the tank into the robot until it clicks.
Dampen the mop cloth and wring until it stops dripping.
Insert it along the bottom attachment slot and stick firmly.
Slide the mount forward under the tank until it clicks.
After cleaning and docking, press both side latches and slide the mount backward to remove it.
Wash the cloth after each use and regularly empty unused tank water.
Remove the mount when not mopping; the tank may remain.
Injury warning: never put a finger between the mop-cloth mount and water tank.
Connecting to the app
Instructions from the manual
Connect the app and reset WiFi9 steps
Choose Roborock or Xiaomi Home.
Search its name in the App Store or Google Play, or scan the corresponding official QR code to install.
Open the top cover and find the WiFi indicator.
Hold Spot Clean and Dock together until the Resetting WiFi voice alert sounds.
Slowly flashing WiFi means reset is complete and the robot waits for connection.
If router configuration, a forgotten password or another issue prevents connection, reset WiFi and add it as a new device.
In Roborock, tap Scan to Connect; in Xiaomi Home, tap + in the top right.
Follow the app instructions, which may change with updates.
Only 2.4GHz WiFi is supported.
Instructions
Instructions from the manual
Turn on and offView
Hold Power/Clean to turn on; its indicator lights and the robot waits. Hold it to turn off and end the cleaning cycle. It cannot turn off while charging.
Start cleaning8 steps
Press Power/Clean.
The robot scans and divides rooms into zones, outlines each zone and fills it in a zigzag, cleaning zones one by one.
Start from the dock for automatic return; never move the dock during cleaning.
Charge first if battery is too low.
A task completed in under 10 minutes cleans the area twice.
On low battery the robot returns to charge and resumes where it stopped.
With the mop mount fitted, it retracts the mount on carpets; alternatively set carpets as no-go zones in the app.
Before each mopping task, fit the VibraRise mop properly.
Spot cleaningView
Press Spot Clean to clean a 1.5 m (5 ft) by 1.5 m (5 ft) square centered on the robot. It returns to its starting point and waits afterward.
Empty the dustbinView
Auto-emptying starts on return after cleaning. Press Dock to trigger emptying manually; any button stops emptying. Avoid frequent manual emptying.
Pause and resumeView
Any button pauses a running robot. Press Power/Clean to resume or Dock to return to the dock. Manually putting a paused robot on the dock ends the current cleanup.
Refill water or clean the mop during a taskView
Press any button to stop and remove the mopping module. Add water or clean the cloth, reinstall the module and press Power/Clean to continue.
Sleep and wake3 steps
After over 10 minutes paused, the robot sleeps and its power light flashes every few seconds.
Any button wakes it.
It does not sleep while charging, and shuts down after over 12 hours asleep.
Do Not Disturb mode2 steps
The default period is 22:00–08:00; the app can disable or change it.
During DND, the robot does not automatically resume cleaning, the power light dims and voice prompts become quieter.
Child lock3 steps
Hold Spot Clean to enable or disable child lock; its controls overview specifies 3 seconds.
The app can also set it.
When stationary, the robot ignores buttons; while cleaning or docking, any button still stops it.
Charging and return3 steps
After cleaning, the robot returns to charge.
While paused, press Dock to send it back; the power light pulses during charging.
If it cannot find the dock, it returns to its starting point; place it on the dock manually.
Error notifications3 steps
On error, the robot power light flashes red or dock status light stays red; an app popup appears and a voice alert may sound.
It sleeps after over 10 minutes malfunctioning.
Manually docking it ends the current cleanup.
System resetView
If buttons do not respond or the robot cannot turn off, press Reset; the system resets automatically. Scheduled cleaning, WiFi and other settings return to factory settings.
Deactivate WiFiView
Hold Reset until a voice message sounds. Wait 5 minutes for automatic WiFi deactivation. To reconnect, follow the connecting instructions.
Restore factory settings2 steps
If a system reset does not fix the robot, switch it on.
Hold Dock and simultaneously press Reset until the Restoring factory settings voice prompt sounds; factory settings will be restored.
Routine maintenance
Instructions from the manual
Clean the main brushes7 steps
Switch off and unplug before cleaning or maintenance.
Clean every 2 weeks and replace every 6–12 months.
Turn the robot over, press the latches and remove the main-brush cover.
Remove the main brush and pull out its bearing; pull out the brush caps.
Remove hair or dirt from both ends, reinstall the brush and press the cover to lock.
Wipe the brush with a wet cloth and let it dry away from direct sunlight.
Use no corrosive cleaning fluid or disinfectant.
Clean the side brushView
Switch off and unplug first. Clean monthly and replace every 3–6 months. Unscrew the side-brush screw, remove and clean the brush, reinstall and tighten the screw.
Clean the omnidirectional wheel5 steps
Switch off and unplug first.
Clean as required.
Use a tool such as a small screwdriver to pry out the axle and remove the wheel.
The bracket cannot be removed.
Rinse the wheel and axle to remove hair and dirt; dry and refit, pressing the wheel firmly into place.
Clean the main wheelsView
Switch off and unplug first. Clean monthly with a soft, dry cloth.
Clean the dustbin7 steps
Switch off and unplug first.
Clean as required.
Open the top cover and remove the dustbin.
Open its cover, remove the filter and empty the dustbin.
Fill with clean water, close the cover, gently shake and pour out dirty water.
Use only clean water without cleaning liquid to avoid blockage.
Leave both dustbin and washable filter to dry.
Clean the washable filter7 steps
Switch off and unplug first.
Clean every 2 weeks and replace every 6–12 months.
Open the filter cover and remove the filter.
Rinse repeatedly and tap out dirt.
Never touch the filter surface with hands, brush or hard objects.
Allow 24 hours to dry thoroughly and reinstall.
An extra filter may be purchased to alternate if necessary.
Clean the water tankView
Switch off and unplug first. Clean as required. Open and fill with clean water, close and shake gently, then pour out remaining water as shown in the manual.
Clean the VibraRise mop cloth4 steps
Switch off and unplug first.
Clean after every use and replace every 3–6 months.
Remove the cloth from its mount, clean and air-dry.
A dirty mop impairs performance; clean before use.
Clean robot sensorsView
Switch off and unplug first. Clean monthly with a soft, dry cloth: wall sensor, Reactive 3D obstacle sensor, carpet sensor and all cliff sensors.
Replace the dust bag6 steps
Switch off and unplug first.
Replace as required.
Remove the dustbin cover vertically.
Lift and discard the bag; its handle seals on removal to prevent dust leakage.
Clean the filter with a dry cloth.
Fit a new bag along its slot and replace the cover.
Clean the dock air ductView
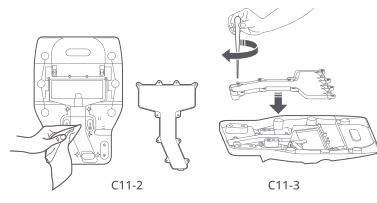
Switch off and unplug first. Clean as required. Remove the 10 screws and duct cover. Wipe duct and cover with a dry cloth. Reinstall the cover and screws.
Clean charging contact areasView
Switch off and unplug first. Clean as required. Wipe robot charging contacts with a soft, dry cloth. Clean dock beacon, charging contacts and electrode brushes.
Maintain the batteryView
Keep the built-in rechargeable lithium-ion battery charged during normal use. For extended nonuse, turn off and charge at least every 3 months to avoid overdischarge.
A
Instructions from the manual
Robot and dock parts diagramsView
Use the reviewed source diagrams with their complete keys and corresponding instructions. Preserve the source conditions, quantities and warnings.
B
Instructions from the manual
Dock installation and mopping diagramsView
Use the reviewed source diagrams with their complete keys and corresponding instructions. Preserve the source conditions, quantities and warnings.
Complete dock screwdriver, assembly, cable routing, clearances, charging and first mopping panels. S8+ CE 220–240 V; FCC 120 V and nonplus packages excluded.
Diagram key
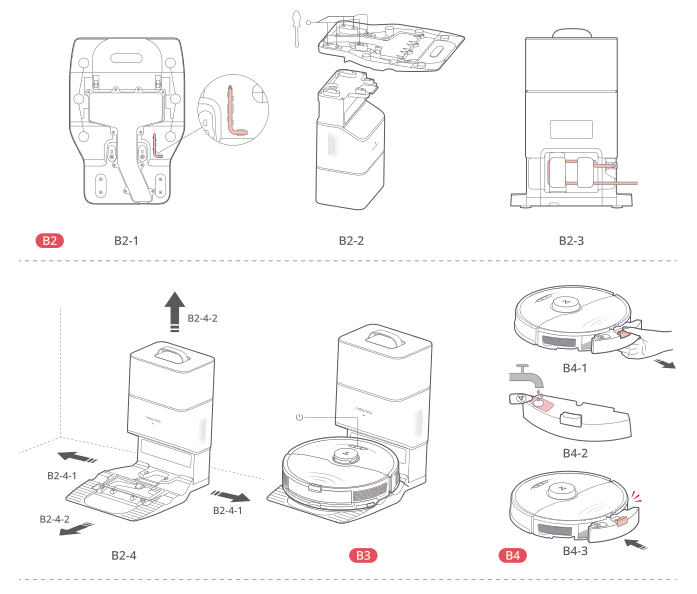
B2: Position the charging dock; all warnings in the instructions remain applicable.
B2-1: Remove the screwdriver from its bin under the base.
B2-2: Hold dustbin cover securely; turn dock upside down on a soft, flat surface and attach base with six screws.
B2-3: Connect cable and store excess cord.
B2-4: Place on hard, flat floor against wall with good WiFi; plug in.
B2-4-1: More than 0.3 m (1 ft) on each side; both side clearances are shown.
B2-4-2: More than 1 m (3 ft) in front and above; front and overhead clearances are shown.
B3: Hold Power/Clean and dock when lit; dock light goes off and charging alert sounds.
B4: Mopping; follow all full setup and injury warnings.
B4-1: Press tank latch and slide tank backward; vacuum floors at least three times before first mopping.
B4-2: Open stopper, fill with water and close firmly; no hot water and only Roborock floor cleaner.
B4-3: Slide tank back until it clicks.
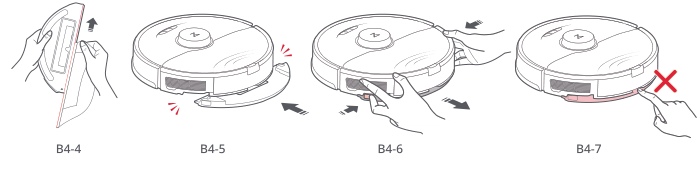
Complete mop-cloth fitting, mount attachment, removal and finger-injury warning panels. S8+ CE 220–240 V; FCC 120 V and nonplus packages excluded.
Diagram key
B4-4: Dampen cloth, wring until no drips, insert along bottom slot and stick firmly.
B4-5: Slide mount forward under tank until it clicks.
B4-6: After cleaning and docking, press both latches and slide mount backward. Wash cloth after each use and regularly empty unused tank water; remove mount when not mopping, tank may remain.
B4-7: Risk of injury: never put a finger between mount and water tank.
Crossed-out finger: Prohibited finger position between mount and tank; the red cross shows the prohibited finger position.
C
Instructions from the manual
Brush, wheel and filter maintenance diagramsView
Use the reviewed source diagrams with their complete keys and corresponding instructions. Preserve the source conditions, quantities and warnings.
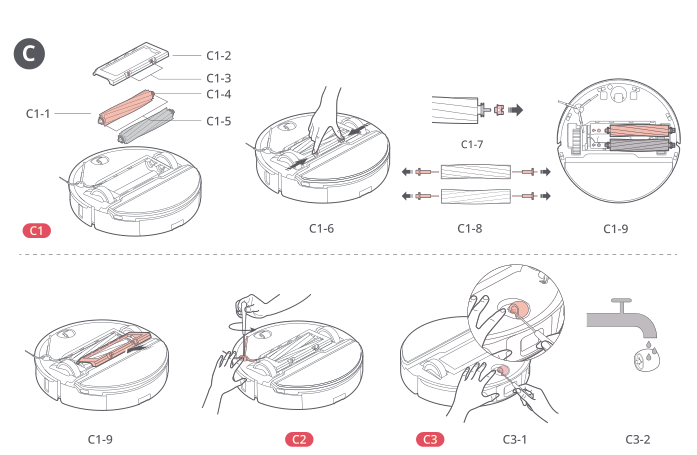
Complete main-brush removal, cap/bearing cleaning, refitting, side-brush and wheel care panels. S8+ CE 220–240 V; FCC 120 V and nonplus packages excluded.
Diagram key
C: Routine maintenance; switch off and unplug first.
C1: Main brushes: clean every 2 weeks, replace every 6–12 months.
C1-1: Main brush.
C1-2: Main-brush cover.
C1-3: Both latches.
C1-4: Main-brush bearing.
C1-5: Main-brush caps.
C1-6: Turn robot over, press latches and remove cover.
C1-7: Remove main brush and pull out bearing; both brushes are shown.
C1-8: Pull out caps.
C1-9: Remove hair/dirt at both ends, reinstall and lock cover. Wipe with wet cloth, dry out of sunlight; no corrosive cleaner or disinfectant.
C1-9 repeated: Refit the brushes and lock the cover.
C2: Side brush: clean monthly, replace every 3–6 months. Unscrew, remove and clean; refit and tighten.
C3: Omnidirectional wheel: clean as required; bracket cannot be removed.
C3-1: Use a small screwdriver or similar tool to pry axle and remove wheel.
C3-2: Rinse wheel/axle, dry and reattach firmly.
Sensor, dust bag and air duct maintenance diagramsView
Use the reviewed source diagrams with their complete keys and corresponding instructions. Preserve the source conditions, quantities and warnings.
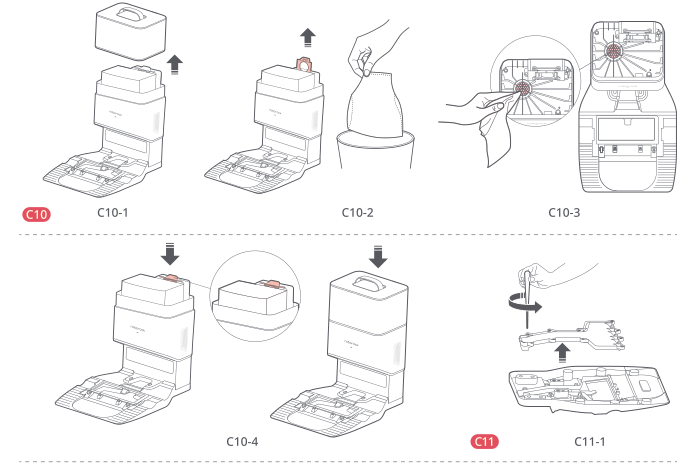
Complete dust-bag replacement, filter cleaning and initial air-duct cover removal panels. S8+ CE 220–240 V; FCC 120 V and nonplus packages excluded.
Diagram key
C10: Replace bag as required; switch off and unplug first.
C10-1: Remove dustbin cover vertically.
C10-2: Lift and discard bag; handle seals it against leakage.
C10-3: Clean filter with dry cloth.
C10-4: Install new bag along slot and replace cover.
C11: Air duct: clean as required; switch off and unplug first.
C11-1: Remove 10 screws and cover.
Complete air-duct and cover wiping, refitting and screw-tightening continuation panels. S8+ CE 220–240 V; FCC 120 V and nonplus packages excluded.
Diagram key
C11-2: After switching off and unplugging, and removing 10 screws and cover, wipe duct and cover with a dry cloth; wipe both the duct and its cover.
C11-3: Reinstall cover and screw it in place.
Controls and parts
See the manual diagrams 2 diagrams
Complete power, spot-clean, child-lock and dock-button explanations and battery/error indicator key. S8+ CE 220–240 V; FCC 120 V and nonplus packages excluded.Complete robot top, bottom, open-cover and dustbin views. S8+ CE 220–240 V; FCC 120 V and nonplus packages excluded.
Diagram key
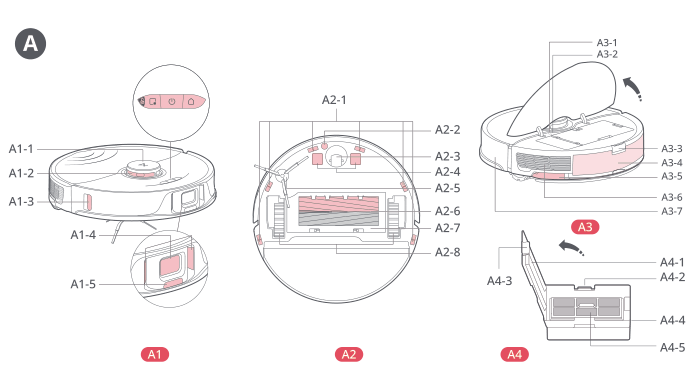
A: Product overview.
A1: Robot top view, with control and front-sensor insets.
Power/Clean symbol: Hold to switch on/off; press to clean.
Spot Clean/Child Lock symbol: Press for spot cleaning; hold 3 seconds for child lock.
Dock symbol: Press to return to dock or start emptying.
A1-1: Vertical bumper.
A1-2: LiDAR sensor.
A1-3: Wall sensor.
A1-4: Reactive 3D obstacle avoidance sensor.
A1-5: Infrared fill light.
A2: Robot bottom view.
A2-1: Cliff sensors (all marked locations).
A2-2: Carpet sensor.
A2-3: Omnidirectional wheel.
A2-4: All charging-contact positions.
A2-5: Side brush.
A2-6: Both main brushes.
A2-7: Main-brush cover.
A2-8: Both main wheels.
A3: Robot with upper cover open, with the cover open.
A3-1: WiFi indicator: off disabled; slow flashing waiting; fast flashing connecting; steady connected.
A3-2: Reset button.
A3-3: Water-tank latch.
A3-4: Water tank.
A3-5: VibraRise module.
A3-6: Air outlet.
A3-7: Bumper.
A4: Dustbin.
A4-1: Filter cover.
A4-2: Dustbin latch.
A4-3: Cover latch.
A4-4: Air inlet.
A4-5: Washable filter.
Model details
Model and compatibility
Battery and charging
14.4 V/5200 mAh typical lithium-ion battery;20 V DC1.2 A input;charging takes less than6hours.
Dock power
220–240 V AC,50–60 Hz;5 A dust collection,0.5 A charging;20 V DC1.2 A output.