MODEL REFERENCE
Tivax SewSimple Handheld
1 troubleshooting topic · 11 guides
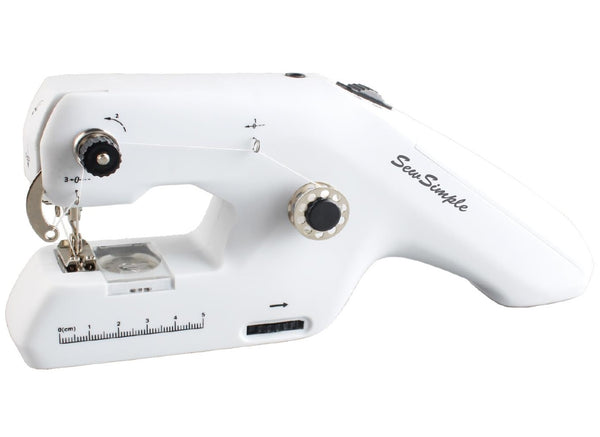
The checks and guides below come from the official manuals for this model.
No matches for this wording. Try a light name, error code or a shorter phrase.
Troubleshooting
Find the problem you are experiencingRadio or television interference4 checks
- Receiving-antenna position
- If switching the equipment off and on confirms harmful radio or television interference, try one or more of the listed measures: reorient or relocate the receiving antenna.
- Equipment and receiver separation
- If switching the equipment off and on confirms harmful radio or television interference, try one or more of the listed measures: increase the separation between the equipment and receiver.
- Shared power circuit
- If switching the equipment off and on confirms harmful radio or television interference, try one or more of the listed measures: connect the equipment to an outlet on a circuit different from the receiver circuit.
- Further assistance
- If switching the equipment off and on confirms harmful radio or television interference, try one or more of the listed measures: consult the dealer or an experienced radio/TV technician for help.
Guides
Safety information
Instructions from the manualSafety Information16 steps
- Use this machine only for household sewing.
- Keep it away from children: it is not a toy and is not meant to be used by or near children.
- Never sew clothing while someone is wearing it.
- Switch off before touching the needle.
- Disconnect the adapter and remove batteries before changing needles or threading.
- Check threading before sewing; incorrect threading or bobbin placement can damage the machine.
- Guide fabric gently without pulling: pulling can break the needle and damage the machine.
- Never open the main motor case: its mechanism is factory adjusted.
- Never submerge the machine or any part in water.
- With the adapter connected, do not operate with wet hands, without shoes, or while standing in water or on a wet surface.
- Use only the manufacturer-recommended adapter.
- Do not use a damaged cord or plug; keep the cord away from heat and do not close doors on it or pull it around sharp edges.
- Unplug by grasping the plug with dry hands, never by pulling the cord.
- Never leave the machine unattended while plugged in.
- When not in use, switch off, unplug the adapter and remove batteries.
- Remove batteries for long storage to protect the machine and preserve battery life; keep spare batteries available for projects.
Threading the top thread
Instructions from the manualThreading the top thread10 steps
- Switch off, then remove batteries or unplug the adapter before replacing top or bobbin thread.
- Correct threading is essential; check carefully and make one practice stitch before sewing.
- Place a spool or bobbin on the short thread spindle.
- Insert the spindle with the thread running counterclockwise.
- Pass the thread through the first thread guide shown in the reviewed threading diagram.
- Pass thread over the tension discs, then pull it down between both metal discs.
- It must be wedged between the discs, rather than lying across their tops.
- Pass through the next thread guide.
- Thread the take-up lever from front to back, then pass through the lower thread guide.
- Thread the needle eye from left to right; threading in the other direction may prevent sewing.
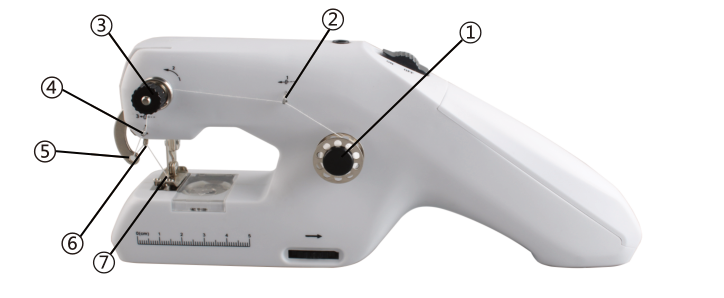
Diagram key
- 1: Put the spool or bobbin on the thread spindle with thread running counterclockwise
- 2: Pass thread through the first thread guide
- 3: Pass thread over the tension discs and pull down between both metal discs, rather than resting on top
- 4: Pass thread through the next thread guide
- 5: Thread the take-up lever from front to back
- 6: Pass thread through the lower thread guide
- 7: Thread the needle eye from left to right
Inserting the bottom bobbin
Instructions from the manualInserting the bottom bobbin9 steps
- Switch off and disconnect the power source before replacing the bobbin thread, following the threading safety warning.
- Press the bobbin cover and pull it toward you.
- Put the new bobbin in its case with thread running counterclockwise and leave about 5 cm of thread hanging out.
- Hold the top thread loosely in the left hand.
- Turn the handwheel in its marked-arrow direction with the right hand until the needle goes down and returns to its highest position.
- Lightly pull the top thread so the bobbin thread appears through the needle-plate slot.
- Pull the bobbin thread the rest of the way through the slot.
- Bring both threads together toward the back, under the presser foot.
- Replace the bobbin cover.
Connecting the ac/dc adapter
Instructions from the manualConnecting the AC/DC adapter6 steps
- Use only a compatible manufacturer-recommended 6 V, 1000 mA adapter.
- Use either batteries or the adapter; never both at the same time.
- Check that the power switch is OFF before connecting the adapter.
- Connect its power cord to the machine DC input socket, then connect its plug to the power outlet.
- If the machine malfunctions, switch off immediately and remove batteries or unplug the adapter to prevent accidental startup.
- After repair, turn the handwheel to make several practice stitches before starting powered sewing.
Machine malfunctions1 check
- Machine malfunction
- Immediately switch off and remove batteries or unplug the adapter. After repair, make several practice stitches with the handwheel before sewing.
Installing/removing the batteries (not included)
Instructions from the manualInstalling and removing batteries11 steps
- Use either batteries or the adapter, never both.
- Switch OFF before installing batteries.
- The compartment is inside the handle at the top right of the machine.
- Push up the end of the battery cover and remove it.
- Carefully pull out the battery-holding assistive device; it can be removed completely.
- Insert four AA batteries with the polarity marked inside the machine and replace the cover.
- To remove batteries, open the cover and carefully pull out the assistive device with the batteries.
- Remove the batteries, put the device back and replace the cover.
- When unused, switch off, unplug the adapter and remove all batteries.
- Do not mix old and new batteries or different battery types.
- Replace all four together; do not mix carbon-zinc, alkaline or rechargeable nickel-cadmium batteries.
Changing the needle
Instructions from the manualChanging the needle8 steps
- Switch off and remove batteries and/or disconnect the adapter to prevent accidental startup.
- Turn the handwheel to bring the needle to its highest position.
- Hold the old needle and loosen its clamp screw.
- Remove the needle and discard it responsibly.
- Insert the new needle with its flat side facing the right side of the machine.
- Push it fully into the clamp before tightening.
- Tighten the clamp screw securely.
- Correct needle direction and secure tightening prevent incorrect installation and the needle falling out.
Adjusting tension
Instructions from the manualAdjusting tension6 steps
- Inspect both sides of the stitching.
- Normal top and bottom threads look even, neither too tight nor too loose, as in figure A.
- If the bottom thread looks like a straight line, the top thread is too loose.
- Slowly turn the tension dial clockwise to increase tension until stitching returns to normal, as in figure B.
- If the top thread looks like a straight line, the top thread is too tight.
- Slowly turn the dial counterclockwise to reduce tension until stitching returns to normal, as in figure C.
Winding the bobbin
Instructions from the manualWinding the bobbin11 steps
- Switch off and remove batteries or disconnect the adapter before unthreading the needle.
- Remove all fabric and unthread the needle before winding: the needle moves during bobbin winding.
- Find the bobbin-winding pin in the accessory bag.
- Align the thin-end slot of the pin with the two positioning ribs inside the bobbin-winding hole on top of the machine.
- Insert the pin downward.
- Put an empty bobbin on the winding pin and pass the thread tail through any hole in the bobbin.
- Switch on to wind.
- Guide thread between the fingers while it is in midair between spool and bobbin.
- Do not touch moving machine parts and do not wind beyond the bobbin edge.
- When full, switch off to stop.
- Remove the bobbin and winding pin, then cut the thread.
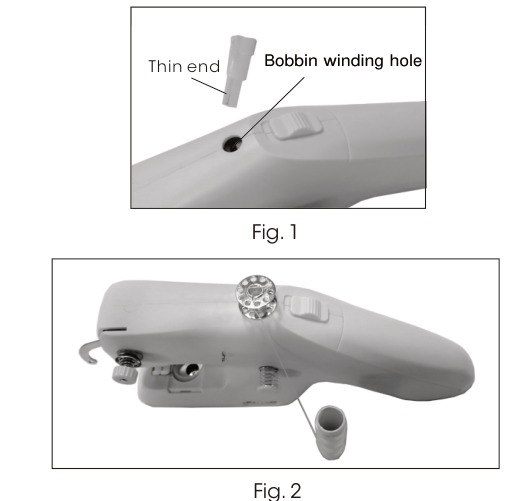
Diagram key
- Thin end: Align the thin-end slot with the two positioning ribs in the bobbin-winding hole
- Bobbin winding hole: Insert the aligned pin downward into this hole on top of the machine
- Fig. 1: Fit the bobbin-winding pin before adding the empty bobbin
- Fig. 2: Place the empty bobbin on the pin and put the thread tail through any bobbin hole
Sewing
Instructions from the manualSewing9 steps
- Turn the handwheel in its marked-arrow direction to raise the needle to its highest position if necessary.
- Raise the presser-foot lifter, put fabric under the foot, then lower the lifter.
- Turn the handwheel in the marked-arrow direction two or three times to lower the needle into the fabric.
- Push the power switch to begin sewing.
- Guide gently without pulling the fabric.
- After sewing, push the switch to turn off.
- Turn the handwheel to raise the needle fully, raise the presser-foot lifter, remove the fabric and cut the thread.
- If fabric is difficult to remove, turn the handwheel back and forth; do not pull hard on fabric or thread.
- To draw more thread through the needle, first pull from above the needle to create slack, then pull through the eye.
Fabric is difficult to remove1 check
- Fabric or thread resists removal
- After sewing, switch off and turn the handwheel to raise the needle fully.
- Raise the presser-foot lifter.
- If fabric is difficult to remove, turn the handwheel back and forth without pulling hard on fabric or thread.
- Create slack above the needle before pulling more thread through its eye.
Controls and parts
See the manual diagrams 1 diagram
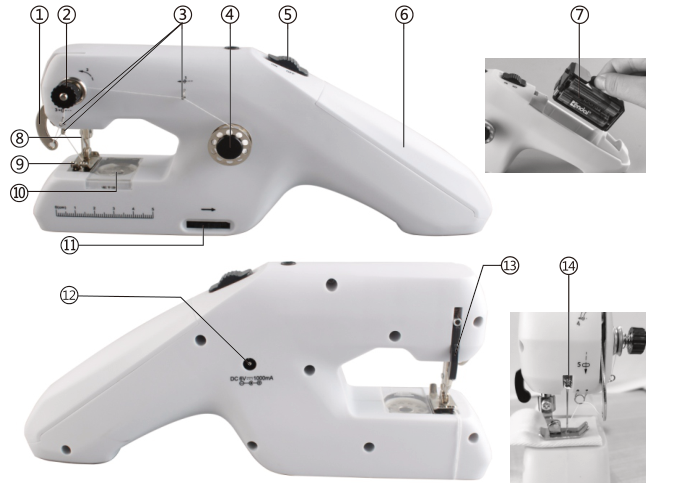
Diagram key
- 1: Take-up lever
- 2: Upper thread tension dial
- 3: Thread guides; both leaders carrying this number identify guides
- 4: Short thread spindle
- 5: Power switch
- 6: Battery cover
- 7: Separate battery box, shown in the open-handle inset
- 8: Needle
- 9: Presser foot
- 10: Bobbin cover
- 11: Hand wheel
- 12: Power jack
- 13: Presser foot lifter
- 14: Needle clamp screw, shown in the needle-area inset
Model details
Model and compatibility
- Adapter
- Manufacturer-recommended compatible 6 V, 1000 mA adapter; use separately from batteries.
- Battery supply
- Four AA batteries, not included; never use batteries and adapter together.
- Needle threading
- Thread the needle eye from left to right.
Included accessories
- Full bobbins
- 2
- Empty bobbins
- 2
- Needle threader
- 1
- Supplied needle
- #14, quantity 1
- Adapter
- 1
- Bobbin-winding pin
- 1