MODEL REFERENCE
TP-Link Deco X95 V1
8 errors · 10 troubleshooting topics · 43 guides

The checks and guides below come from the official manuals for this model.
No matches for this wording. Try a light name, error code or a shorter phrase.
Errors and indicators
Light patterns and messages documented in the manualFind the indicator lights
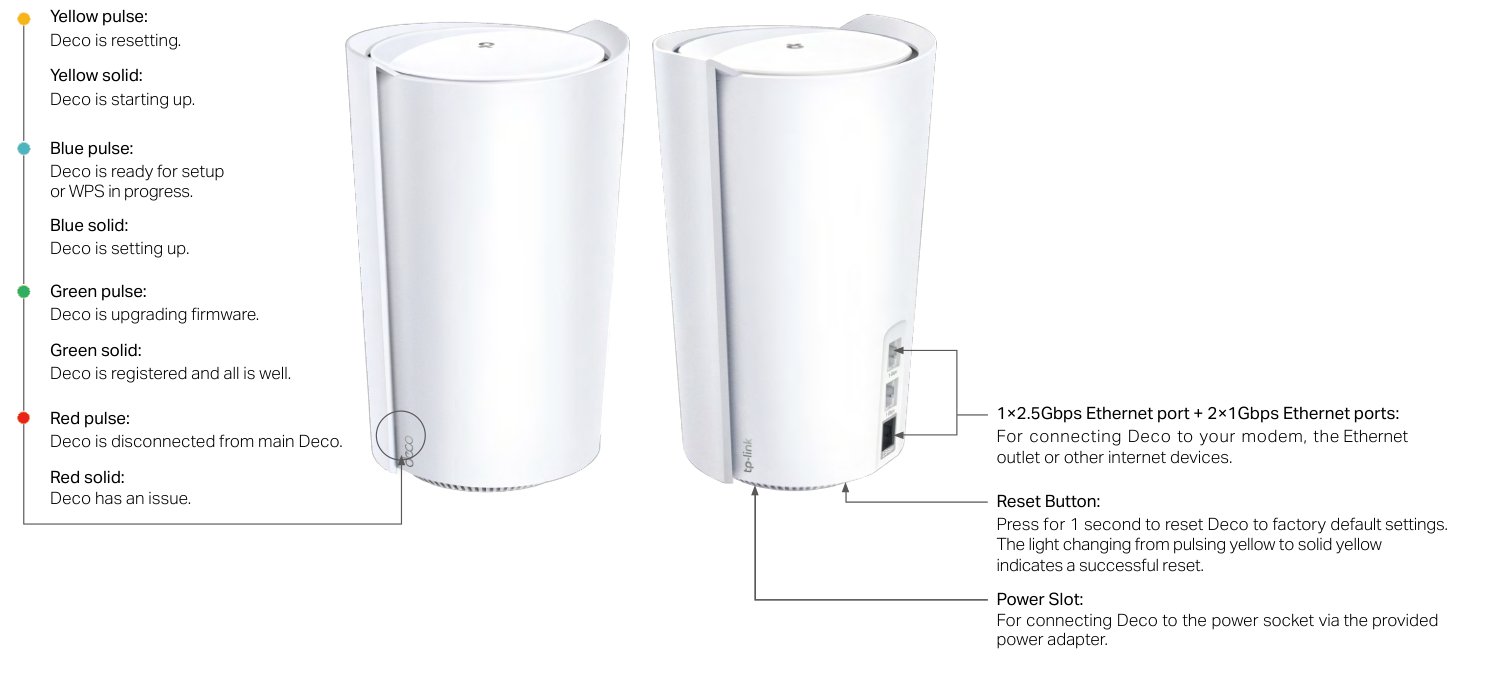
Diagram key
- Yellow pulse: Deco is resetting.
- Yellow solid: Deco is starting up.
- Blue pulse: Deco is ready for setup or WPS is in progress.
- Blue solid: Deco is setting up.
- Green pulse: Deco is upgrading firmware.
- Green solid: Deco is registered and all is well.
- Red pulse: Deco is disconnected from the main Deco.
- Red solid: Deco has an issue.
- Three Ethernet ports: One 2.5 Gbps port and two 1 Gbps ports connect to a modem, Ethernet outlet or other internet devices.
- Reset Button: Press for 1 second to restore factory defaults. A change from pulsing yellow to solid yellow indicates success.
- Power Slot: Connect the supplied power adapter to the power socket.
Yellow pulseyellow pulse — Deco is resetting
Deco is resetting.
Yellow solidyellow solid — Deco is starting up
Deco is starting up.
Blue pulseblue pulse — Deco is ready for setup or WPS is in progress
Deco is ready for setup or WPS is in progress.
Blue solidblue solid — Deco is setting up
Deco is setting up.
Green pulsegreen pulse — Deco is upgrading firmware
Deco is upgrading firmware.
Green solidgreen solid — Deco is registered and all is well
Deco is registered and all is well.
Red pulsered pulse — Deco is disconnected from the main Deco
Deco is disconnected from the main Deco.
Red solidred solid — Deco has an issue
Deco has an issue.
Troubleshooting
Find the problem you are experiencingMain Deco setup: We couldn’t find Deco1 check
- Main Deco setup: We couldn’t find Deco
- Use TP-Link FAQ 2239 or its main-Deco discovery video, as linked from the official user guide. If the problem persists, contact TP-Link support.
Satellite setup: We couldn’t find another Deco1 check
- Satellite setup: We couldn’t find another Deco
- Use TP-Link FAQ 1447 or its satellite-Deco discovery video, as linked from the official user guide. If the problem persists, contact TP-Link support.
Setup stuck on Testing Internet Connection1 check
- Setup stuck on Testing Internet Connection
- Use TP-Link’s Testing Internet Connection video linked from the official user guide. If the problem persists, contact TP-Link support.
Wireless devices cannot connect to Deco1 check
- Wireless devices cannot connect to Deco
- Use TP-Link FAQ 2718, linked from the official user guide. If the problem persists, contact TP-Link support.
Deco suddenly loses internet access1 check
- Deco suddenly loses internet access
- Use TP-Link FAQ 1454, linked from the official user guide. If the problem persists, contact TP-Link support.
Finding a suitable spot for Deco1 check
- Finding a suitable spot for Deco
- Use TP-Link FAQ 1446, linked from the official user guide. If the problem persists, contact TP-Link support.
Deco app does not work properly1 check
- Deco app does not work properly
- Use TP-Link FAQ 1456, linked from the official user guide. If the problem persists, contact TP-Link support.
Harmful radio or television interference1 check
- Equipment causes harmful radio or television interference
- If the equipment causes radio or television interference, determine this by turning the equipment off and on.
- Try one or more of the manual’s measures.
- Reorient or relocate the receiving antenna.
- Increase separation between the equipment and receiver.
- Connect the equipment to an outlet on a different circuit from the receiver.
- Consult the dealer or an experienced radio/TV technician.
Firmware update fails1 check
- Firmware update fails
- Reboot the main Deco, move the satellite Deco closer to it, then try the update again.
Wireless client cannot connect to Wi-Fi 61 check
- Older wireless-device driver or software may be incompatible
- If older wireless-device drivers or software prevent connection to Wi-Fi 6, update that device’s driver or software.
- Check the wireless adapter model.
- Go to its manufacturer’s website for the latest driver version.
- Update the driver.
- Contact that manufacturer if you need help with the update.
- TP-Link FAQ 2303 is the detailed resource linked by the guide.
Guides
Appearance
Instructions from the manualReset Deco to factory defaultsView
Press the Reset button for 1 second to restore factory default settings. A change from pulsing yellow to solid yellow indicates a successful reset.
Set up your deco
Instructions from the manualSet up the Deco network16 steps
- Download TP-Link Deco from Google Play or the Apple App Store, or scan the manual’s QR code.
- Install it on an Android or iOS phone or tablet.
- Open the app and log in with your TP-Link ID.
- Sign up first if needed.
- If you forget the login password, tap Forgot password? and follow the app.
- Power off the modem.
- Connect Deco to the modem and power both on.
- Without a modem, connect the Ethernet outlet directly to Deco.
- Select Deco’s location; choose Custom to create one if it is not listed.
- Select the internet connection type and enter its information.
- Contact your internet service provider if unsure.
- Create a Wi-Fi network name and password.
- The illustrated setup requires at least 8 password characters and recommends a combination of letters, numbers and symbols.
- Connect your devices to Deco’s Wi-Fi to continue setup.
- Once setup is complete, connect all devices to the Deco network.
- Plug in the other Deco units included in the package; the guide says they will join the network automatically within 2 minutes.
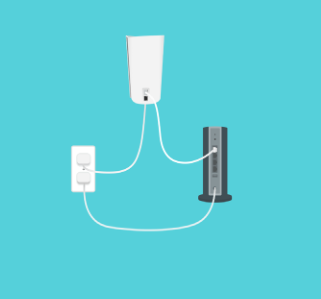
Diagram key
- Deco (upper device): The Deco unit connects to the modem and to its supplied power adapter.
- Modem (right device): The modem connects to Deco by Ethernet and to power.
- Power socket (left): The diagram shows power supplied to both devices.
- Ethernet connection: Connect the modem LAN port to either Ethernet port on Deco.
- Power connections (two branches): Power Deco and the modem after connecting them. Use the supplied Deco adapter.
Add more decos
Instructions from the manualAdd more Deco unitsView
On Overview, tap the plus icon. Select the Deco model to add and follow the app instructions. After setup, tap the globe/network icon to find the added Deco units.
Dashboard
Instructions from the manualUse the app dashboardView
Tap Overview to see the network status. Tap HomeShield for its security features. Tap More for additional features.
Check deco status
Instructions from the manualCheck Deco status and change its location3 steps
- On Overview, tap the globe/network icon to check the status of all Decos.
- Tap a Deco to check its details.
- Tap the Deco unit on the details screen to change or customize its location.
Manage connected devices
Instructions from the manualManage connected devices3 steps
- On Overview, tap a client in the Devices list to see its details.
- Tap the gear icon to manage device settings.
- Tap Belongs to to add a profile for the device and manage its online activities.
Create new networks
Instructions from the manualCreate a network from Overview3 steps
- Use the same TP-Link ID to manage multiple Deco networks, including networks you manage for family or friends.
- On Overview, tap the downward arrow beside the network name and choose Create New Network.
- Follow the app instructions to complete setup.
Remove/reboot deco
Instructions from the manualRemove or reboot a Deco3 steps
- Tap the globe/network icon to show all Deco units.
- Tap a Deco to open its details, then open the three-dot menu and choose Remove or Reboot.
- If its LED does not turn pulsing blue after Remove, use the Reset button as described in the reviewed reset instructions.
Homeshield
Instructions from the manualReview HomeShield plans and features8 steps
- HomeShield provides basic free features and charged Pro features.
- Use the HomeShield information and user-guide resources listed by TP-Link for detailed use and upgrades.
- Weekly/Monthly Reports show usage such as security threats and top visited content.
- Use Scan to examine the network for potential risks.
- Real-Time Protection is for Pro users only: it blocks malicious sites and external attacks, prevents infected devices sending sensitive information or threats outside the network, and identifies and monitors IoT devices when they join.
- Parental Controls lets you create family profiles, assign devices, set when and how long each person can use the internet, block inappropriate content and pause internet access.
- QoS prioritizes a device for a chosen duration; the manual’s example is a family member’s laptop for one hour during a video call.
- Upgrade to HomeShield Pro only if you want its additional features.
Wi-fi settings
Instructions from the manualChange main Wi-Fi settingsView
Tap More, then Wi-Fi. Manage the main network’s name and password.
Enable a guest networkView
Tap More, then Wi-Fi. Enable the separate guest network to keep it separate from the main network.
Deny list
Instructions from the manualManage the deny listView
Tap More, then Deny List. Add connected clients to the list or add other devices by their MAC address. Use the list’s management controls to remove entries when needed.
Online update
Instructions from the manualUpdate Deco firmware4 steps
- When the Deco app prompts you, update to the latest firmware.
- Tap More, then Update Deco.
- Follow the app instructions.
- If the update fails, reboot the main Deco, move the satellite Deco closer to it, then try the update again.
Advanced features
Instructions from the manualView or change IPv4 internet settingsView
Open More > Advanced. View IPv4 details or change the internet connection type.
Enable an IPv6 internet connectionView
Open More > Advanced and enable IPv6 to set up an IPv6 internet connection.
Add IPv6 firewall rules3 steps
- Open More > Advanced.
- Add IPv6 firewall rules to allow specified devices to access specified services.
- The illustrated rule provides Service Type, Service Name, Internal IP, Port (1–65535) and Protocol fields.
Change the LAN IP addressView
Open More > Advanced. Modify the LAN IP to avoid an IP address conflict.
Change DHCP server settingsView
Open More > Advanced and change the DHCP server settings. The illustrated form includes Start IP, End IP, Default Gateway, and optional primary and secondary DNS fields.
Enable IPTV or VLANView
Open More > Advanced and enable IPTV/VLAN mode for IPTV service. The example notes that when IPTV is configured, the other port of the main Deco is used for IPTV service only.
Enable MAC Clone when internet connection fails3 steps
- Open More > Advanced and enable MAC Clone if Deco fails to connect to the internet.
- Select or enter the MAC address specified by your ISP.
- TP-Link FAQ 2925 is the manual’s additional resource.
Reserve an IP address for a deviceView
Open More > Advanced and reserve an IP address for a specified device so it is easier to identify and manage.
Set up port forwarding3 steps
- Open More > Advanced and set up port forwarding to make a local device accessible over the internet.
- The illustrated form has Service Type, Service Name, Internal IP, Internal Port, External Port and Protocol.
- Its Internal Port hint is 1–65535 or blank; follow the app for the actual configuration.
Register a TP-Link DDNS name2 steps
- Open More > Advanced and register a TP-Link DDNS domain to reach the router and local servers by name.
- The illustrated naming rules require a letter or number first, only letters, numbers and hyphens, and no more than 20 characters.
Enable SIP ALGView
Open More > Advanced and enable SIP ALG to communicate with SIP (Session Initiation Protocol) servers through NAT.
Enable UPnPView
Open More > Advanced and enable UPnP to allow the local network to open ports dynamically for applications such as gaming.
Enable Fast Roaming3 steps
- Open More > Advanced and enable Fast Roaming for seamless switching between Deco units.
- The illustrated note warns that enabling it may disconnect older wireless devices.
- If devices disconnect after turning it on or off, forget the Deco network on those devices and join it again.
Enable BeamformingView
Open More > Advanced and enable Beamforming to concentrate the Wi-Fi signal towards connected devices.
Turn off the LED or use Night ModeView
Open More > Advanced. Toggle LED off to turn off the Deco light, or configure Night Mode to turn it off only during the chosen bedtime period.
Change operating mode3 steps
- Open More > Advanced and change the operating mode.
- In Access Point mode, HomeShield, IPv4, Address Reservation, Port Forwarding and DHCP server are unavailable.
- The illustrated explanation also says NAT, Parental Controls and QoS are unsupported in this mode; it connects Deco to a wired or wireless router by Ethernet to extend coverage.
Set connection alertsView
Open More > Advanced and set connection alerts to receive notifications when clients connect to or disconnect from Deco.
Enable app notifications2 steps
- Open More > Advanced and set notifications to receive alerts in the notification bar.
- If Notifications shows Disabled, open Settings > Notifications on your phone or tablet and enable it.
Wps
Instructions from the manualConnect a client using WPS4 steps
- Tap More, then WPS.
- Tap the WPS icon in the Deco app and then on the client.
- Check the app’s success indication to confirm the client is connected.
- This method avoids entering a Wi-Fi password.
Weekly/monthly reports
Instructions from the manualView and control weekly or monthly reportsView
Tap More, then Reports to review usage, including security threats and the total connected devices for each day. Use the report settings gear icon to enable or disable reports.
Managers
Instructions from the manualAdd or remove network managers4 steps
- Each manager must have their own TP-Link ID.
- Tap More, then Managers to add other accounts.
- Set their privileges; the illustrated choices are Network Management and Client Management.
- Use the manager removal control when you want to remove a manager.
Rf exposure information
Instructions from the manualMaintain the RF separation distanceView
Use Deco at least 20 cm from your body. The FCC branch requires at least 20 cm from all people and prohibits co-location or operation with another antenna or transmitter.
National restrictions
Instructions from the manualUse Deco indoors in the UK and EUView
Use this Deco indoors only in Great Britain, EU member states, EFTA countries and Northern Ireland.
安全諮詢及注意事項
Instructions from the manualCleaning, ventilation and service precautions8 steps
- Use the original power supply or the power type marked on the product.
- Disconnect the power cord before cleaning.
- Do not use liquids, spray cleaners or a wet cloth.
- Keep moisture and other liquids away.
- Do not block or cover ventilation slots or openings; they prevent overheating and support reliable operation.
- Keep Deco away from heat sources; do not place it in an enclosed space without proper ventilation.
- Do not open the housing or repair it yourself.
- Contact the manufacturer or agent if it malfunctions.
Safety information
Instructions from the manualSafe operation and when to stop10 steps
- Keep Deco away from water, fire, humidity and hot environments.
- Do not disassemble, repair or modify it; contact TP-Link for service.
- Do not use damaged chargers or USB cables, or chargers other than those recommended.
- Use only the manufacturer’s original supplied power supply.
- Do not use Deco where wireless devices are prohibited.
- Keep the adapter near the equipment and easily accessible.
- Operate at 0–40°C (32–104°F).
- Keep the product and adapter more than 15 cm (6 inches) from pacemakers and other implanted medical devices.
- If interference is suspected, switch the product off and consult your physician for advice specific to the implanted device.
- Read and follow the safety information and use the product carefully; improper use can cause accidents or damage.
Recycling
Instructions from the manualRecycle electrical and electronic equipment2 steps
- The crossed-out wheeled-bin marking identifies WEEE collection.
- Give the product to a competent recycling organization or to a retailer when buying new electrical or electronic equipment.
Getting started
Instructions from the manualStay online during app download and loginView
Remain online using Wi-Fi or mobile data while downloading the app and logging in. Download TP-Link Deco for iOS or Android and follow the app through setup.
For indoor decos:
Instructions from the manualFollow the quick guide’s indoor power precautions9 steps
- For this indoor Deco, keep it away from fire and hot environments.
- Do not disassemble, repair or modify it; contact TP-Link for service.
- Do not use it where wireless devices are prohibited.
- Do not use damaged chargers or USB cables, or chargers other than those recommended.
- Keep the power adapter or power-supply-cord plug near the equipment and easily accessible.
- Use only manufacturer-supplied power supplies in the original package; consult the model user manual for applicable supplies and contact TP-Link with questions.
- For products powered by a power-supply cord with a three-pin plug, connect to an earthed wall outlet.
- This condition does not prescribe a different adapter for X95.
- Read and follow the safety information and use the product carefully; improper use can cause accidents or damage.
Model details
Model and compatibility
- Ports and controls
- One 2.5 Gbps Ethernet port, two 1 Gbps Ethernet ports, a power slot, a Reset button and a status LED.
- Power connection
- Connect the supplied power adapter to the power slot.
- Operating temperature
- 0–40°C (32–104°F).
Related reviewed instructions
Manuals and sources
- TP-Link operation manual
- TP-Link model support and details
- TP-Link manual download listing
- TP-Link operation manual
- TP-Link operation manual
- Official manual-linked troubleshooting resource
- Official manual-linked troubleshooting resource
- Official manual-linked troubleshooting resource
- Official manual-linked troubleshooting resource
- Official manual-linked troubleshooting resource
- Official manual-linked troubleshooting resource
- Official manual-linked troubleshooting resource
- Official manual-linked troubleshooting resource
- Official manual-linked troubleshooting resource
- Official manual-linked troubleshooting resource
- Official manual-linked troubleshooting resource
- Official client driver update resource linked by the Wi-Fi 6 guide